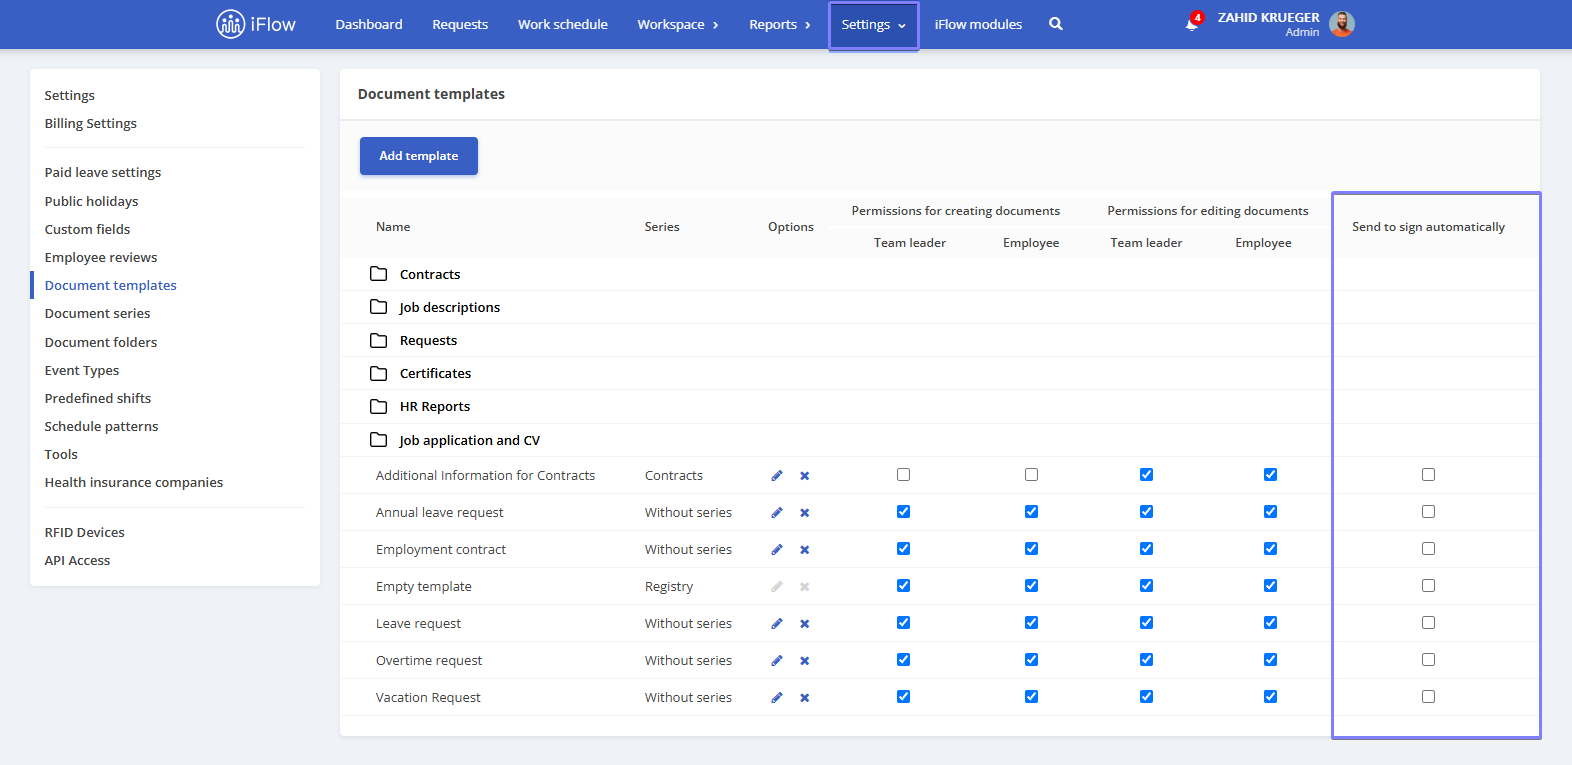
Document templates
Templates are now organized into folders, just like regular documents. Once you create a folder, it can be used for documents and templates.
How to create a document template
- Go to Settings – Documents – Document Templates
- Click the Add Template button
- Enter the Document Name
- Select the Series and Folder
- Add the Template Content and use Placeholders to fill in employee information automatically
- Click the green Save button

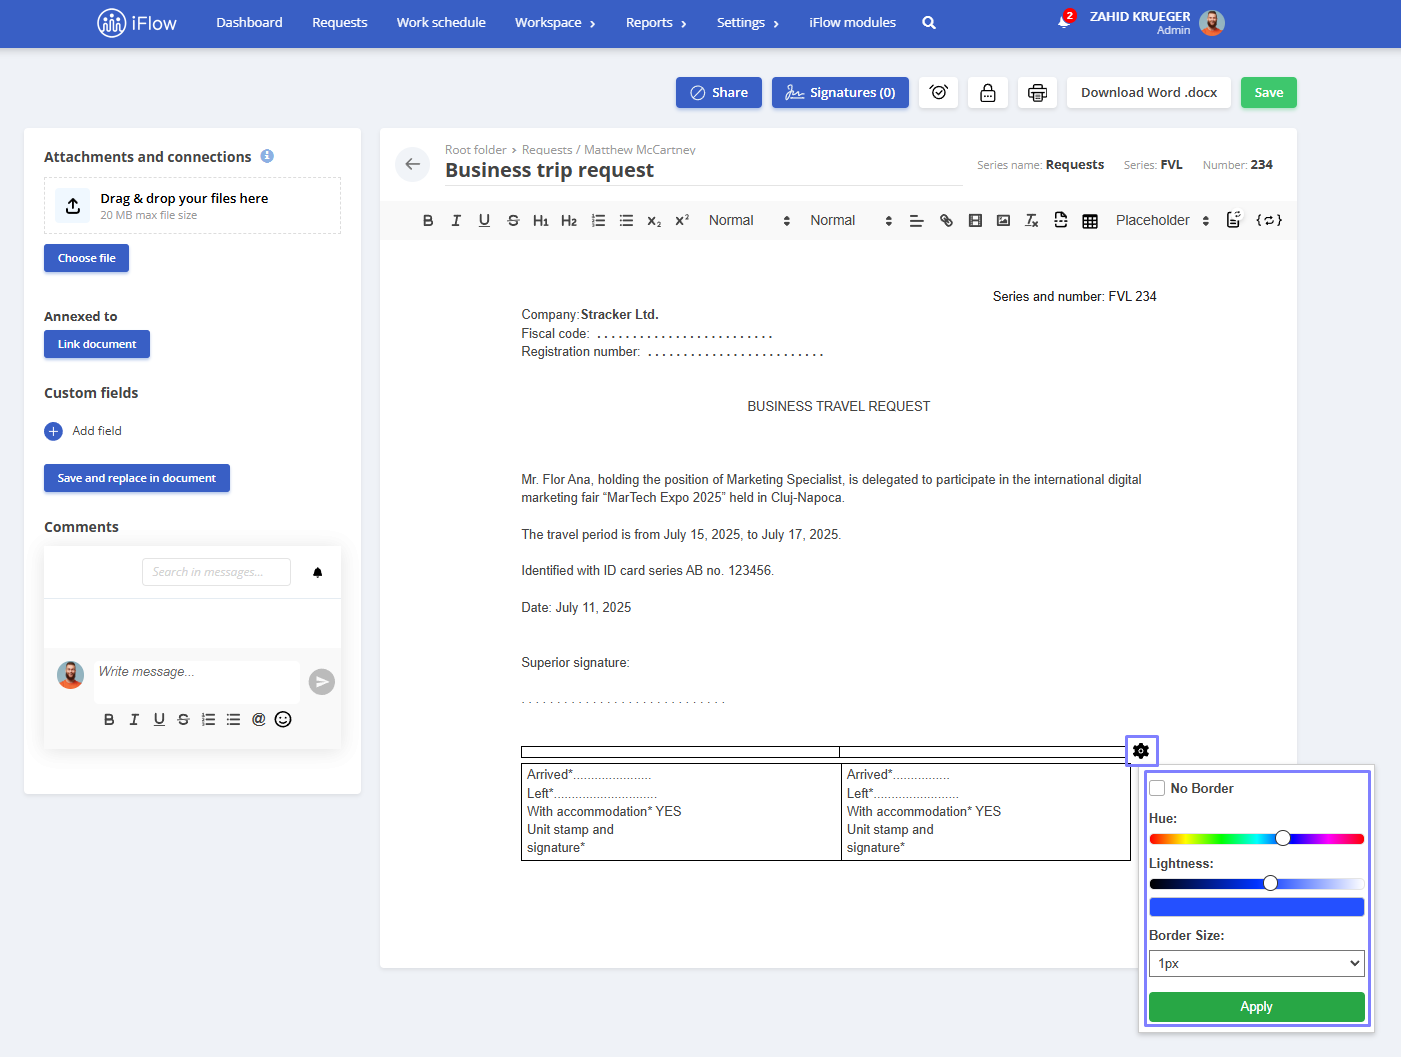
How to customize the table border in templates
- Open the template where you want to add or edit a table
- Select the desired table or insert a new one
- Click on the table, then click the gear-shaped settings icon (located in the corner of the table)
- A window will open where you can configure the following:
- No border if you don’t want any border
- Select the desired Hue from the color palette
- Adjust the Lightness using the slider
- Choose the Border size (between 1px and 5px)
- Click Apply to save the changes
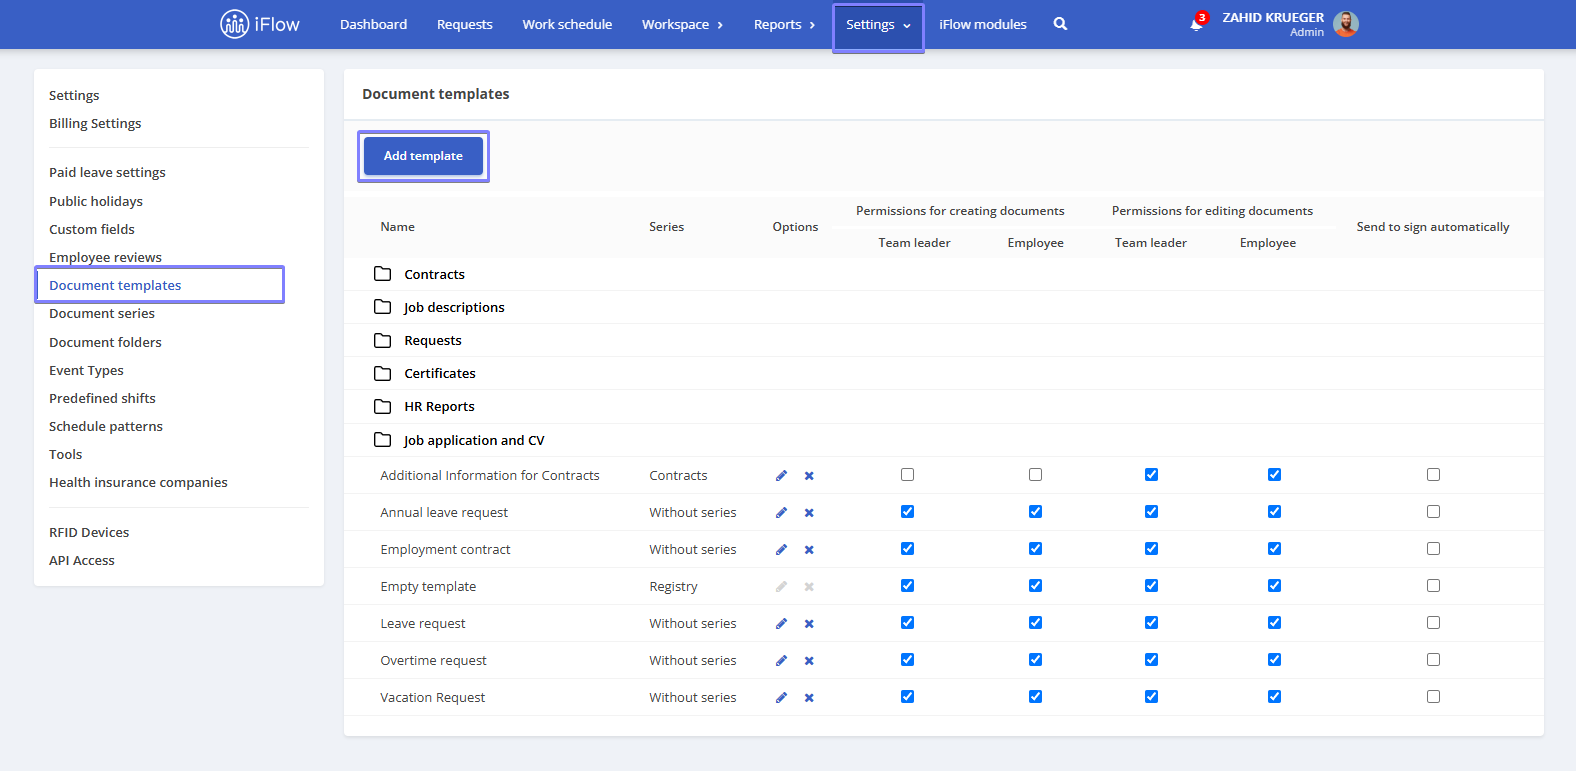
How to edit a document template
- Click the pencil icon in the Options column
- Modify the necessary details
- Click Save to apply the changes

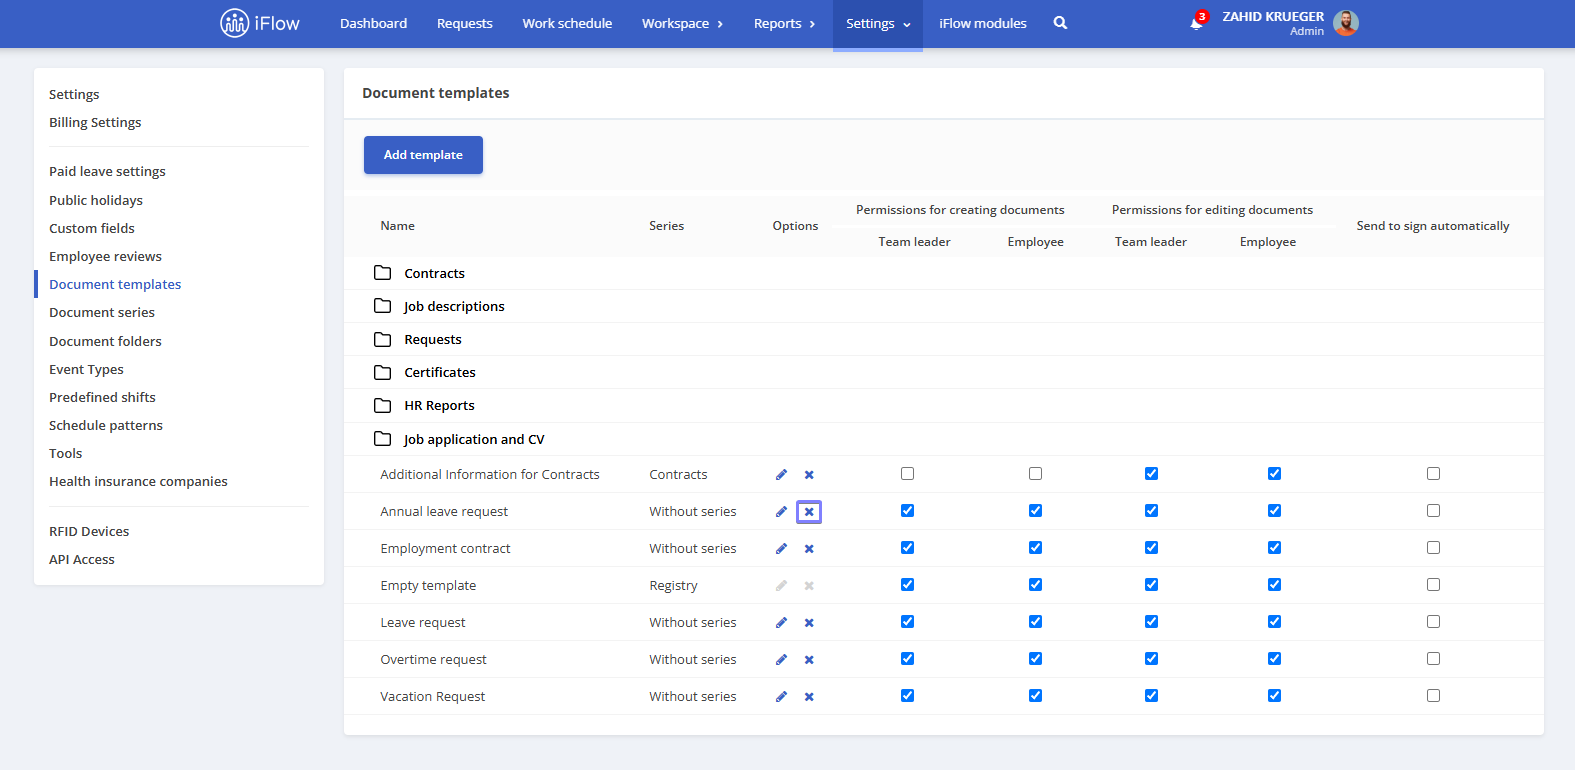
How to delete a document template
- Click the X icon in the Options column
- In the confirmation window, click the Delete button
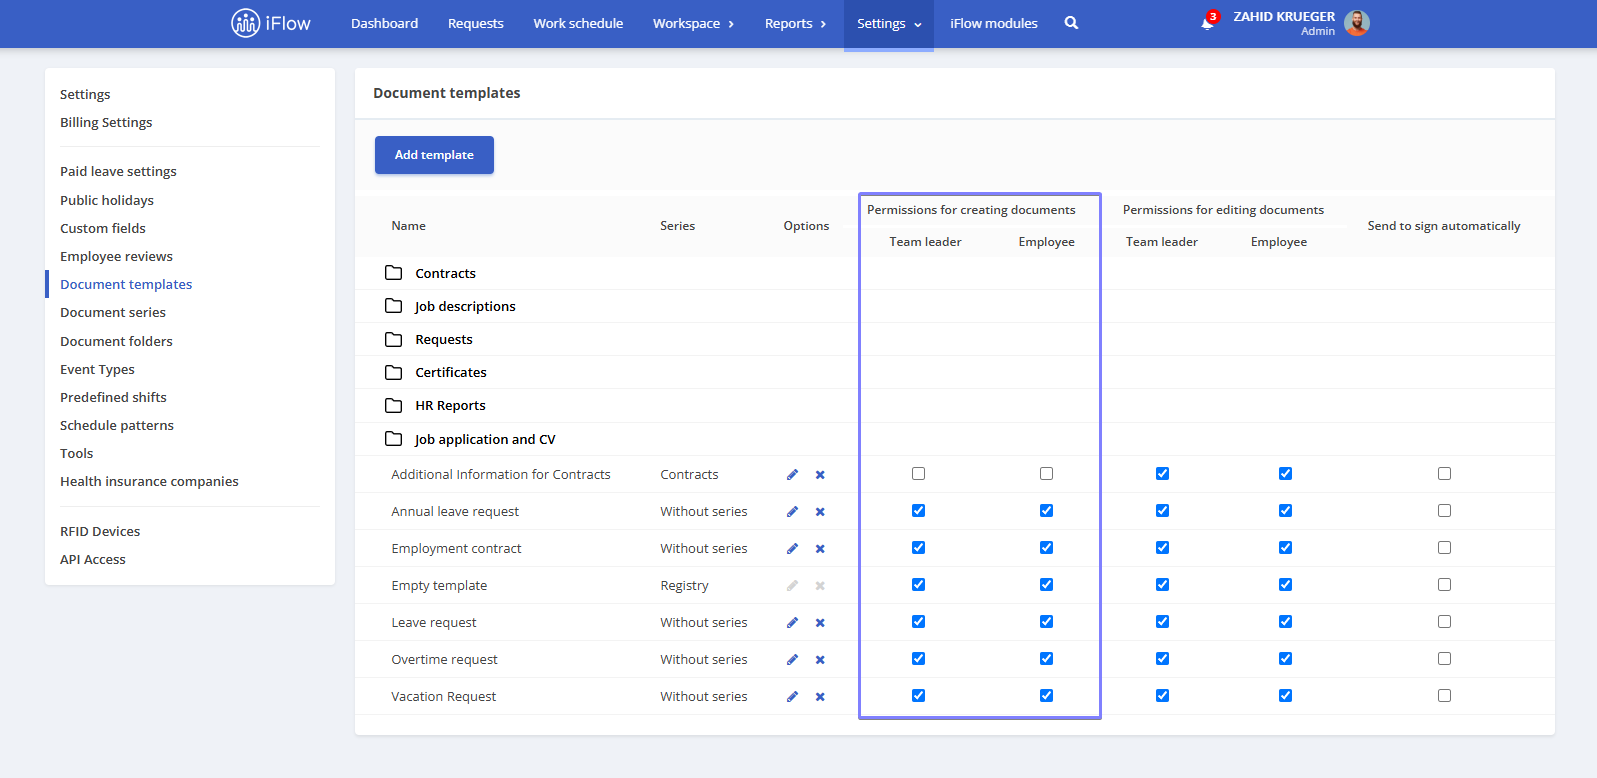
Setting permissions for document templates
In the Permissions for creating documents column, check the box for either Team Leader or Employee, depending on who should have the right to create documents.
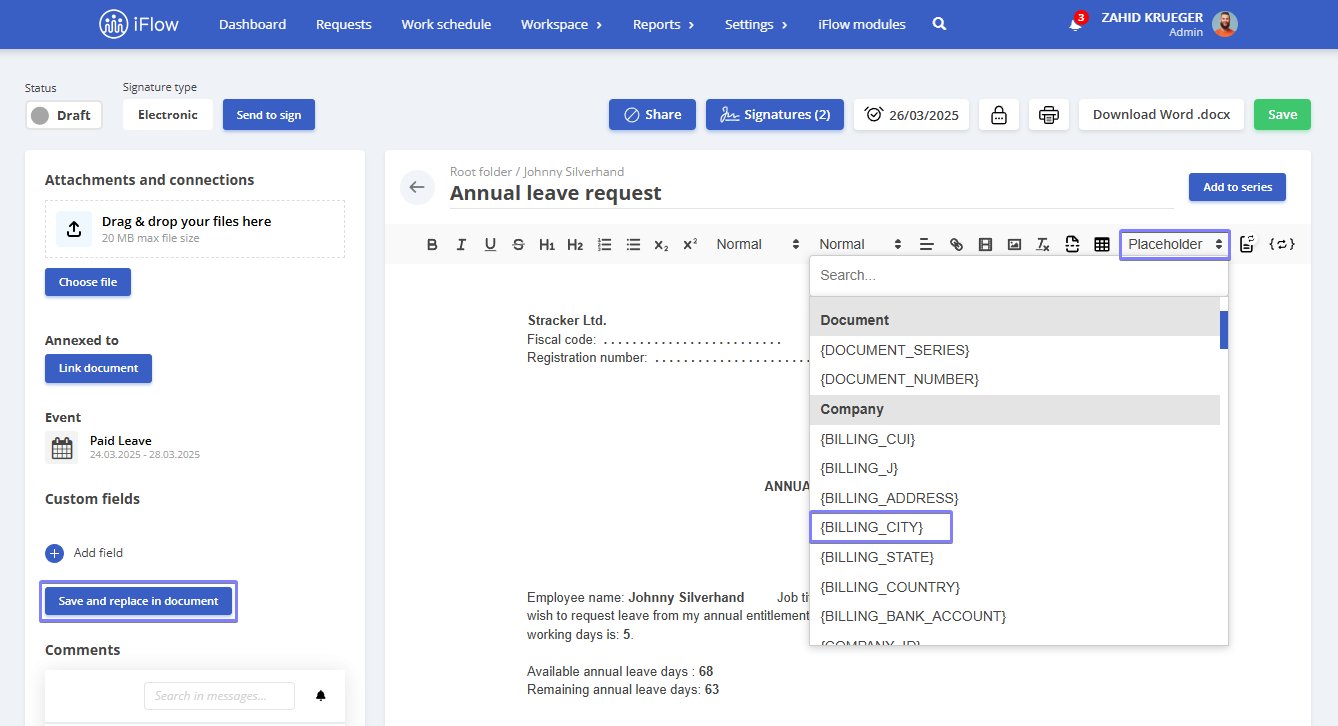
Placeholders
- {LEGAL_REPRESENTATIVE} – Legal representative
- {ADDRESS} – Employer’s address
- {DOCUMENT_SERIES} – Document series
- {DOCUMENT_NUMBER} – Document number
- {BANK_ACCOUNT} – Employee’s bank account
- {BILLING_CUI} – Tax identification code
- {BILLING_J} – Trade registry number
- {BILLING_ADDRESS} – Billing address
- {BILLING_CITY} – Billing city
- {BILLING_STATE} – Billing state
- {BILLING_COUNTRY} – Billing country
- {BILLING_BANK_ACCOUNT} – Billing bank account
- {BIRTH_DATE} – Employee’s date of birth
- {CITY} – Employee’s city
- {COUNTY} – Employee’s county
- {CNP} – Employee’s personal identification number
- {COMPANY_ID} – Company ID
- {COMPANY_NAME} – Company name
- {CONTRACT_NUMBER} – Employment contract number
- {CONTRACT_TYPE} – Contract type
- {CONTRACT_ENDING_TYPE} – Contract termination reason
- {COUNTRY_CODE} – Country code
- {CURRENT_DATE} – Current date
- {CURRENT_USER} – Current user
- {DATE_FORMAT} – Date format
- {DEFAULT_TIMEZONE} – Default time zone
- {DISABLE_DATE} – Employee’s deactivation date
- {EMAIL} – Employee’s email address
- {EMPLOYMENT_DATE} – Employee’s hiring date
- {EVENT_CREATED} – Event creation date
- {EVENT_DATE} – Event date
- {EVENT_APPROVED_BY} – Event approved by
- {EVENT_APPROVED_DATE} – Event approval date
- {EVENT_PARTIAL_APPROVED_BY} – Event partially approved by
- {EVENT_PARTIAL_APPROVED_DATE} – Partial approval date
- {EVENT_PARTIAL_APPROVED_BY_REPLACEMENT} – Shift change partially approved by
- {EVENT_PARTIAL_APPROVED_BY_REPLACEMENT_DATE} – Shift change partial approval date
- {EVENT_TIME_INTERVAL_START} – Event start time (time interval)
- {EVENT_TIME_INTERVAL_END} – Event end time (time interval)
- {EVENT_TIME_INTERVAL_HOURS} – Total event duration in hours (time interval)
- {EVENT_DATE_INTERVAL_START} – Event start date (date interval)
- {EVENT_DATE_INTERVAL_END} – Event end date (date interval)
- {EVENT_DATE_INTERVAL_CALENDAR_DAYS} – Total calendar days (date interval)
- {EVENT_DATE_INTERVAL_WORKING_DAYS} – Total working days (date interval)
- {EVENT_PAID_LEAVE_DAYS_BEFORE} – Paid leave days available before the event
- {EVENT_PAID_LEAVE_DAYS_AFTER} – Paid leave days available after the event
- {EVENT_PAID_LEAVE_DAYS_AFTER_2019} – Remaining leave days for 2019
- {EVENT_PAID_LEAVE_DAYS_AFTER_2020} – Remaining leave days for 2020
- {EVENT_PAID_LEAVE_DAYS_AFTER_2021} – Remaining paid leave days after 2021
- {EVENT_PAID_LEAVE_DAYS_AFTER_2022} – Remaining paid leave days after 2022
- {EVENT_PAID_LEAVE_DAYS_AFTER_2023} – Remaining paid leave days after 2023
- {EVENT_PAID_LEAVE_LEAVE_FOR_DAY} – Half-day leave event
- {EVENT_PAID_LEAVE_REPLACED_BY} – Substitute for paid leave event
- {EVENT_REPLACED_BY_USER_FULL_NAME} – Full name of substitute
- {EVENT_REASON_MESSAGE} – Event reason
- {EVENT_DURATION} – Event duration
- {EVENT_SCHEDULE_DATE_DAY_NAME} – Holiday name for recovery
- {EVENT_SCHEDULE_DATE} – Recovery day date
- {FULL_NAME} – Full name
- {ID_CARD} – Identity card
- {ID_CARD_ISSUED_BY} – Identity card issuing authority
- {ID_CARD_ISSUE_DATE} – Identity card issue date
- {JOB_TITLE} – Employee’s job title
- {LANGUAGE} – Language
- {LOCATION} – Location
- {MARK_NUMBER} – Employee mark number
- {MEDICAL_DAYS_IN_PAST_12_MONTHS} – Medical leave days in the past 12 months
- {MEDICAL_DAYS_IN_PAST_24_MONTHS} – Medical leave days in the past 24 months
- {MEDICAL_EVENTS_IN_PAST_12_MONTHS} – Medical leave events in the past 12 months
- {MEDICAL_EVENTS_IN_PAST_24_MONTHS} – Medical leave events in the past 24 months
- {PHONE_ONE} – Phone number
- {PHONE_TWO} – Second phone number
- {SECTION} – Section
- {DEPARTMENT_NAME} – Department name
- {TEAM_NAME} – Team name
- {TIMEZONE} – Time zone
- {USER_ID} – User ID
- {USER_NOTE} – User note
- {USER_TYPE} – User type
- {RESIDENCY_PERMIT_SERIES} – Residency permit series
- {RESIDENCY_PERMIT_ISSUE_DATE} – Residency permit issue date
- {RESIDENCY_PERMIT_EXPIRE_DATE} – Residency permit expiration date
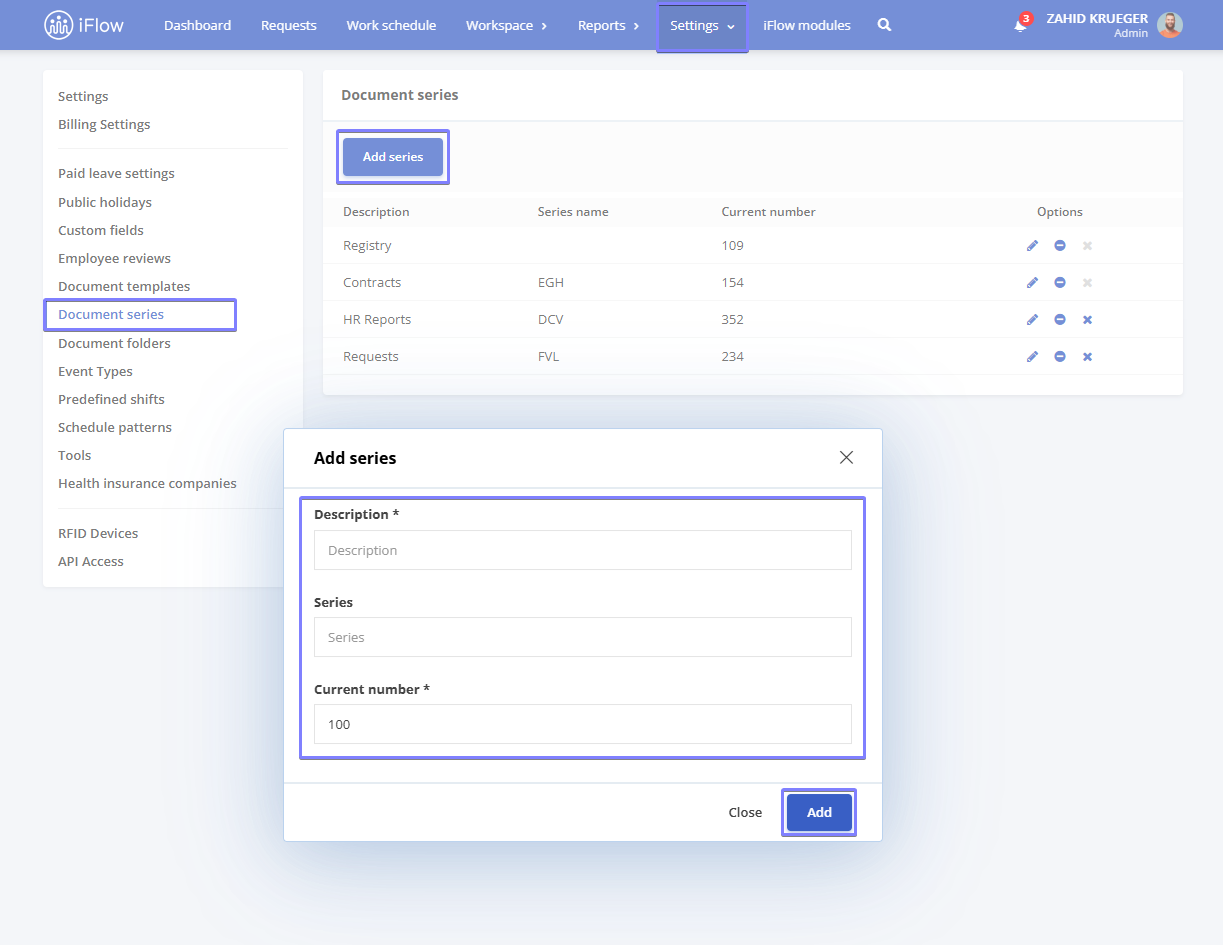
Document series and number
How to create a document series
- Go to Settings – Documents – Document Series
- Click the Add Series button
- Enter the Description, Series, and optionally the Serial Number
- Click Add
The Series and Number are assigned when you click Edit Document Template or add a new document template.
Note!
Document series cannot be deleted to maintain record consistency.
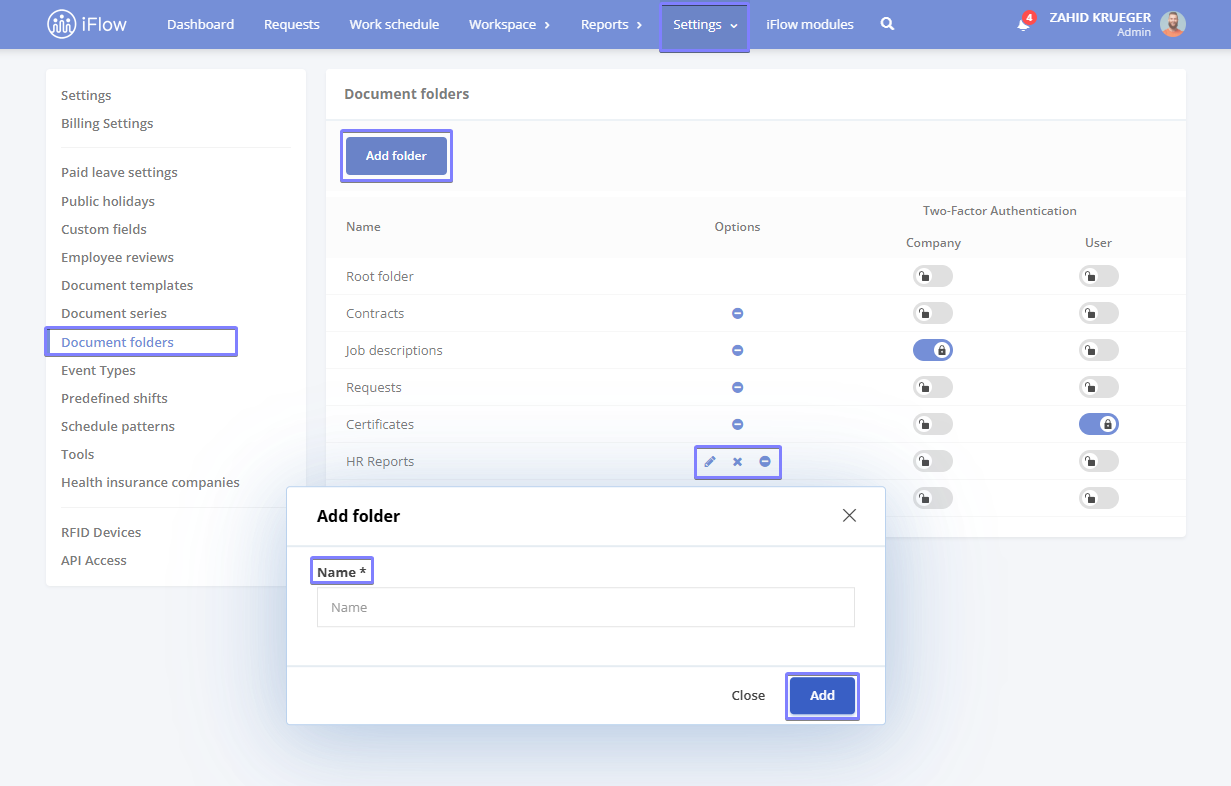
Document folders
How to create a document folder
- Go to Settings – Documents – Document Folders
- Click the Add Folder button
- Enter the Folder Name
- Click Add
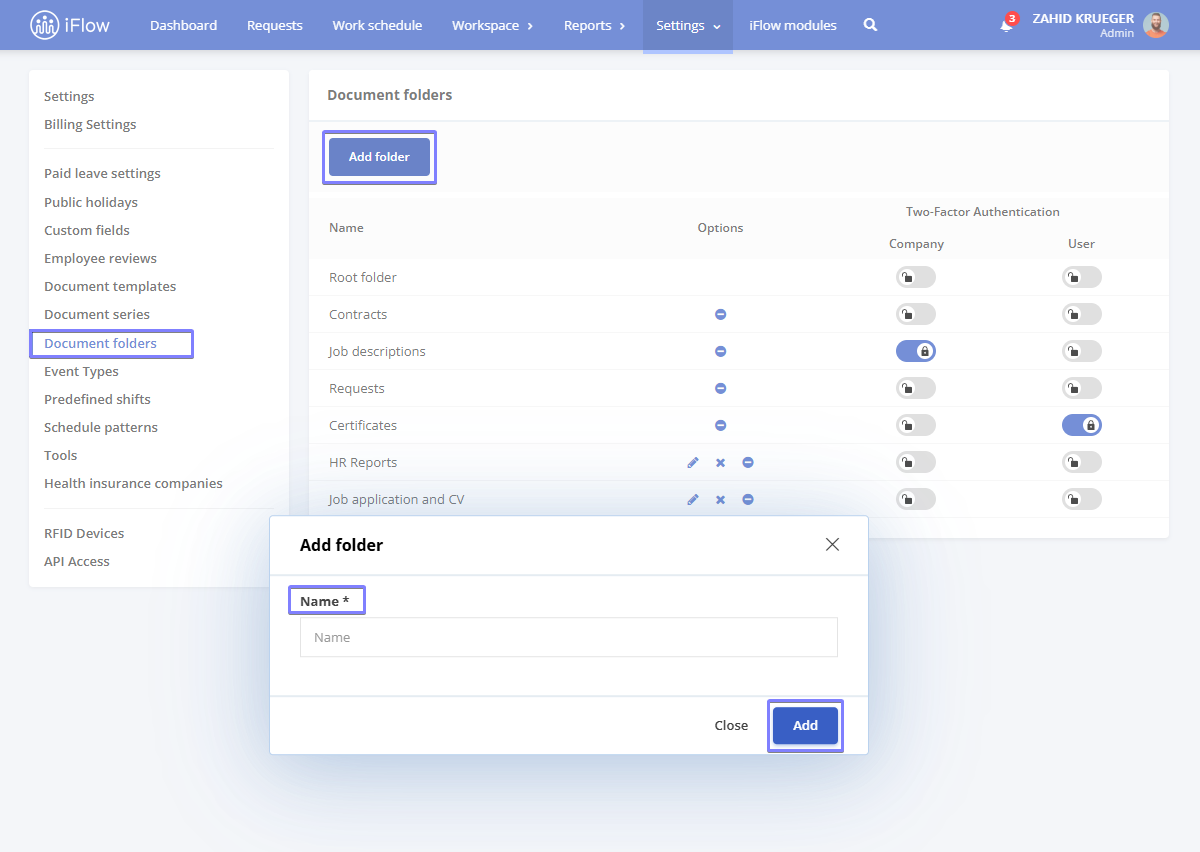
Folders such as Root Folder, Contracts, Job Description, Requests, and Certificates are predefined in the application and cannot be edited or deleted. However, new folders can be created as needed by clicking Add Folder. Once saved, they will automatically appear in each employee’s profile under the Documents section.
Documents are automatically assigned to folders if a display folder is selected when creating or editing them. Additionally, documents can be added to a folder using the drag-and-drop function after selecting an employee and navigating to the Documents section.
Two-factor authentication – 2FA
How to enable 2FA
- Go to Settings – Documents – Document Folders
- Click the button next to the folder you want
- Check the option at the Company level or Employee level to enable 2FA
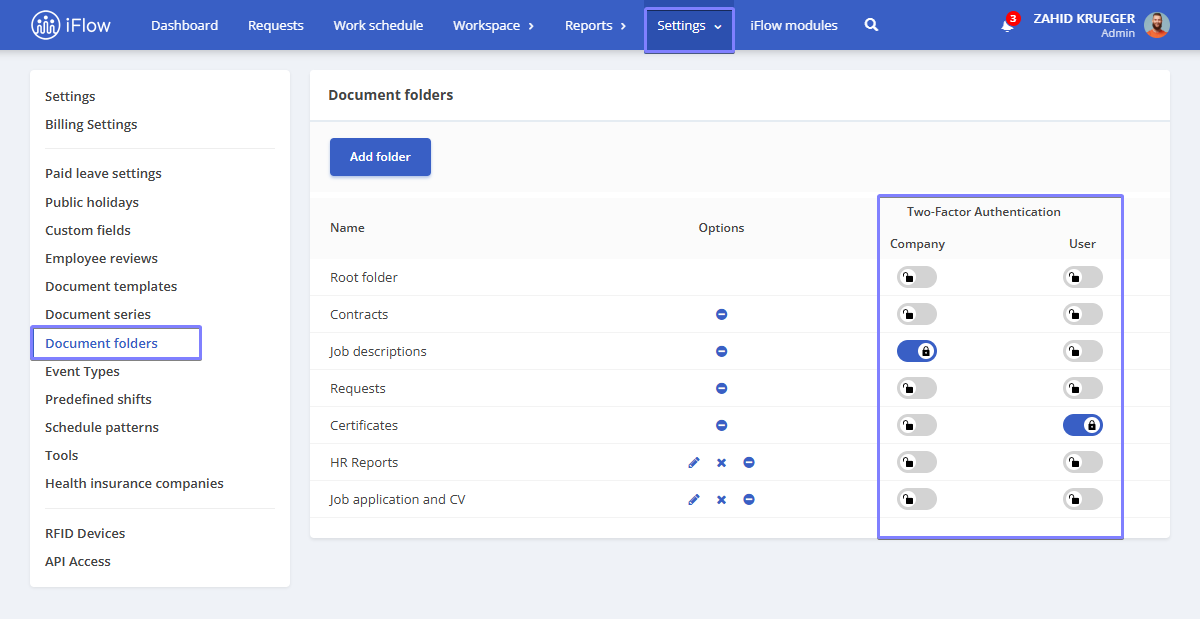
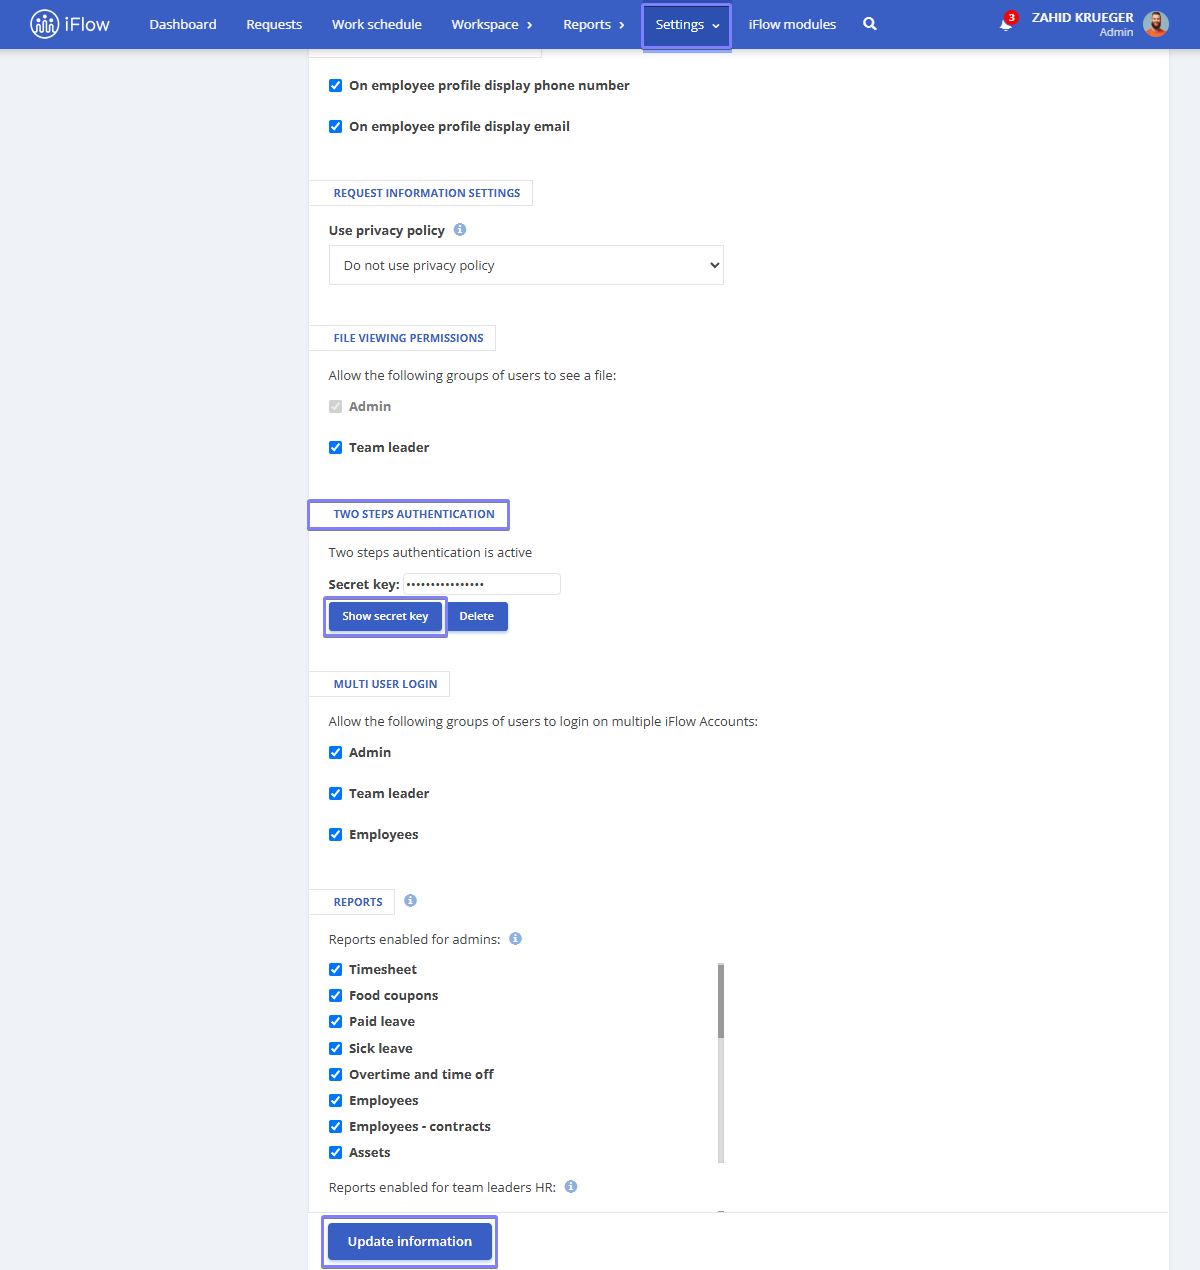
2FA at company level
An employee will need the access key provided by the administrator to access a document with 2FA enabled at the company level.
- Go to Settings – Company – Company Settings – Two Steps Authentication
- Click Enable
- Download Google Authenticator or Microsoft Authenticator
- Open the app and scan the QR code
- Enter the 6-digit code
- Click Update to save the settings
Now, the configuration key is set at the company level. You need to share the key with them to grant employees access to folders protected with 2FA.
- Go to Settings – Company Settings – Two-Factor Authentication
- Click Show Secret Key
- Copy and share the key with the necessary employees
- Employees must enter the key in their downloaded authentication app
2FA at the employee level
To access a document with 2FA enabled at the employee level, the employee must generate an access code from the application.
- Go to Employee Profile – Settings – Account Settings – Two-Factor Authentication
- Download Google Authenticator or Microsoft Authenticator
- Open the app and scan the QR code
- Enter the 6-digit code
- Click Save Settings

2FA at the Employee Level does not provide a setup key to share with others. The employee can only access documents using the code generated by the authenticator app.
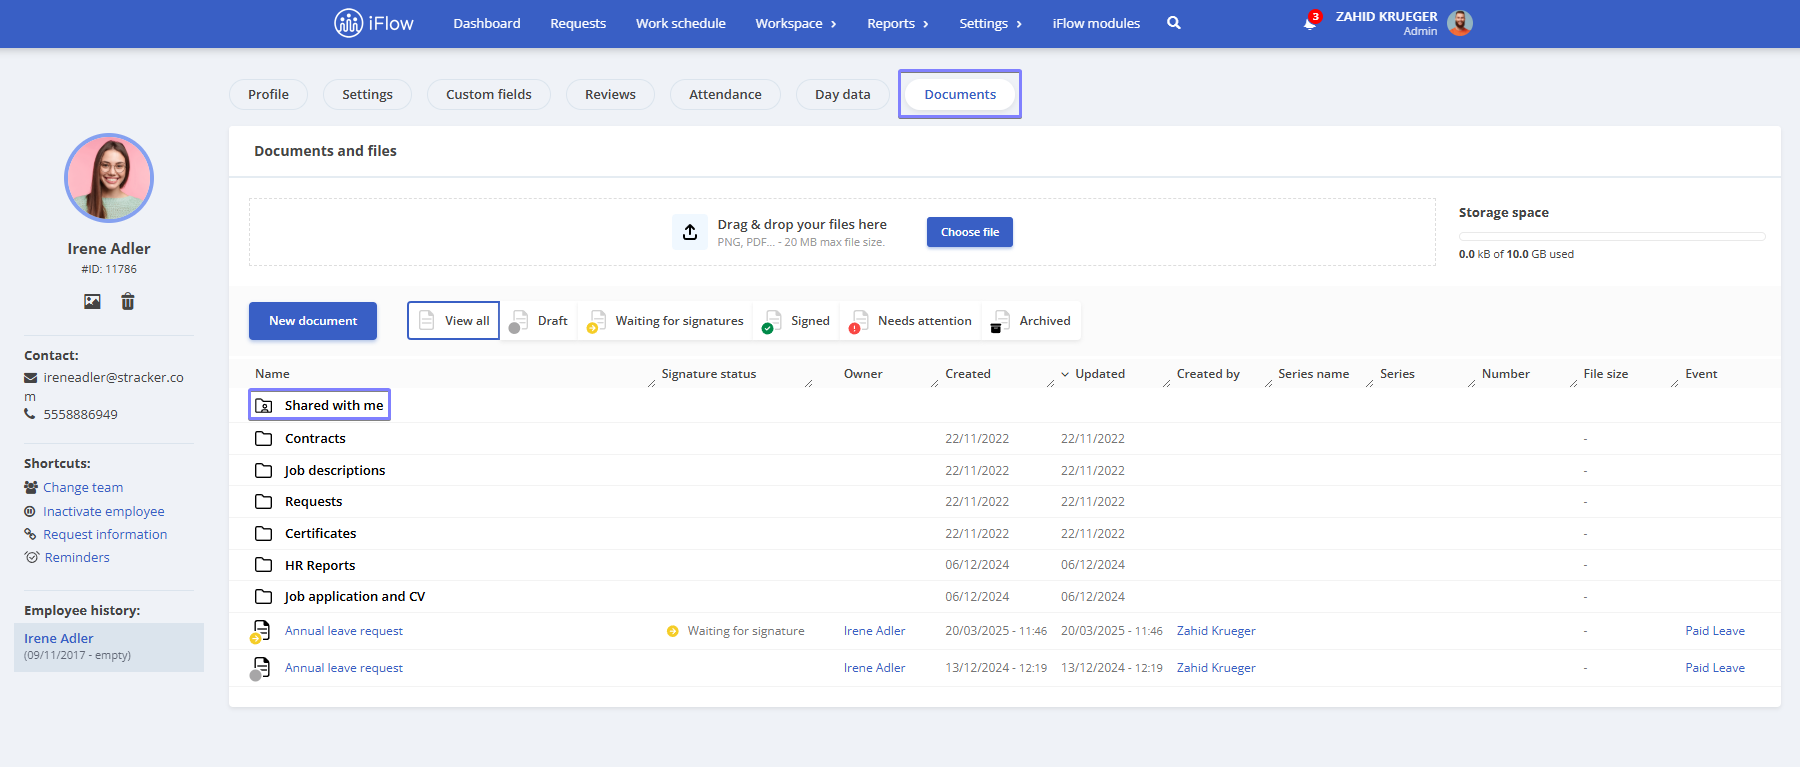
“Shared with me” folder
The Shared with Me folder is located in the employee’s profile, under the Documents section, and contains all files shared by other users.
Once a document is shared, it will automatically appear in the employee’s “Shared with Me” folder.
To remove a document from the folder, hover over the desired document and click the Remove Link icon on the right-hand side.
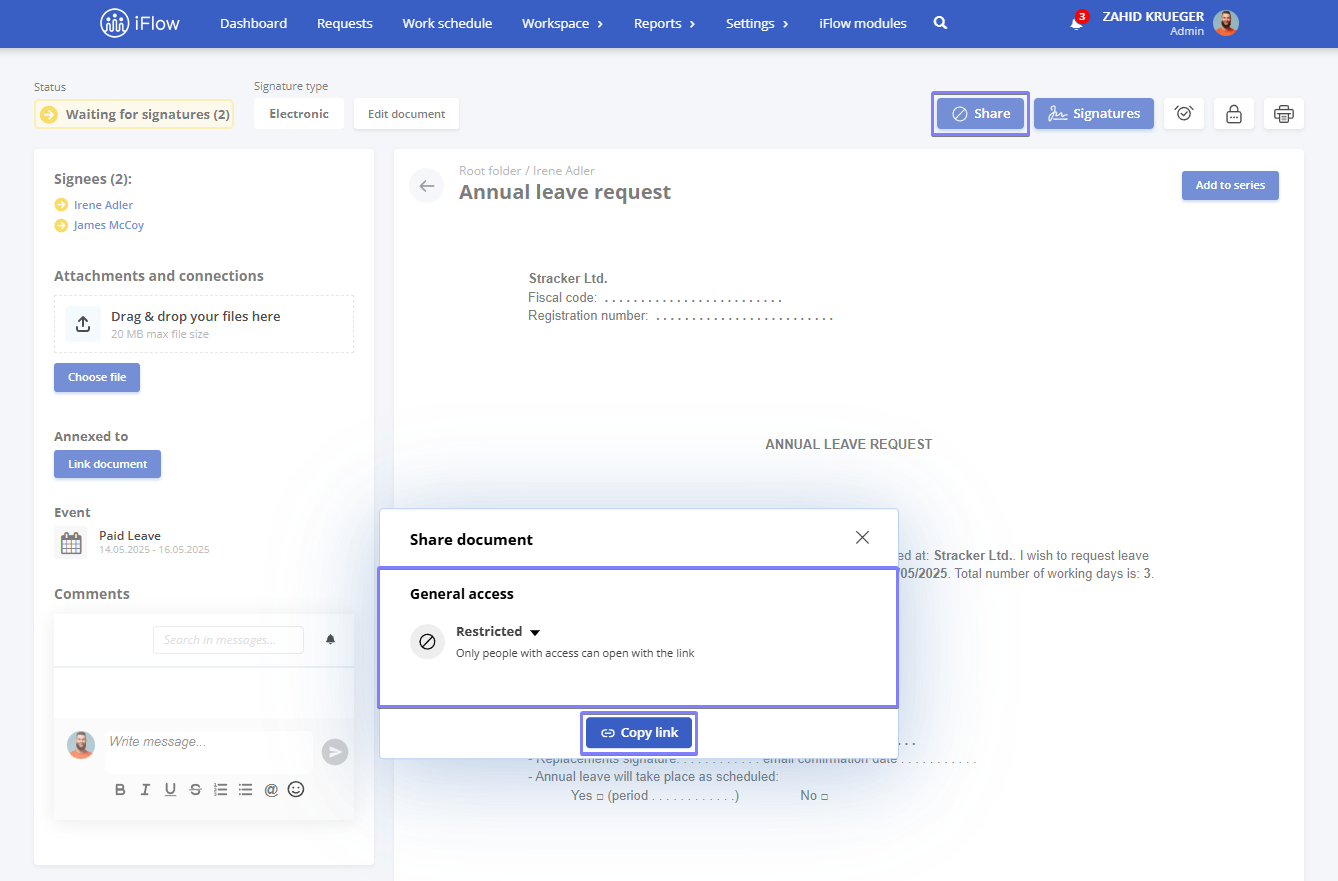
How to share a document
- Click on the document you want to share
- Click the Share button at the top
- Choose the access level for the shared document:
- Anyone with the link: Anyone who has the link and internet access can view or edit the document, depending on the settings
- Restricted: Only people you’ve granted access to can use the link
- Then click the Copy Link button
Company documents
How to access documents as an administrator/HR leader
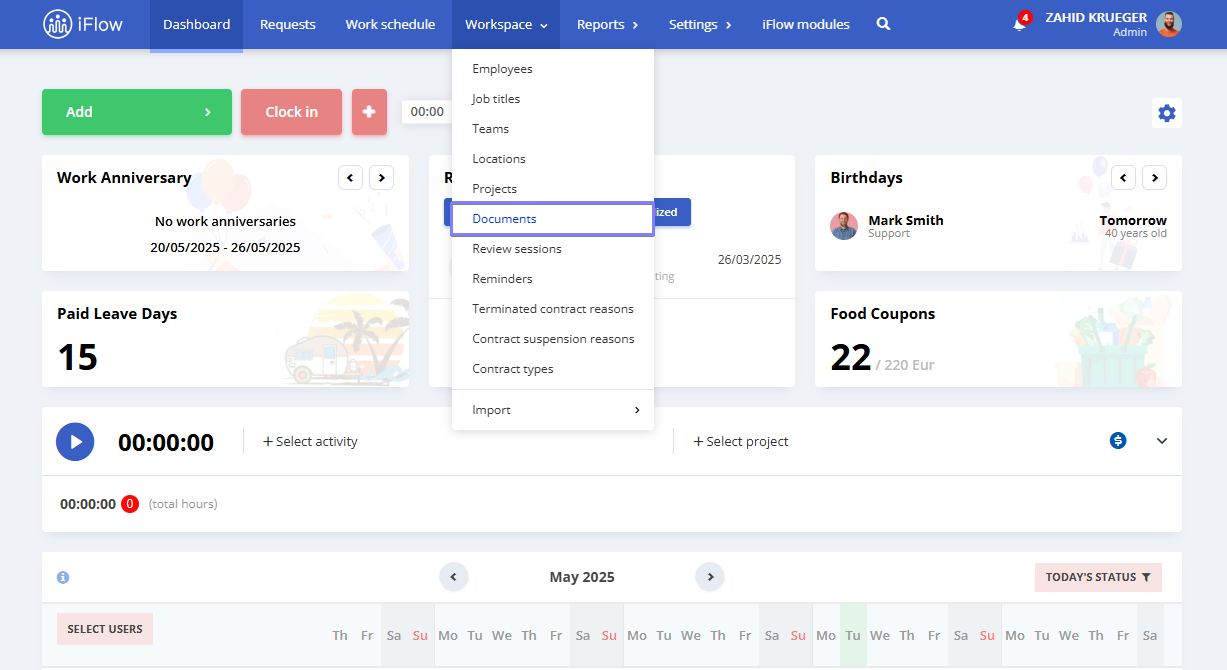
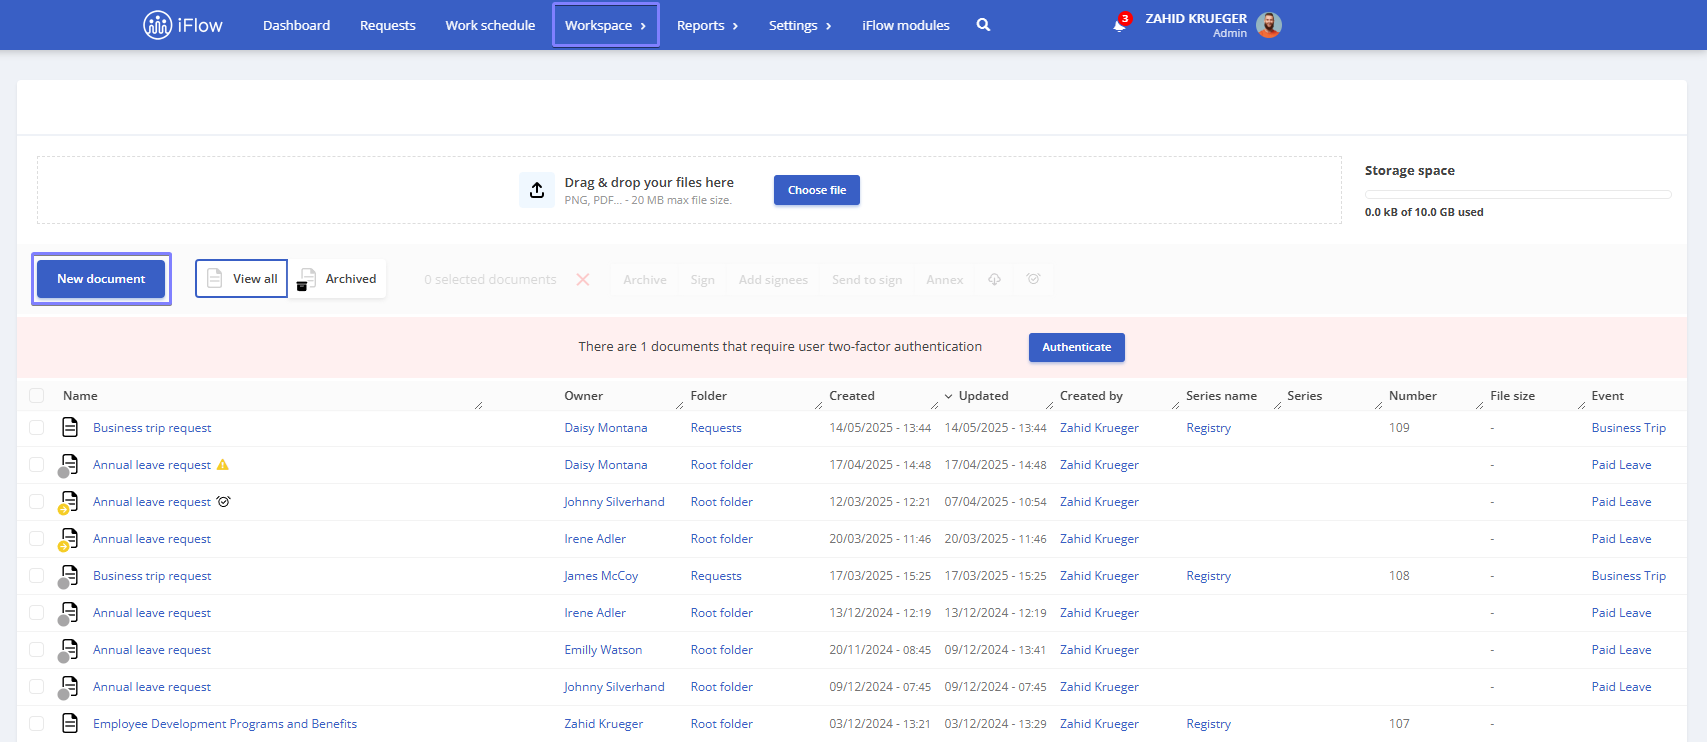
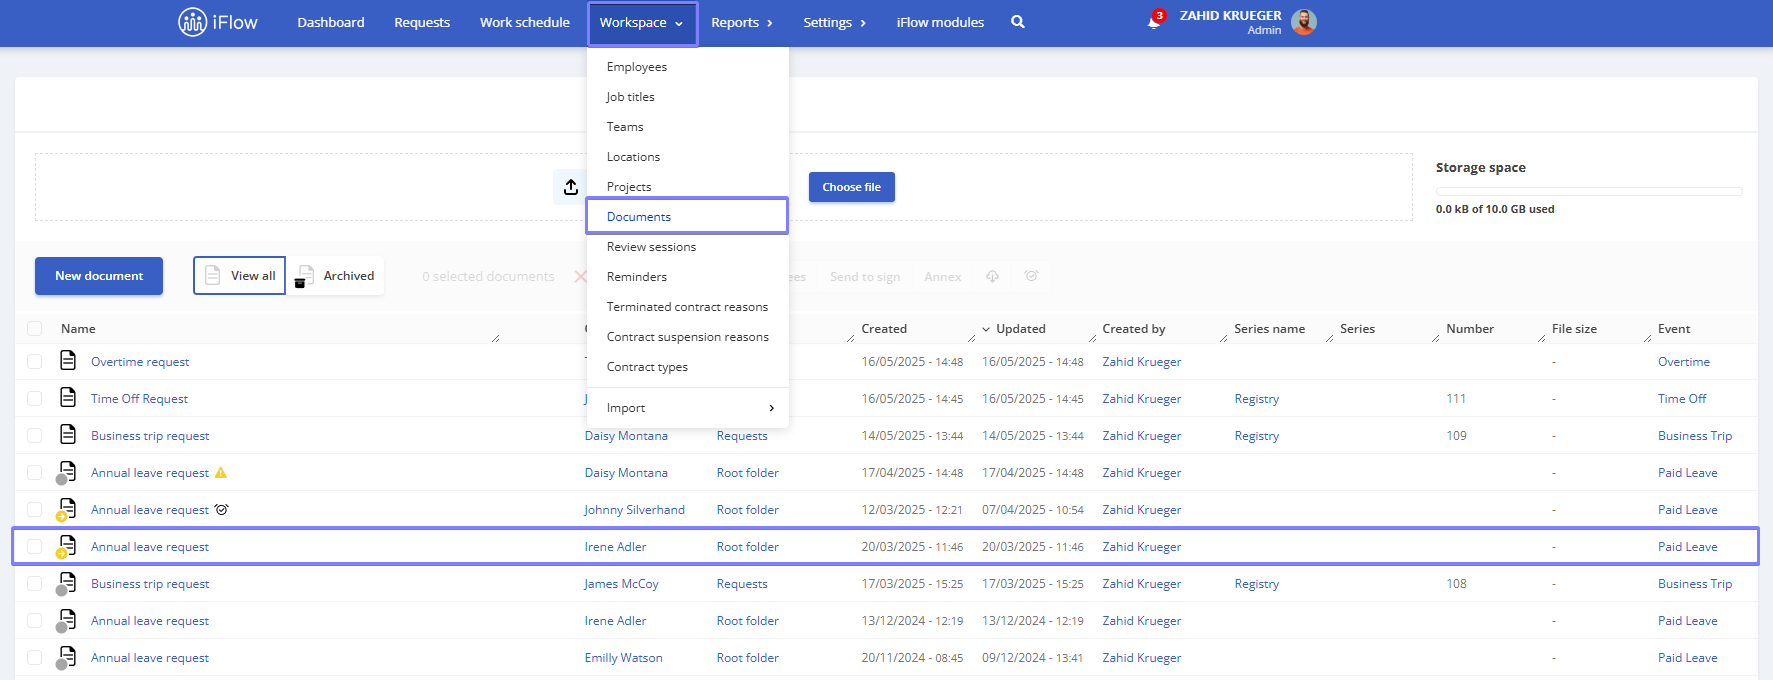
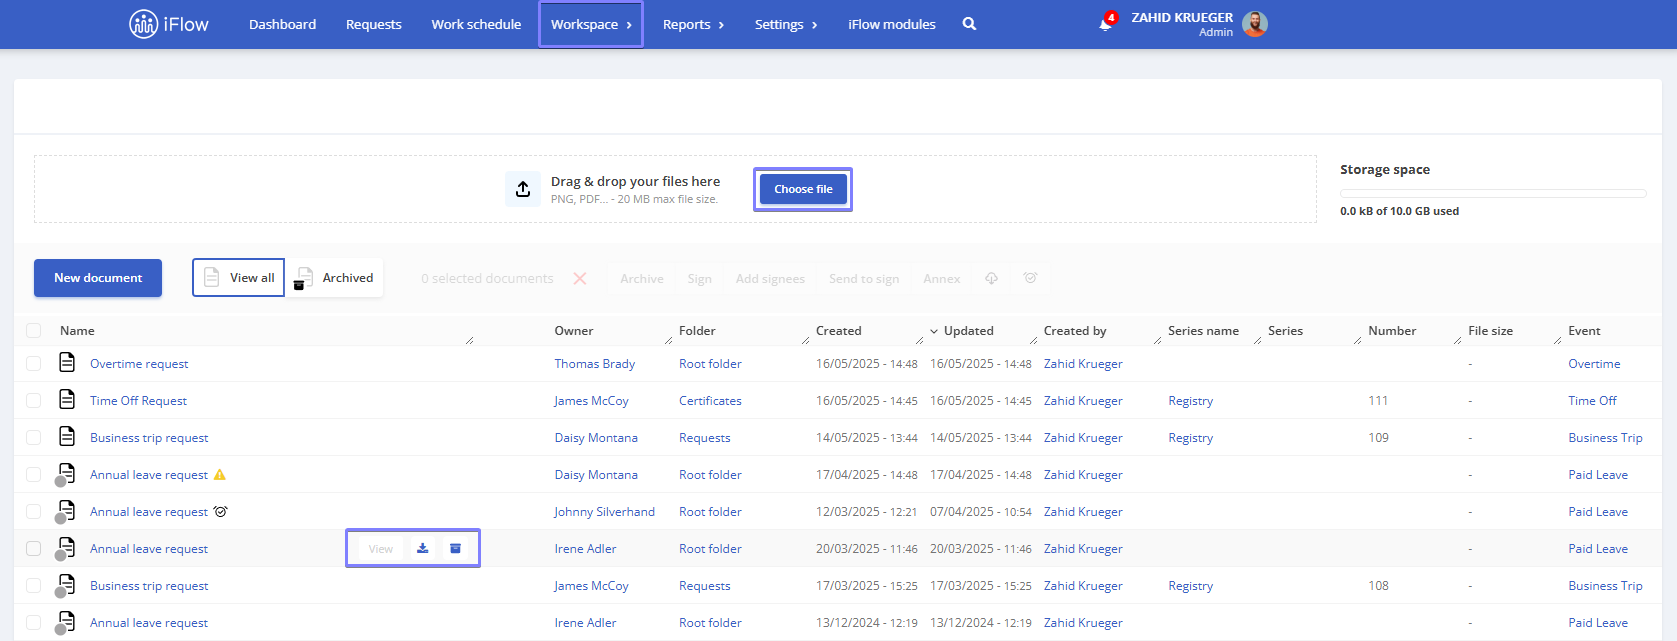
The Documents section can be found in the Workspace menu, under the Documents submenu
How to create a new company-level document
- Navigate to Workspace – Documents in the menu
- Click on New Document
- Select the Document Template
- Enter the Name
- Choose the Series and Folder
- If required, enter a Password and confirm it
- Enable Encryption for enhanced security (optional)
- In the Document for the section, select the employees
- Click on Create Document
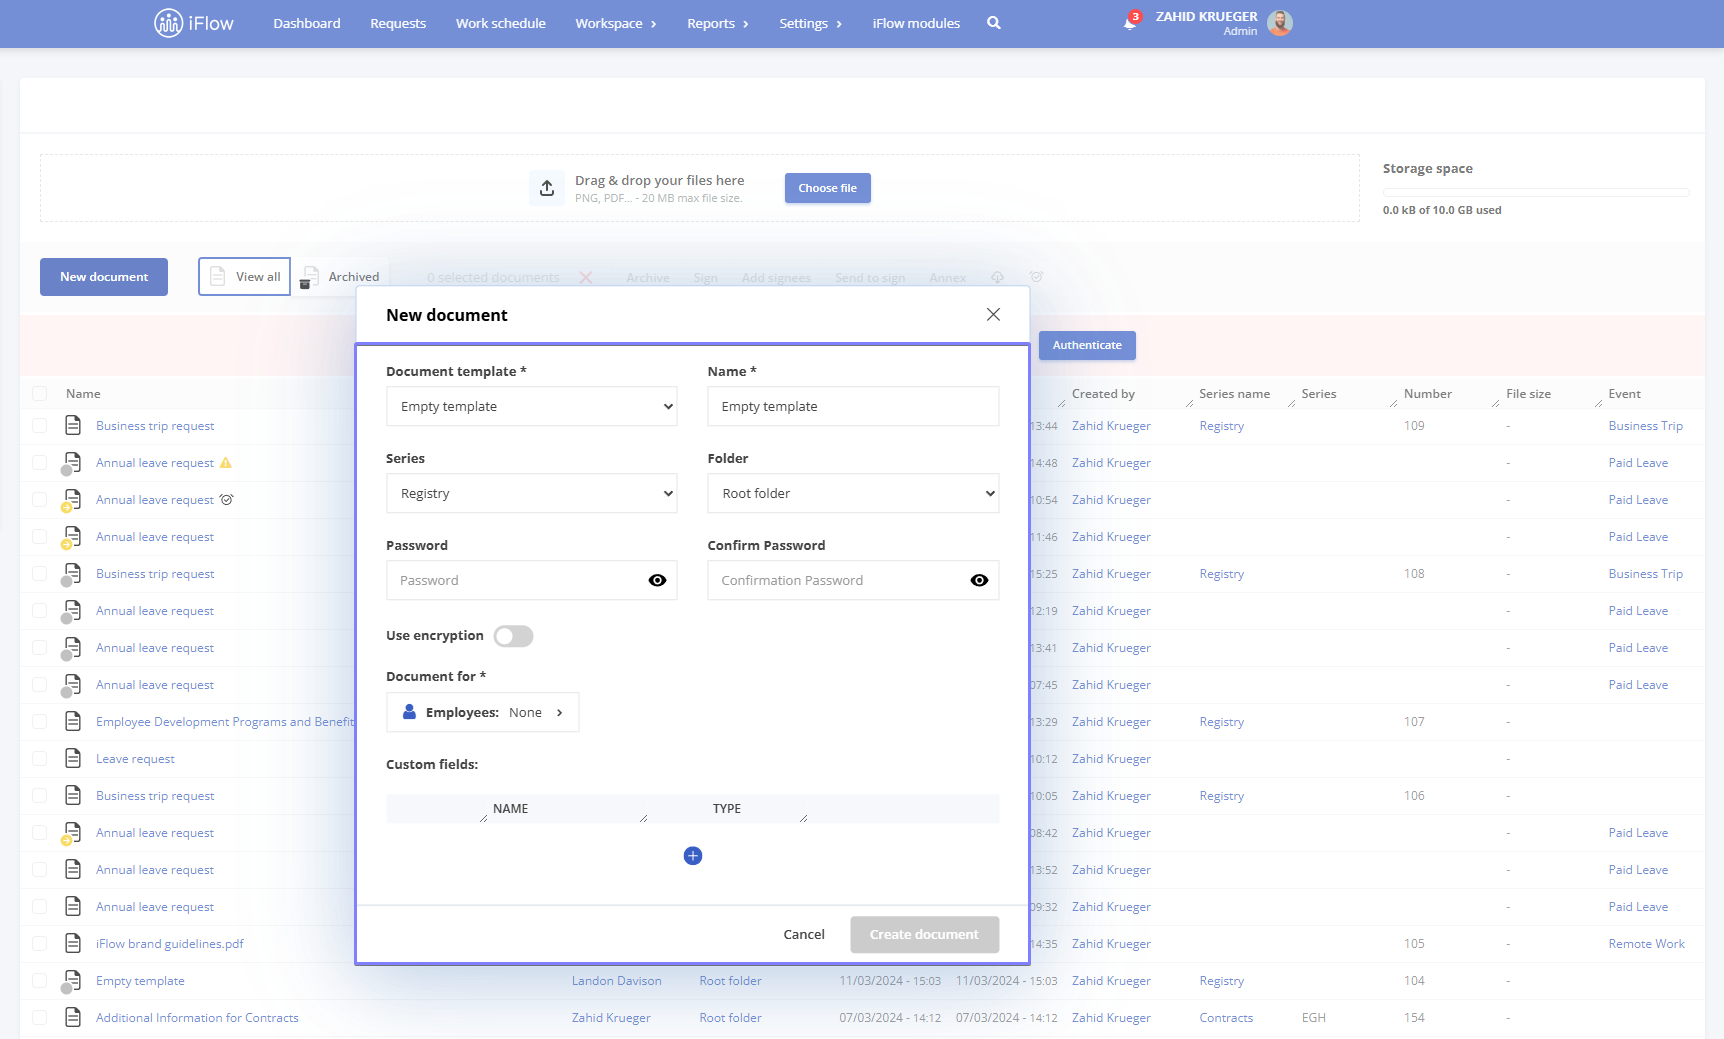
By enabling the Encryption option, the document’s content will be protected by a Password.
Keep in mind the following:
- Losing the password makes the document inaccessible – If you forget or lose the password, there is no way to recover the encrypted document’s data
- We cannot reset the password – The application cannot reset the password or access the encrypted document.
- Store the password securely – To prevent loss of access, ensure the password is kept in a safe and secure location.
A document can be shared in multiple ways:
- Restricted – Only the employee who created the document and the person it was created for have access
- Anyone with the link can:
- View – Anyone with the link can view the document
- Edit – Anyone with the link and editing permissions can modify the document
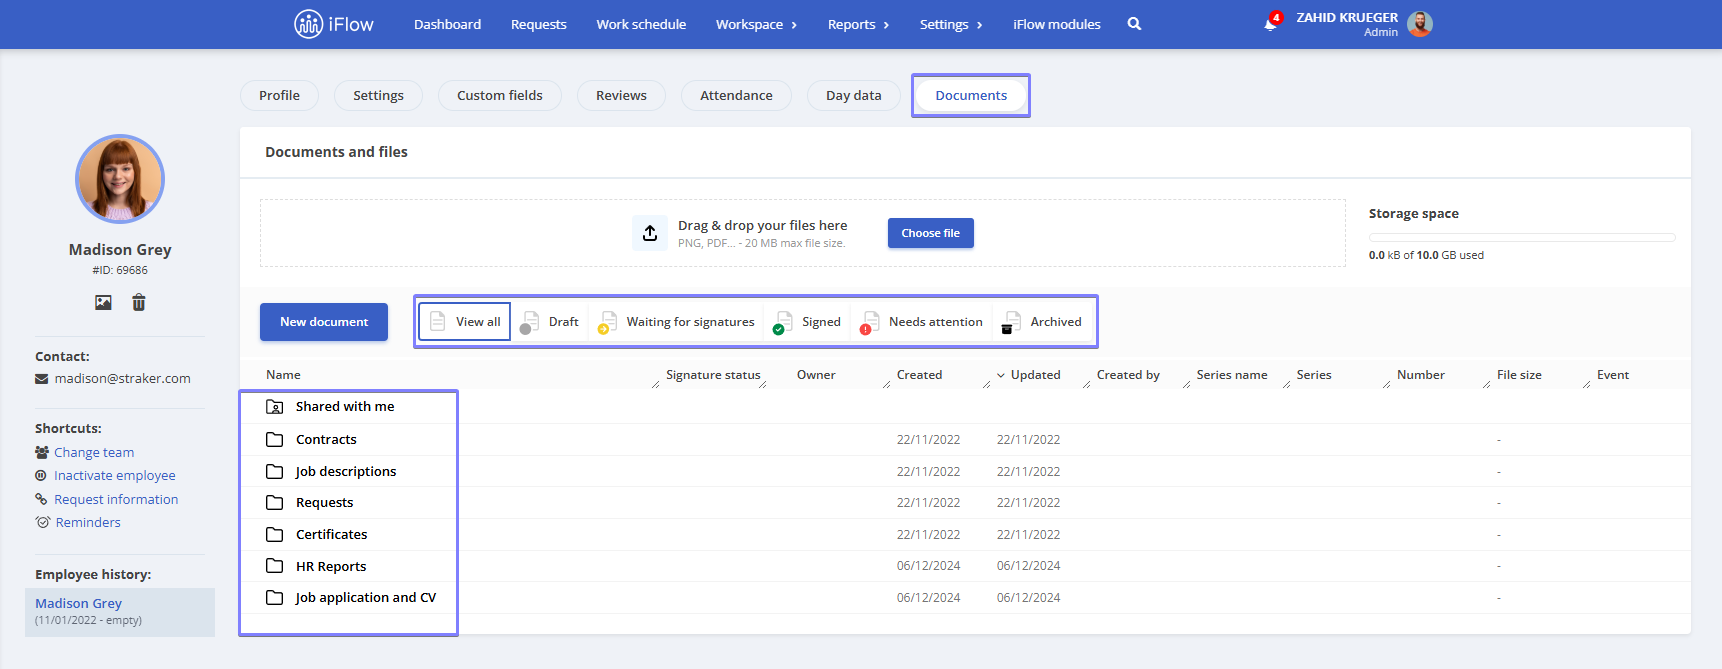
Employee documents
How to access documents from an employee’s profile
- Click on the employee
- Click on Documents from the top menu

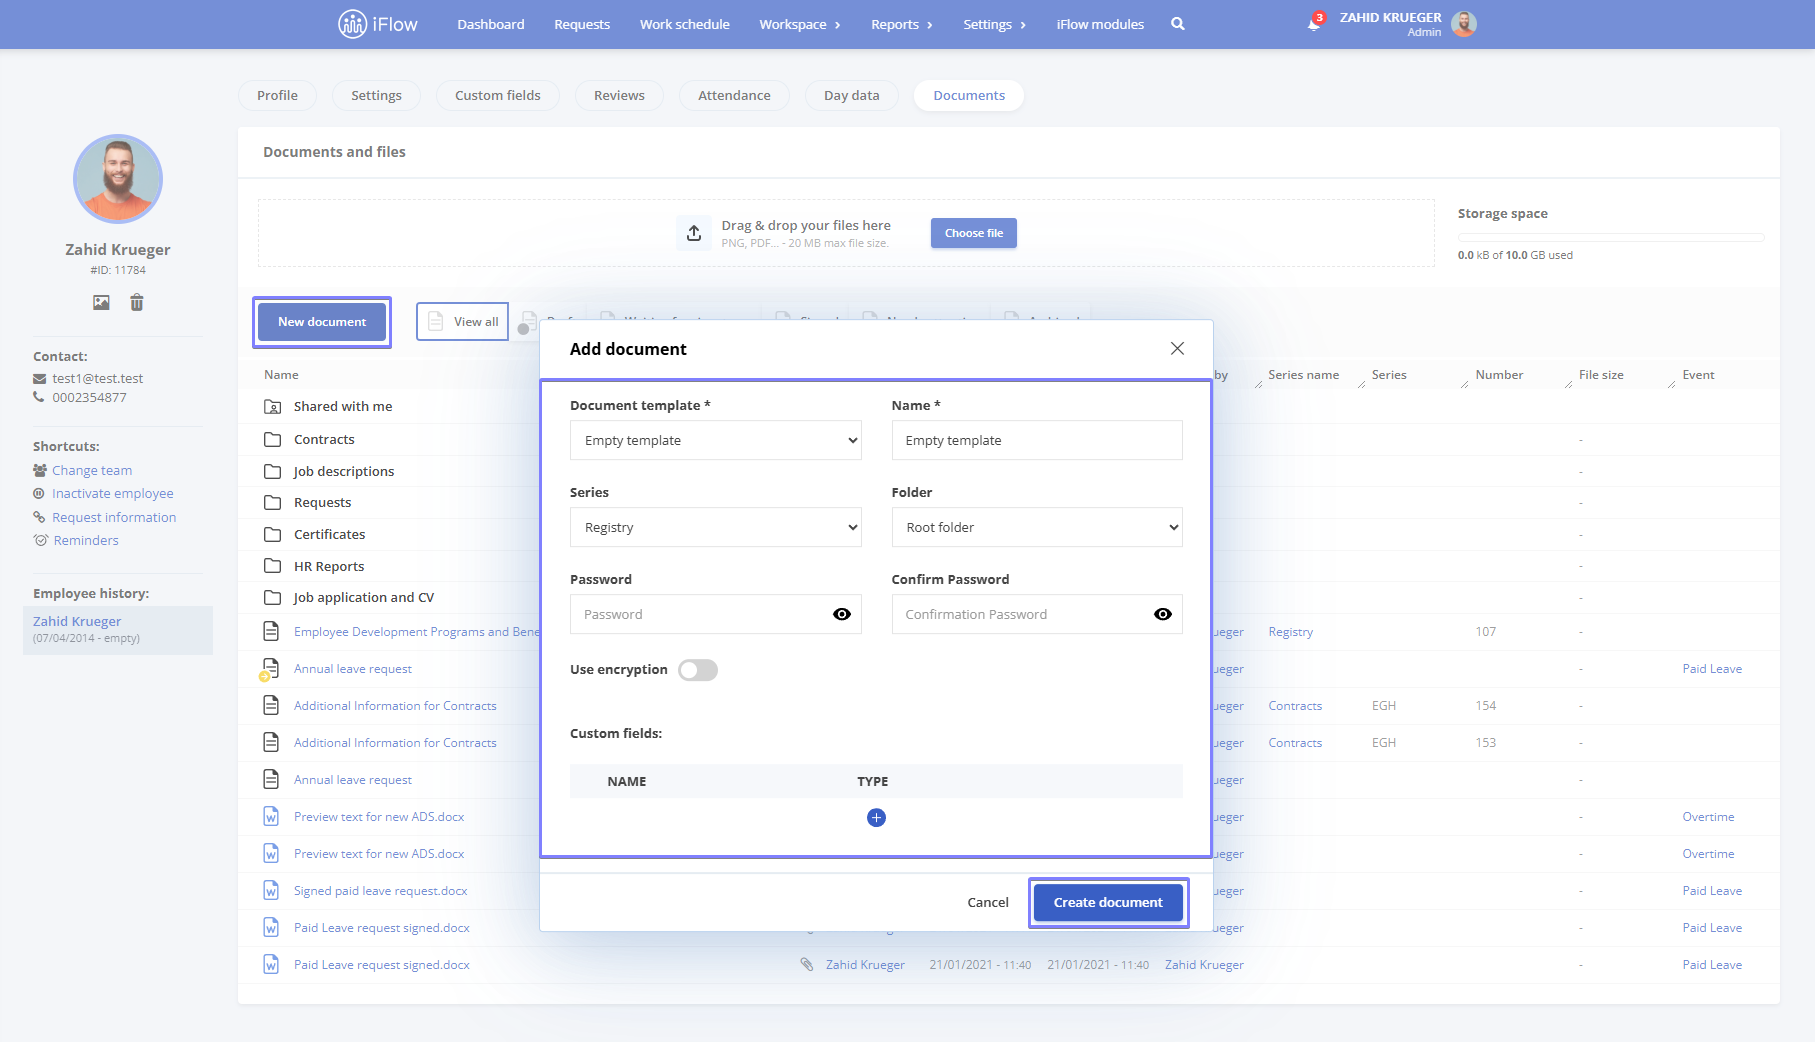
How to generate a new document from an employee’s profile
- From the employee’s profile, click on Documents
- Click the New Document button
- Select the required Document Template
- Enter a Name for the document
- Choose the Series and Reference Folder
- If required, enter a Password and confirm it
- Enable Encryption for enhanced security (optional)
- Click Create Document
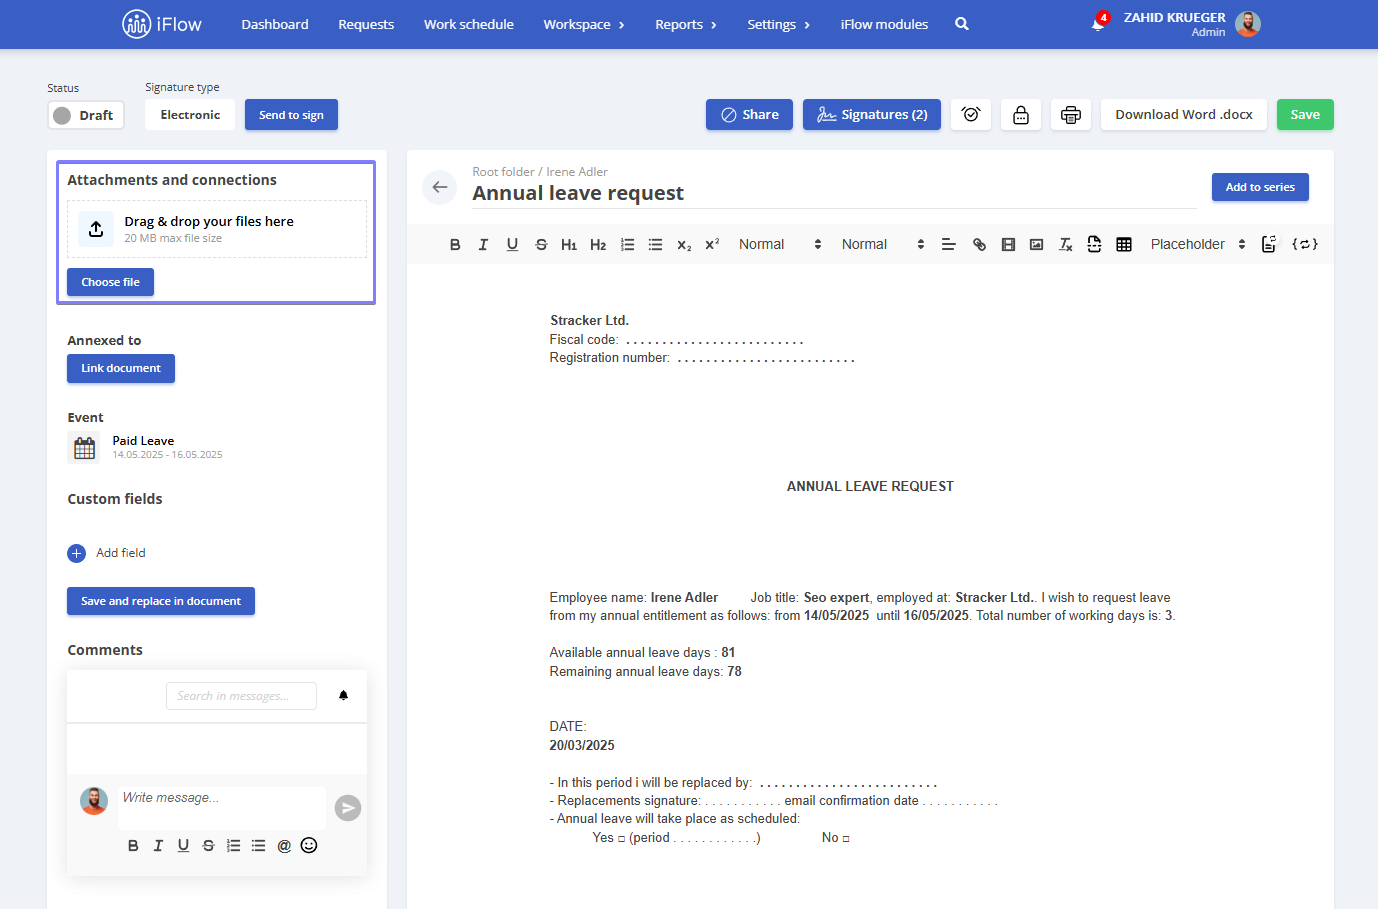
You will be redirected to the automatically generated document containing all the employee’s information. You can edit the document directly and click Save.
By enabling the Encryption option, your document’s content will be protected by a Password. It is essential to keep in mind the following:
- Losing the password makes the document inaccessible – If you forget or lose the password, there is no way to recover the encrypted document’s data
- We cannot reset the password – The application cannot reset the password or access your encrypted document
- You are responsible for storing the password – Ensure it is kept in a safe and secure place to avoid losing access
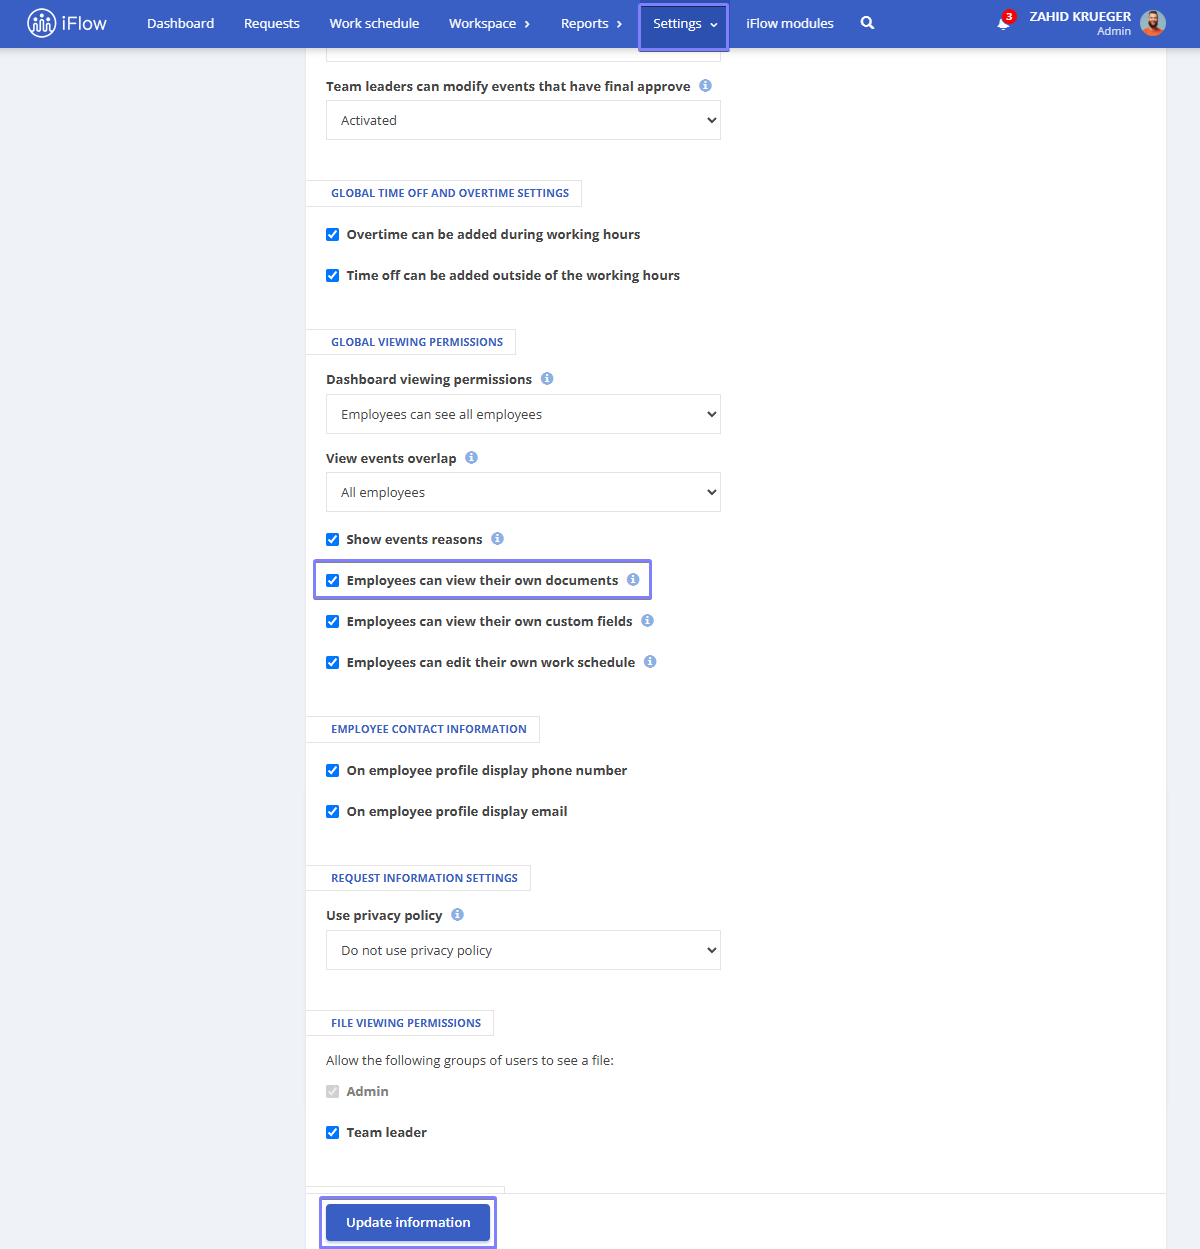
How to grant employees permission to view documents
This setting lets you control whether employees can view documents such as requests and certificates from their profile. If you want to enable them to download or print their documents, follow the steps below:
- Go to the Settings menu
- Navigate to the Company section
- Open the Company Settings submenu
- Check the box for employees can view their own documents
- Click Update Information
Event documents
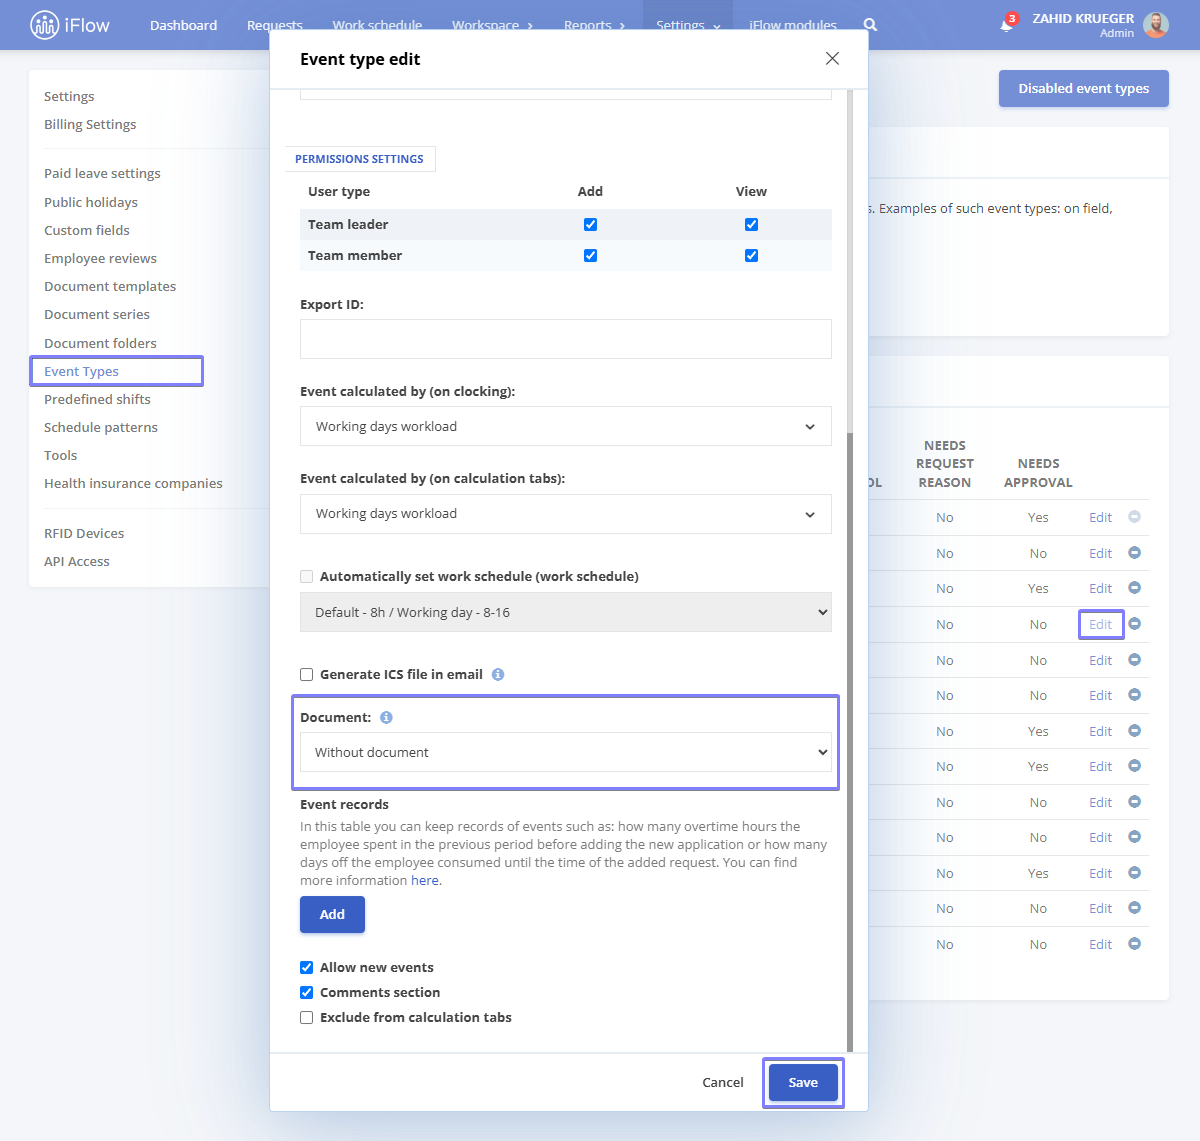
How to set up automatic document generation for an event
- Go to the Settings menu
- Click on Event Types
- Click the Edit button next to the event
- In the Document section, select the template you want
- Click Save to finalize the setup
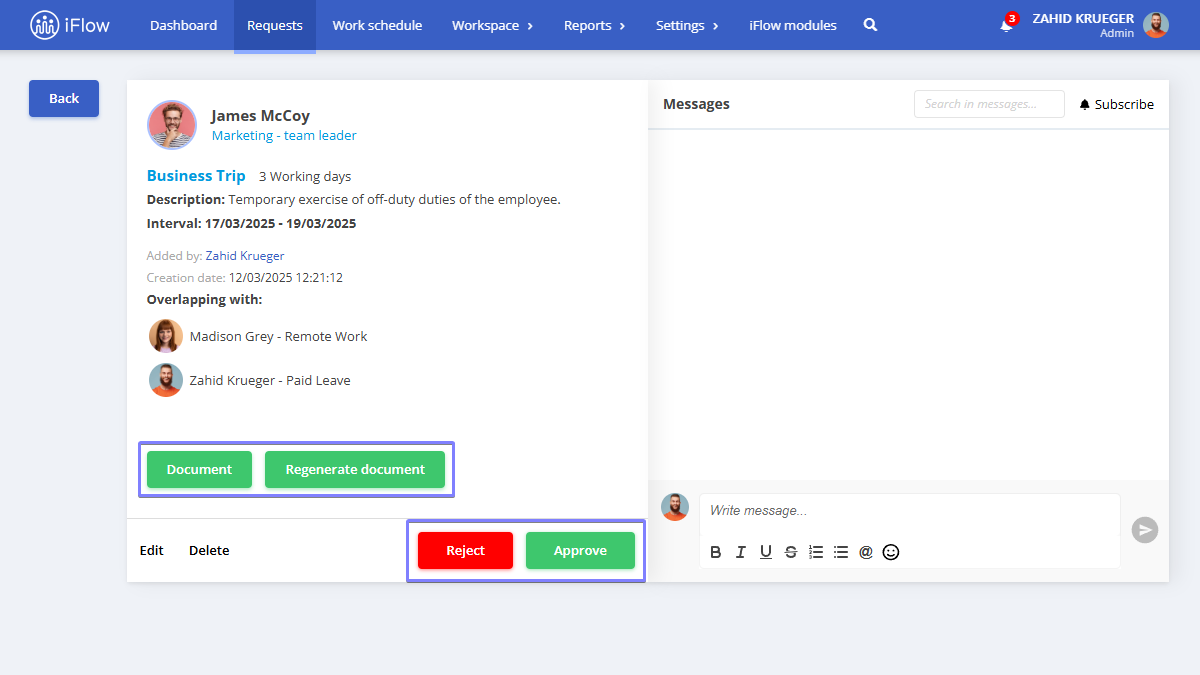
How to view event documents
- Click on the Event to see all its details
- Approve or Reject the event
- View associated documents by clicking on Document or Regenerate Document
To see how to create new document templates, click here.
Custom fields
Depending on the user’s needs, custom fields in documents/templates add specific information to each document. They provide greater flexibility and organization and are helpful for auto-filling data, adding additional details, and customizing documents.
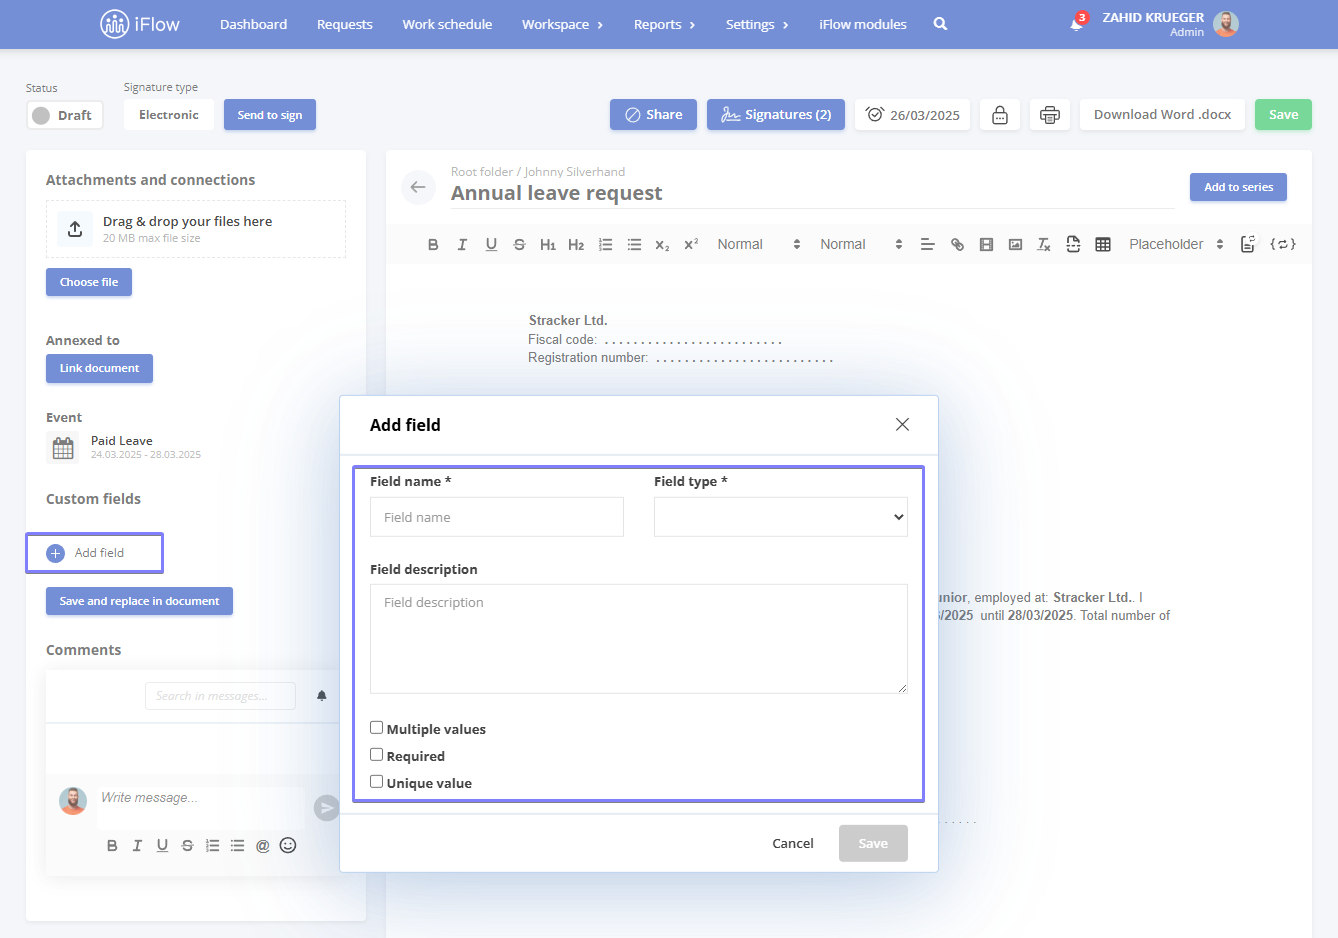
How to add custom fields to a template
- From the main menu, go to Settings – Documents – Document Templates
- Click the pencil icon next to the desired template
- On the left side, you’ll find the Custom Fields section. Click the + button to add a new custom field
- In the window that opens, fill in the following details:
- Field Name – The primary identifier of the field
- Field Type – Defines the type of information that will be entered
- Description (optional) – A brief explanation of the field, to clarify its purpose
- Check the necessary options: Multiple values, Required, Unique value
- Finally, click Save
Afterwards, search for the placeholder of the newly created field in the Documents section, and insert it in the document where you want the new information to appear.
To finish, click the Save button to update the information in the custom field.

If you create custom documents based on a template, any new document generated from that template will automatically include the previously added custom fields.
How to add a custom field to a document
- From the main menu, go to Workspace – Documents
- Click on the document you want
- In the left-hand column, click the + button to add a new custom field
- In the window that opens, fill in the following:
- Field Name – The primary identifier of the field (e.g., Order Number or Payment Term)
- Field Type – Defines the type of information to be entered (e.g., text, date, number)
- Description (optional) – A short explanation to clarify the purpose of the field
- Options:
- Multiple values – Allows multiple values for the field
- Required – The field must be filled in to save the document
- Unique value – Only one unique value is allowed for the field (e.g., Order Number)
- Click Save to finish adding the custom field
After adding a new custom field, a placeholder is automatically created in the Documents section list. You can insert it anywhere in the document where you want the new information to appear.
Finally, click Save and Replace in Document to update the information in the custom field.


Attention!
If you add custom fields to a document, those fields will remain strictly associated with that specific document.
How to add attachments and links
How to add files
- You can upload documents from your PC in the Attachments and Connections section
- This feature is available for leaders and administrators
- Attachments cannot be edited and can be viewed in Reports – Files
- You can attach multiple files. To attach a document, follow these steps:
- Open the required document
- Click the Choose File button and select the document you need
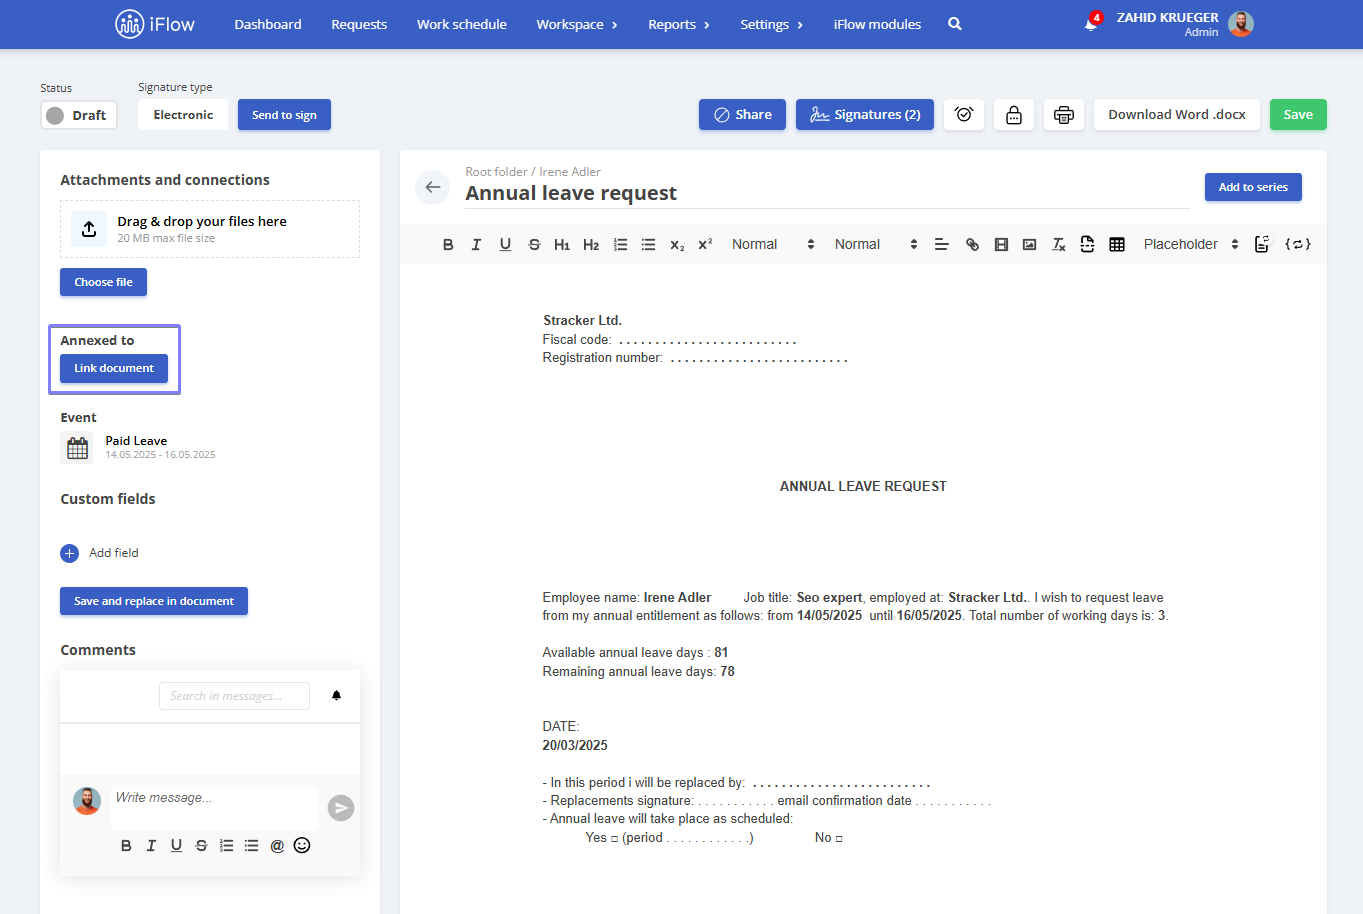
How to add annexes
The Link Document button allows you to link two documents during the annexing process. Unlike attachments, which involve uploading files, annexing simply means selecting two documents that become connected, such as an employment contract and a job description. Once annexed, you can navigate between them quickly with a single click to efficiently access the needed information.
To annex a document, follow these steps:
- Open the required document
- Click the Link Document button and select the necessary document
How to add comments to documents
When you add a document for an employee on the platform, the dedicated comments section is available on the left side of the page. By leaving a comment on the document, you will automatically be subscribed to notifications for future messages, but you can unsubscribe with a single click on the Unsubscribe button.
The comment history is saved individually for each document and can be found in the Notifications – Messages- Internal section. This feature is available for all user categories. Each message can be Edited or Deleted, and you can react to other messages by hovering over the necessary comment.
To leave a comment:
- Open the required document
- Enter your message in the designated comment box
How to upload documents in the application
*This feature is available with the Business subscription.
From the workspace menu
Go to the Workspace menu – Documents section, and click the Choose File button at the top of the page. You can upload multiple documents simultaneously, then View them within the application or Download them as needed.
From the employee profile
Go to the Employee Profile – Documents section, and click the Choose File button at the top of the page. You can upload multiple documents simultaneously, then View them within the application or Download them as needed.
Additionally, documents can be uploaded as files when adding a new event or as attachments to existing documents in the application.
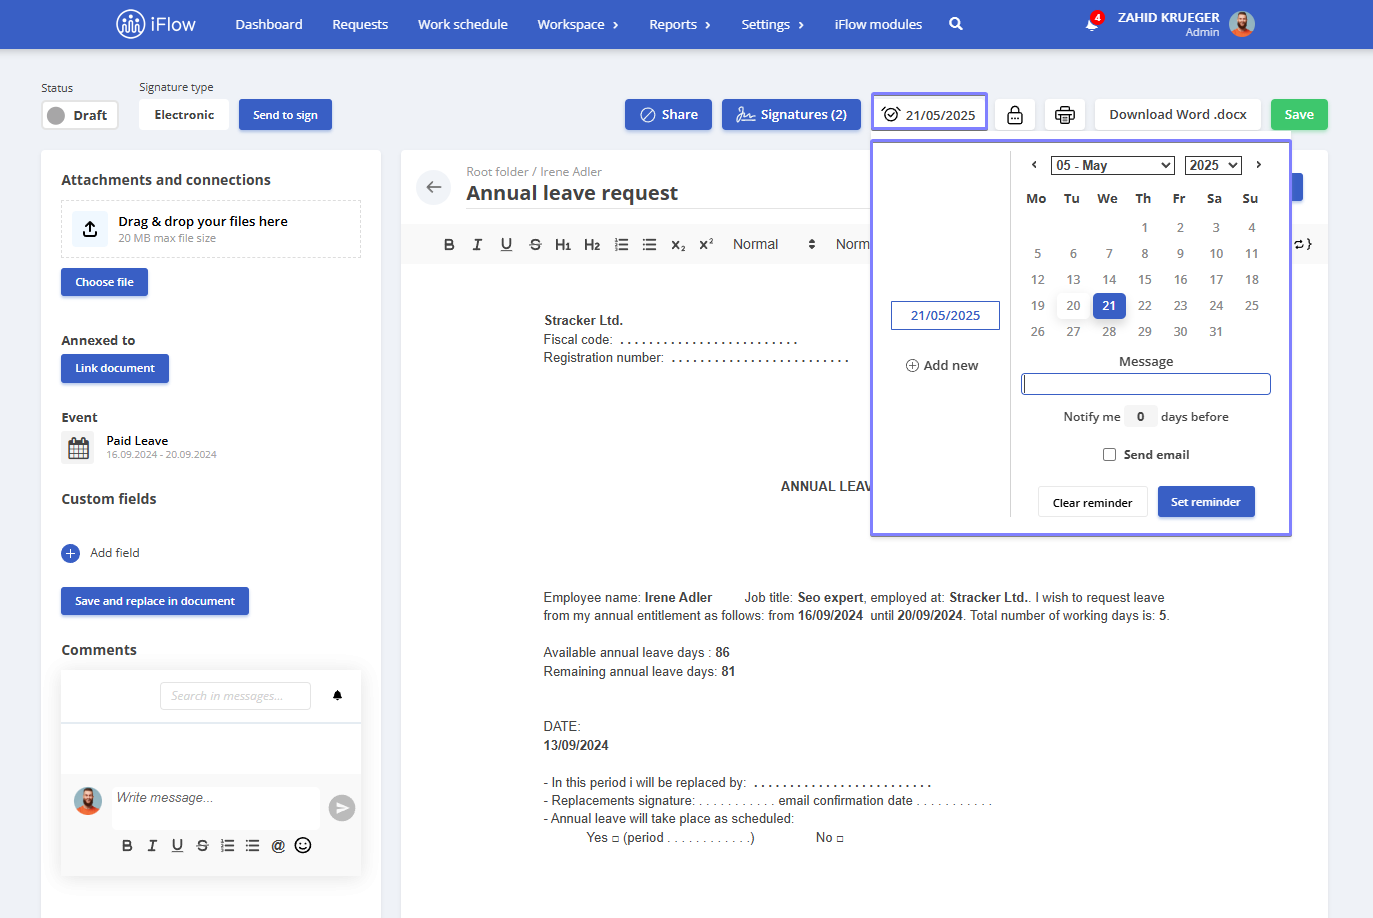
How to set a reminder for a document
*This feature is available in the Business subscription.
- From the Workspace – Documents menu
- Open the required document
- Click on the clock icon at the top of the page
- Select the date when you want to be notified
- Add a message if needed
- You can set a notification to be sent a few days before the due date
- Check the Send email box if you want to receive the notification via email
- The reminder will be saved automatically. If you want to cancel it, click ClearrReminder
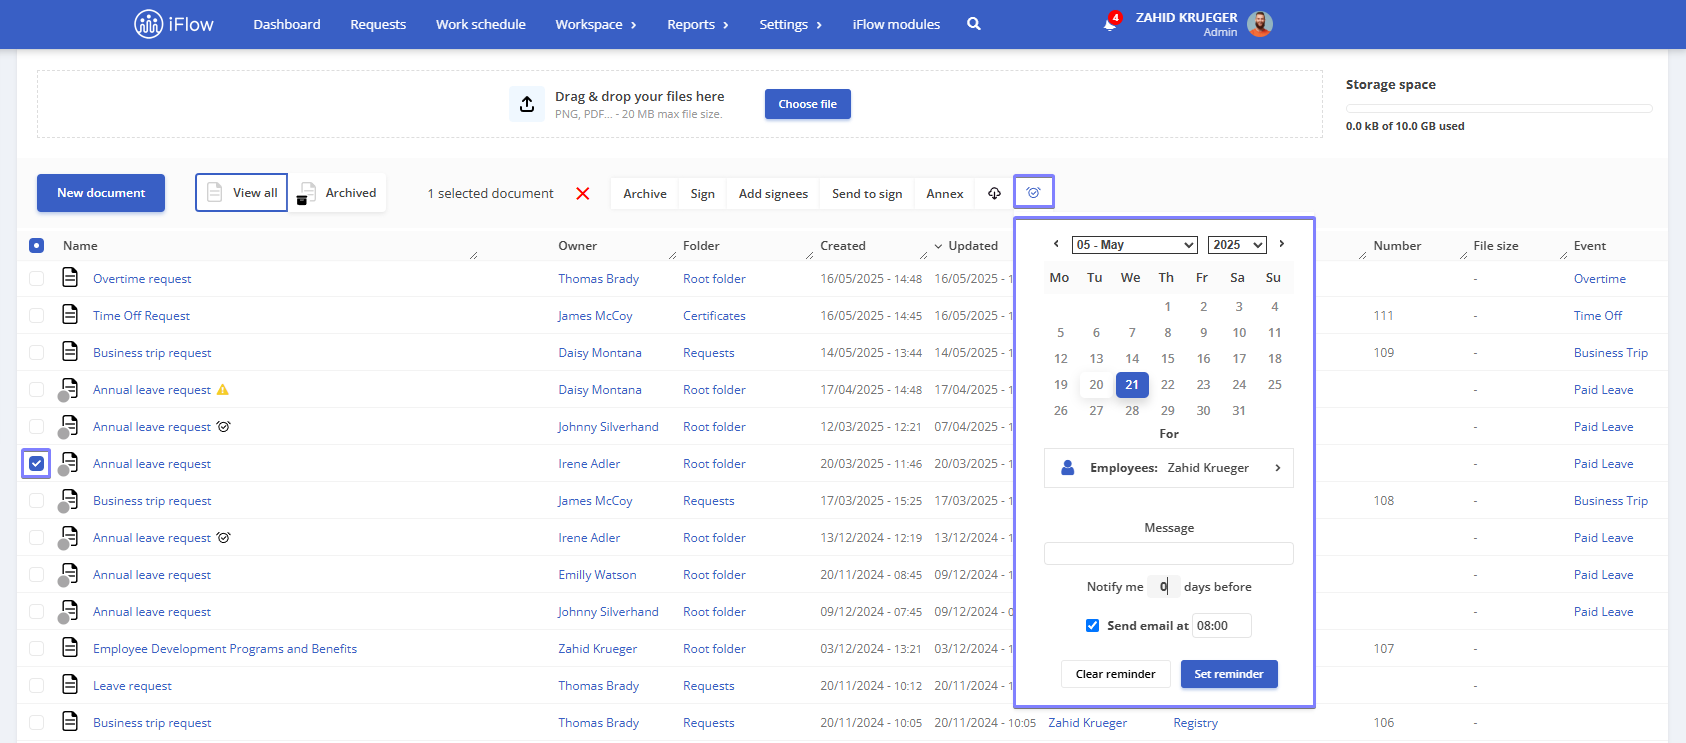
How to set a reminder for signers
*This feature is available in the Business subscription.
This applies to an already created document that requires a signature from the employee or manager.
- Go to Workspace – Documents
- Select the document by checking the box in front of it (based on the selected document, the application will generate a list of signing employees)
- Click on the Clock button
- Choose the Date when you want to be notified
- Check the Employee who will receive the notification
- Add a Message if needed(Optional)
- You can set a Notification to be sent a few days before the due date
- Check the Send email box if you want to receive the notification via email
The reminder will be saved automatically. If you want to cancel it, click Clear reminder
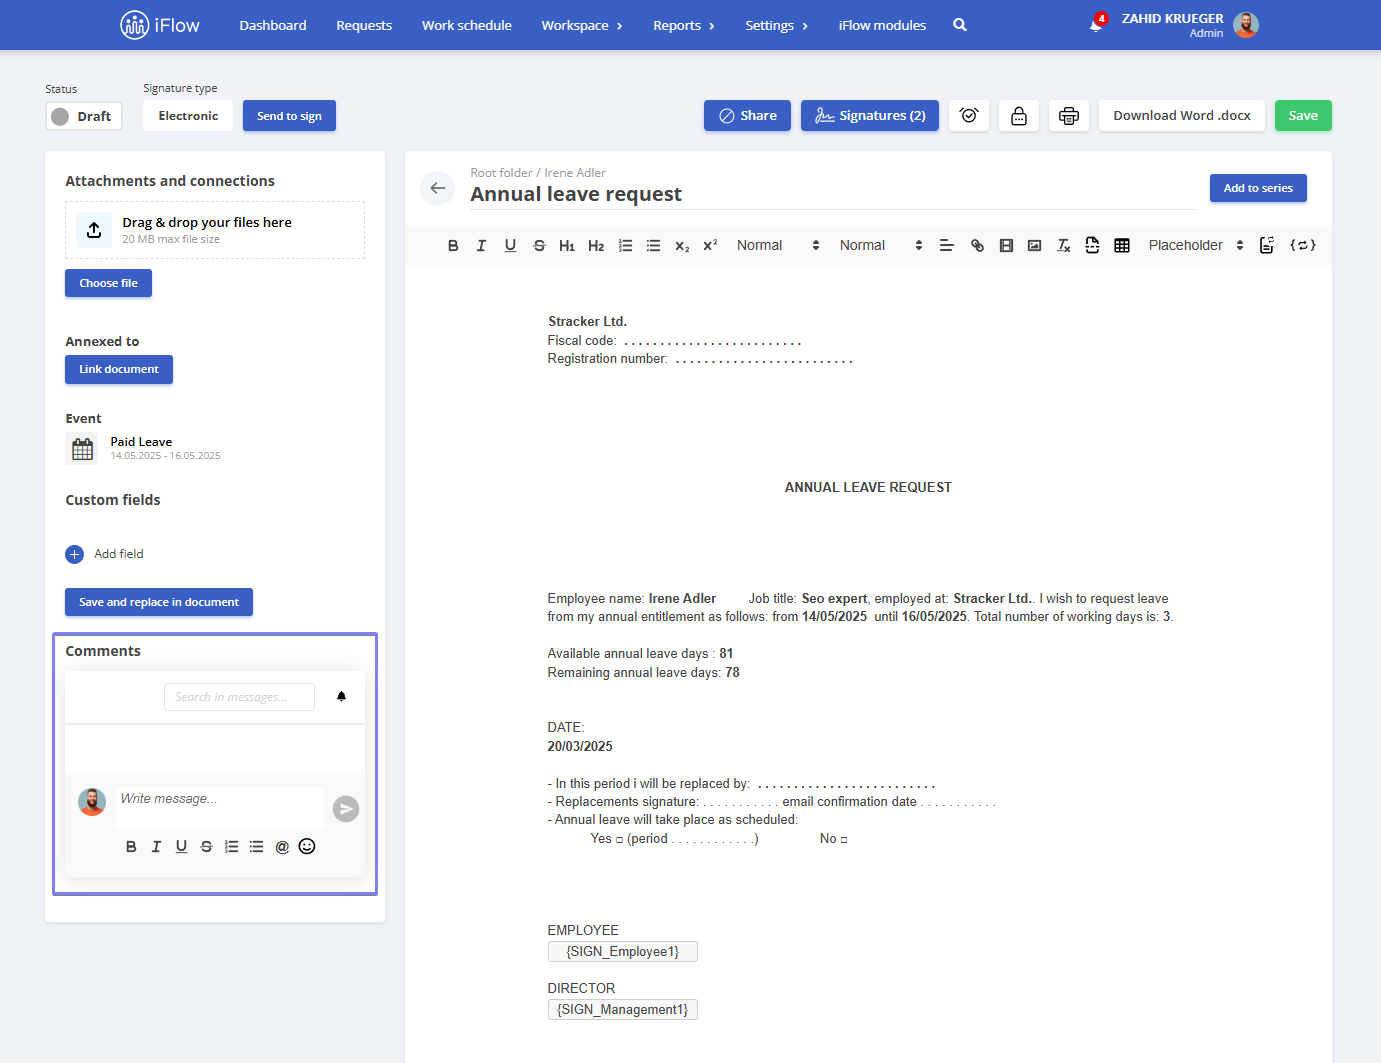
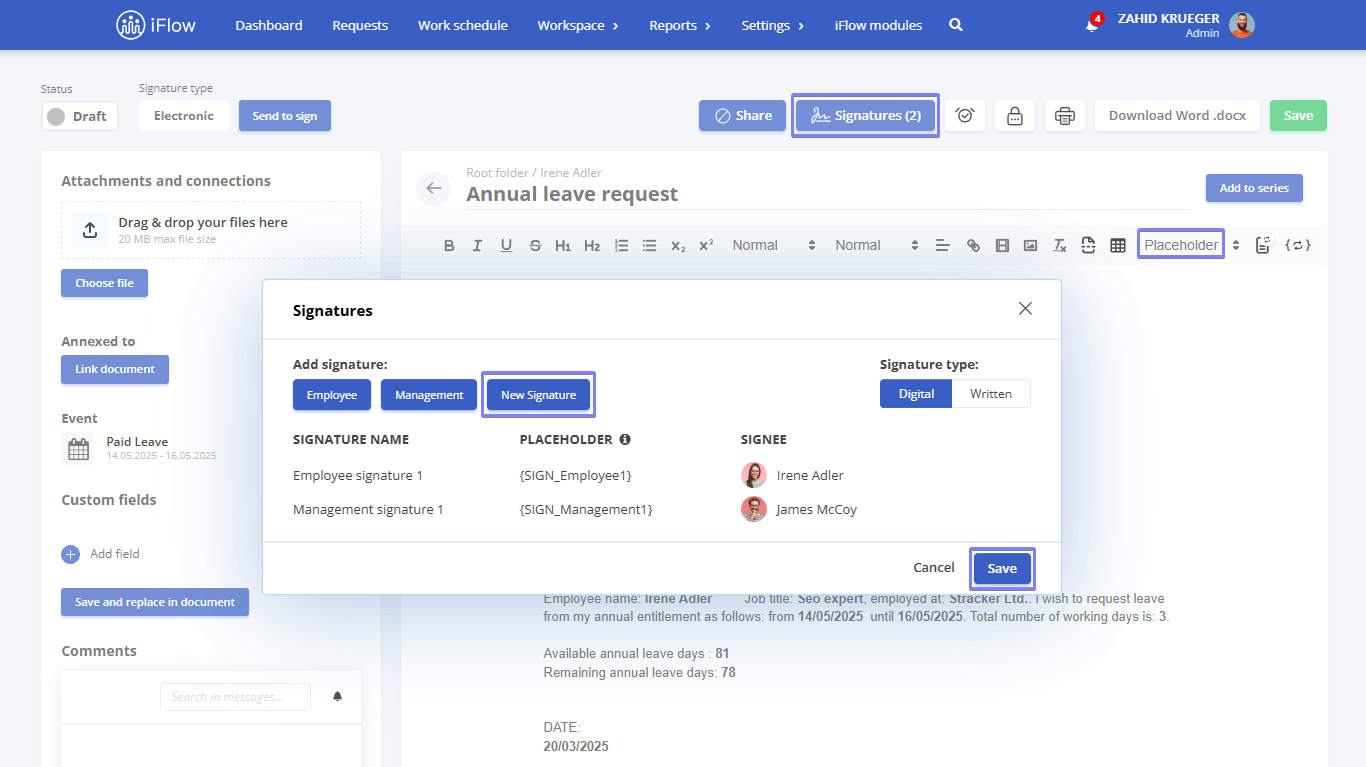
Digital signatures
*This feature is available in the Business subscription
Add a signature placeholder and select the signature type to display a signature on a document.
Available digital signature placeholders:
- Employee placeholder – Marks the location where the employee’s digital signature will be applied. Ideal for documents such as employment contracts or any document requiring an employee’s signature:
- {SIGN_Employee1} – choose from available signatures
- {SIGN_Name_Employee1} – displays the employee’s name
- Management placeholder – Used for management approval of documents. Commonly applied in internal approval processes where a manager’s signature is required:
- {SIGN_Management1} – choose from available signatures
- {SIGN_Name_Management1} – displays the manager’s name
- Legal representative placeholder – Used when a legal representative must approve a document. Frequently applied in internal approval processes where the legal representative’s signature is necessary:
- {SIGN_Representative} – Choose from available signatures
- {SIGN_Name_Representative} – Displays the legal representative’s name
To set a legal representative, navigate to Settings – Company – Company Data, in the field dedicated to legal representatives, select the employee(s) – then click on the Update Information button.
- Replacement placeholder – Marks where a substitute’s digital signature will be applied. Ideal for documents like leave requests or any document requiring the substitute’s signature:
- {SIGN_Replacement} – Choose from available signatures
- {SIGN_Name_Replacement} – Displays the substitute’s name
Here’s the translation for your online application documentation:
To add an additional signer, follow these steps: click on Edit Signatures inside of the document, then select New Signature. Choose a name for the new signature and click Add. After selecting the signer you want, click Save. The new signature will appear in the Placeholder section, where you can insert it directly into the document.
By correctly using placeholders and selecting the appropriate signature type for your needs, you can sign documents quickly and efficiently, ensuring their authenticity and integrity.
How to add a signature to the employee profile
*This feature is part of the Business subscription
You can create and save your signature in your profile to sign documents more quickly in the future. Instead of drawing your signature every time, you can quickly select the one saved in your profile.
Steps:
- Go to the employee profile
- Open the Settings submenu – Personal Details
- Scroll down to the Signatures section
- Click the Select Signature button
- Choose the type of signature, then click Save
- Click the Save Settings button

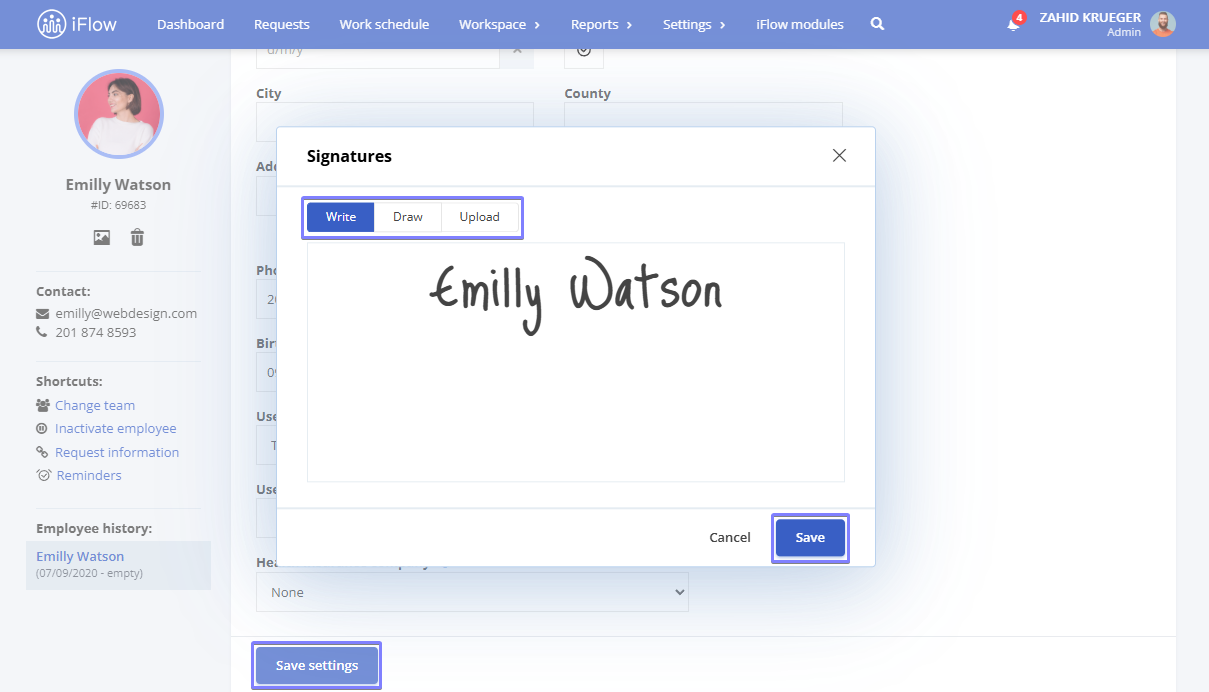
Available options:
- Write: a signature automatically generated from text
- Drawn: a manually created signature drawn on the device
- Upload: a pre-existing signature imported from a file
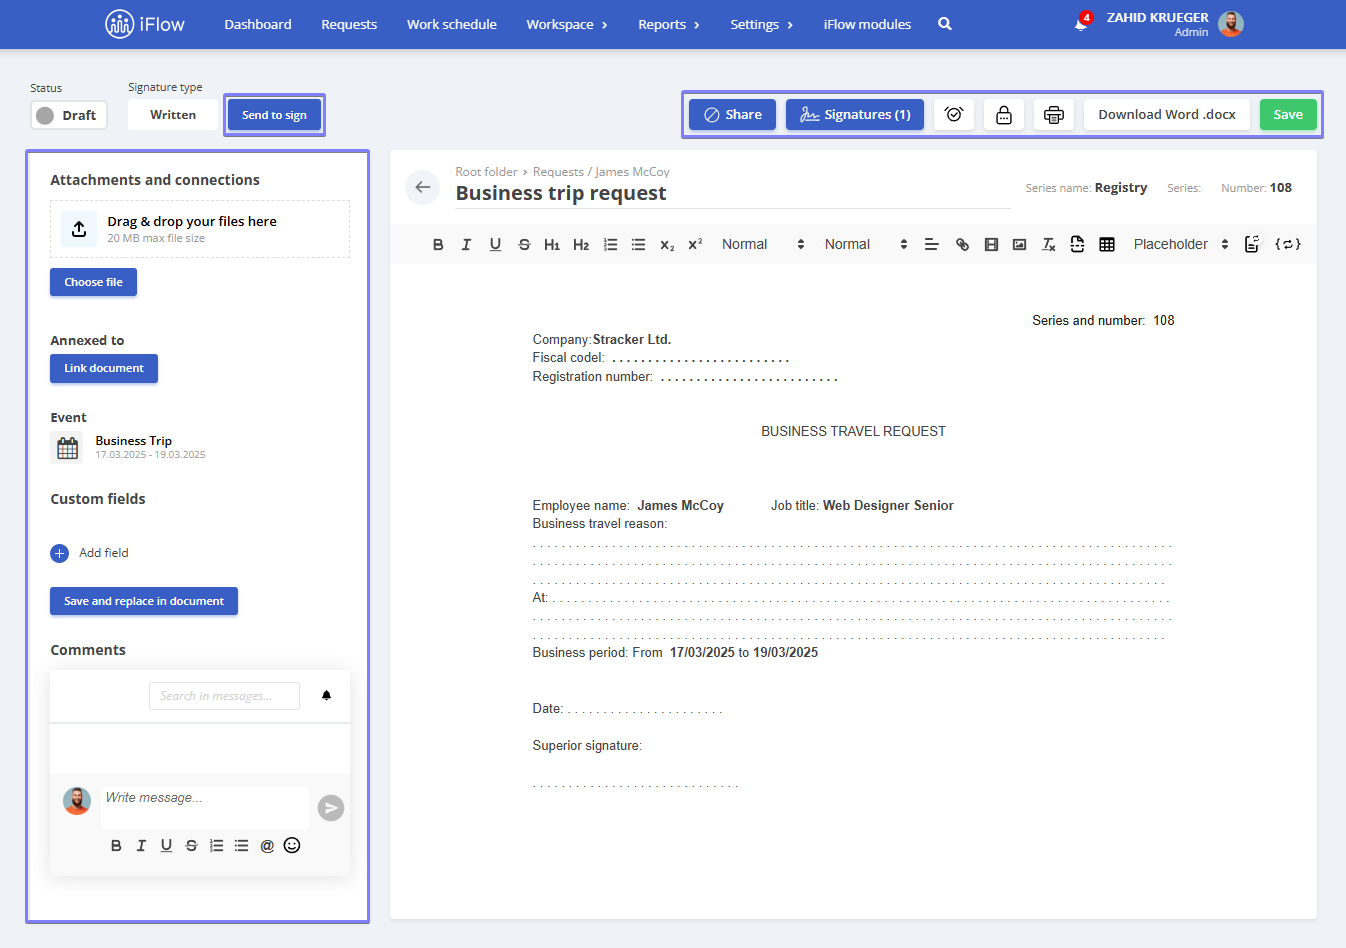
How to Manually Send a Document for Signing
*This feature is available with the Business subscription
After generating a document from the employee profile or an event, you will be redirected to the document preview page. In this section, you can perform the following actions related to the document:
- Edit
- Download as a Word file (.docx)
- Attach reference files
- Link the document to other documents in the application
- Add a comment
- Set a reminder
- Edit signatures
- Send for signing
- Save the file
Click the Send to signing button, and the employee for whom the document was generated will be notified within the application.
How to automatically send a document for signing
From the Settings menu, go to Documents – Document Templates. In the Send to sign automatically column, check the box to automatically send the document for signing when it is generated.
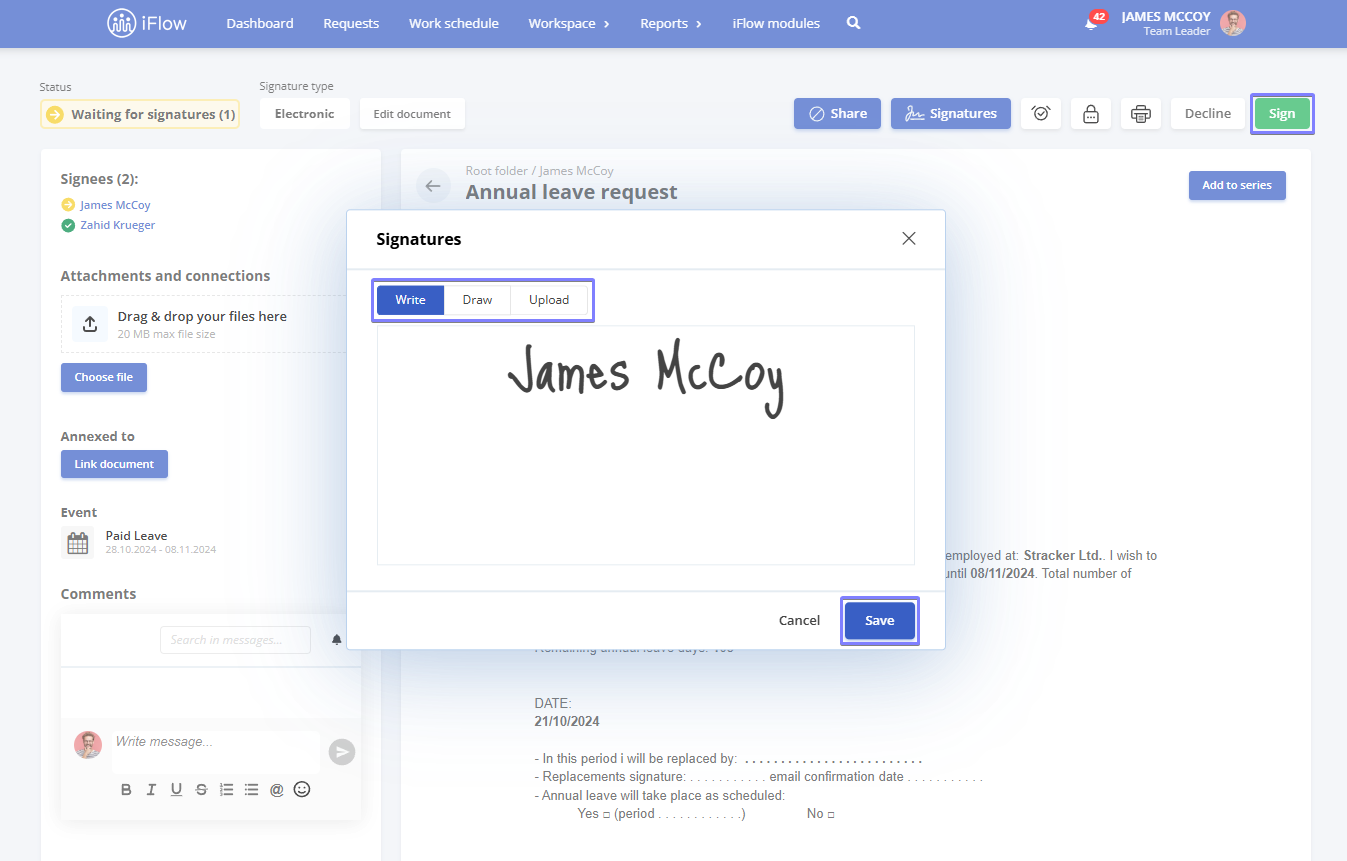
How to sign a document in iFlow
*This feature is available with the Business subscription
After you receive a notification that a document needs your signature, click on the document. At the top of the page, you will find the Sign button.
You have three options for signing the document:
- Write: Your full name will be inserted in the designated signature field.
- Draw: You can draw your signature directly in the application.
- Upload: You can upload your electronic signature and use it to sign documents within the application.
If you selected the written signature option for the document, you can mark it as signed in the application after it has been physically signed.
Open the document and click the Confirm as Signed button.
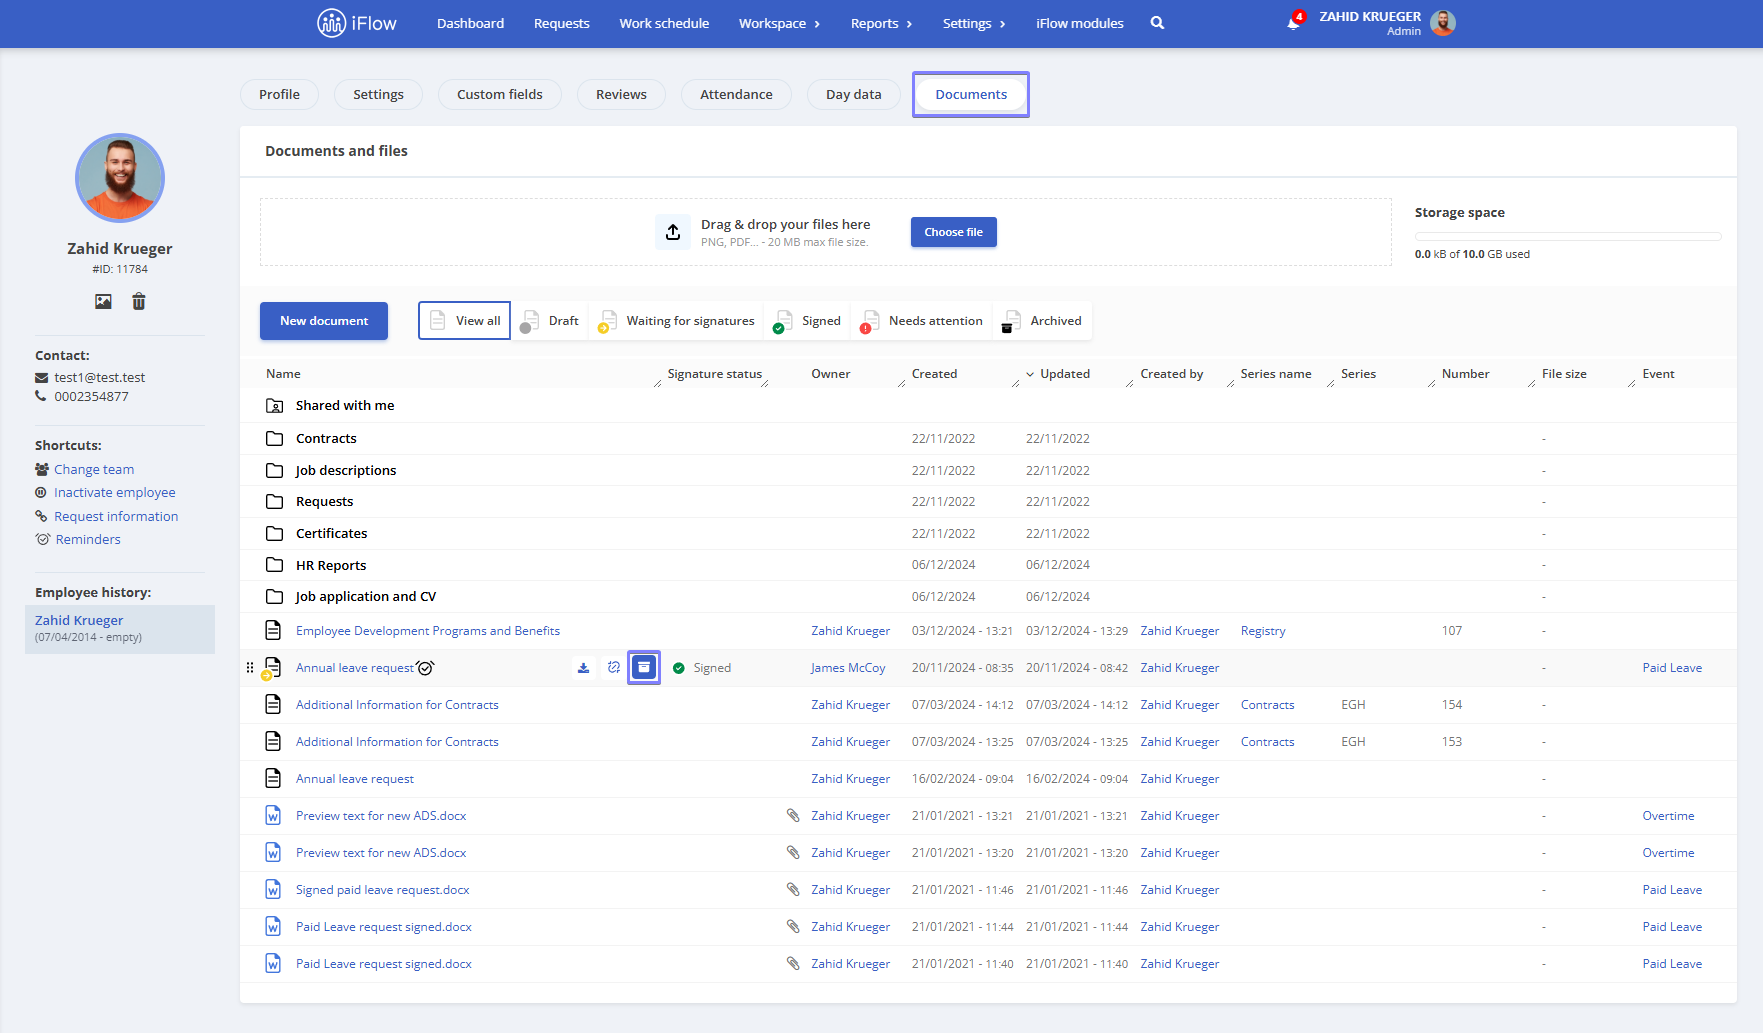
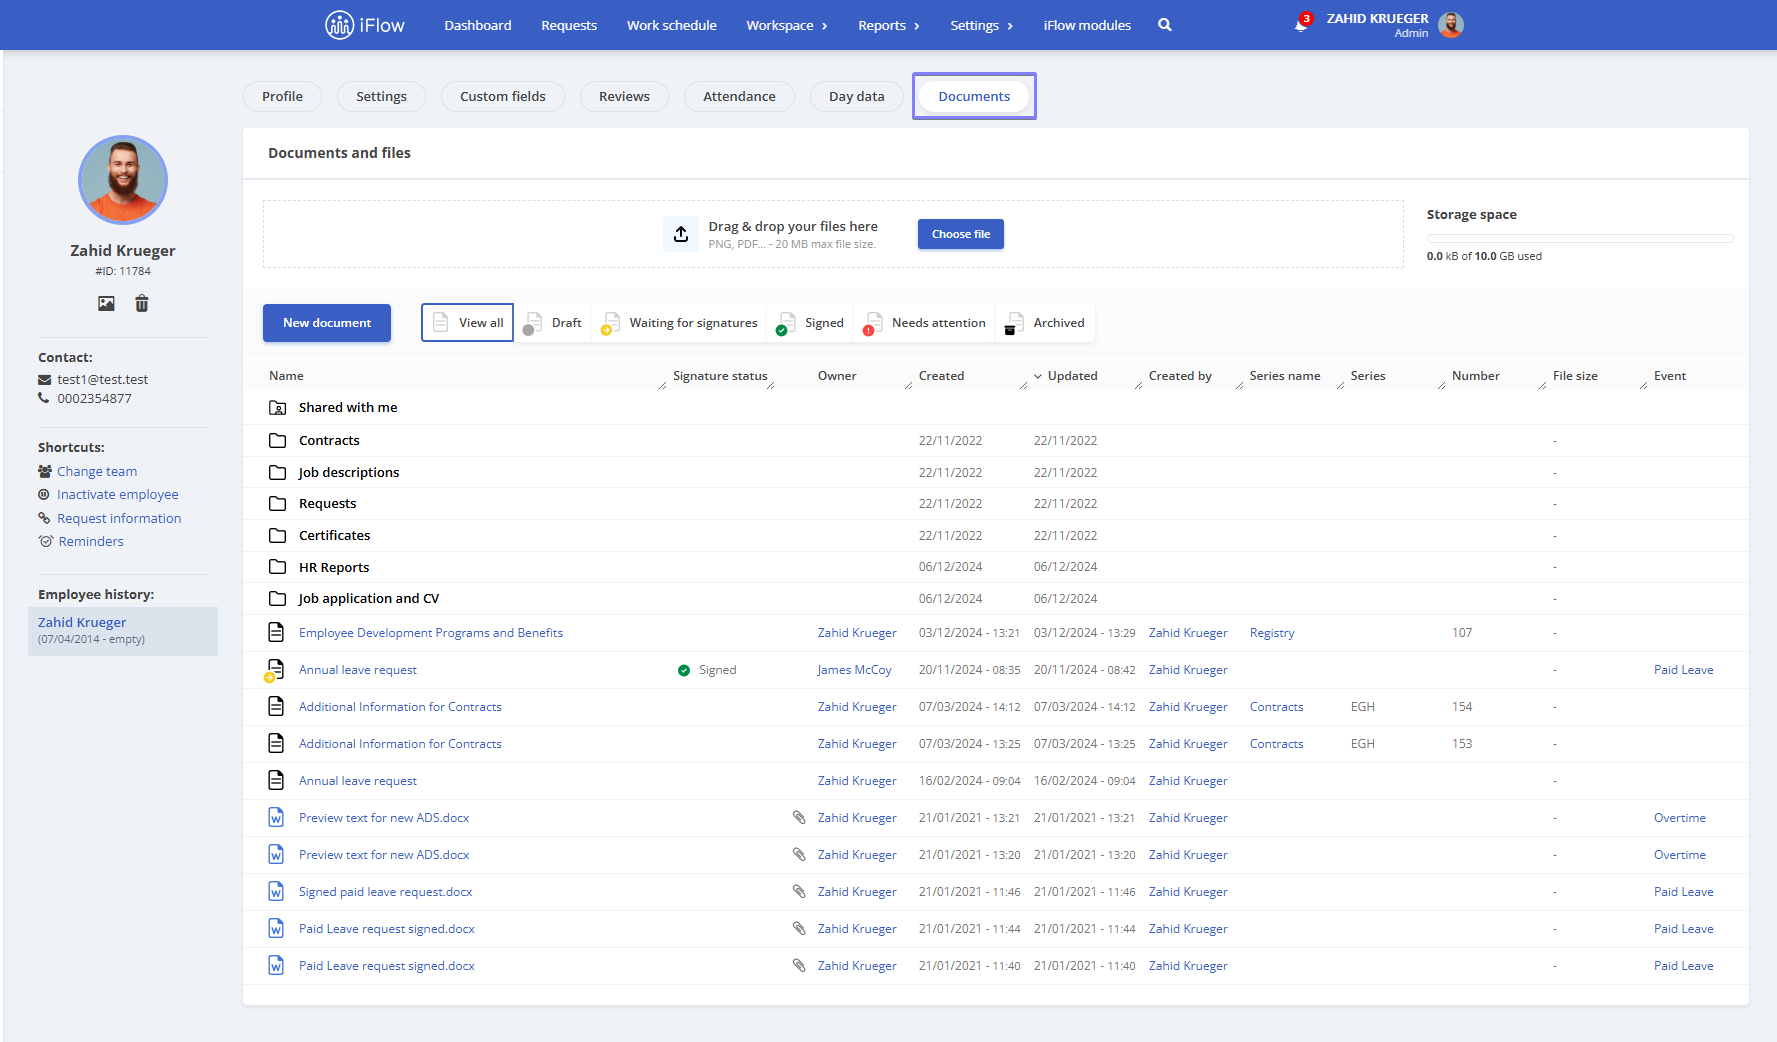
How to track the status of documents
The status of documents is displayed in the employee’s profile, under the following categories:
- View All: Displays all documents for that employee
- Draft: Documents that have not been finalized
- Waiting for Signatures: Documents that have not yet been signed
- Signed: Documents that have been signed
- Needs Attention: Documents that the employee has refused to sign
- Archive: Archived files
Additionally, in the same section, documents are organized into folders such as:
- Contracts
- Job Descriptions
- Requests
- Certificates
To add new folders, go to Settings – Documents – Document Folders. Here you can Add, Edit, or Disable, Delete the folders you’ve created.
Attention!
Predefined folders in the application cannot be edited or deleted.
How to archive a document
- Go to the employee’s profile – Documents
- On the left side of the document, click the Archive button