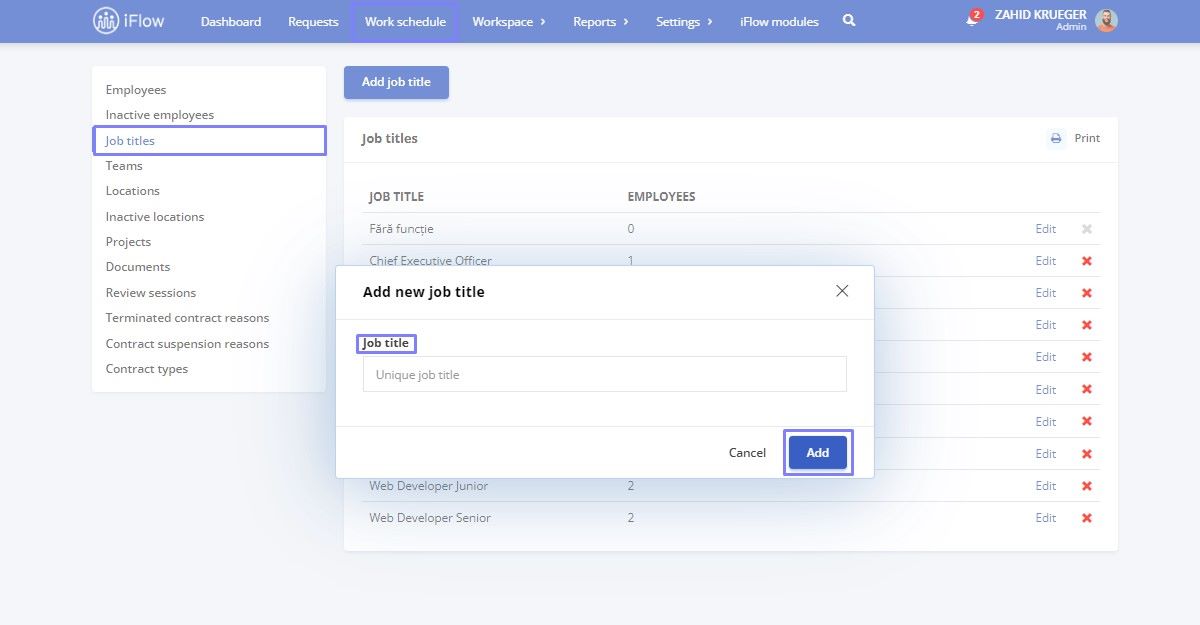
How to Add new Positions
- From the Workspace menu – go to the Job Titles section
- Click on Add job title
- Enter the Job title
- Click on Add
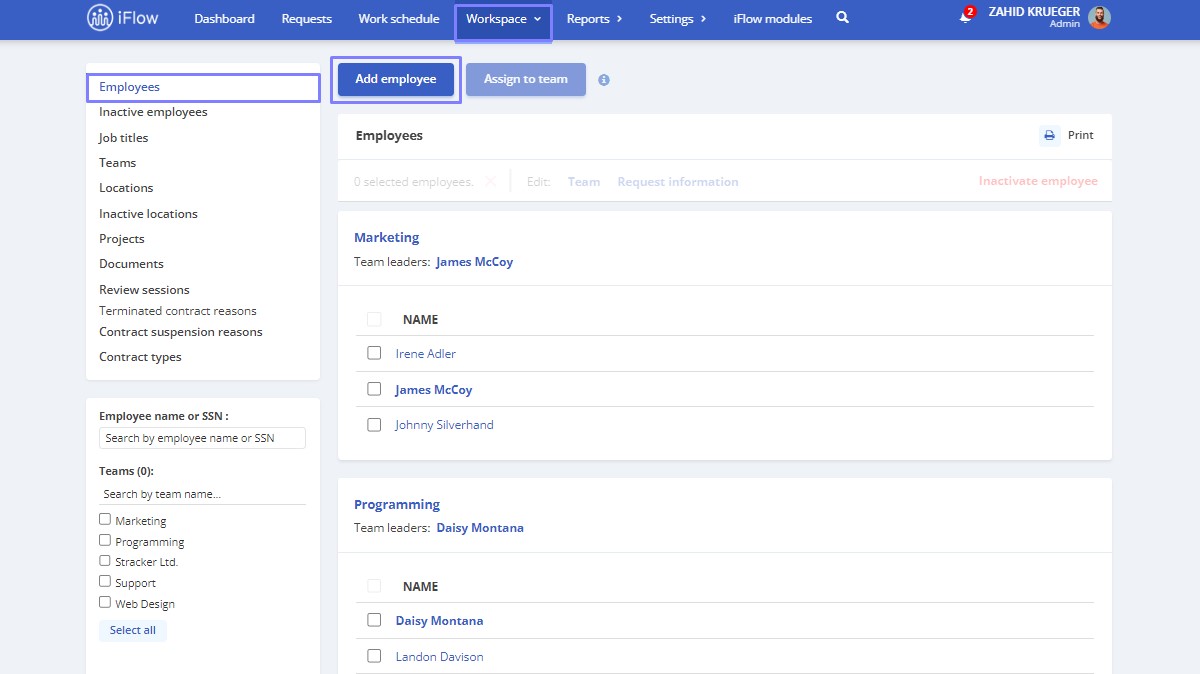
How to Add new Employees
- From the Workspace menu, go to the Employees section
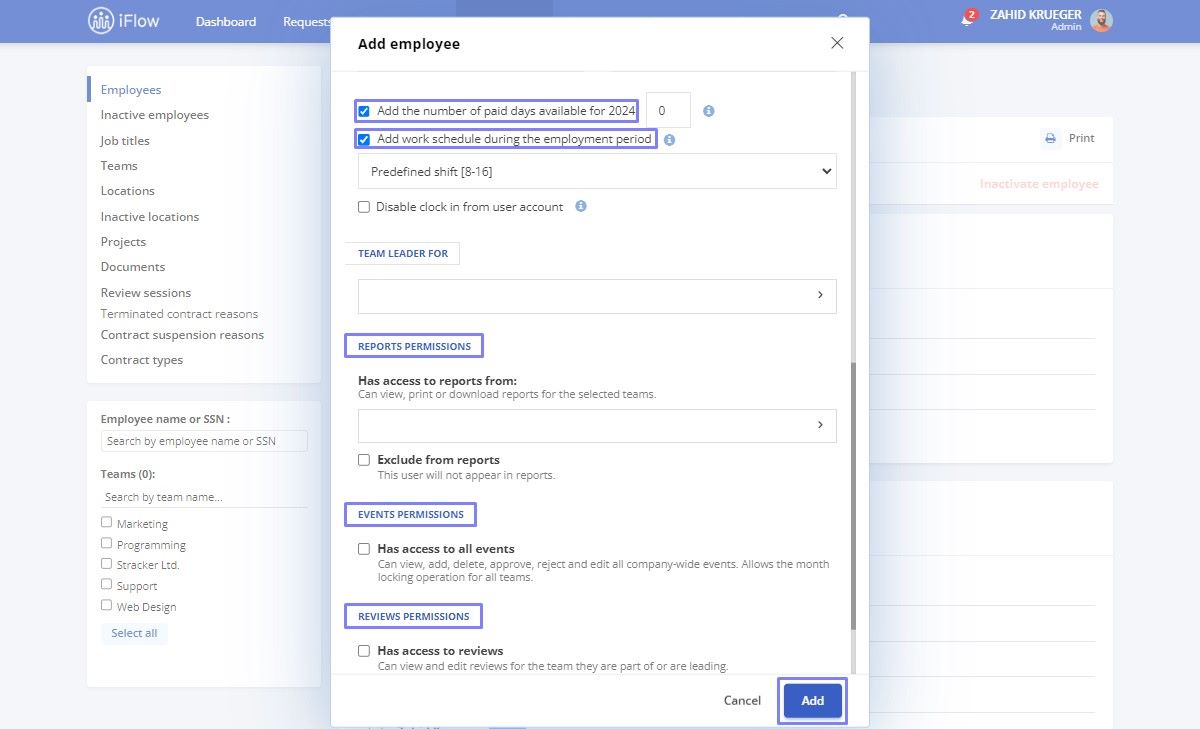
- Click on the Add Employee button
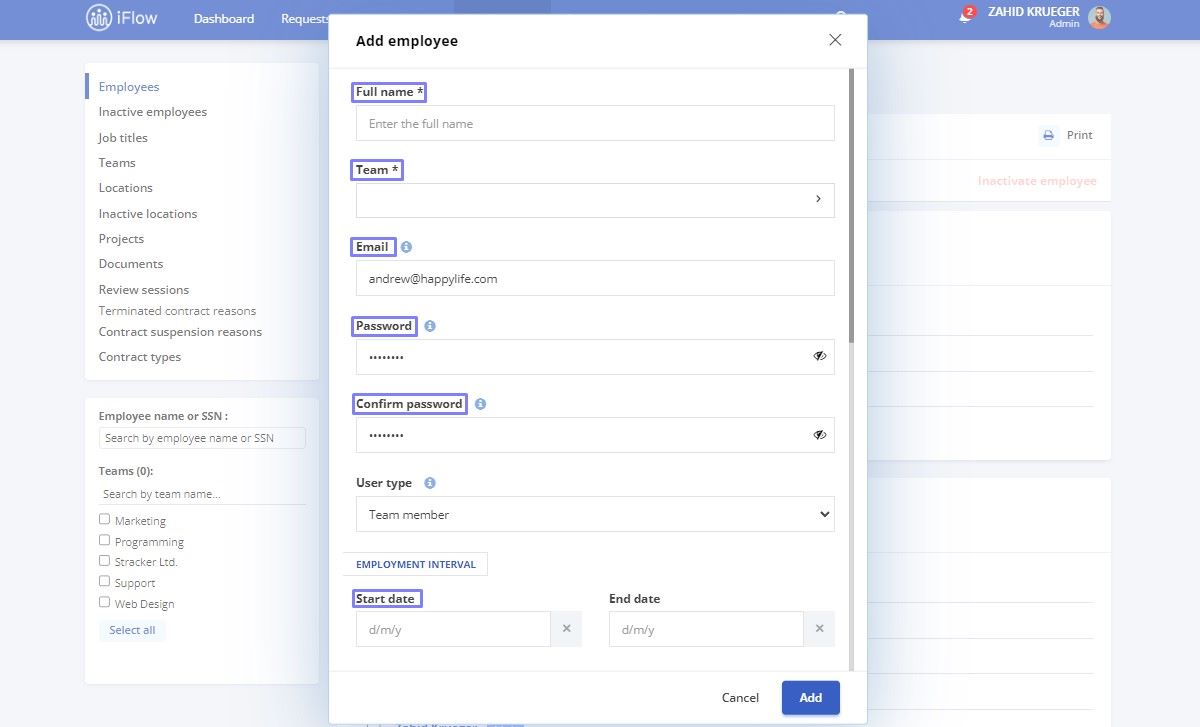
- Enter the employee’s Full Name
- Select the Team/Department to which they belong
- Fill in their Email address and Password (if you want the employee to have access to the application). The password must include at least one uppercase letter, one lowercase letter, and one number
- Enter the employment Start Date (the employee will only be visible in the application starting from this date)
- Check the box for Add the number of paid days available for the corresponding year (if you want to edit the number of available days for the current year that will be allocated to this user)
- Check the box for Add work schedule during the employment period (if this employee has a different schedule than the default one, creating that predefined shift is recommended before adding the employee to the application)
- Add Permissions
- Click on the Add button
Updating Employees
There are two ways to update employees in HR iFlow:
- Manual update (ideal for editing the details of a single employee)
- Import file (the best method for updating all employee data simultaneously)
How to update employees using the Import employees File
You can use the import file to add new employees, update existing ones, or simultaneously. The application indicates which users will be updated and which will be added as new users.
The downloaded file already contains all the application data, such as employee names, details, and the team they belong to.
To add new employees, simply add them to the downloaded file, continuing from the existing entries.
To update existing employees, modify the existing data or fill in any blank fields in the file.
Important!
Ensure that you have completed the Social Security numbers for existing employees. This information must be present in both the application and the update file. Otherwise, the system may duplicate users.
To accomplish this, follow the steps below:
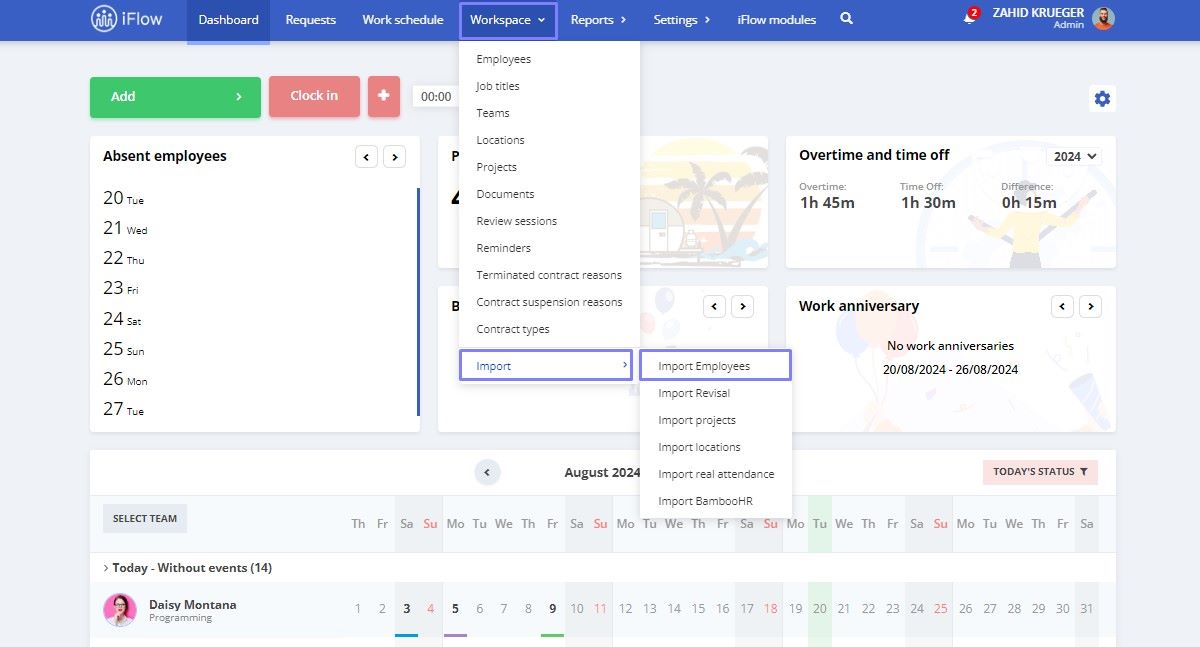
- Go to the Workspace menu, select the Import section, and then Import Employees
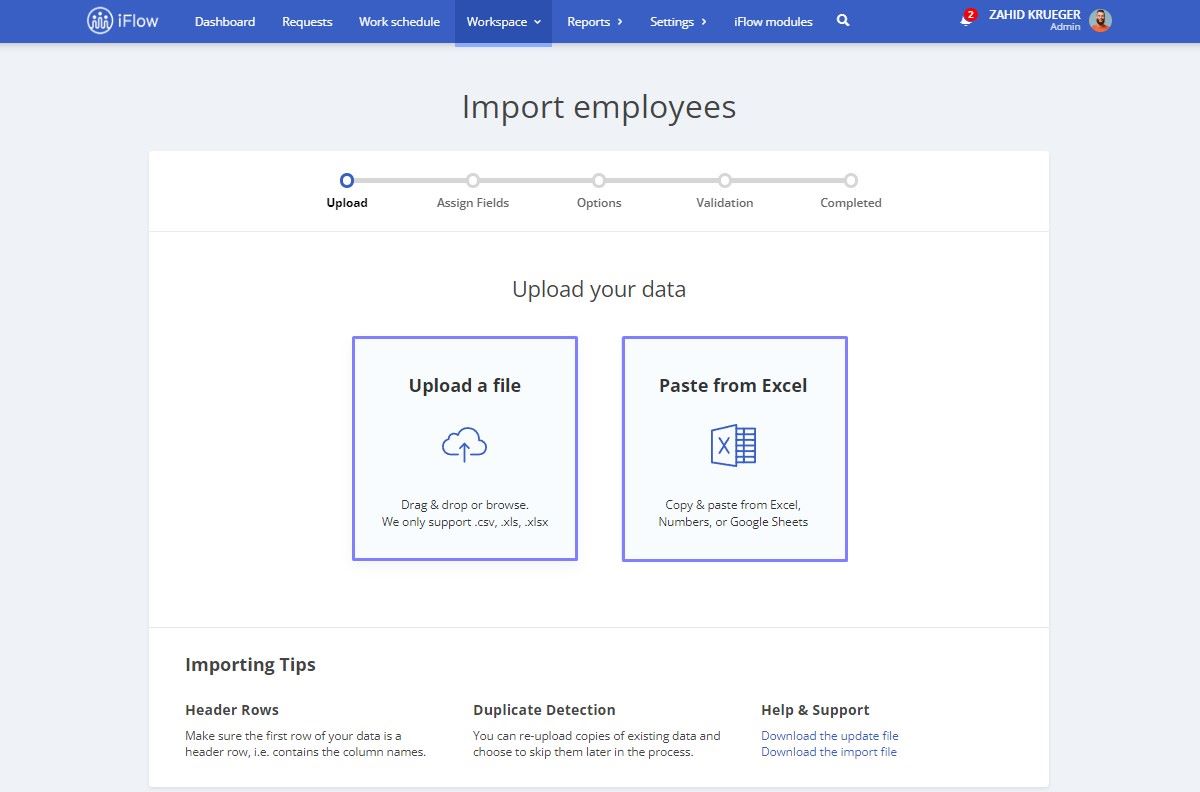
- Click on the Download the update file button
- Add or modify data in the downloaded file
- Once editing is complete, click on Upload a file
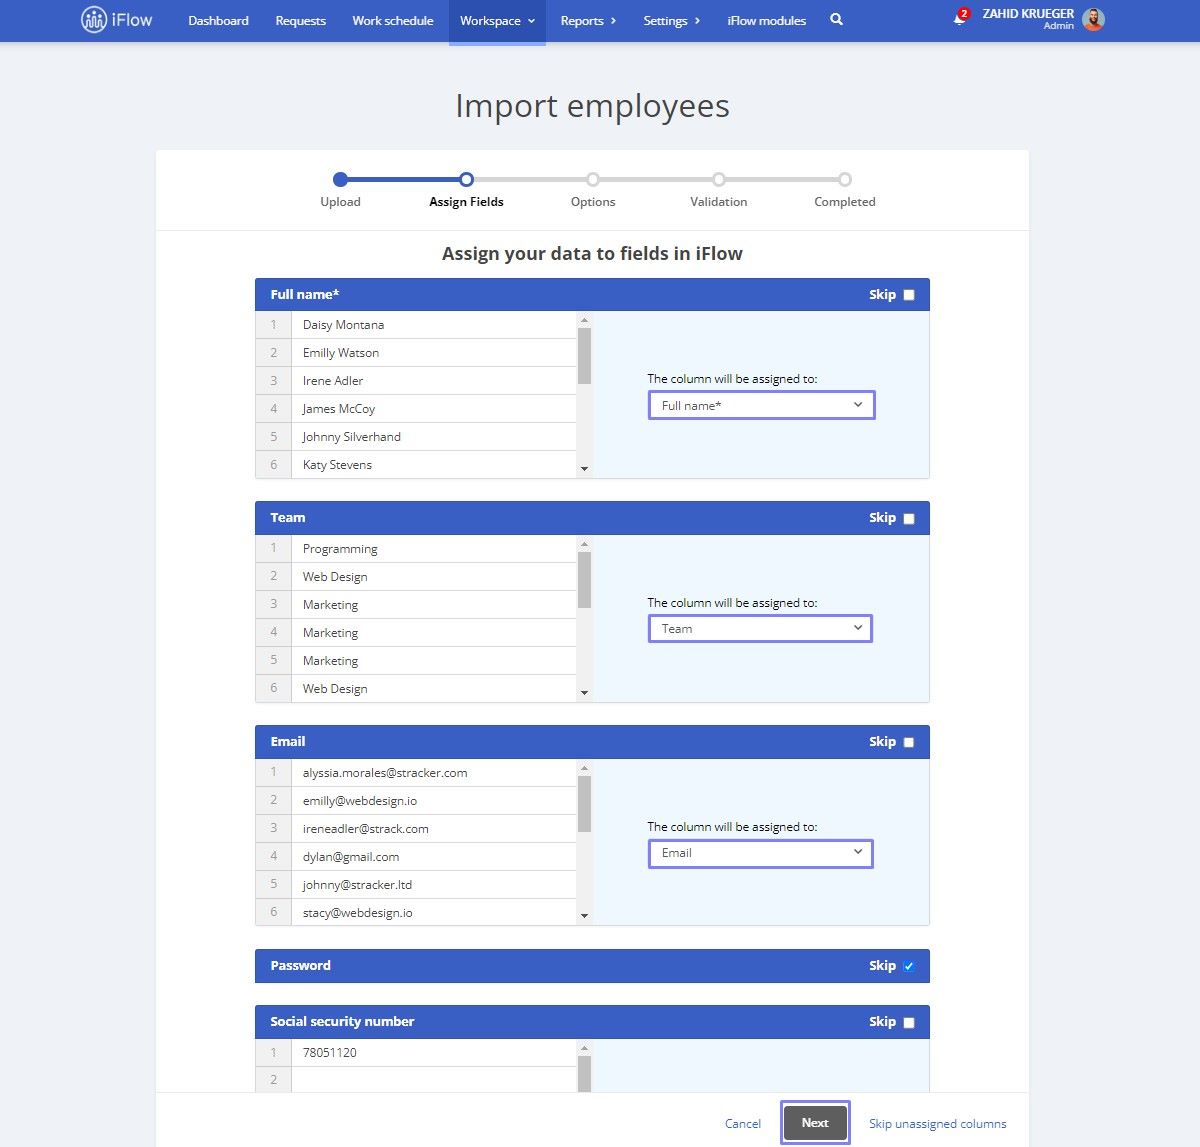
The application will automatically identify most of the data, highlighting correct entries in blue. Entries highlighted in grey usually require your attention to select the correct format. Choose the correct field for the information and select the appropriate format.
- If you want to skip adding or updating specific columns, check Skip or click Skip unallocated columns, then click Next
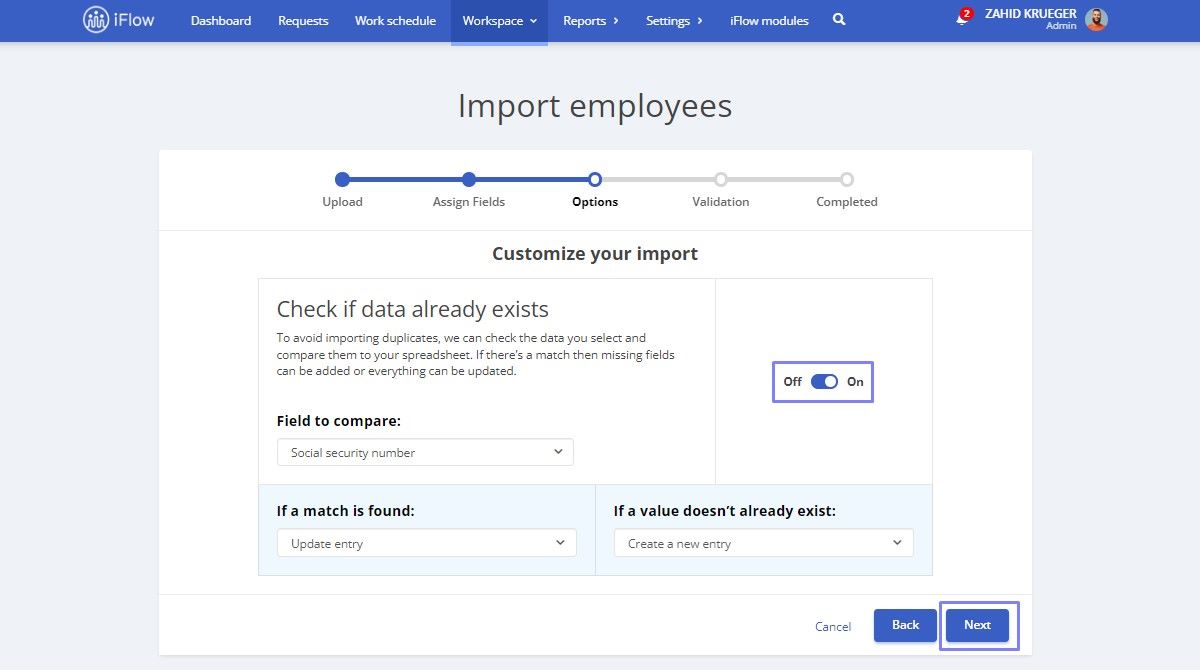
- Choose the field for comparison: Social Security number, Employee ID, Work Contract, etc.
- Then select what should happen if a match is found: Update entry or Skip entry, and what should happen if a value does not exist
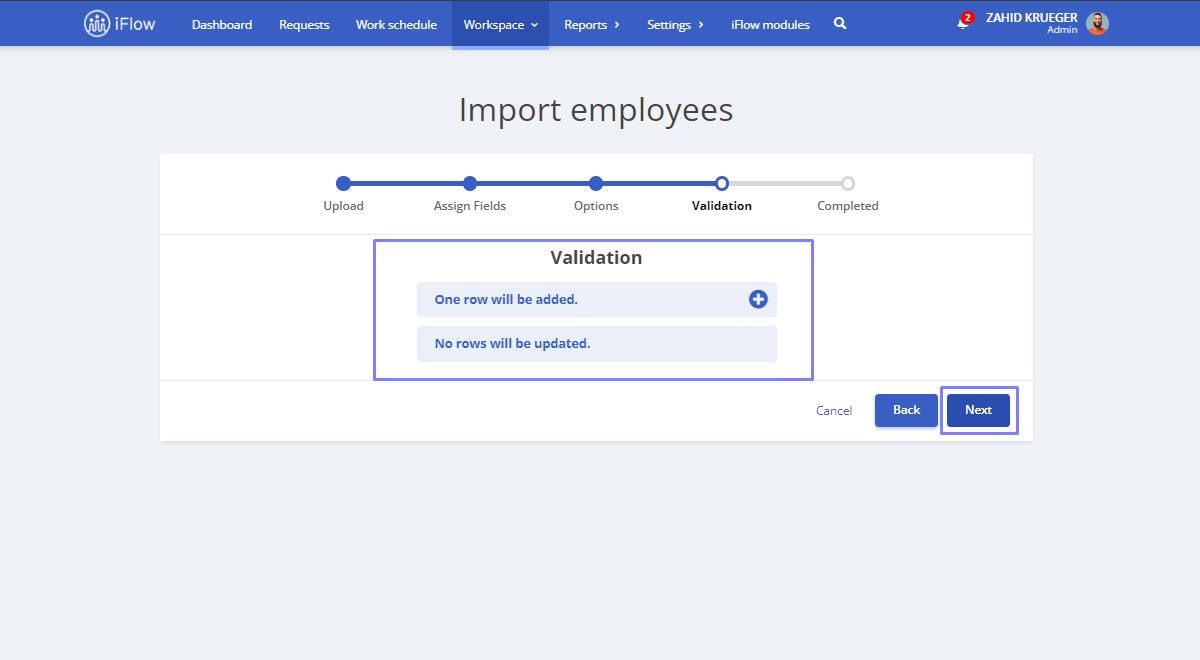
- Validation: You can review any errors and fix or skip them at this step
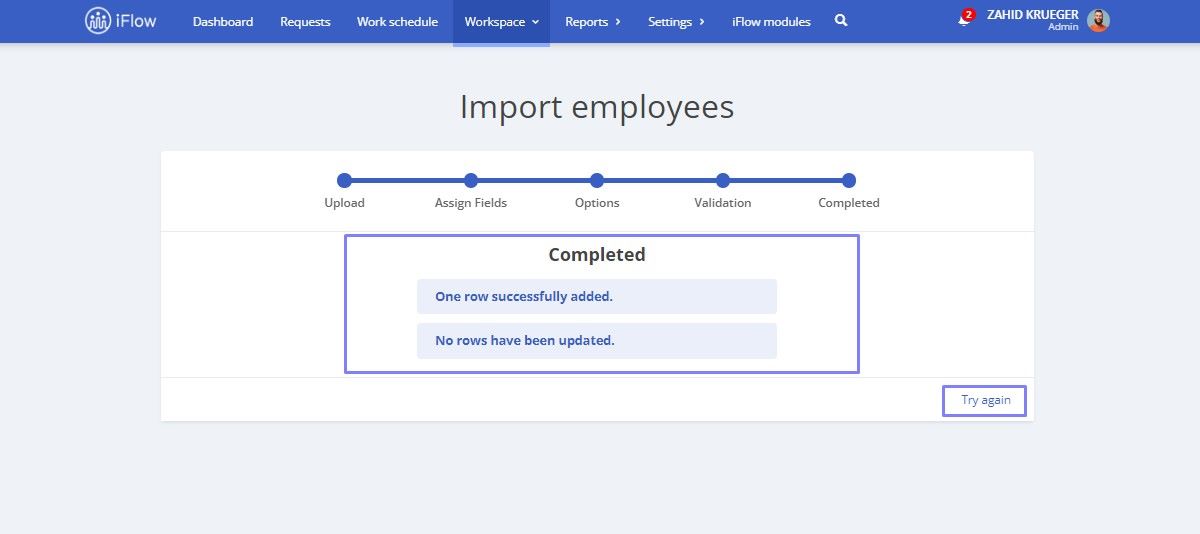
- Finally, you will receive a confirmation with details on which information has been updated, added, or omitted, and you can confirm the update.
Important!
To activate the import functionality and take advantage of all the application’s features, please email us at [email protected].
How to Add an Employee’s Personal Information
Although not mandatory, providing personal information in an employee’s account offers certain advantages. This information allows the automatic completion of documents generated in the application, such as leave requests.
Only the full name, email address, and password are mandatory if you want to grant employees access to the application. The rest of the information is optional. (The password must include at least one uppercase letter, one lowercase letter, and one number.)
The more complete the employee profile, the more benefits you will gain from the application.
Importance of Certain Information:
- Social Security number: These details allow you to make updates through the update file. Without them, the application cannot identify users and may duplicate them
- Employment Period: The application generates accurate reports and performs specific calculations based on this period. If this information needs to be included, the respective employees will appear in the application as having always been with the company
- Work Schedule: The number of hours is essential for calculating the monthly norm and overtime and automatically filling in the correct number of hours for leave
How to Modify Personal Information
You can add or modify personal information in two ways: automatically or manually within the application.
Automatically:
- Via the Update File
Manually:
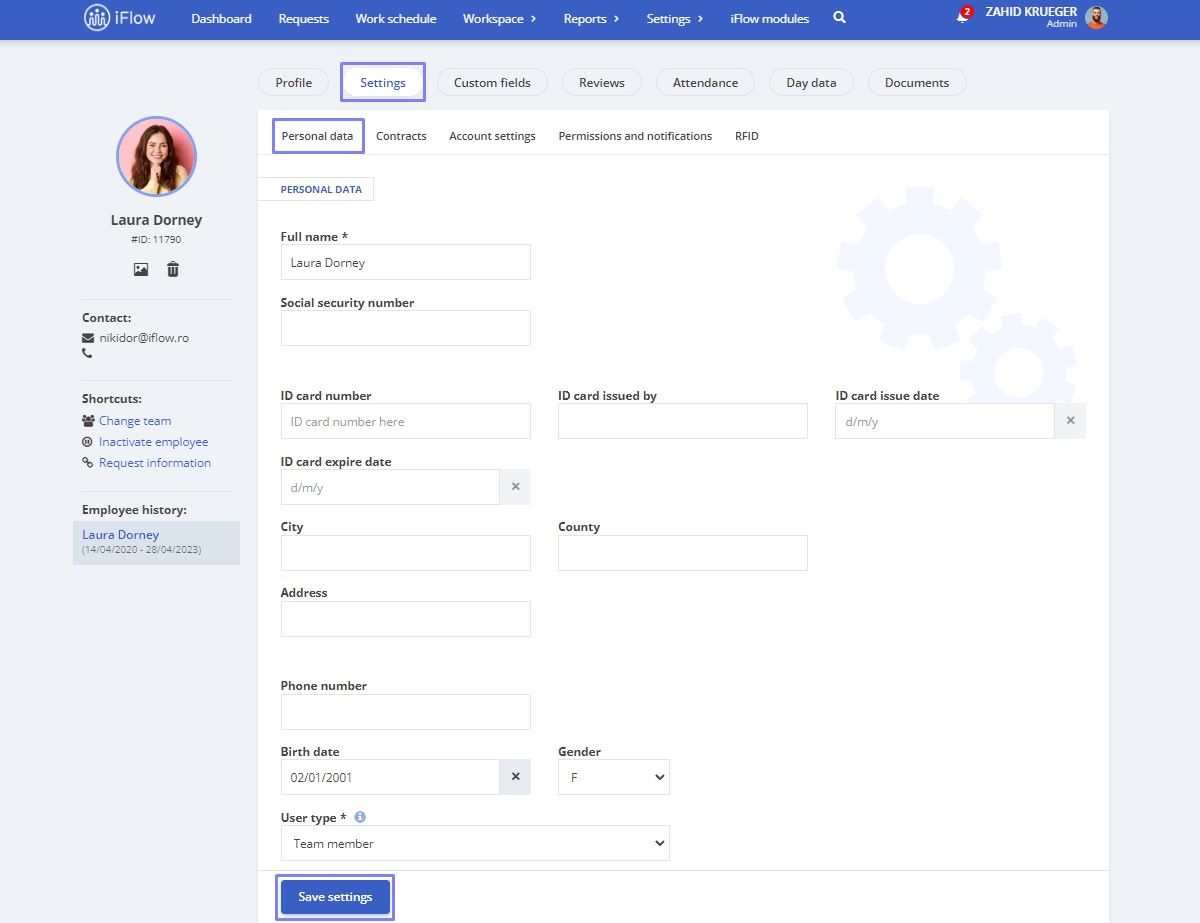
- Navigate to the employee’s profile
- Click on the Settings menu
- Add or modify the necessary information
- Click Save settings
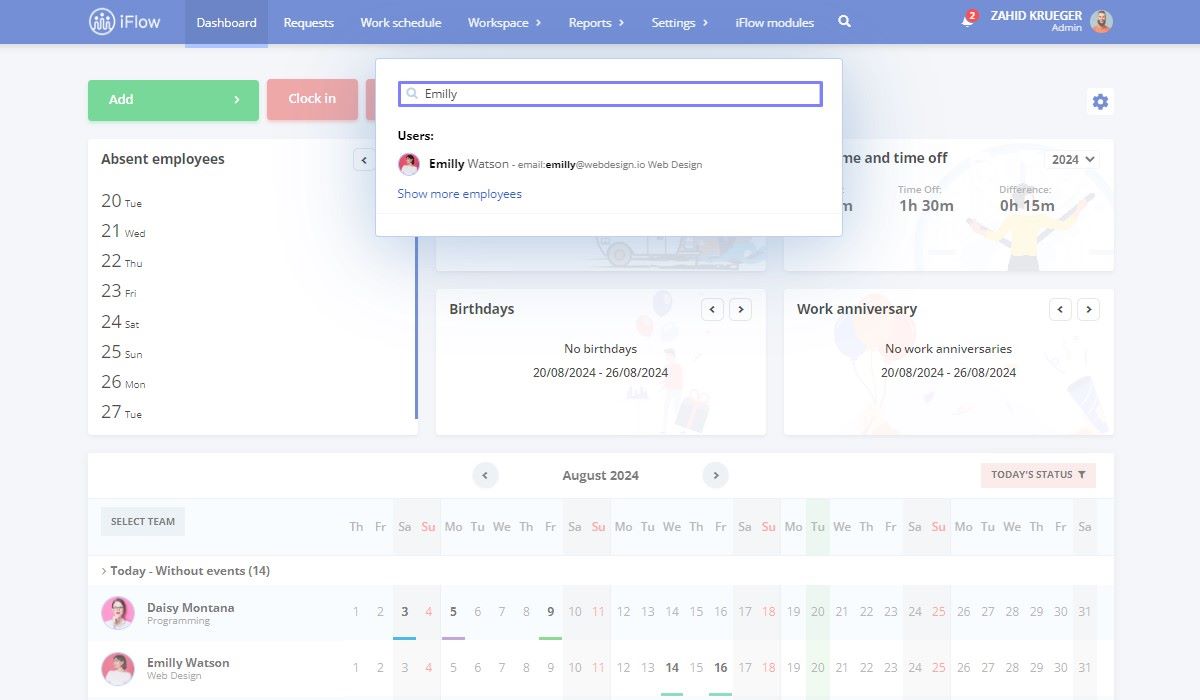
How to Access an Employee’s Profile
You can access an employee’s profile anywhere in the application by clicking their name. Here are the main places from which you can access the profile:
- Search function: use the magnifying glass icon to search for the employee’s name and click on the result
- Panels: Click on their name in the General, Requests, or Reports panels
- Work Schedule: Click on the profile picture bubble in the work schedule
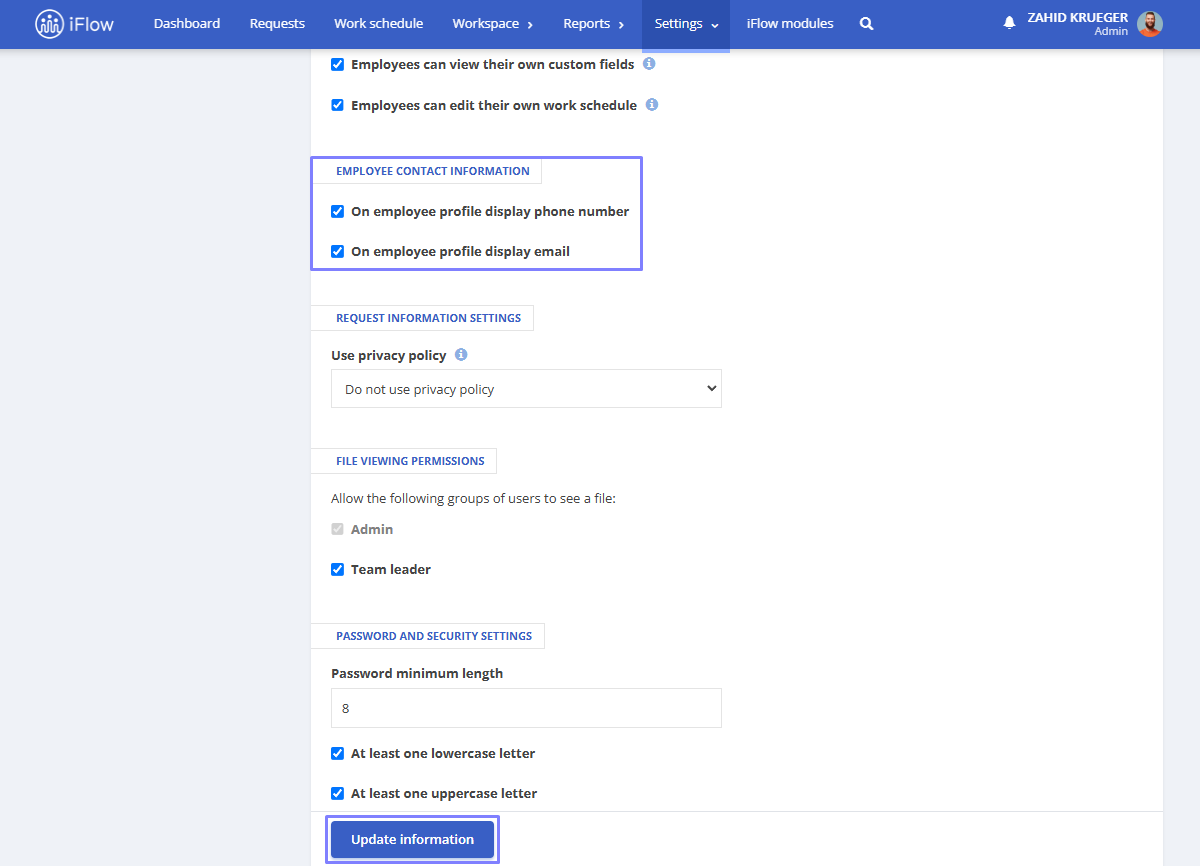
Employee Contact Information
The contact details can be found in each employee’s profile, below the profile picture. To enable them:
- Go to the Settings menu – Company – Company Settings
- Select Employee contact information
- Check On employee profile display phone number and/or On employee profile display email
- Then click Update information
How to Change the User Category
The user categories are:
- Administrator
- Team Member
- Team Leader
How to Define an Administrator
- Go to the user’s profile
- Click on the Settings menu next to the Profile button
- Scroll down and in the User type field, select Administrator
- Then click the Save settings button

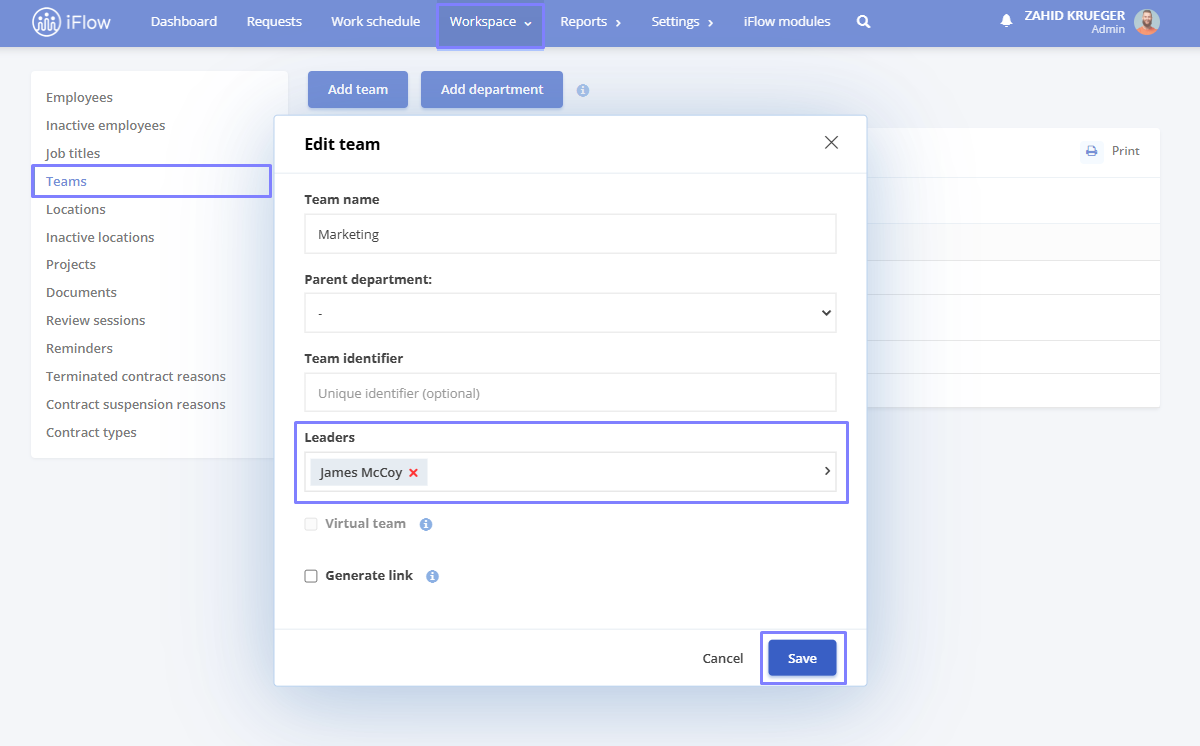
How to Define a Team Leader
- From the Workspace – Teams menu
- Click Edit next to the team for which you want to define the leader
- In the Leaders field, select the desired employee(s)
- Click Save
How to Enable Email Notifications
There are two types of email notifications: those intended for employees (users in the “team member” category) and those for administrators and team leaders.
Notifications for Employees
Each employee or the account administrator can activate these notifications individually. When this option is enabled, the employee will receive email notifications whenever an event added for them is approved or rejected, when they are late to work, or if they have clocked in from the wrong location.
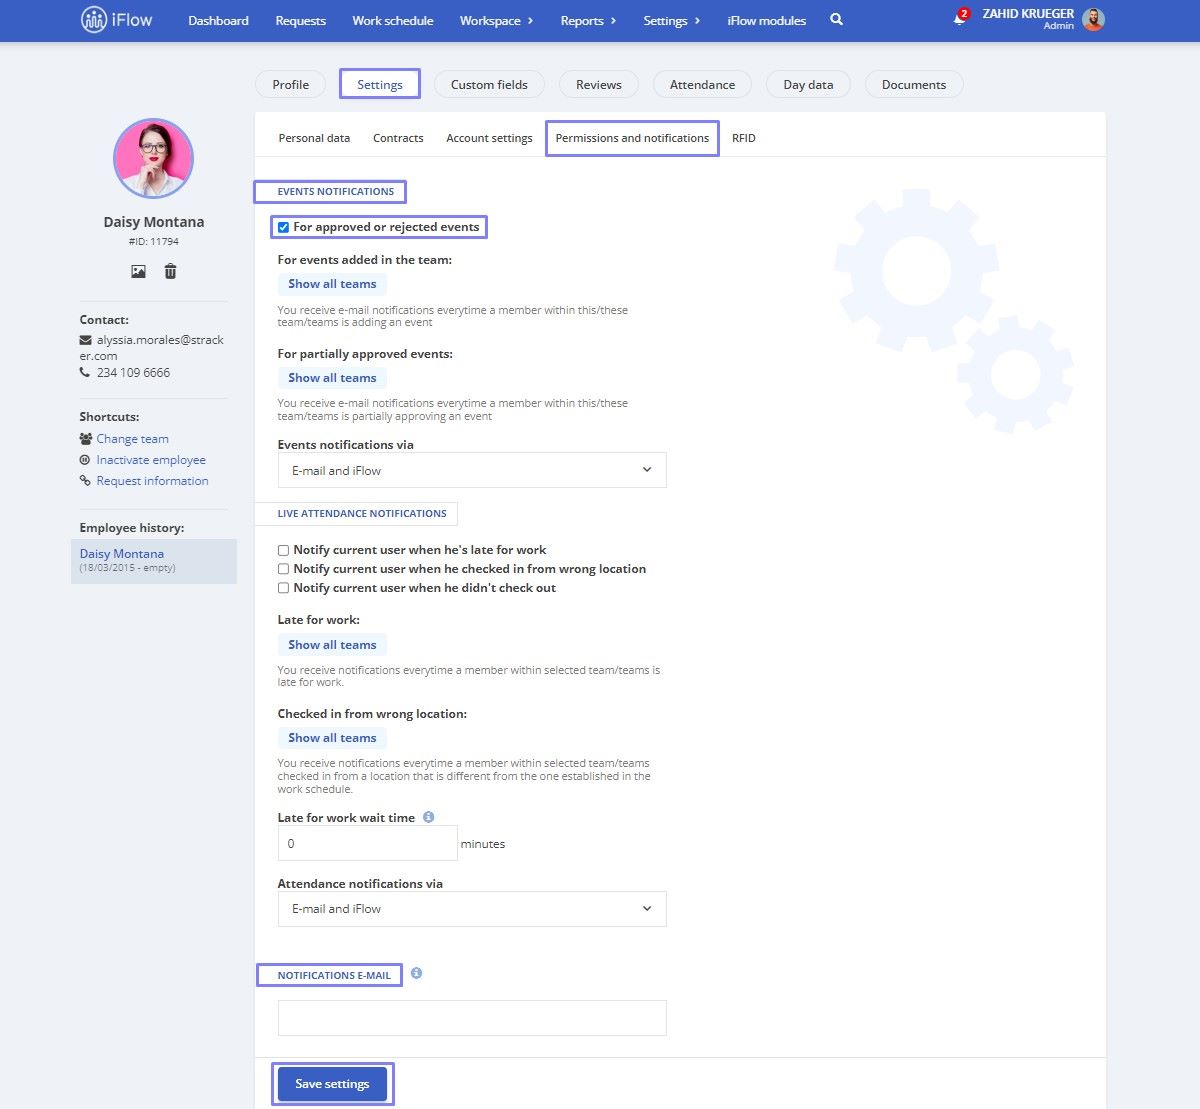
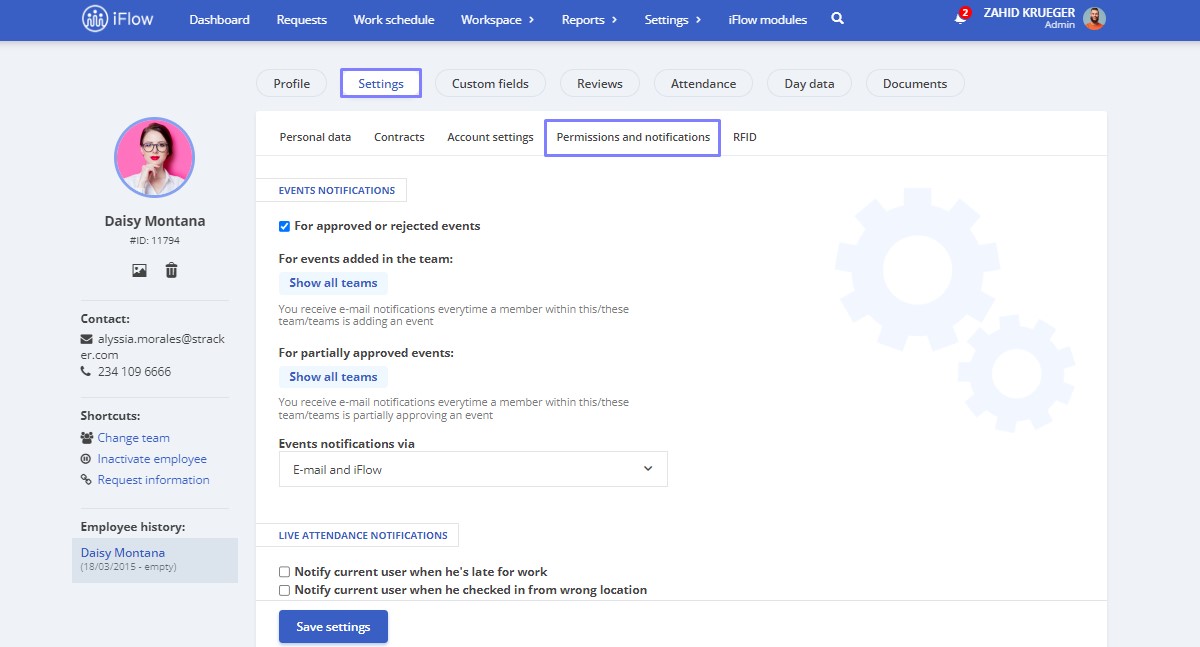
Follow these steps to activate notifications:
- Go to Dashboard
- Click on the Employee name for whom you want to enable notifications
- Click on the Settings submenu
- Click on Permissions and notification
- Check the box for Approved or rejected events
- Add the email address for attendance notifications
- Click Save settings
Important!
The employee must have a valid email address registered in the application to enable email notifications.
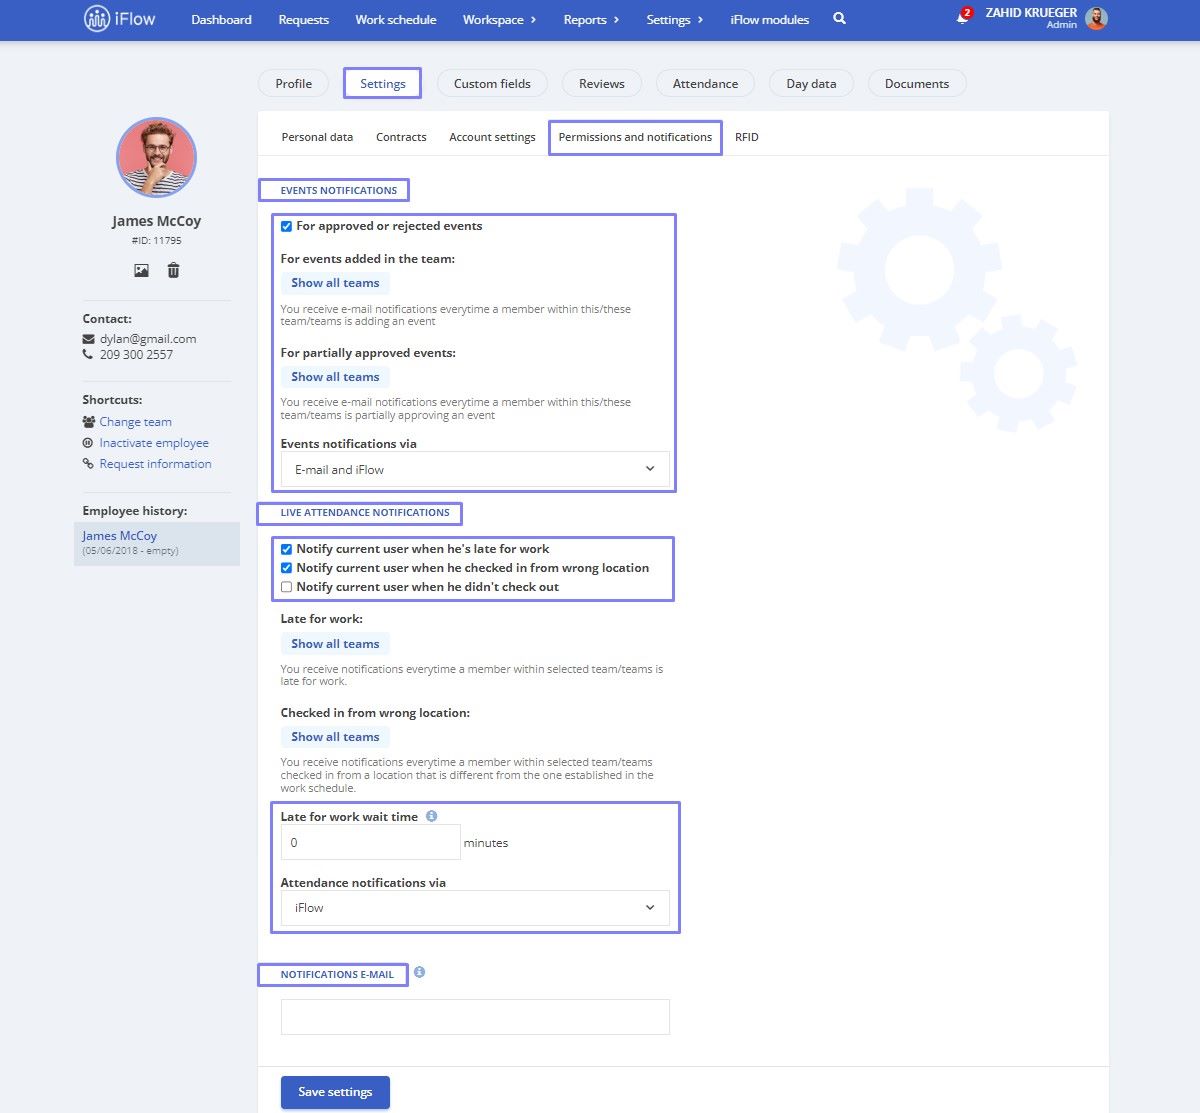
Notifications for the Administrator
For admin users, notifications can be enabled by themselves, another administrator, or the team leader.
The administrator can enable the following types of email notifications:
- Receive notifications when their event is approved or rejected
- Get notified whenever an employee adds an event
- Receive alerts for late arrivals or clock-ins from the wrong location
- Get notified when they arrive late for work
- Receive notifications when an employee clocks in from the wrong location
- Get notified when they clock in from the wrong location
Follow these steps to enable notifications:
- From Dashboard
- Click on your name
- Select the Settings submenu
- Go to Permissions and notification
- Check the box For approved or rejected events
- Check the box next to the relevant team(s) to receive notifications For events added in the team whenever an employee adds an event
- Check the box next to the relevant team(s) to receive notifications For partially approved events in the team
- Check the box to Notify current user when he’s late for work
- Check the box to Notify current user when he checked from the wrong location
- Set the Late for work wait time
- Choose whether to receive Attendance notifications via the app, email, or both
- Enter your email address to receive notifications
Important!
The administrator can select all teams within the company.
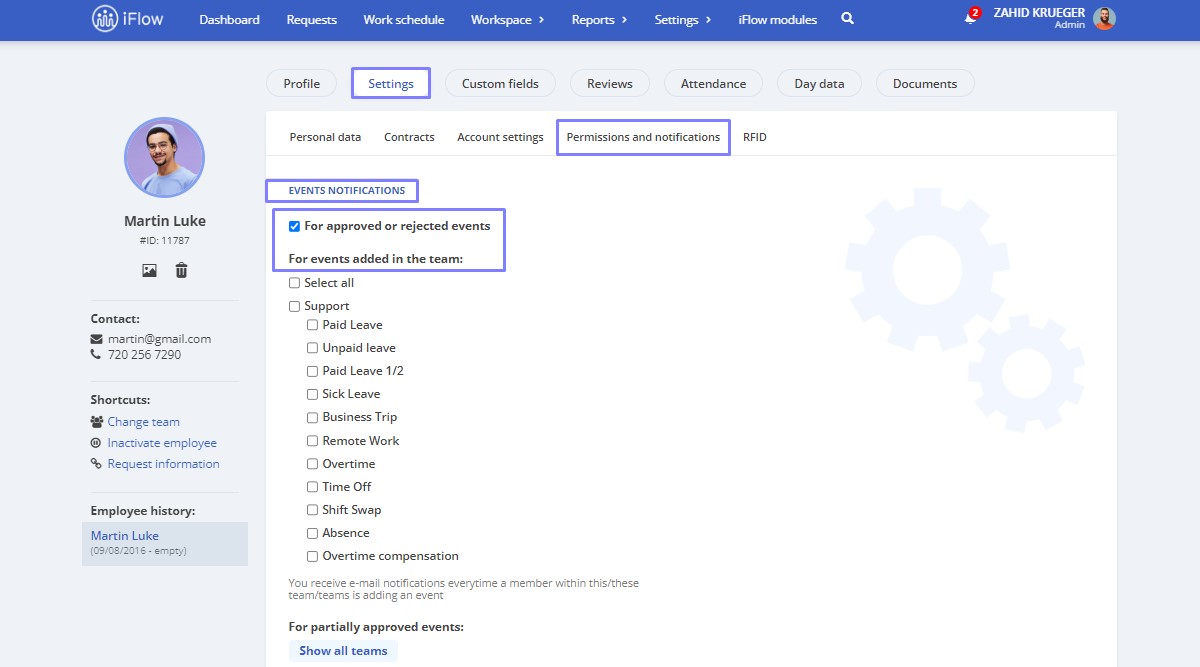
Notifications for Team Leaders
For the team leader user category, notifications can be activated by themselves, the team leader of their team, or by administrators.
The team leader can enable the following types of notifications:
- Receive notifications whenever an event they added is approved or rejected
- Get notified whenever an employee adds an event
- Receive alerts when an employee is late for work
- Get notified when an employee clocks in from the wrong location
Follow these steps to enable notifications:
- From the employee profile
- Click on the Settings menu
- Click on Permissions and notifications
- Check the box For approved or rejected events
- Check the box next to the relevant team(s) to receive notifications For events added to the team whenever an employee who is a member of the team adds an event
Important!
The team leader can select only the team(s) they manage.
How to Delete/Deactivate Employees in the HR iFlow
Whether you have employees whose contracts have expired or employees added for testing purposes, you can delete or deactivate them.
There are three methods for handling employees:
- Deactivate Employees from Their Profile
- Suspend an Employment Contract
- Permanently Delete a User
The difference between these options is that deactivating an employee preserves their past data, while permanently deleting a user removes them and all their data, with no option for recovery. If you deactivate an employee, you can reactivate them whenever necessary.
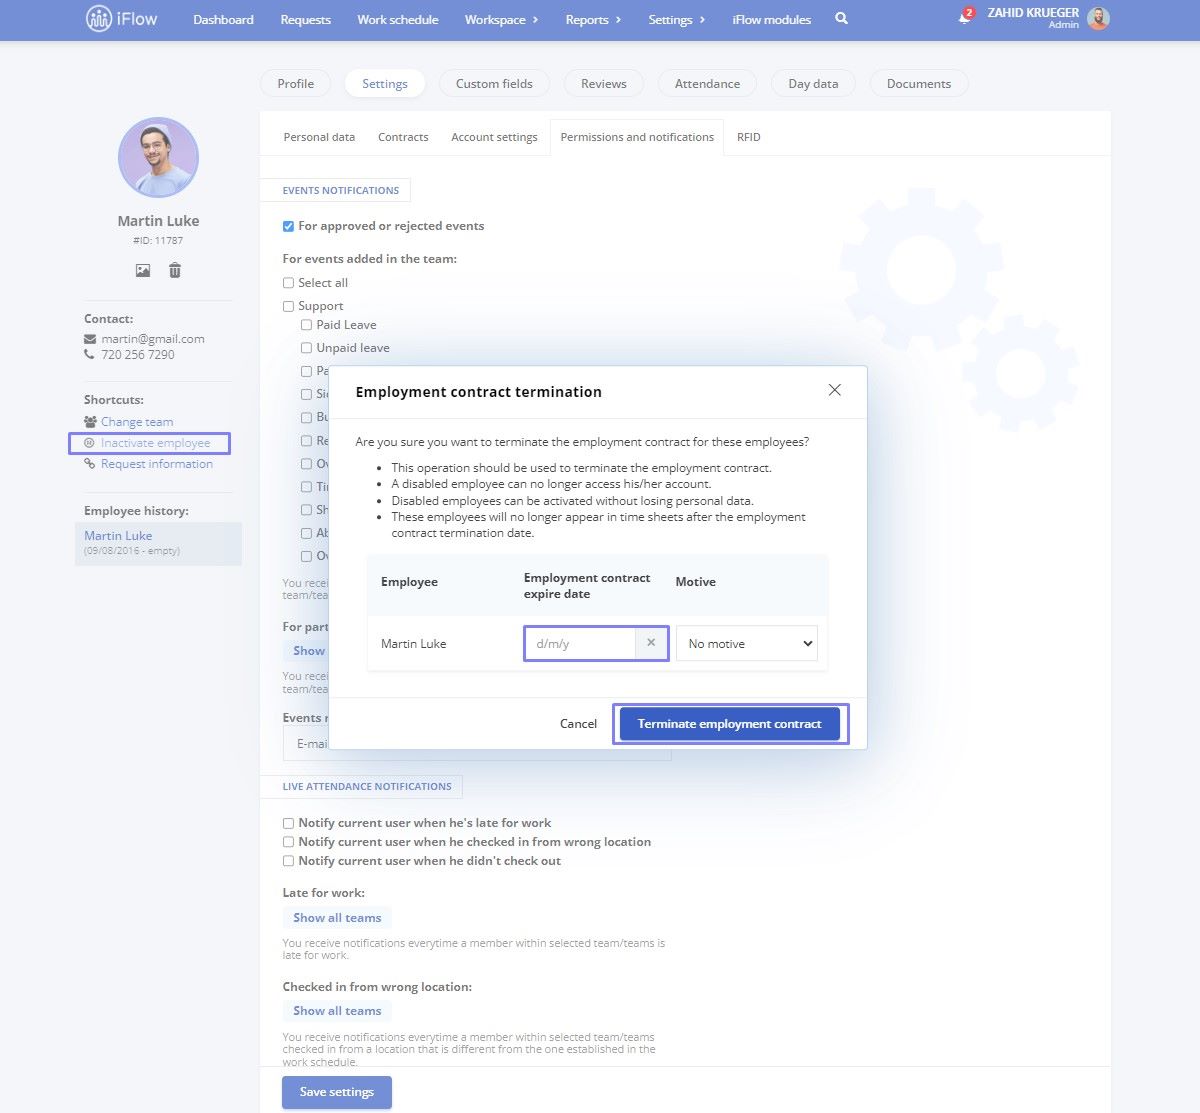
How to Inactivate an Employee from their Profile
- Click on the employee’s profile
- Click Inactivate employee
- Enter the Contract expire date (only if the contract has not expired)
- Click the Terminate employment contract button
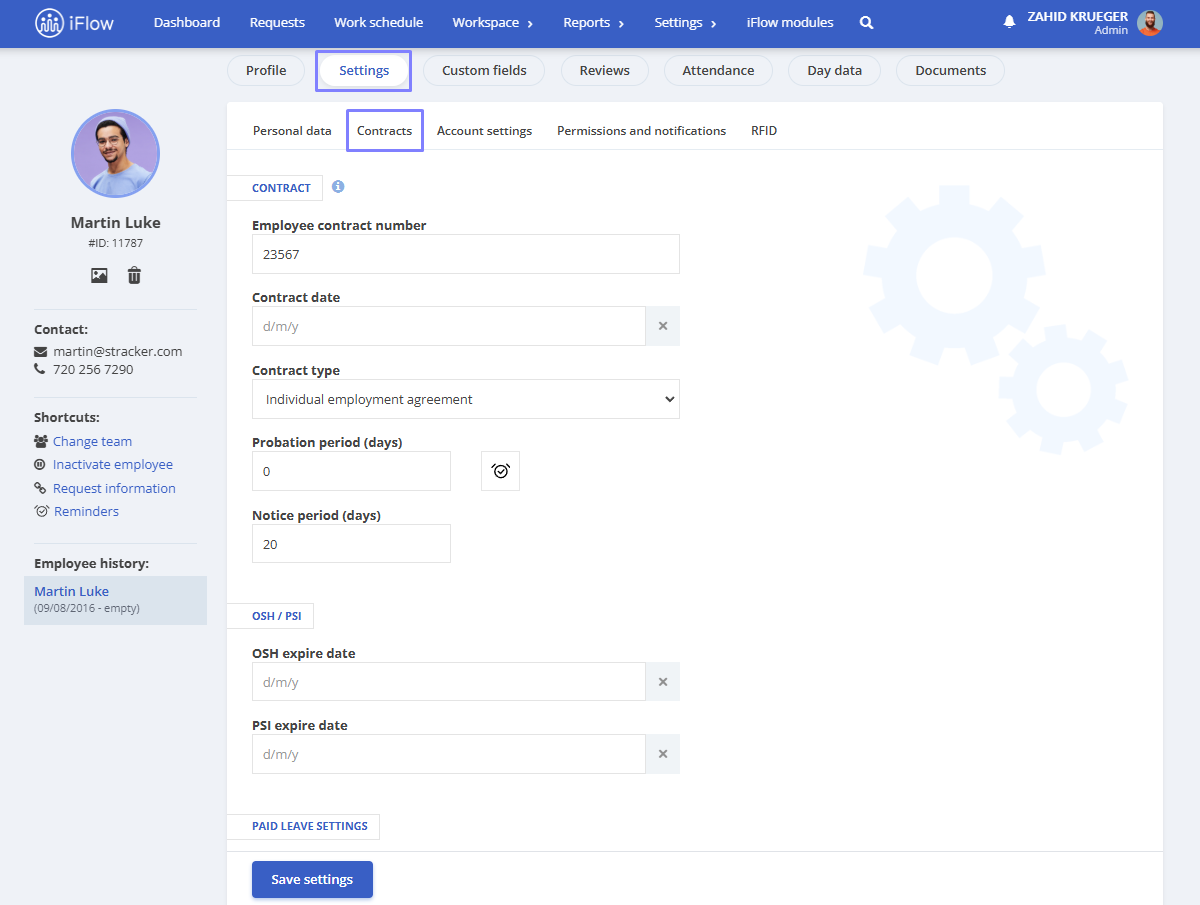
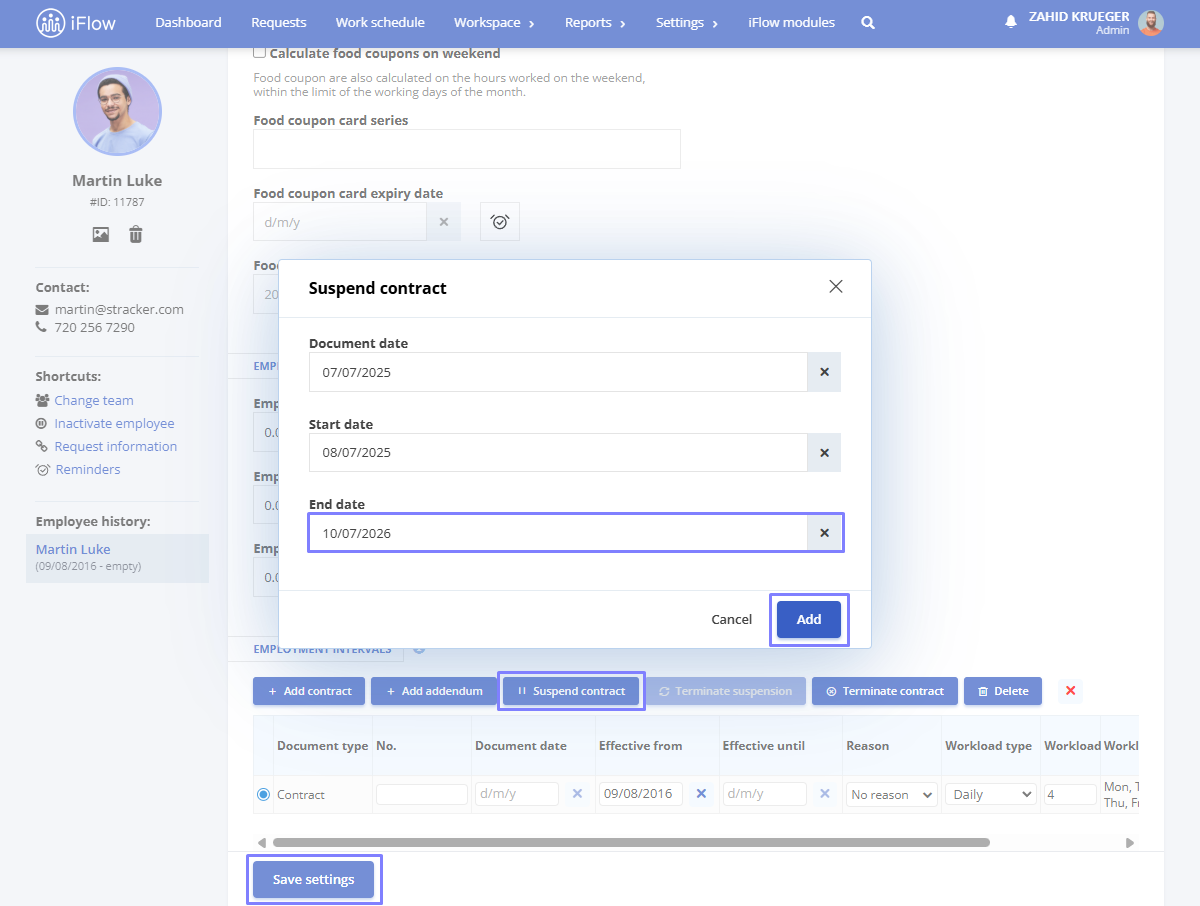
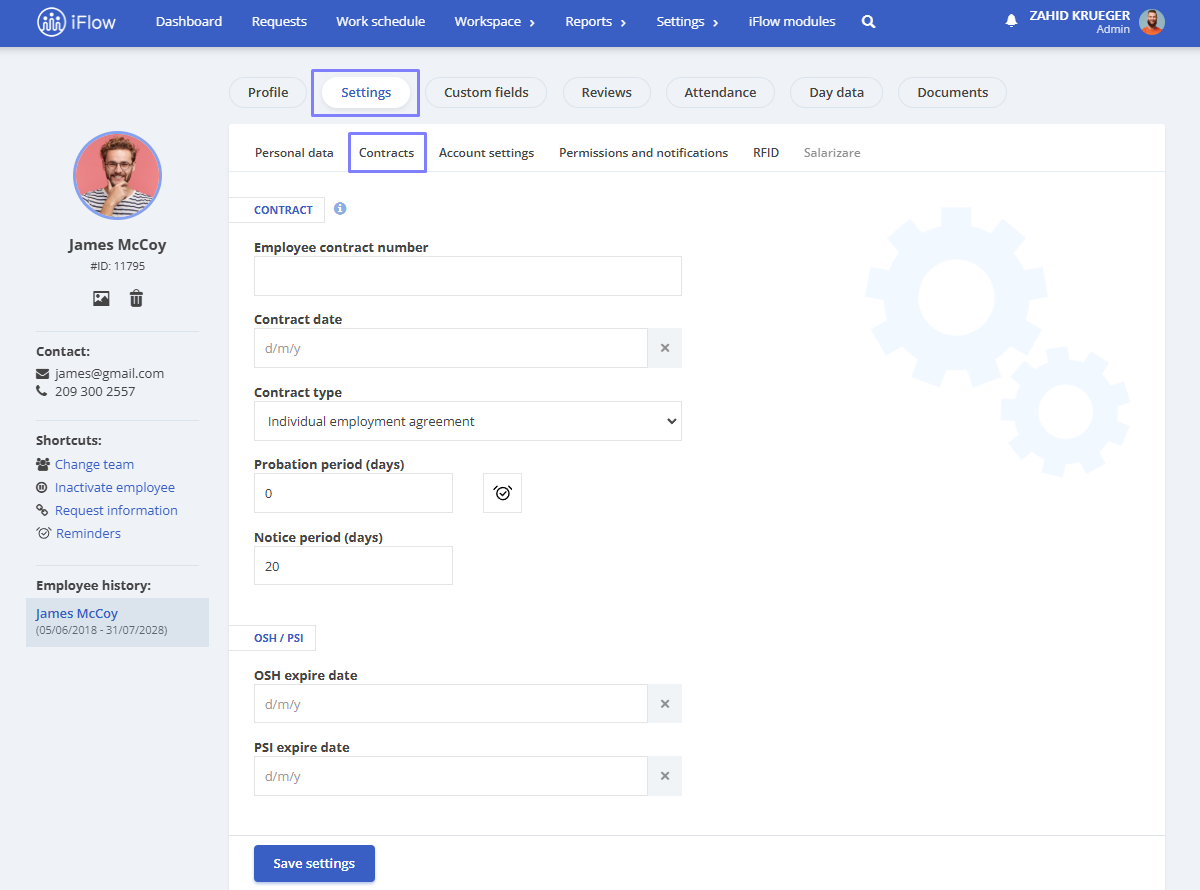
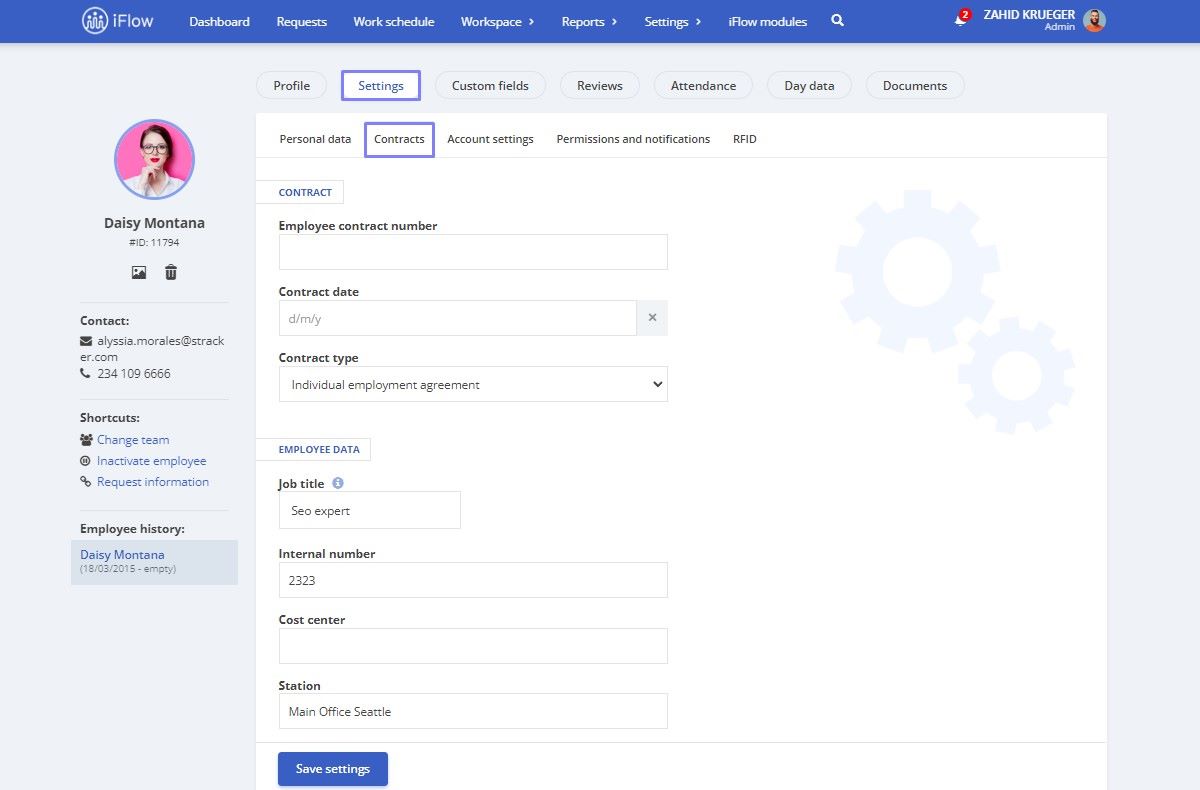
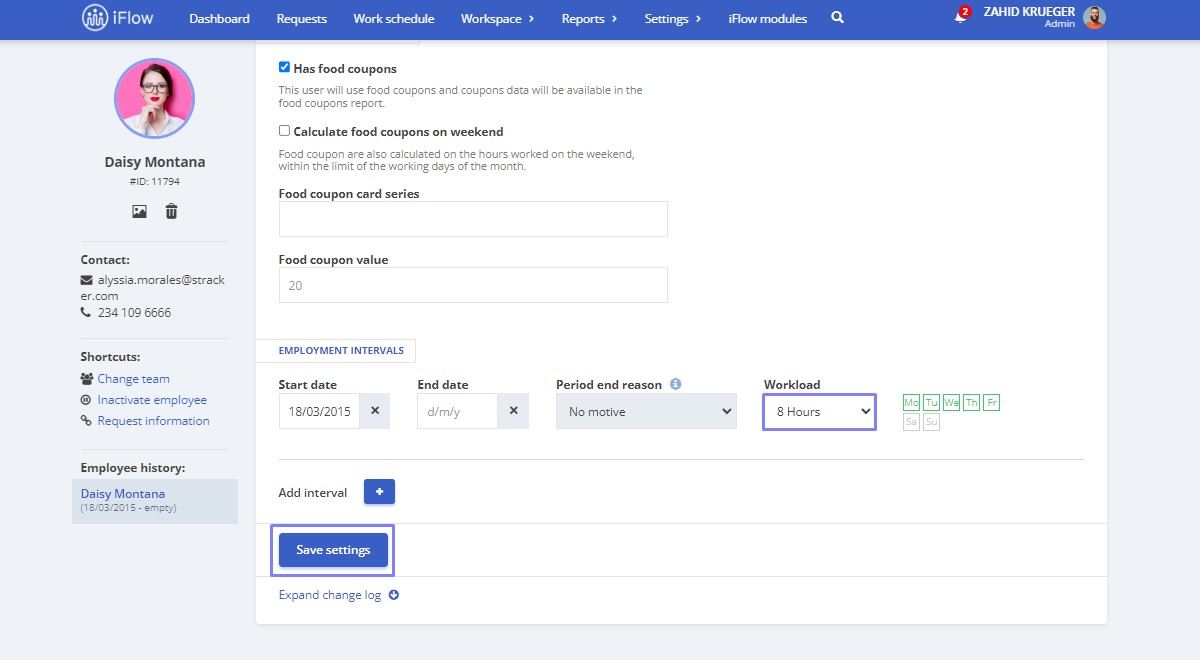
How to Suspend an Employment Contract
- Click on the employee’s profile
- Click the Settings – Contracts button
- Scroll down to the Employment intervals section
- Select the End Date
- Click the Add button
- Click the Save settings button
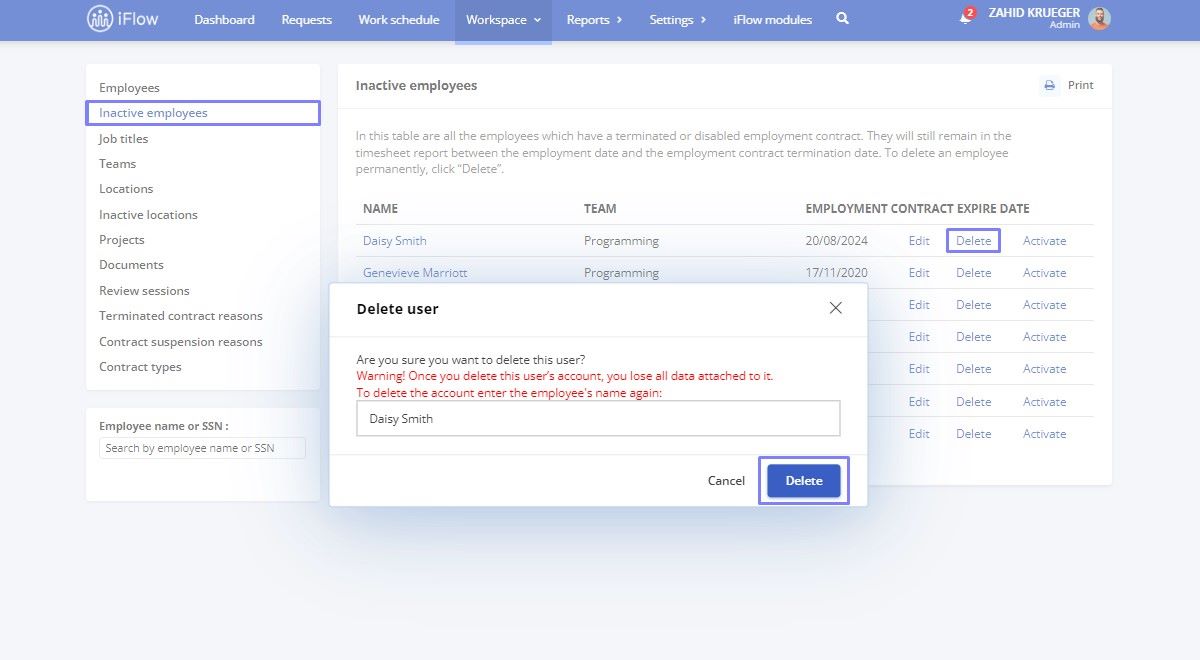
How to Permanently Delete an Employee
- First, deactivate the employee (follow the steps outlined above)
- From the Employee’s menu
- Click on the Inactive Employees submenu
- Click the Delete button next to the employee you want to delete permanently
- Re-enter the employee’s full name
- To finalize, click the Delete button
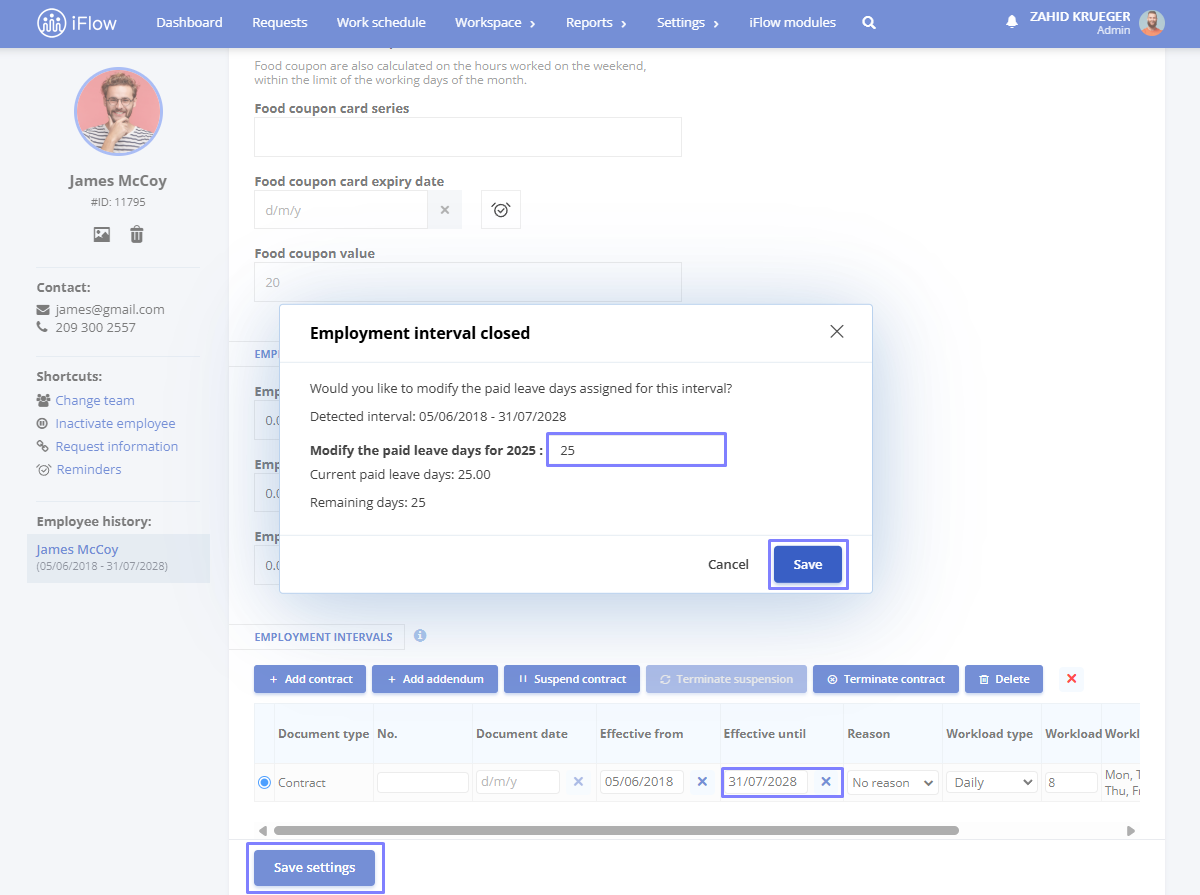
Automatic Recalculation of Vacation Days upon User Deactivation/Activation
When you suspend or reactivate a contract, the application automatically recalculates the remaining vacation days based on the period the employee was inactive.
To make this adjustment, follow the steps below:
- From the employee’s profile, click on Settings
- Access the Contracts submenu
- Go to the Employment intervals section
- Select the contract, then in the Effective until field, add or delete the date, as needed
- In the Modify the paid leave days for 2025 field, select the desired number of days
- Click the Save button
- Finally, click Save settings to apply the changes
What is the Day data, and How does it Work
The Day data page is designed for each user. It lets you view your employees’ activities in one place for a specific day or period.
What does this page include?
- Add events button
- Add Attendance button
- Actual attendance
- Work schedule
- Events
What actions can you perform on this page?
In addition to having all the information about your employee’s activity in one place, you can add, edit, or modify these details directly from this page.
How to Access the Day data Page
You can access this page in two ways:
- From each employee’s profile
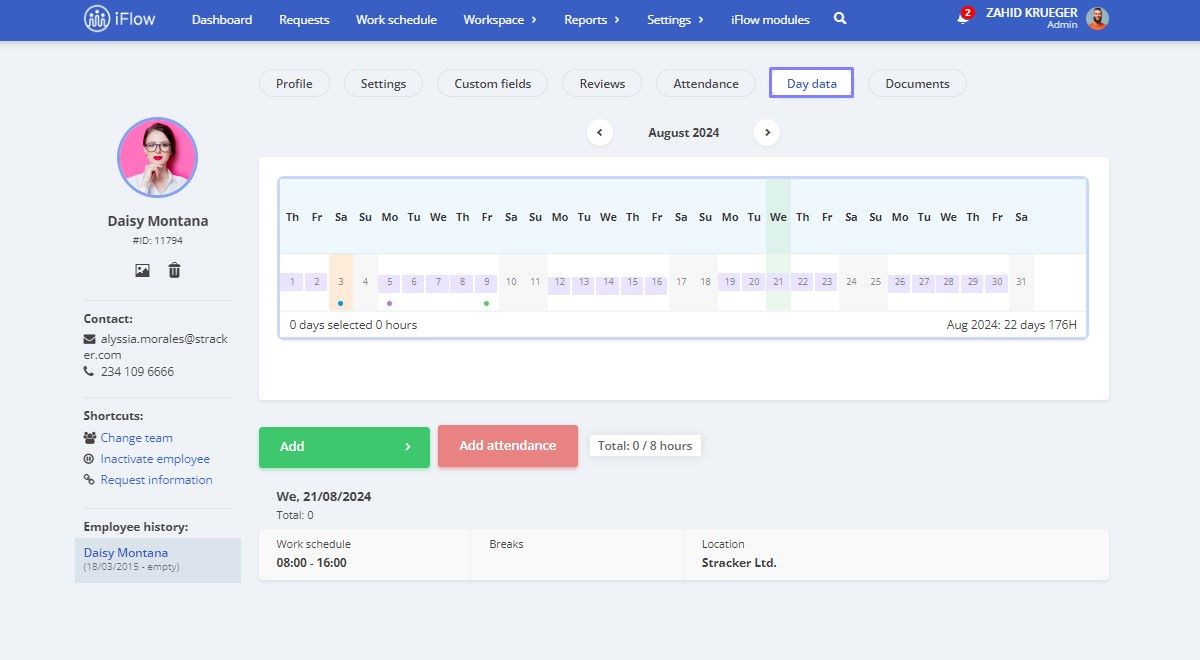
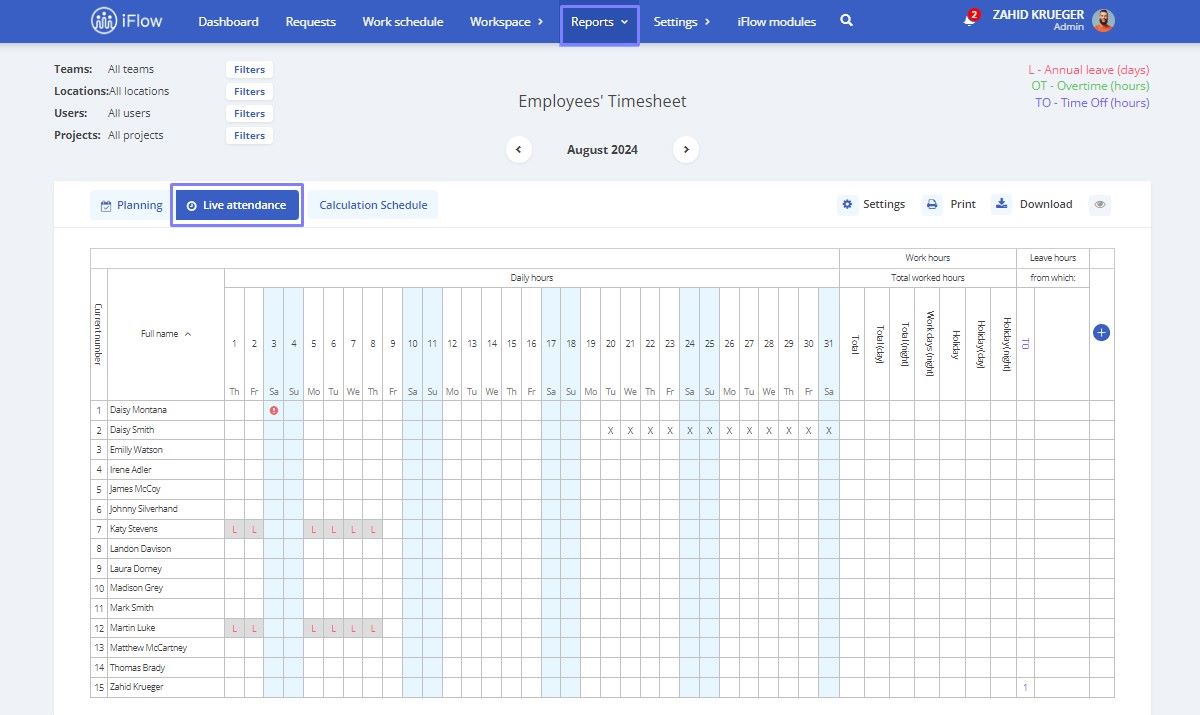
- From the Timesheet report with the Live Attendance data source
User workload in HR iFlow
The application includes the option to set the user’s workload. This can be done through two simple methods.
How to Set the Employee’s Workload
You can set the workload manually or via an import/update file. Here are the steps for both methods.
Manual Workload Setting:
- From the employee’s profile, click on Settings
- Go to the Contracts
- At the bottom of the page, next to the intervals, click on the box for Workload
- Select the user’s workload
- Then, click Save settings
You can find the steps outlined above to update the employee workload using the import function.
Setting up Workload-Based Events
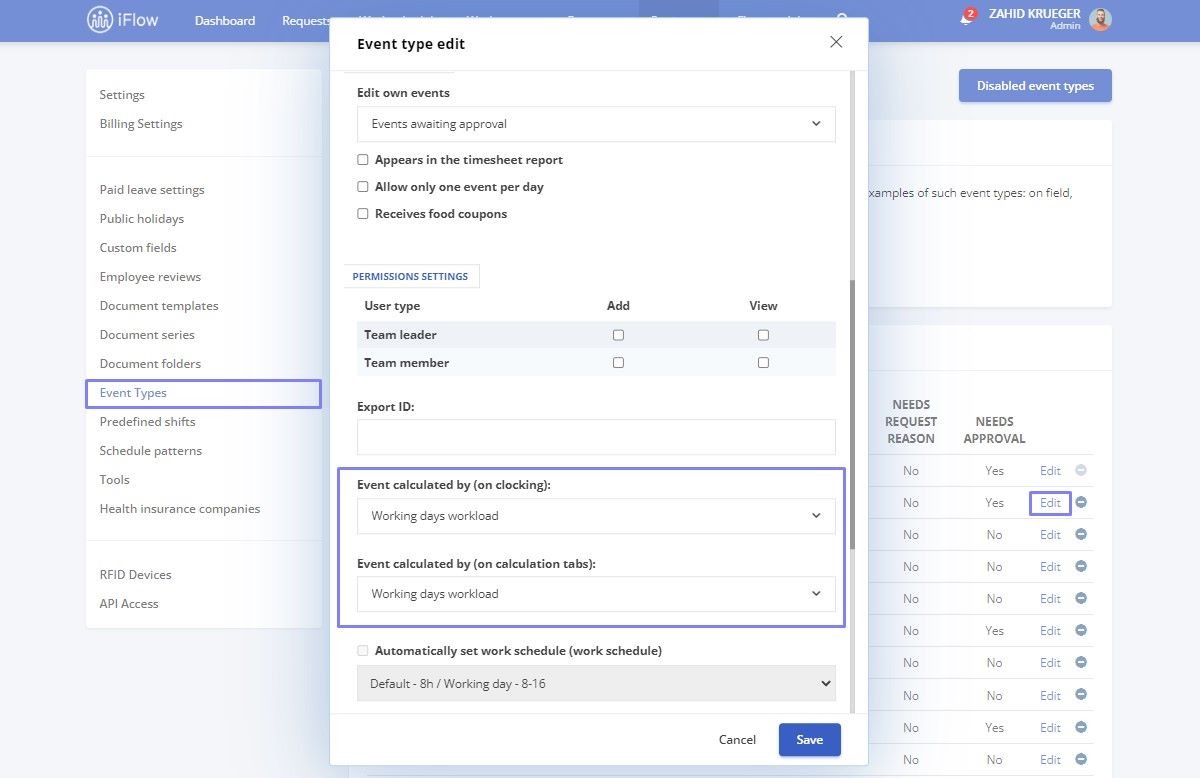
To ensure accurate timesheet calculations based on the workload, you must configure the events accordingly. Follow the steps below:
- From the main menu, go to Settings
- Navigate to the Event Types section
- Click Edit next to the relevant event (e.g., Paid leave events)
- In the field Event calculated by select one of the following options:
- Working days workload: The event will only be calculated for weekdays (Monday to Friday), excluding weekends and public holidays
- Daily workload: The event will be calculated for each day it is applied
- Work schedule: The event will be calculated according to the work schedule for the applied days.
- Finally, click the Save button
Setting the Schedule According to the User’s Norm
Follow these steps to set up predefined shifts based on each workload. Afterwards, you will allocate these shifts to employees according to each user’s workload. The steps for setting up the work schedule can be found here.
For quick and accurate work schedule planning, fill in the work norm for each employee in the notes field. The simplest way is to download an update file and copy the data from the norm column into the notes column. Upload the file and view the workload for each user.
Additional Explanations
Workload on Working Days: With this setting, the application will calculate the user’s workload hours for the event selected. Working days, in this case, are Monday through Friday, with Saturday, Sunday, and public holidays excluded. This setting is suitable for paid leave or any event that functions like leave, such as unpaid leave, maternity leave, or other events not counted on weekends
Daily Norm: With this setting, the application will calculate the event according to the user’s workload for each day it is set, regardless of whether it is a weekend or a public holiday. This setting is appropriate for events like Business Trips if your employees work weekends. For example, if employee “X” has a 6-hour workload and the event “Remote Work” is set, 6 hours per day will be calculated in the timesheet for each day the event is active
Work Schedule: With this setting, the application will consider the work schedule set for the event’s occurrence without considering the workload. This setting is suitable for events that are not dependent on the workload and where the number of hours may differ from the norm
How to set the Language for a User
- Click on the Settings menu from the employee’s profile (next to the Profile button)
- Click on the Account settings submenu
- In the Language section, choose the desired language
- To finalize, click Save settings
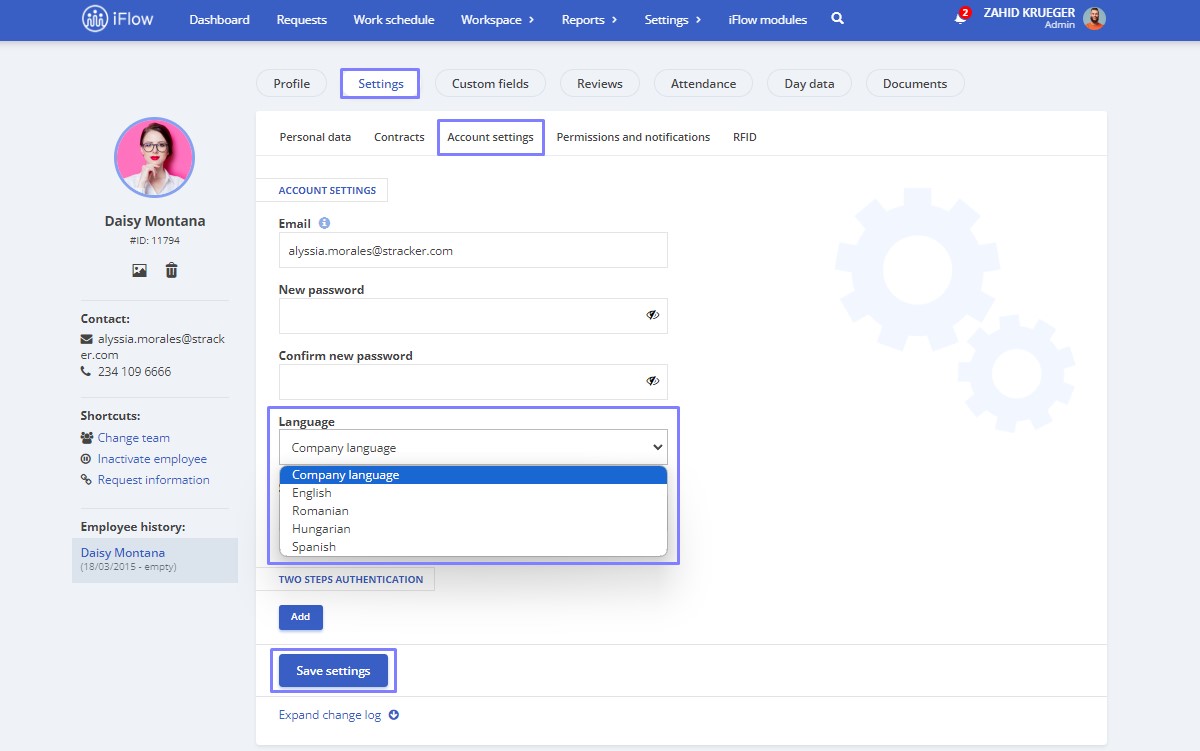
Important!
The account language is the language selected at the time the account was created.
How to Add a Note to a User
This note will be displayed under the employee’s name in the Work Schedule panel. You can use this note to indicate the shift the user is working or other details that help differentiate them in the work schedule and general panel.
- Access the employee’s profile
- Click on the Settings button (next to the Profile button)
- Click on Personal data
- Fill in the User Note field
- Click Save settings
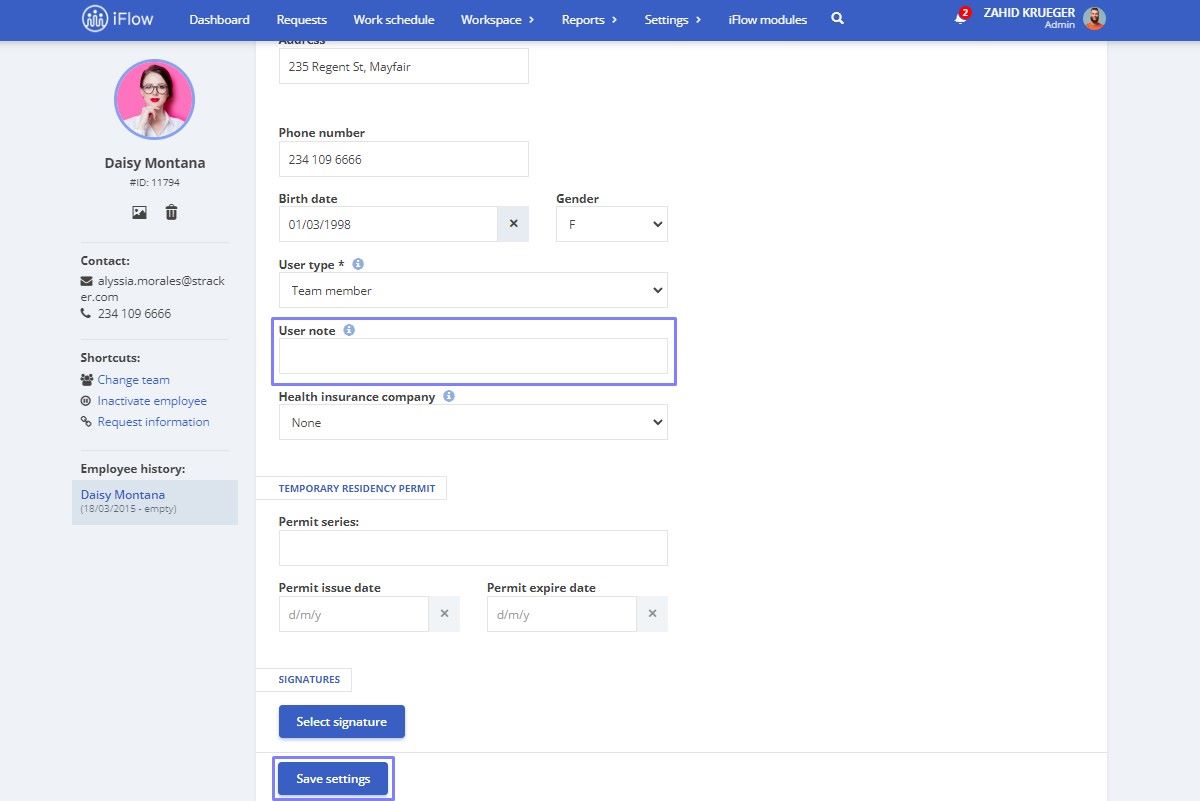
Another way to fill in this field is by using the Import/Update file, where you can enter the notes in the designated column. The document can also include the user note using the corresponding placeholder.
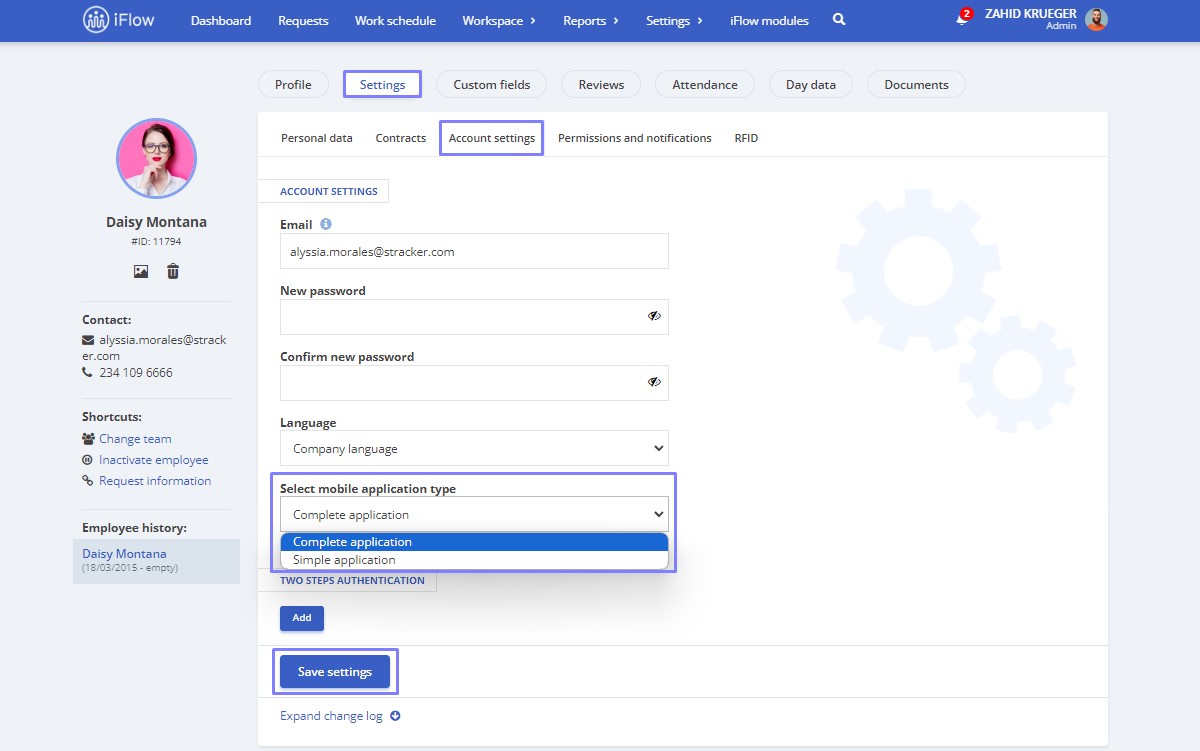
How to Activate the Simple App for Employees
The One Button Clock-In/Out is a simplified version of the HR iFlow app. It consists of a single button that employees can click to record their check-in and check-out times. The app displays the recorded work hours in real-time.
This option needs to be activated individually for each employee by following these steps:
- Access the employee’s profile
- Go to the Settings submenu – Account settings
- In the field labelled Select mobile application type, choose the Simple application option
- Click Save settings
When logging into the app, employees will no longer see the Dashboard with their team members. Instead, they will only see the start/stop and add location buttons. The other panels, such as Activity, Work Schedule, and Personal Profile, will remain unchanged.
How to Set Access Permissions for Reports
How to Enable Report Permissions from the Employee Profile
HR iFlow allows you to set various permissions for reports. Below are the available permissions, along with explanations for each.
Access to all Reports
This permission allows any employee to view and print reports for selected teams. It works at the team level, not at the user level. Follow these steps to grant this permission to an employee:
- From the General panel
- Click on the name of the employee you want to grant this permission to
- Click on Settings (from the menu within the employee’s profile)
- Go to the Permissions section
- Check the box next to the team(s) for which you want this employee to access the reports
- To finalize, click Save settings
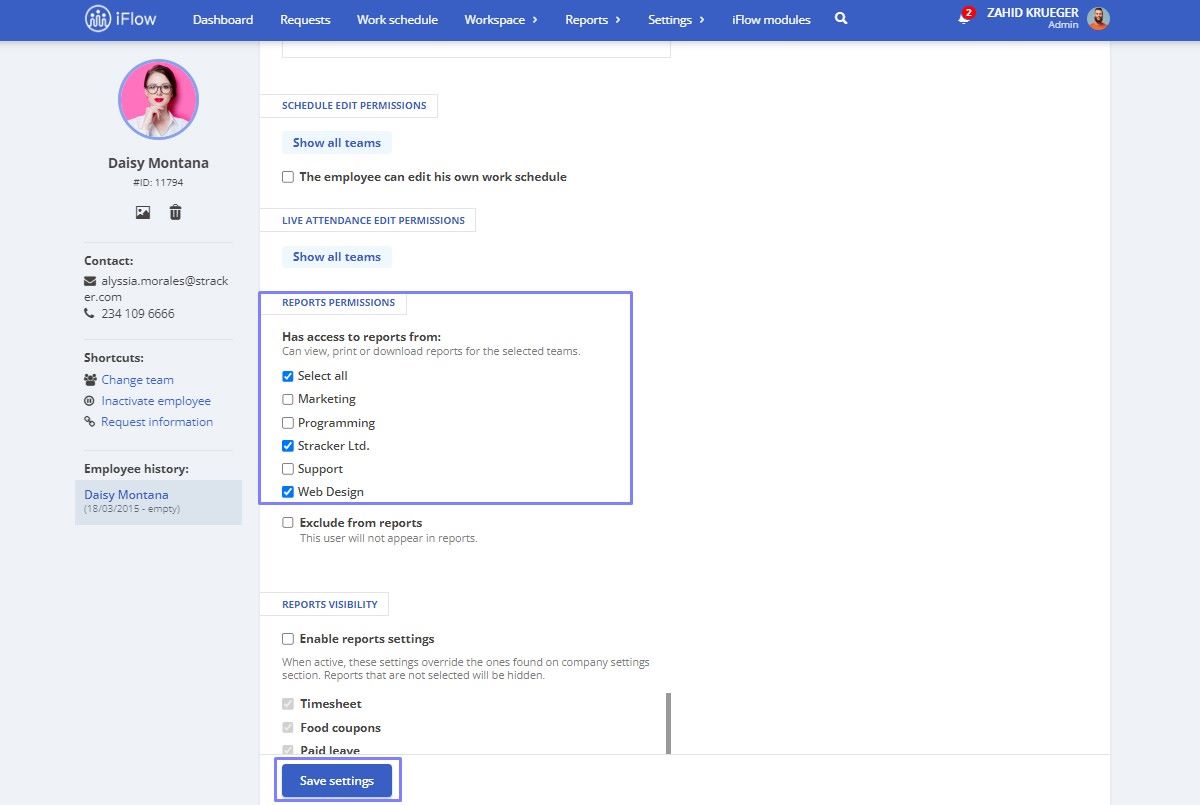
This setting is proper when a user with the team member category needs access to reports for different teams. Still, you want to designate them as something other than a team leader or administrator.
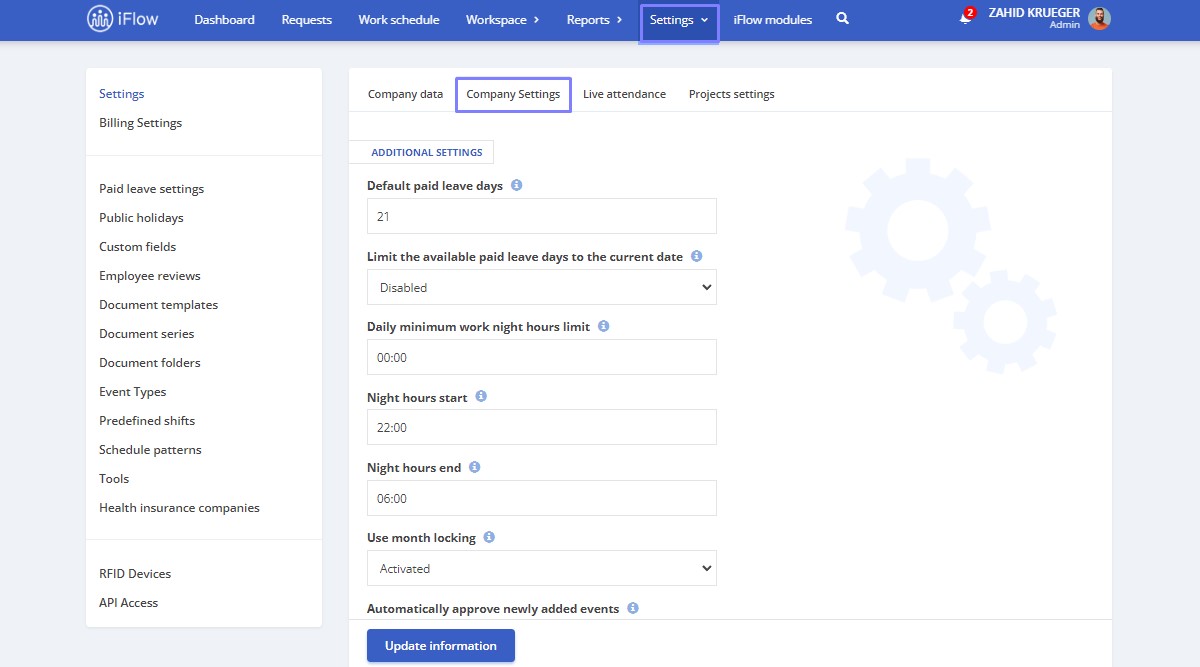
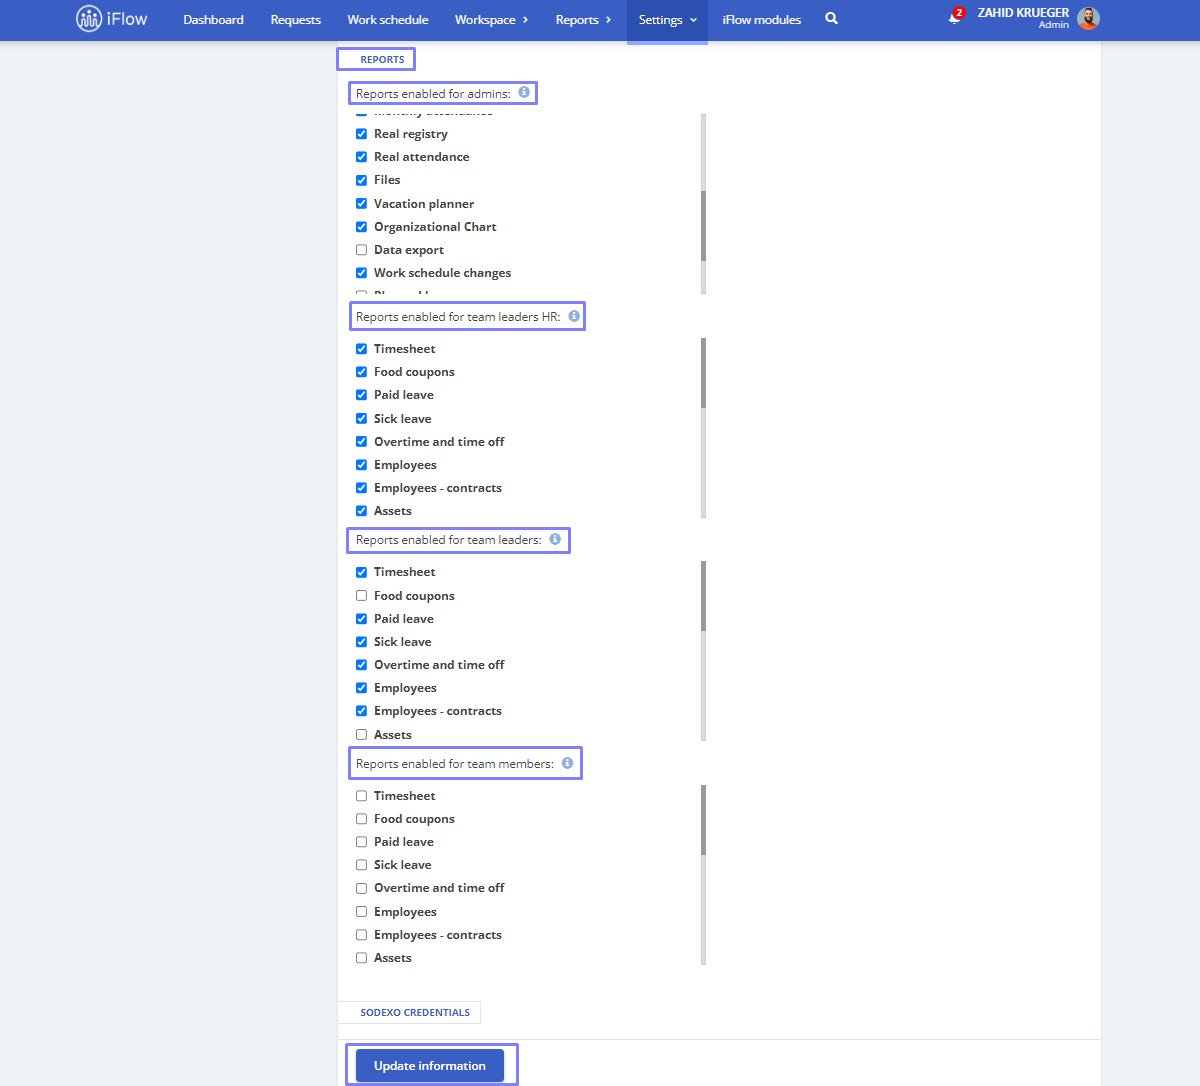
How to Enable Report Permissions at the Company Level
This setting is beneficial when granting or restricting report viewing permissions for all employees.
To add or restrict a user’s report viewing permissions, follow these steps:
- From the main menu, click on Settings – Company – Company Settings
- In the Reports section, you’ll find four categories of permissions based on the types of users available in the application: Administrators, HR Team Leaders, Team Leaders, and Team Members
- In each user category section, check the type of report you want the user to have access to.
- To finalize, click Update information
Exclude from Reports
This permission will hide the employee from reports (ideal for accountants if you want to give them access to the application without them being displayed in timesheets or other HR reports). Follow these steps to grant this permission to an employee:
- From Dashboard
- Click on the name of the employee to whom you want to grant this permission
- Click on Settings in the employee’s profile menu
- Go to the Permissions and notifications section
- Check the box labeled Exclude from reports
- To finalize, click Save settings
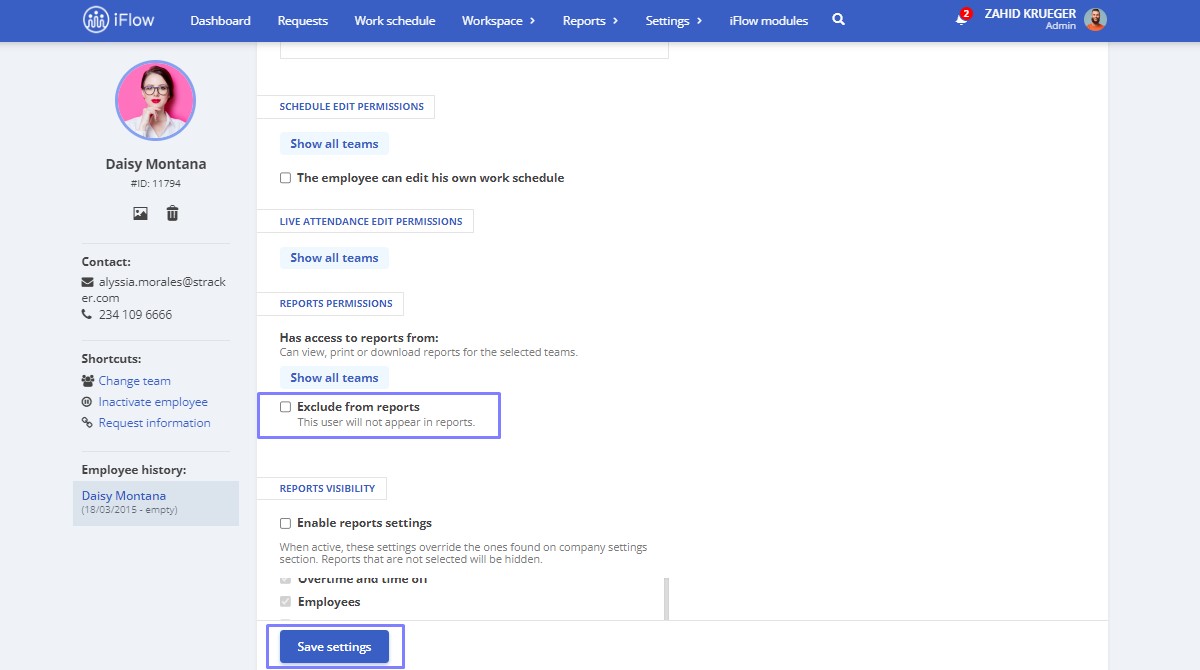
This setting is mainly used for administrators who often should not appear in reports.
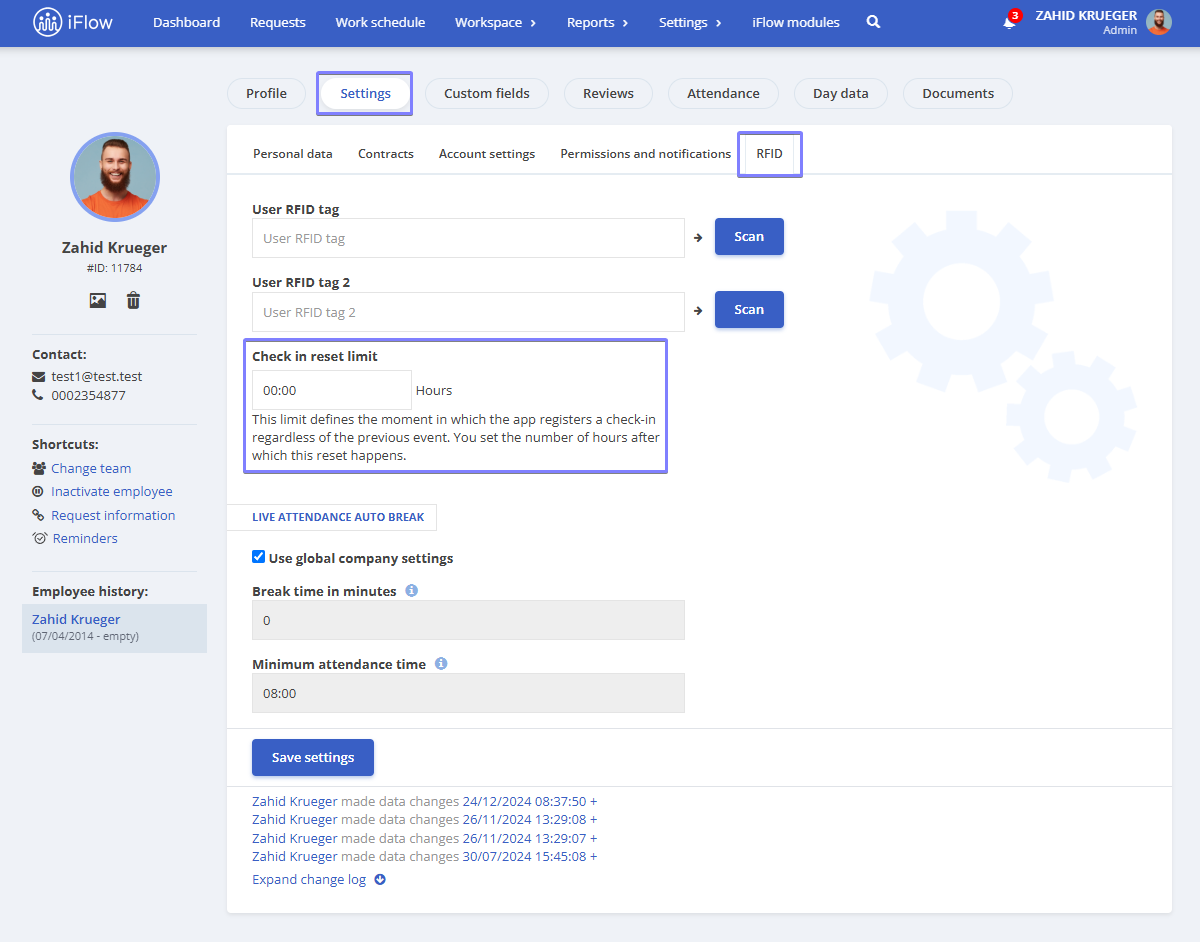
Reset Entry Limit
For real-time attendance users, a Reset Entry Limit configuration option is available at both the company and individual levels.
Reset Entry Limit at the Company Level
This setting can be found in the main menu, under “Settings” – “RFID Devices”, and applies to all company users. However, this general configuration will not affect employees who have a custom reset limit set individually.
Reset Entry Limit at the User Level
Unlike the company-level reset limit, which is restricted to 24 hours, the individual user reset limit can be extended up to 30 hours.
Example: If a 26-hour limit is set and an employee with a 08:00 – 08:00 schedule clocks in at 08:00 AM, the reset button will not activate exactly at 24 hours, but according to the newly set limit. However, the application will still record the exit strictly within the 24-hour limit, regardless of the clock-out time.
How to Set a Reset Limit Over 24h
- Access the user profile
- Click on the “Settings” button (next to “Profile”)
- Select the “RFID” submenu
- Choose the desired check-in reset limit
- Click “Save settings”
Event Permissions
HR iFlow allows you to set permissions for events. Below are the steps to do this.
Has access to all events
This permission grants an employee access to all events and the ability to view, add, edit, delete, approve, or reject their events and those of other employees. Follow these steps to grant this permission to an employee:
- From Dashboard
- Click on the name of the employee to whom you want to grant this permission
- Click on Settings in the employee’s profile menu
- Go to the Permissions and notification section
- Check the box labeled Has access to all events
- To finalize, click Save settings
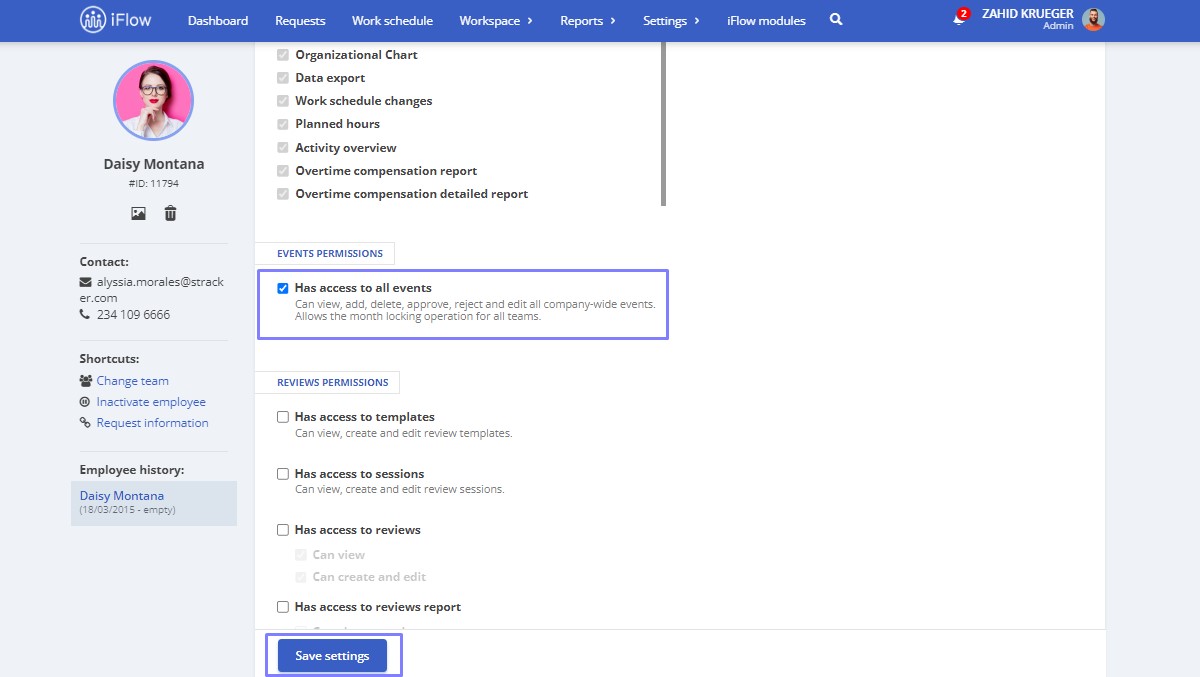
This setting is used when a user needs access to all events across the company, but you want them to be defined just as a Team Member.
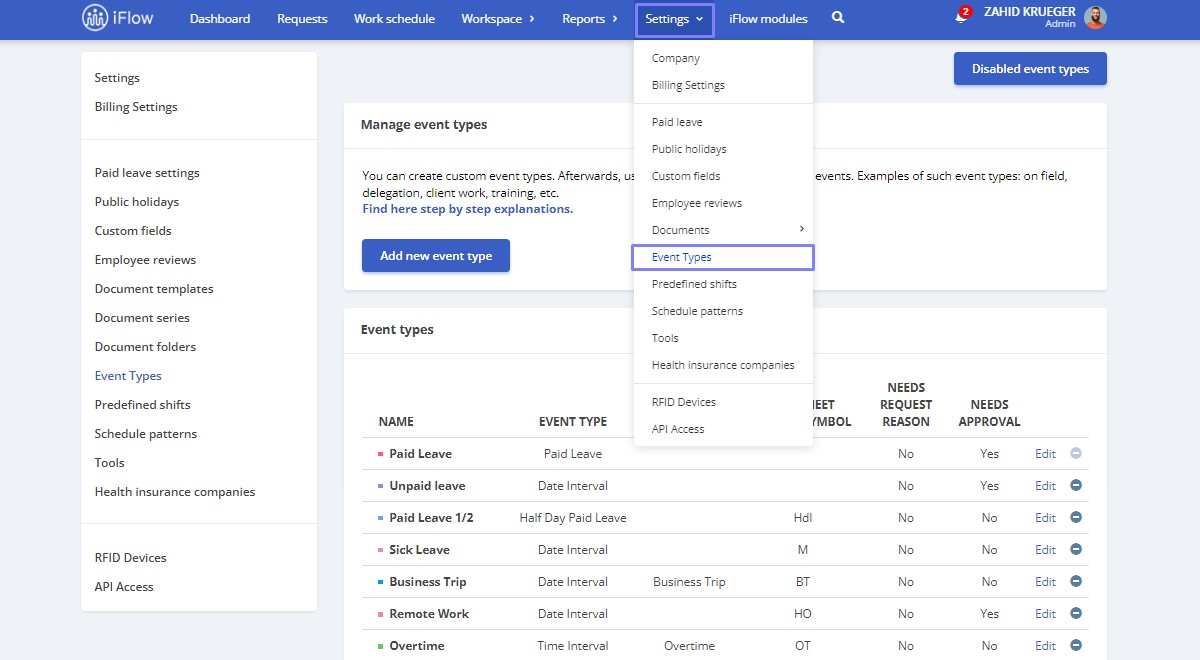
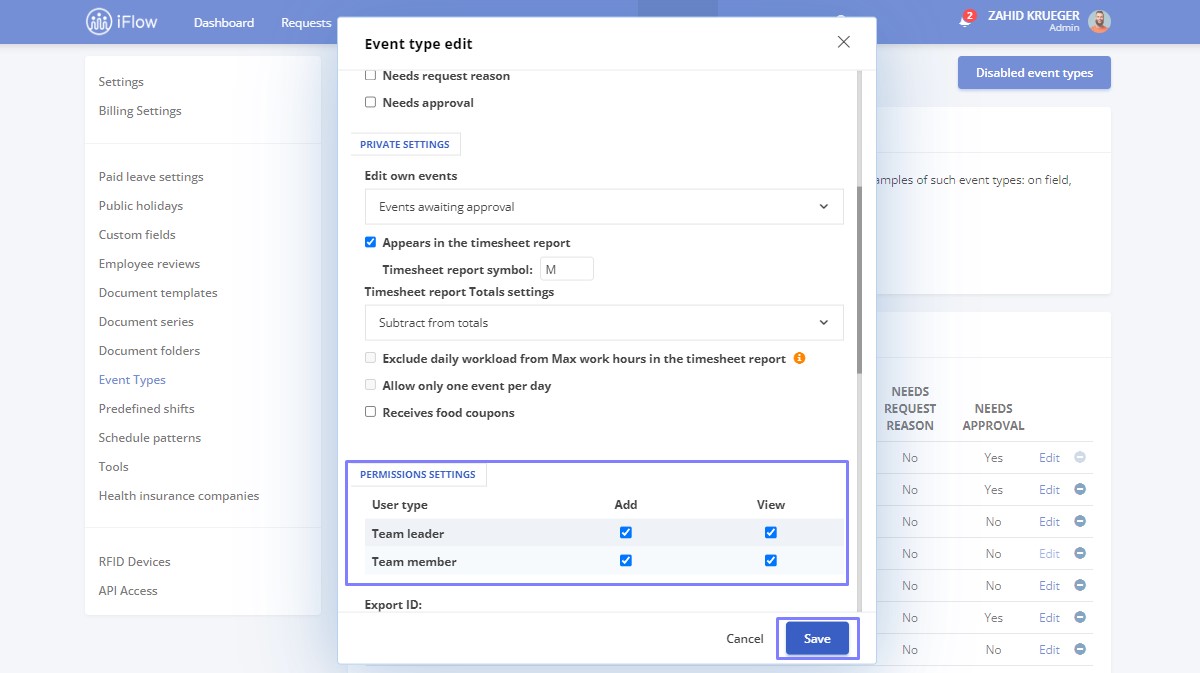
Event Addition Limitation
Any type of event can be hidden to prevent it from being used by the company’s employees. To do this, follow these steps:
- Click on Settings – Event Types
- Next to the desired event, click the Edit button
- In the Permissions Settings section, you can check the boxes next to Team Leaders or Team Members to allow them to Add or View events
- Click Save
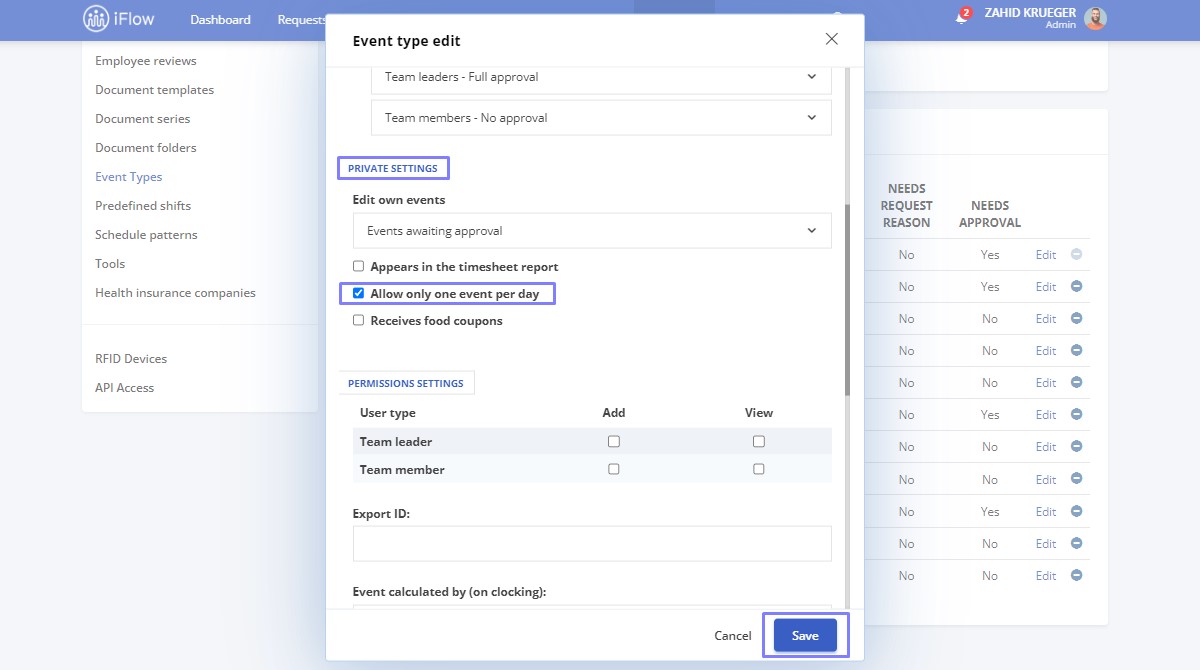
Restricting Overlapping Events on a Date Interval
To restrict the use of two events concurrently, follow these steps:
- From the Settings panel
- Go to the Event Types section
- Click Edit on a custom day-interval event that does not appear on the timesheet
- Check/uncheck the option to Allow only one event per day. Once checked, this option will prevent another event on the same day within the selected date interval
Learn more about HR iFlow events by accessing this link.
Work Schedule Editing Permissions
This permission allows any employee to edit the work schedule for any team, whether they are part of that team or not. Follow the steps below to grant this permission to your employees:
- From Dashboard
- Click on the name of the employee to whom you want to grant this permission
- Click on Settings in the employee’s profile menu
- Go to the Permissions and notification section
- Select the teams for which this employee has the right to edit the work schedule
- To finalize, click Save settings
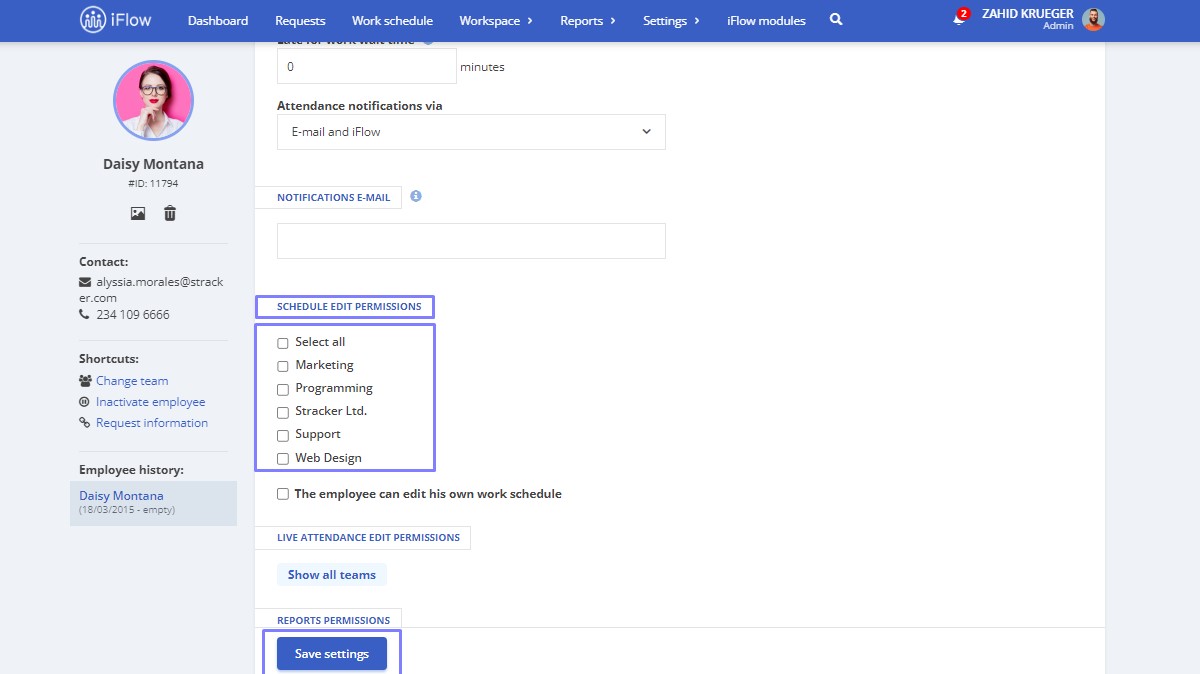
This setting is used when you want a single employee to be able to edit the schedule of one or more teams.
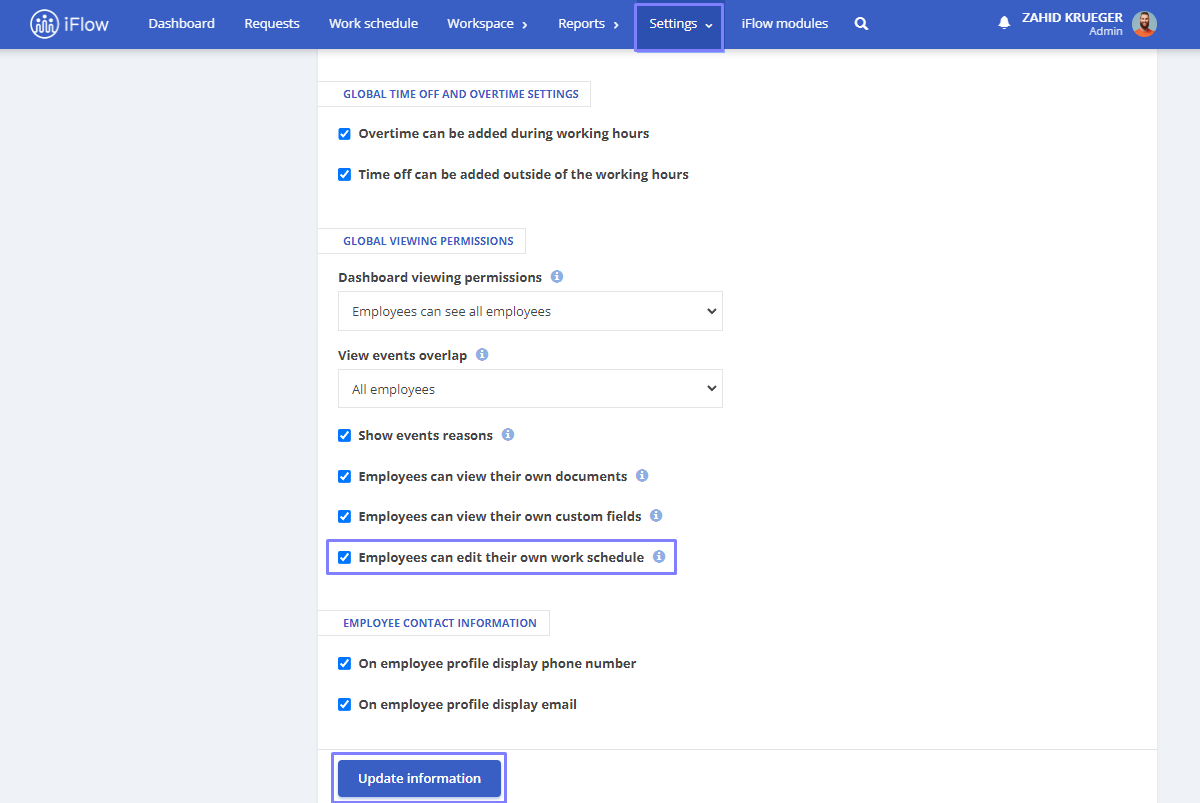
Employees can Modify their Work Schedule – Company-Level Setting
This permission grants all employees the right to edit their work schedule regardless of their user category. If you want employees to be able to set their work hours, follow the steps below:
- From the main menu, go to Settings – Company
- Click on the Company settings submenu
- Check the box for Employees can edit their work schedule
- Then click Update information
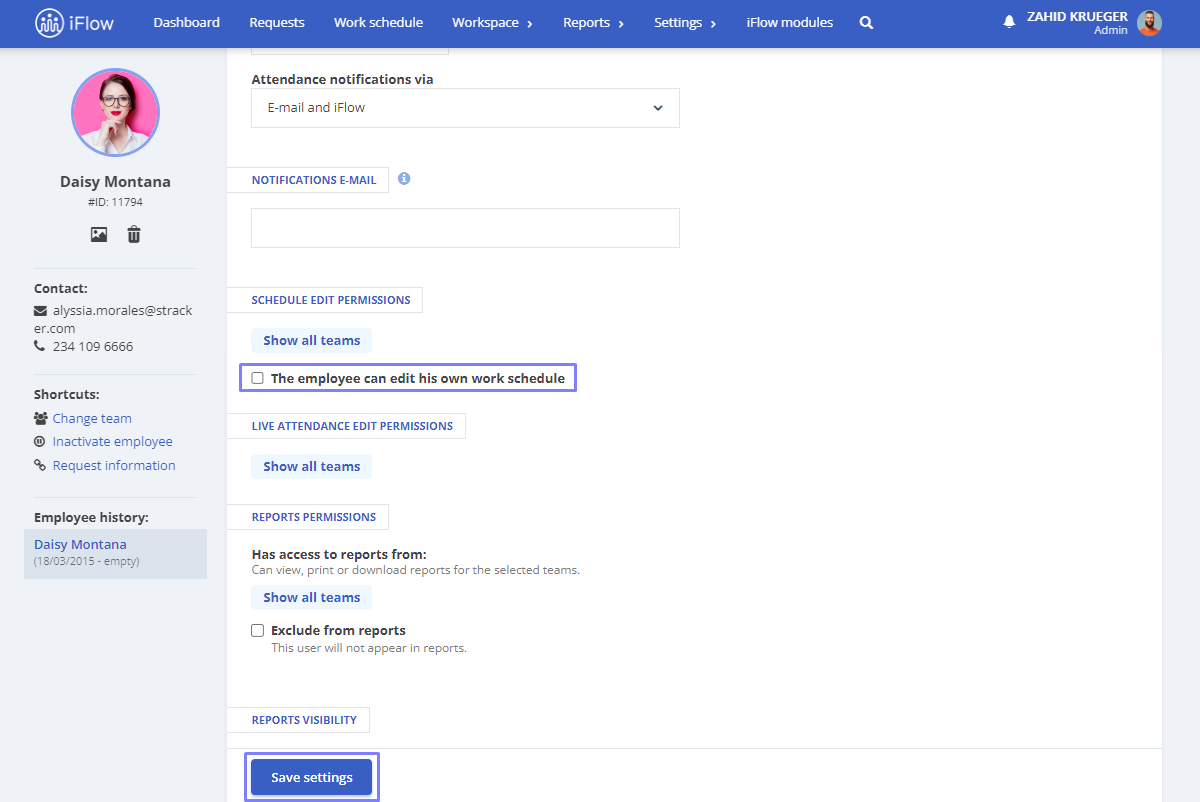
Employees can Modify their Work Schedule – Setting from the Employee Profile
This permission grants all employees the right to edit their work schedule regardless of their user category. If you want employees to be able to set their work hours, follow the steps below:
- From Dashboard
- Click on the name of the employee to whom you want to grant this permission
- Click on Settings in the employee’s profile menu
- Go to the Permissions and notification section
- Check the box for The employee can edit his own work schedule
- To finalize, click Save settings