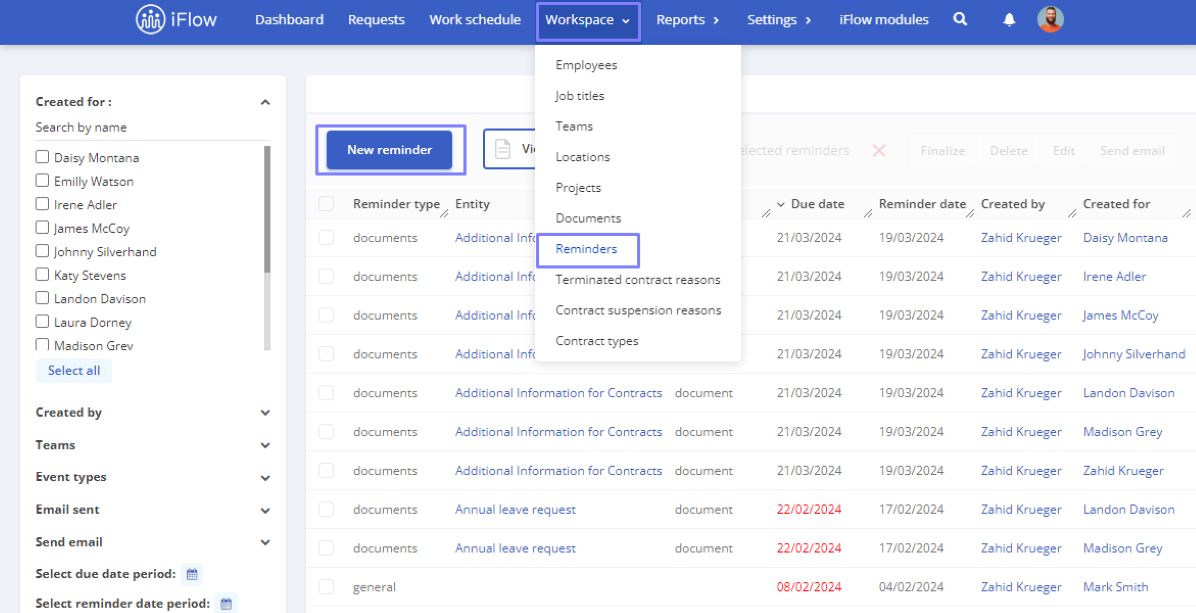
To access the iNotify feature, access from menu bar Workspace – Reminders. Click on the New Reminder button, and you can choose one of the following types: General, User, Documents, Events, Signees, Reviews.
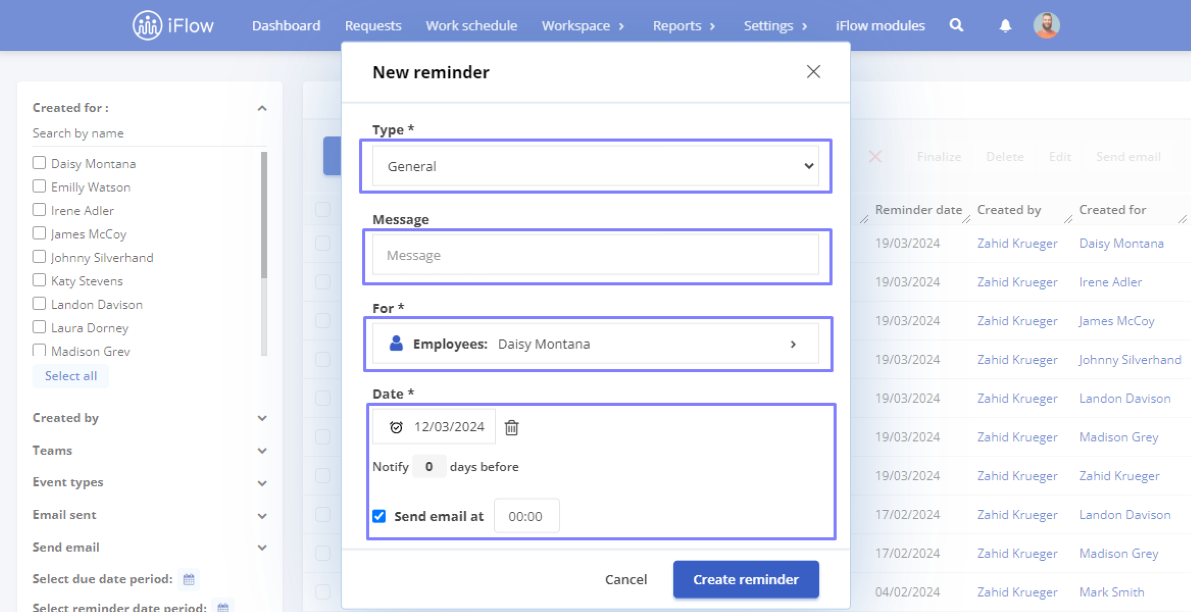
General Reminder
This type of reminder helps you, for example, to remind employees if they have a task to complete by a certain date:
Steps to Create a Reminder:
- Message – fill in the box with the desired information
- For – select the employee(s) to whom you want to send the message
- Date – choose the deadline for when the task should be completed – after selecting the date, you will see the message Notify 0 days before – choose how many days before they should receive the notification
Optionally, check Send email and choose the message time
Click on Create Reminder
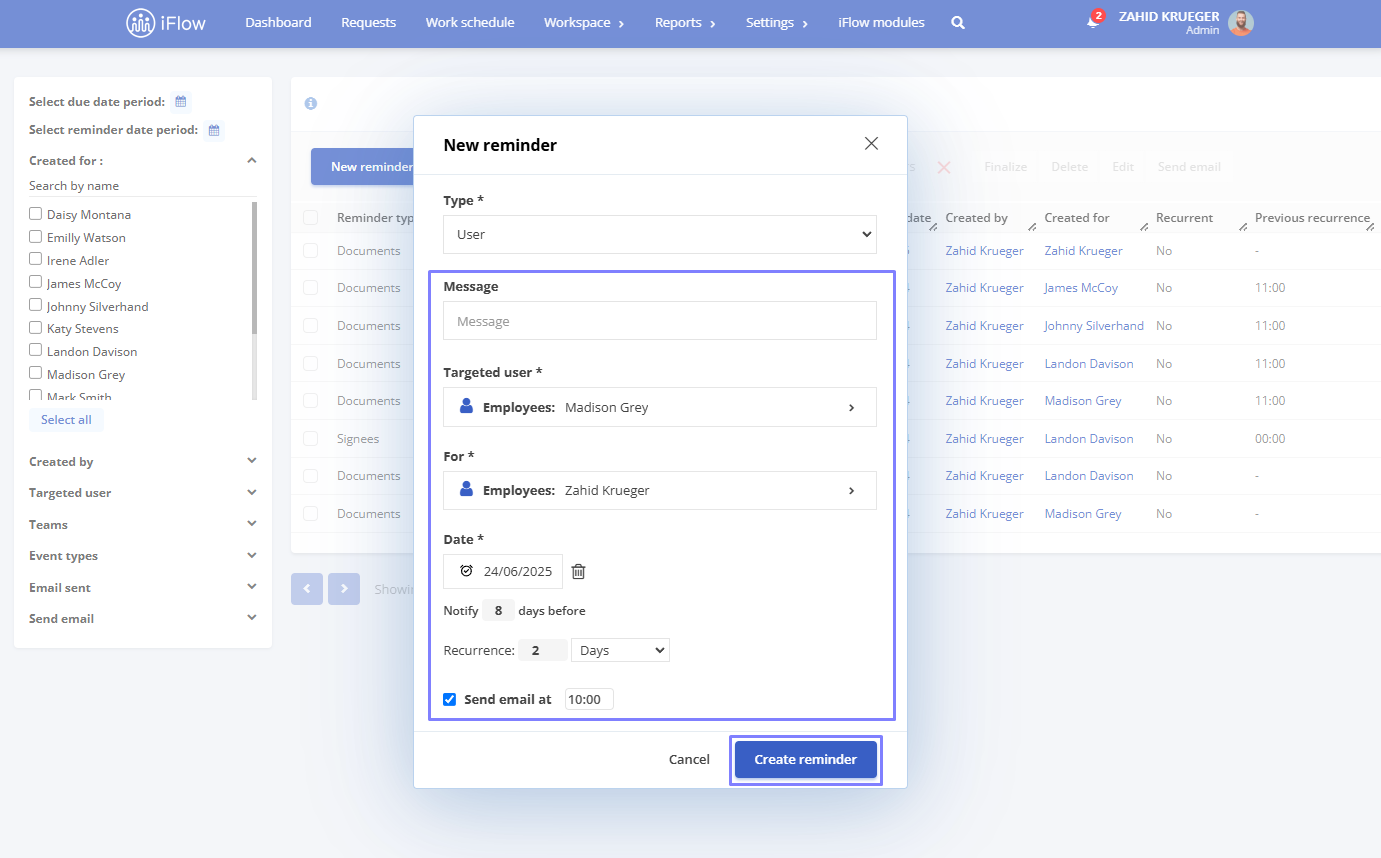
User Reminder
This feature allows you to set a reminder for any employee so you don’t forget something important related to them.
- Message – fill in the box with the desired information
- Targeted user– select the employee, teams, or departments the reminder is for
- For – choose whether the reminder is for yourself or another employee who will receive the notification
- Date – select the date when the reminder should be sent; once the date is selected, the message will appear
- Notify 0 days before – choose how many days before the reminder the notification should be sent
- Repeat – needed, set the frequency: every X Days, Weeks, Months, or Years
- Send email at – needed, check this option and select the time the message should be sent
- Click Create reminder to save
Document Reminder
Ensures that essential company information is up to date
Steps to Create a Reminder:
- Message
- Documents – select from the documents already created
- For – select employees or teams/departments
- Date – choose the notification date – after which you will get the message Notify 0 days before – choose how many days before they should receive the notification
Optionally, check Send email and choose the message time
Click on Create Reminder

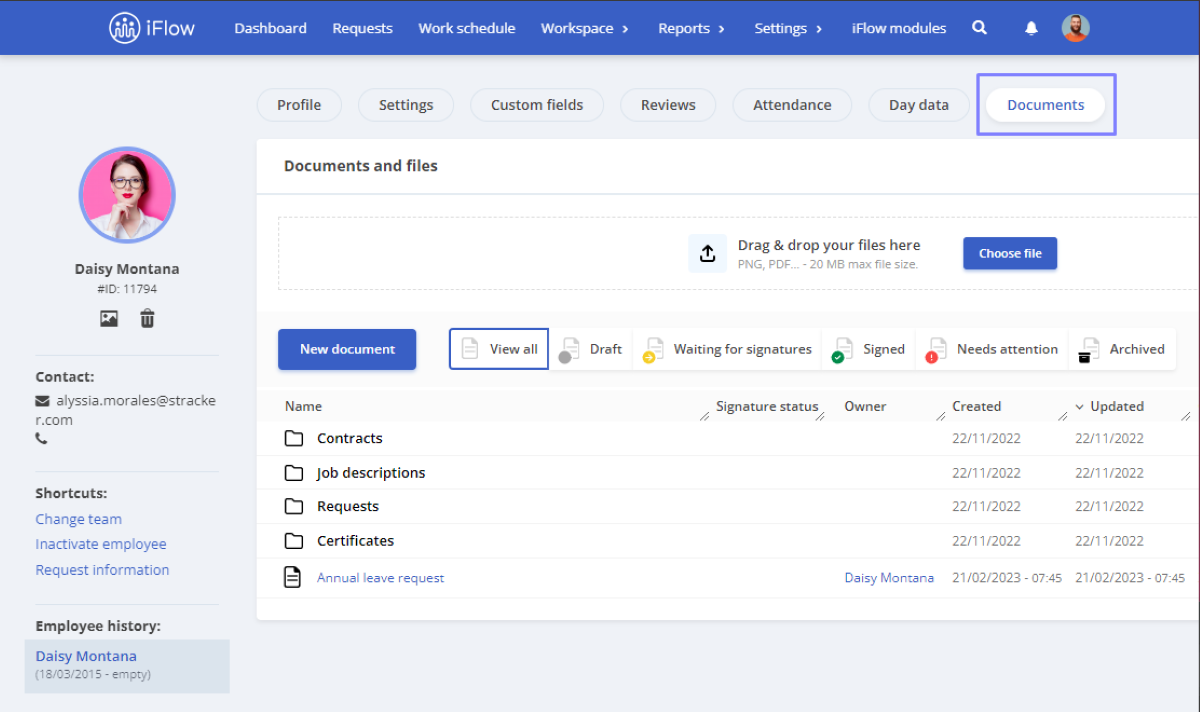
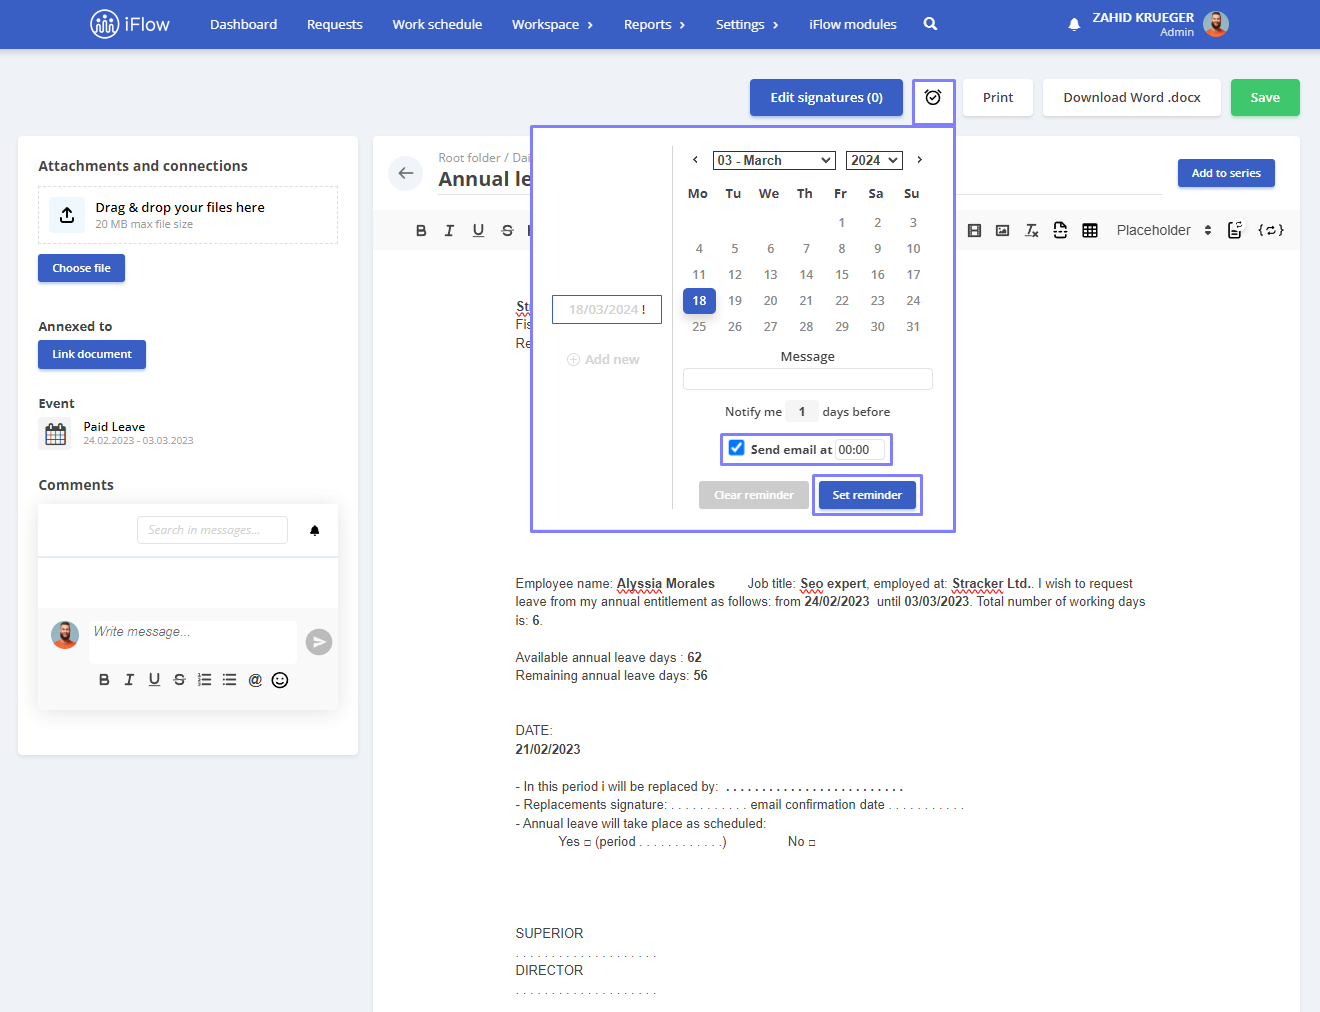
Employee Profile Document Reminder
- From the employee profile select Documents
- Click on a document you need to add a reminder to
- At the top of the document, you have a clock-shaped icon
- Click on the icon to set a reminder
You can choose the reminder day, how many days in advance you want to be reminded, and check if you want to receive it by email – then click on the Set Reminder button.
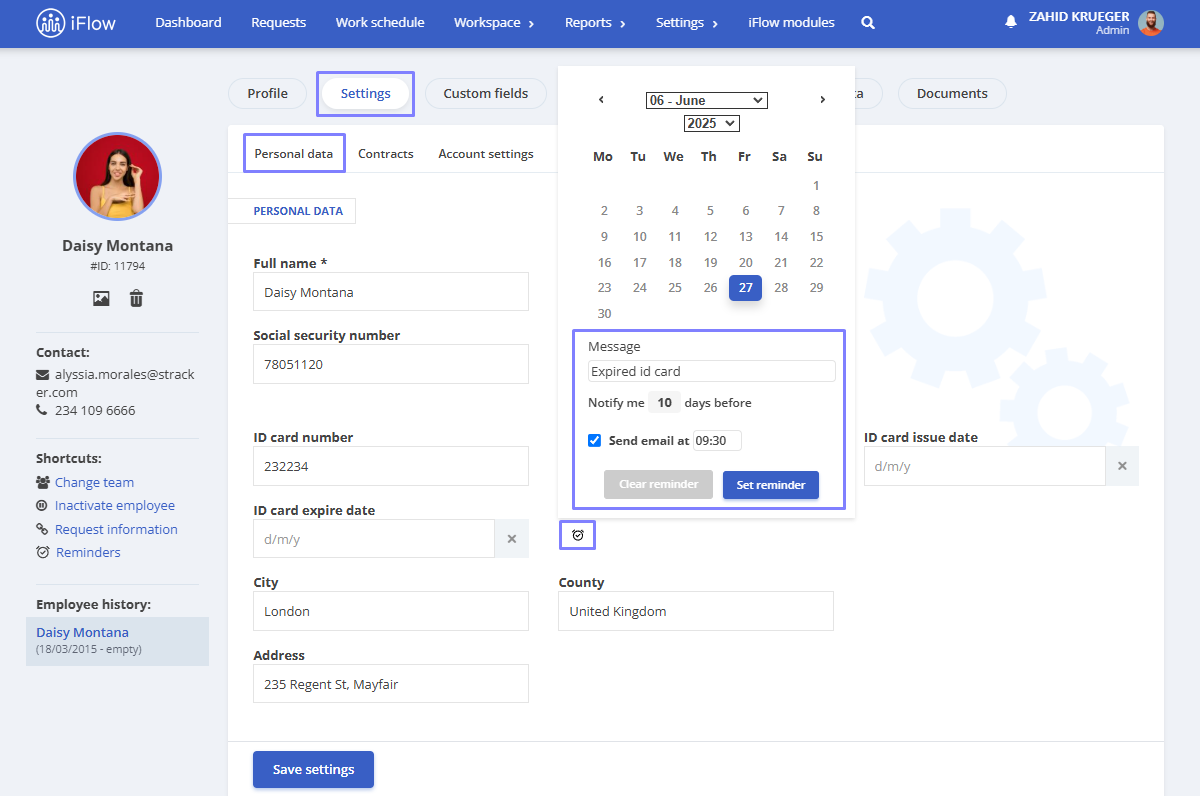
Reminders for Documents with Expiration Date
Setting reminders for ID card, temporary residence permit, and driving permit:
- Access the employee’s profile
- Navigate to the Settings – Personal data section
- Next to the relevant fields (ID card, temporary residence permit, driver’s license), click on the clock icon to set a reminder
- A window will open where you need to complete the following:
- Expiration date: day, month, and year
- Custom message (optional) that will appear in the notification
- Number of days in advance to send the notification
- Time to send the email (optional)
- Click the Set reminder button to save
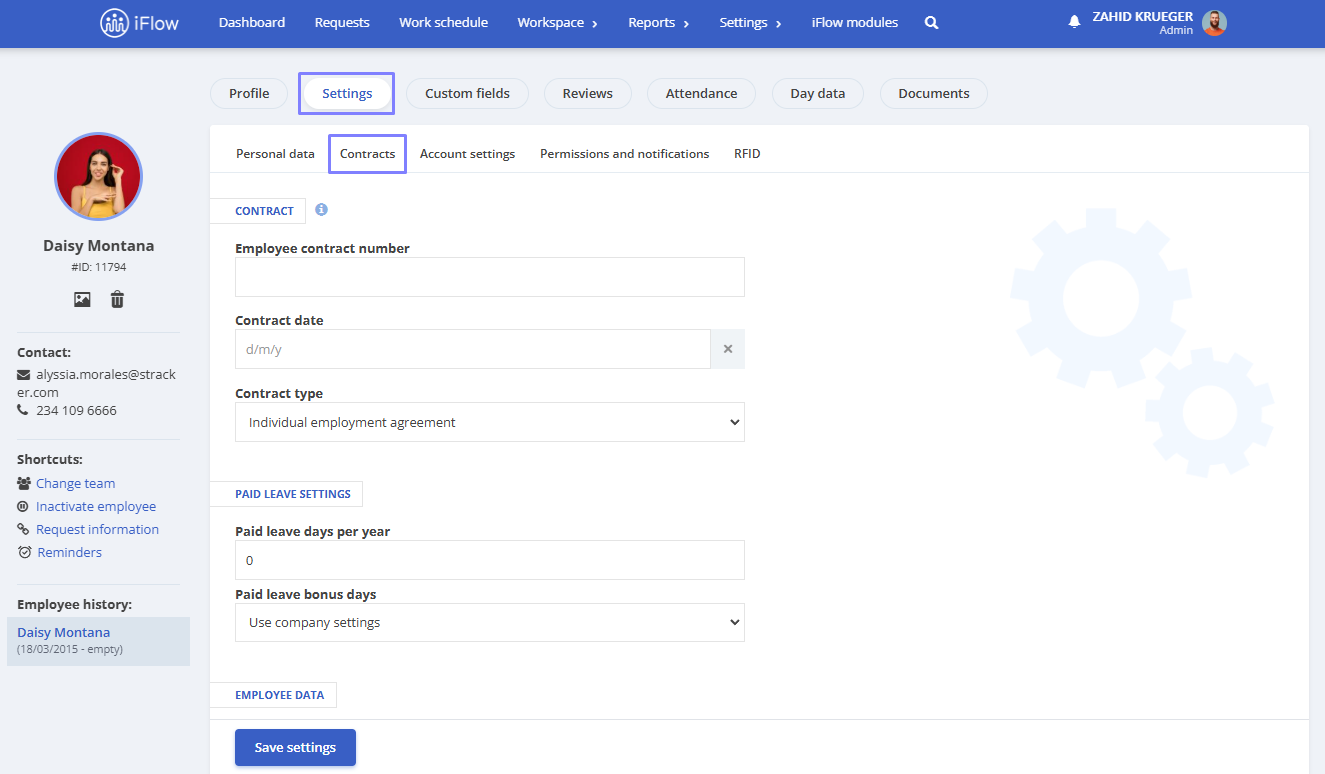
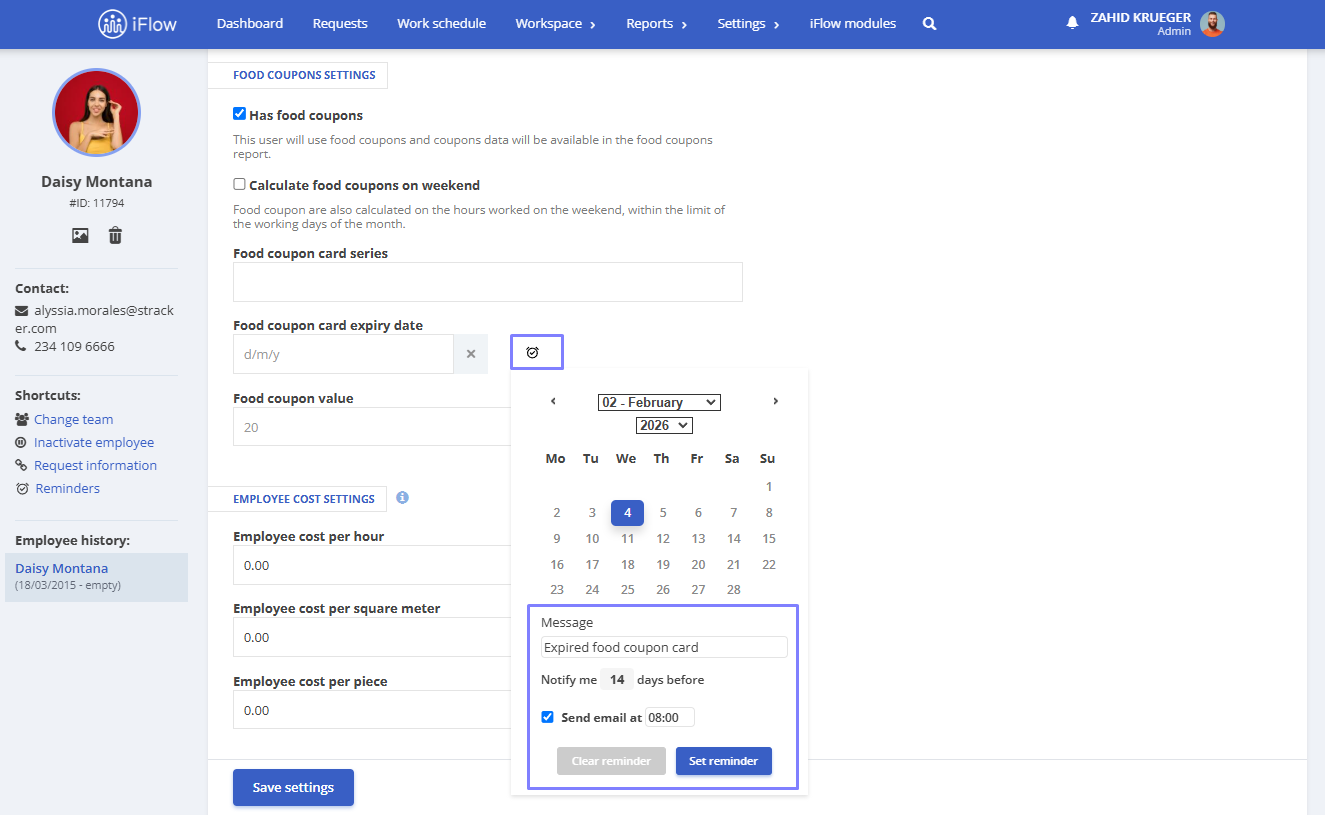
Setting reminders for meal ticket card expiration:
- Access the employee’s profile
- Go to the Settings – Contracts section
- Scroll down to the Food coupon card series field
- Click on the clock icon next to the field
- Fill in the following information:
- Expiration date: day, month, and year
- Desired message (optional)
- Number of days before expiration for notification
- Desired time for receiving the email (optional)
- Click on Set reminder
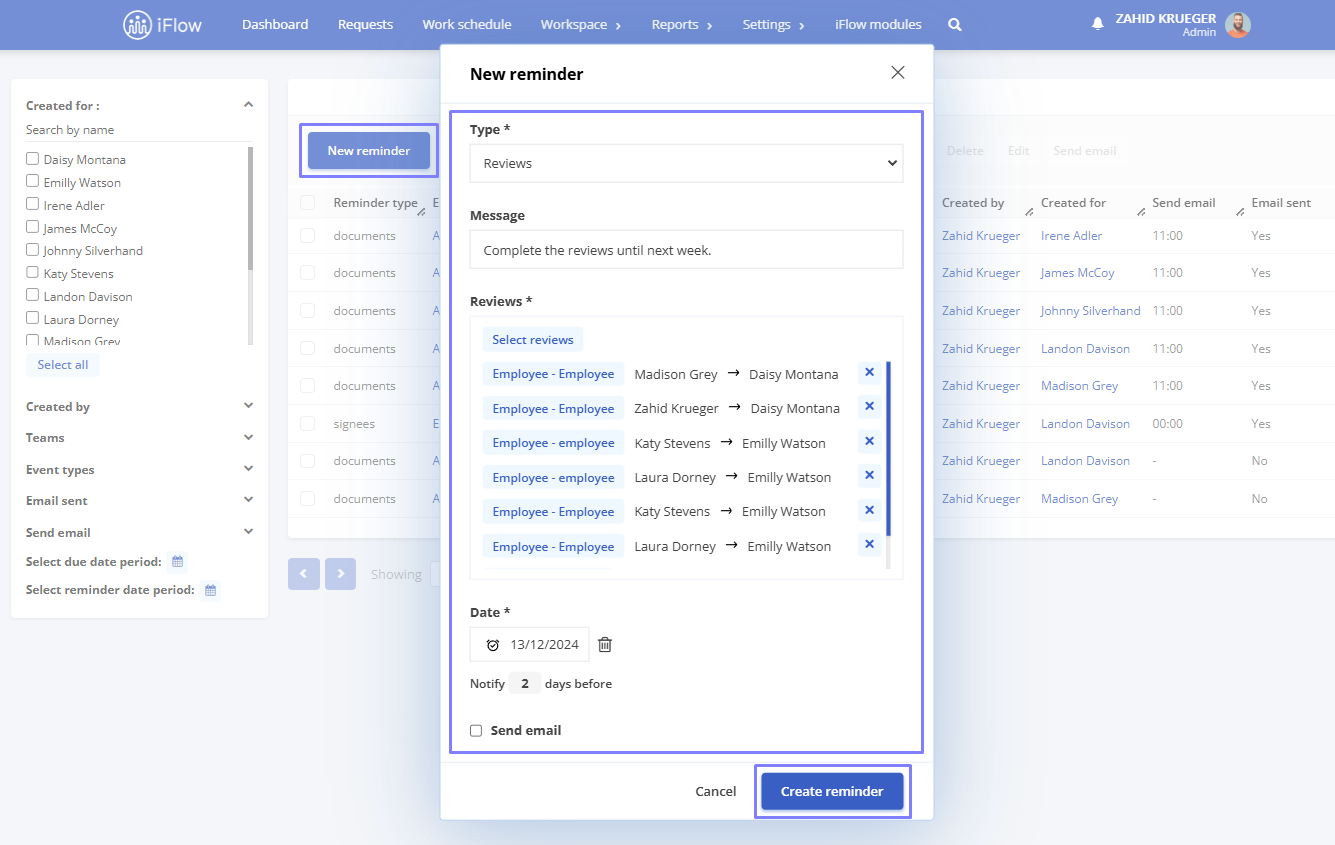
Reviews Reminder
This type of reminder helps you to remind employees to complete an evaluation they haven’t finalized by a specific date.
- From Workspace – Reminders – New reminder
- Type – choose Reviews
- Message – fill in the box with the information you want
- Reviews – select the reviews for which you want to create the reminder. The message in the reminder will be sent to the evaluator employee in the selected evaluation session
- Date – Choose the date when the reminder should be sent. After selecting the date, you’ll see the option “Notify 0 days before” – choose how many days in advance the notification should be sent.
- Optionally, check Send email and select the time for the message
- Click on Create reminder
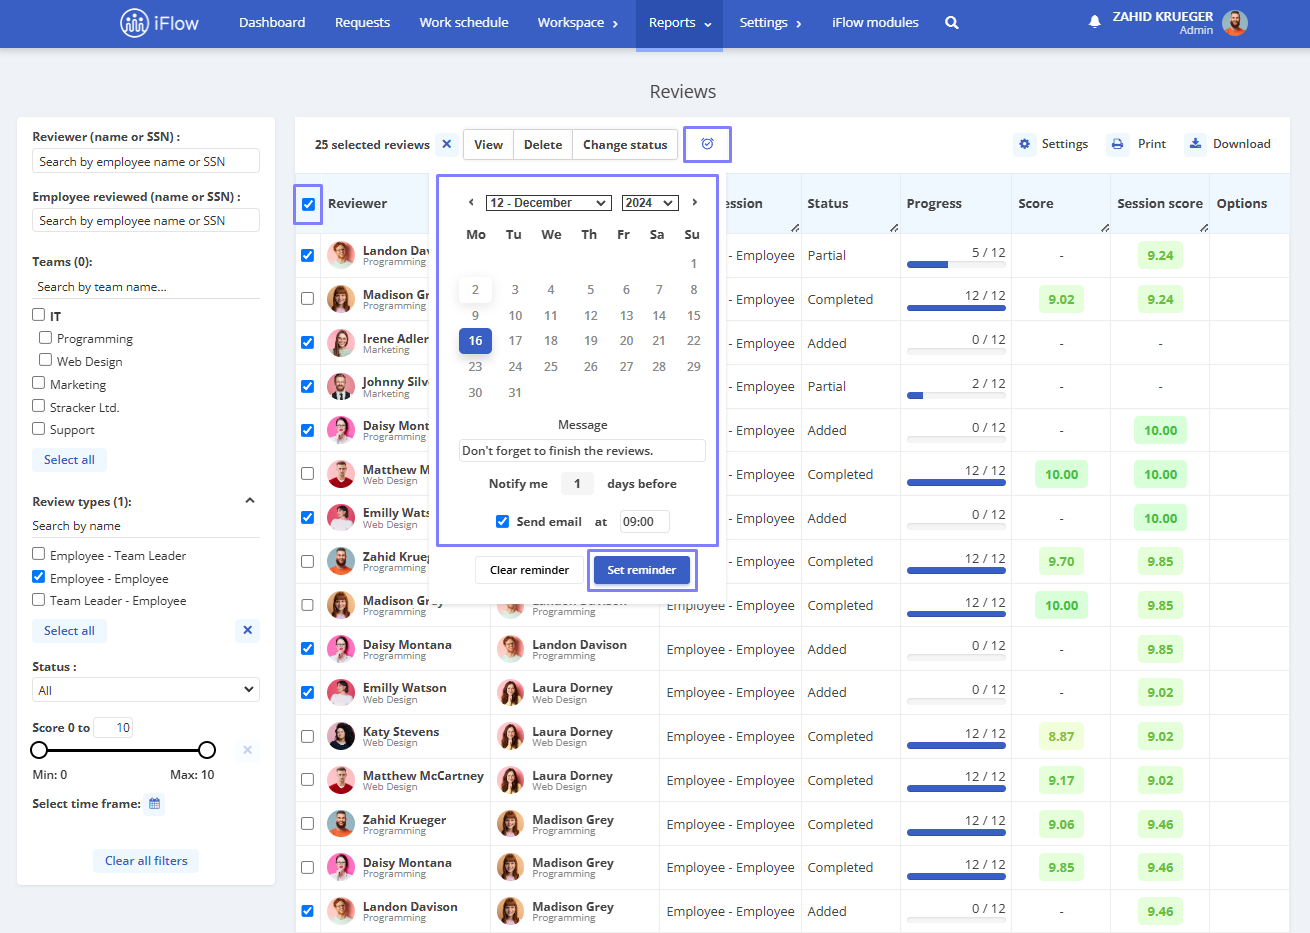
Review Reminder from the Review Report
- From the Reports – Reviews menu
- Select the review for which you want to add a reminder
- At the top of the report, you’ll find a clock-shaped icon
- Click on the icon to set a reminder
- You can choose the message, the message date, and the number of days in advance for the reminder and check the option to send the reminder via email if you want
- Finally, click the Set reminder button
Reminder Events
It can be used to send a reminder to the employee associated with a particular event. For example, you can remind an employee to explain remaining tasks to their replacement before going on leave.
Steps to Create a Reminder:
- Enter Message – Provide the message you want to send as a reminder
- Select Event – Choose the event for which you want to set the reminder
- Choose Reminder Date – Select the date for the reminder and how many days before this date the notification should be sent
- Create Reminder – Click on the Create Reminder button to finalize and set the reminder
By using the Event Reminder feature, you can ensure that important tasks or information related to specific events are communicated effectively and in a timely manner.

Signature Reminder
This feature applies to a document already created, which requires a signature from the employee or manager.
Steps to Create a Reminder:
- Enter Message – Provide the message you want to send as a reminder
- Choose Document – Select the document (based on the selected document, the application will generate a list of employees who need to sign it)
- Check Employee – Tick the box next to the employee who will receive the notification
- Choose Reminder Date – Select the date for the reminder and specify how many days before this date the employee should be notified

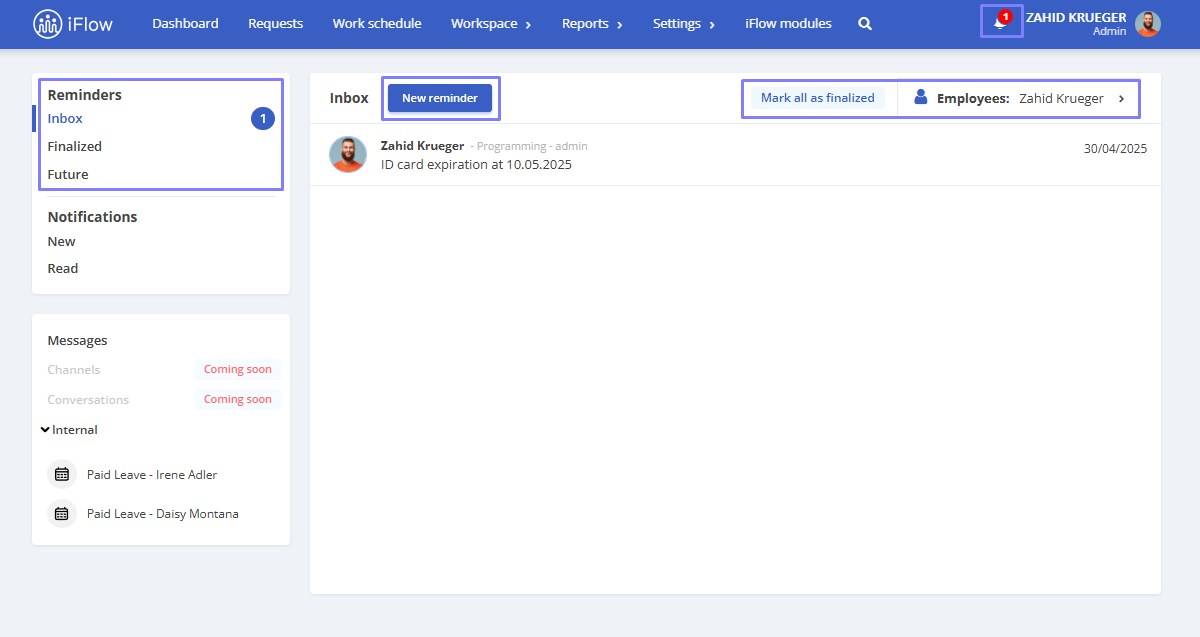
Reminders are structured on the notifications page into three categories:
- Inbox – Recent reminders that have not yet been completed
- Finalized– Reminders that have been marked as completed (to mark a reminder as completed, hover the reminder in the Inbox and click on the checkbox next to it)
- Future – Reminders for which you have chosen a notification date further ahead than the current day

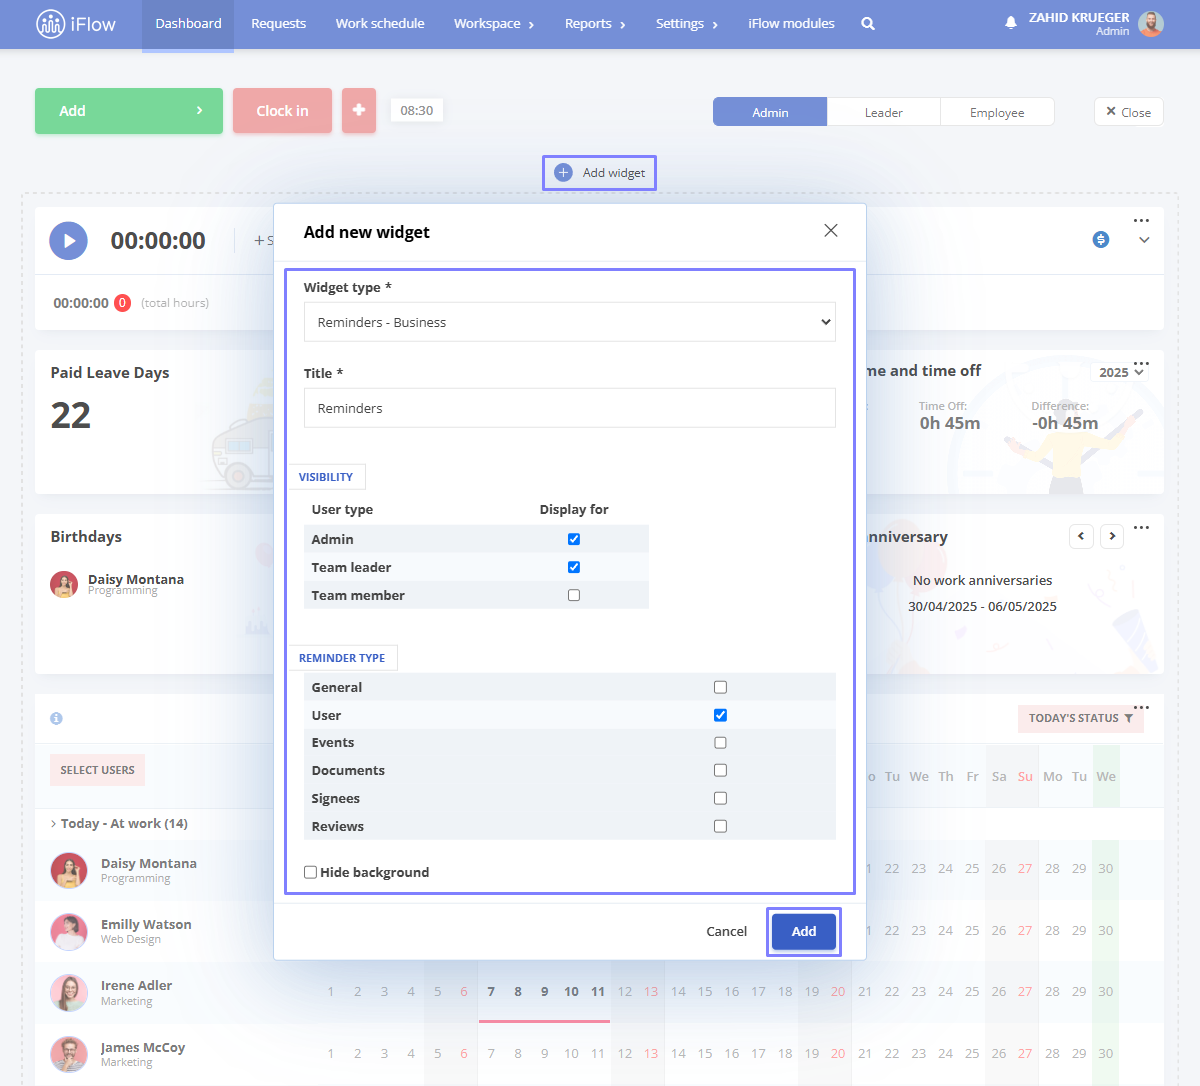
Reminder Widget
- Click on the Settings icon in the top right corner of the main Dashboard, then click on Add widget
- Select Reminders under Widget type
- Enter the widget Title, choose the User type for which you want the widget to be visible and then the Widget type
- Click Add
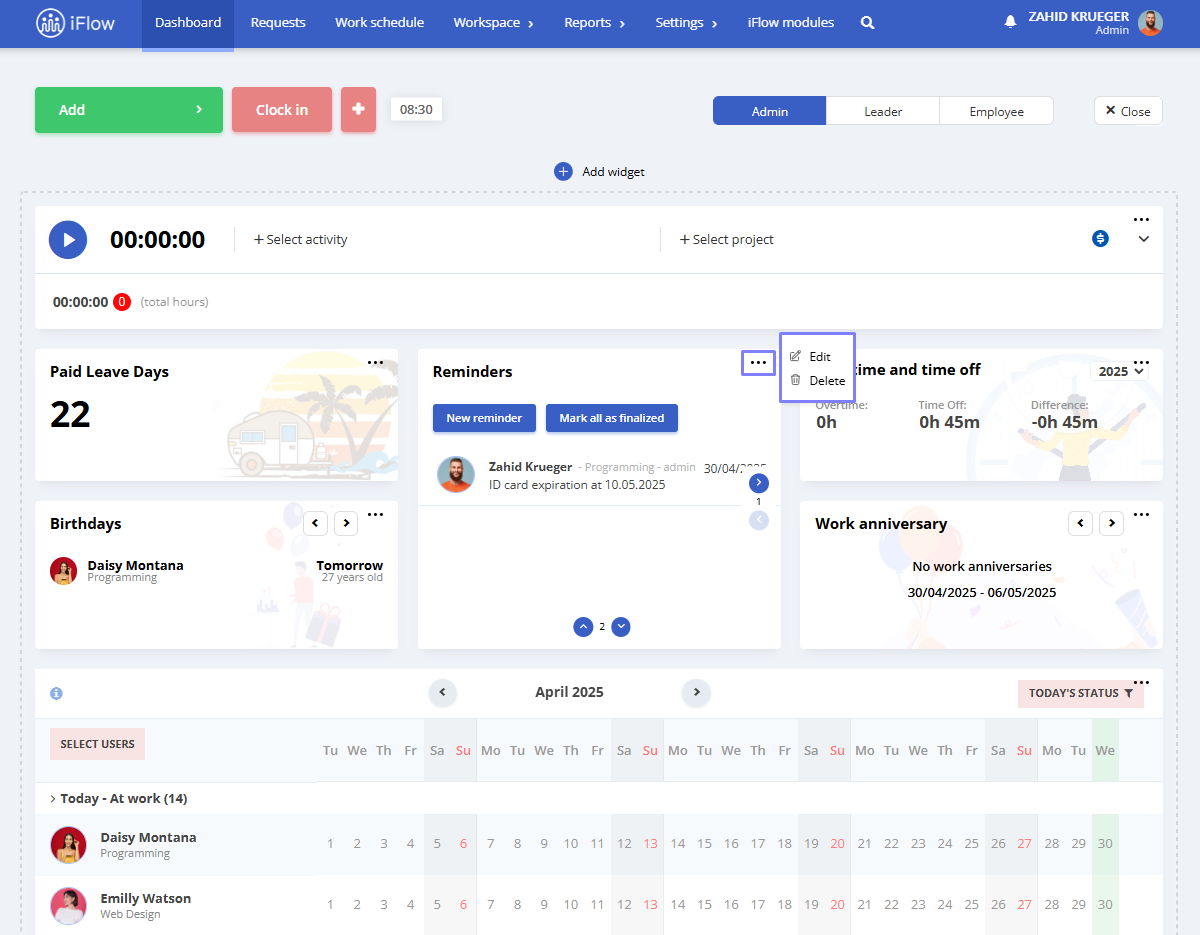
The widget will display reminders with expired deadlines or deadlines corresponding to the current date, a button to create a new reminder, and a button to mark all reminders as completed.
Editing the widget
To edit the widget, click on the Settings icon, then on the three dots in the top right corner of the reminders widget. Choose Edit to change the Title, Visibility, and Reminder type that will appear on the widget (for events, employee, general, documents, settings, ratings) or Delete to make the widget no longer appear on the General panel
Click the Hide background checkbox if you want the background to no longer be displayed.
Reminder notifications filter
In the notification bell section, there is a Reminders area where you can filter notifications by Employees. From this section, you can also add a New reminder or Mark all as finalized from the current day or earlier.
To view future reminders, click Future on the left side of the Reminders section. The same applies when viewing completed reminders by clicking Finalized or current reminders by clicking Inbox.