

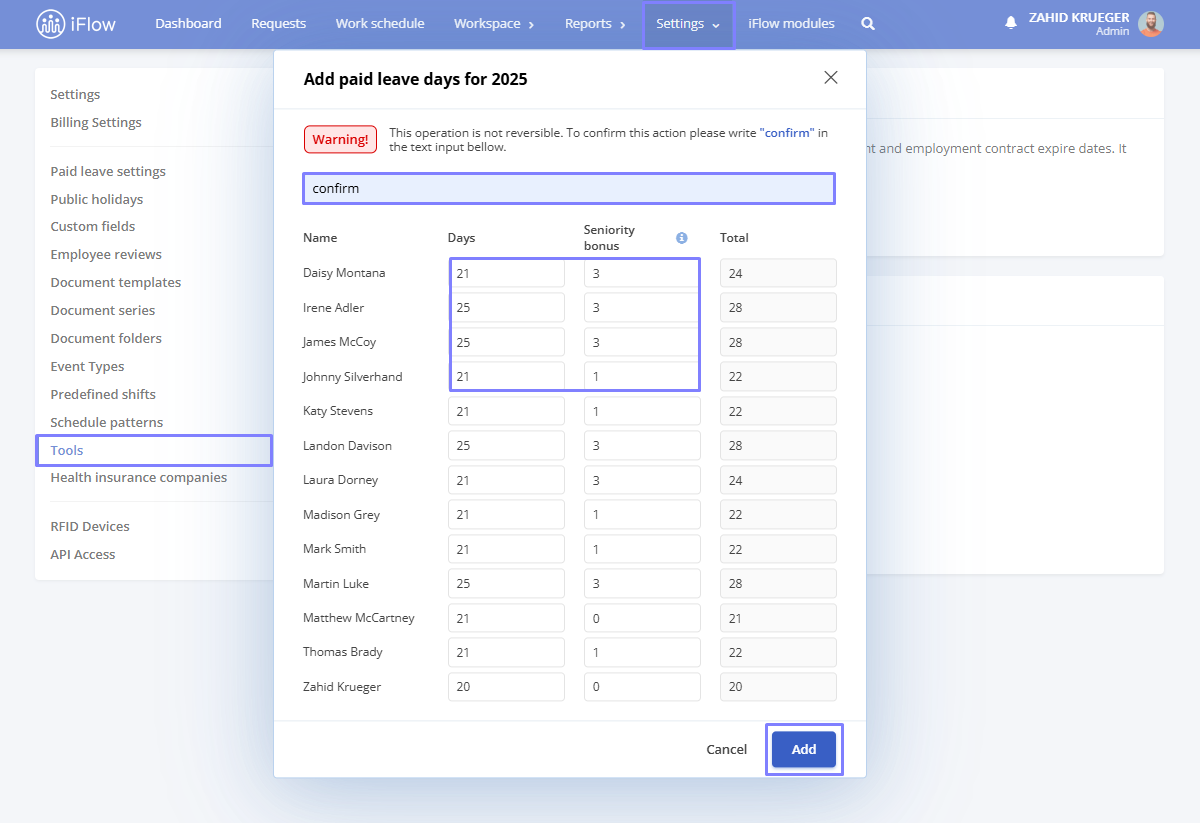
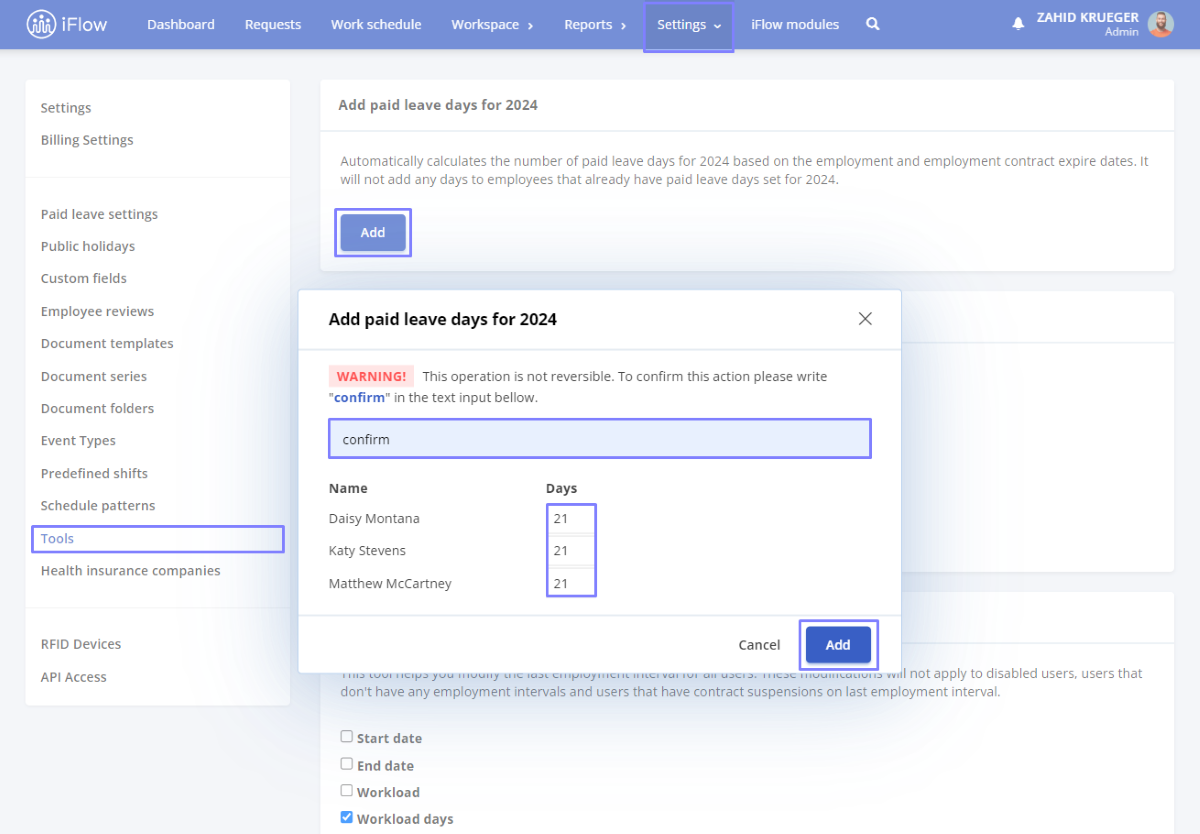
How to allocate annual leave days
- From the main menu, go to Settings – Tools
- Press the Add button in the Add paid leave days for 2024 section
The application will generate a list of employees and automatically allocate the leave days as follows:
- It will take the number of leave days allocated to each employee in the previous year. Therefore, employees will receive for 2024 the same number of days they had in 2023
- The default number set in the company settings will be allocated for employees without a leave history
- Seniority bonus, calculated based on company settings or the employee’s profile
You can directly modify the number of leave days from the open allocation box. If all the information is correct, type “confirm” and click Add.
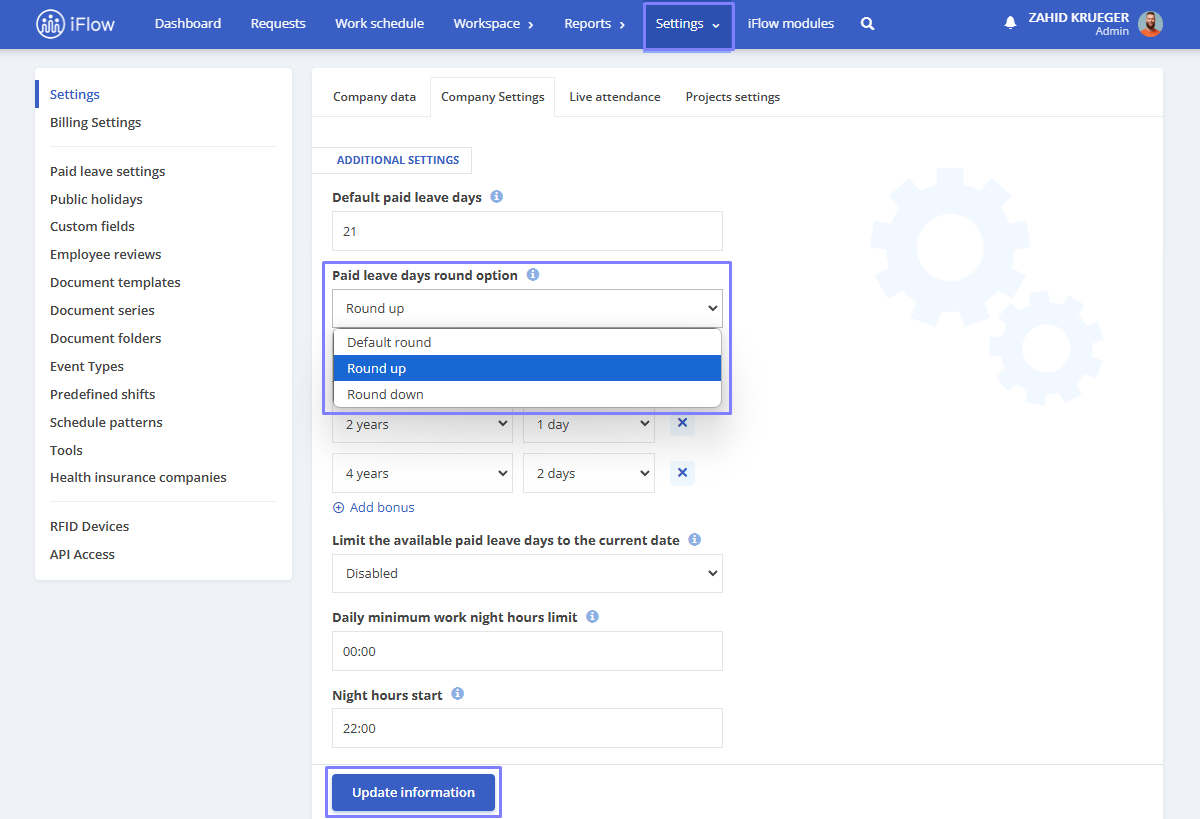
Vacation days by seniority at the company level
- From the main menu, go to Settings – Company
- Click on the Company Settings submenu
- Under the Paid leave days round option, select your preferred setting:
- Default rounding – applies the standard rounding rules
- Round up – the result is automatically rounded up, regardless of the decimals
- Example: If an employee is entitled to 21.3 days of leave, they will receive 22 days
- Round down – the result is automatically rounded down
- Example: If an employee is entitled to 21.7 days of leave, they will receive 21 days
- After you choose the preferred option, click Update information
Setting vacation days based on seniority
In this section, you can also configure the number of additional vacation days granted according to seniority. Depending on the employee’s seniority in the company, you can add up to 3 days per year.
For example:
- At 1 year of seniority – +3 days
- At 2 years of seniority – an additional +2 days
Thus, an employee with 3 years of seniority will receive the standard vacation days plus the additional ones based on seniority.
How the setting works
This option controls how paid vacation days are rounded, especially for employees with less than one year of service. For example, if an employee has worked for only 7 months, the system will automatically round the number of vacation days either up or down, depending on the selected setting.
Note: This setting is also available in each employee’s profile at the individual level. It allows you to manage how the seniority-based vacation bonus is applied per employee.
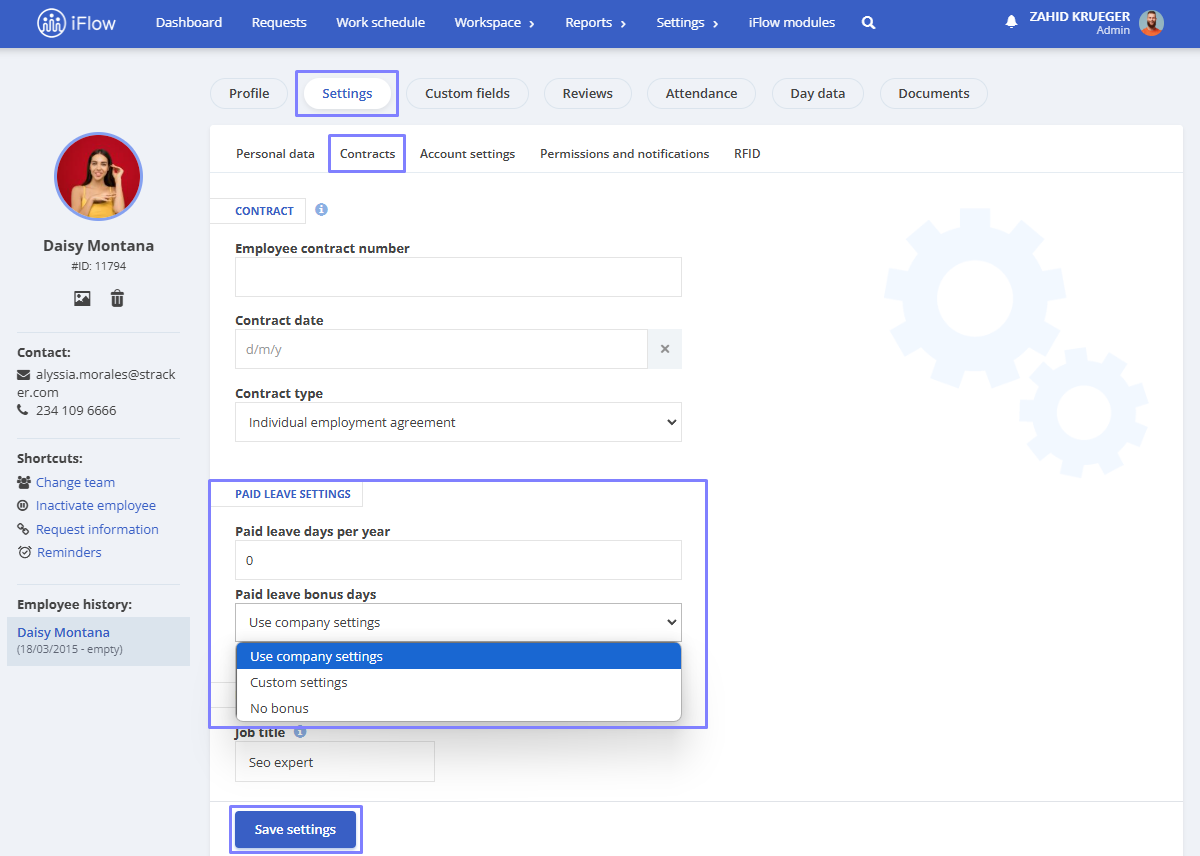
Vacation days by seniority at the employee level
- Open the employee’s profile.
- Go to Settings – Contracts – Paid vacation settings
- Here you will find the options to set:
- Paid leave days per year
- Paid leave bonus days
- Select one of the three options for granting the bonus:
- Use company settings – automatically applies the bonus according to the company’s general configuration
- Custom settings – allows you to define a specific bonus for this employee
- No bonus – the employee will not receive additional vacation days
- Click Save settings
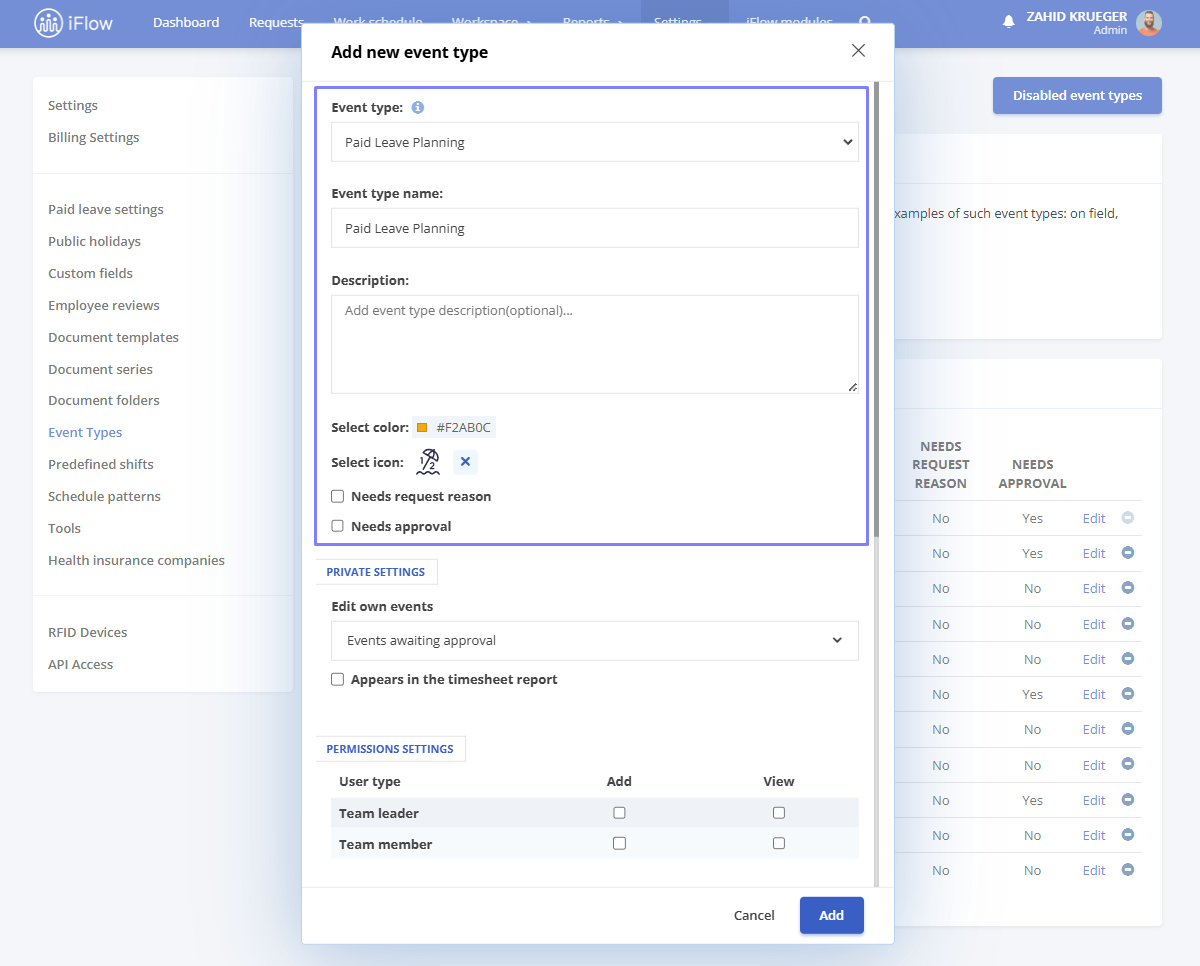
How to create the vacation planning event
From the Settings menu – Event Types:
- Click the Add new envent type button
- Select the Event type: Paid Leave Planning
- Enter the Event type name
- Add a Description for the event (Optional)
- Choose the color and symbol that will represent the event
- Decide whether the event requires Reason or Approval
- Click Add
Check the option Limit planning by the number of paid leave days allocated to see the remaining days and the total number of days for that year. Once this option is enabled, the system will automatically verify that the requested days do not exceed the established allocation, ensuring compliance with the imposed limits.


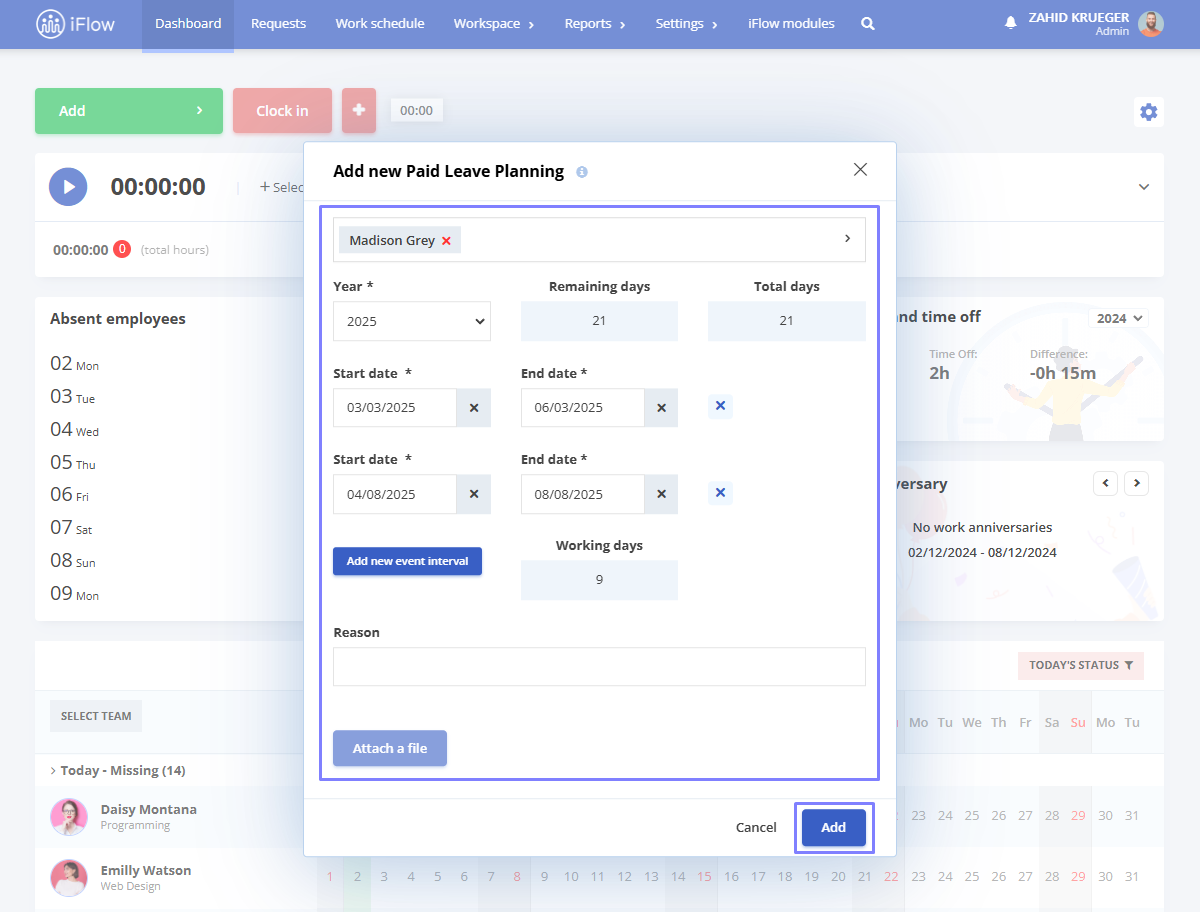
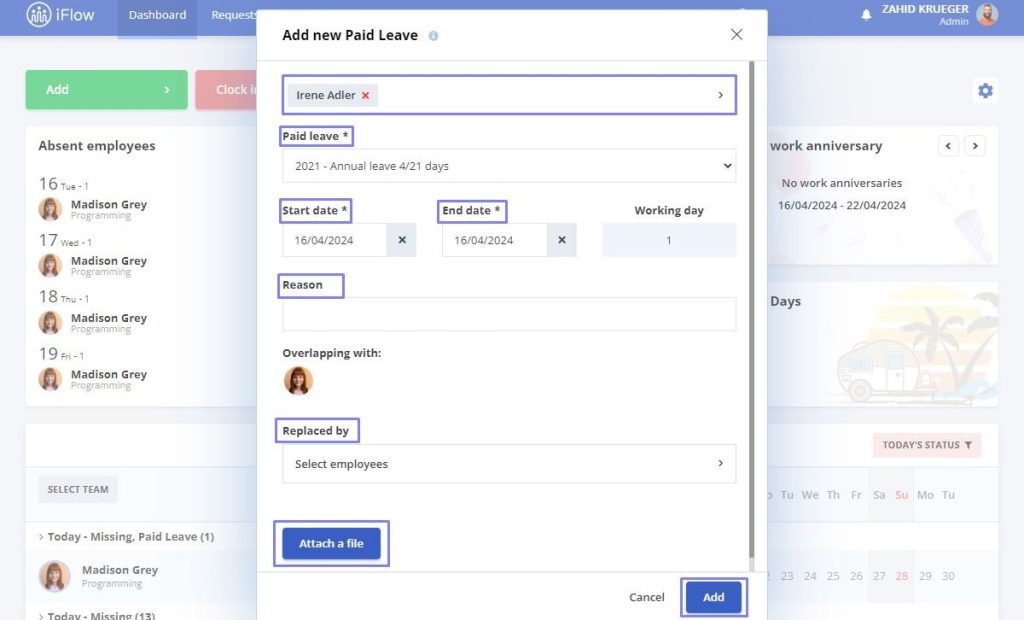
How to add a paid leave planning request
To add a paid leave planning event, follow these steps:
- Go to Dashboard and click on the Add button, then select Paid Leave Planning
In the pop-up window, you will need to fill in the following details:
- Employee: Select the employee you want to add to the planning (if you are an admin or team leader). If you are an employee, you will be automatically selected
- Year: Choose the year for which you want to plan the leave
- Start date and End date: Specify the leave period
- Add new event interval if you want a multi-period planning
- Reason for the Request (if applicable)
- You also have the option to Attach a file if needed
- Finally, click Add to save the request
Attention!
This event serves a strictly informational purpose, being used only for planning and organization. It does not impact the number of available leave days or generate official documents (such as paid leave requests). As the planned period approaches, and if no changes occur, the employee must submit a regular leave request or follow the internal procedures.
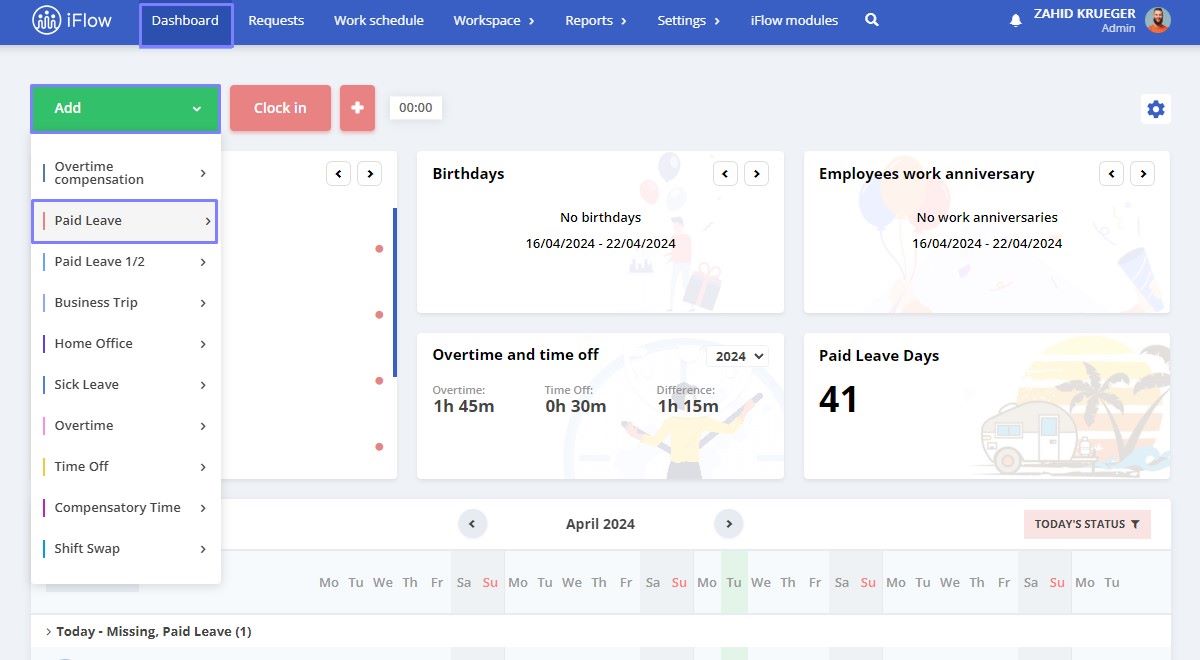
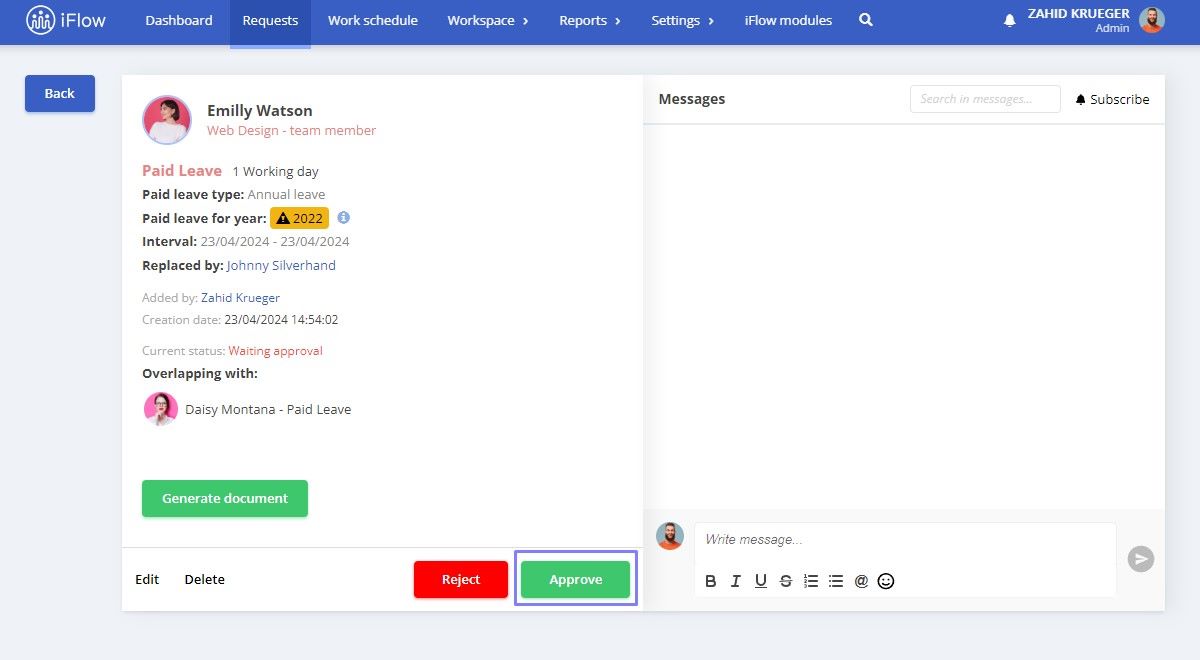
How to add a paid leave request
To add leave days, access Dashboard – and click on the Add events button – Paid Leave.
In the box that opens, you need to select the following:
- The employee to whom you want to add the leave, in case you are an administrator in the application or a team leader. If you are an employee, you will be automatically selected
- The type of paid leave: Annual leave or Special Leave Days
- Start date and End date
- Reason for the request, if applicable
- Replaced by – if the option for this category of event is enabled
You also have the option to Attach a file if necessary and then click Add.
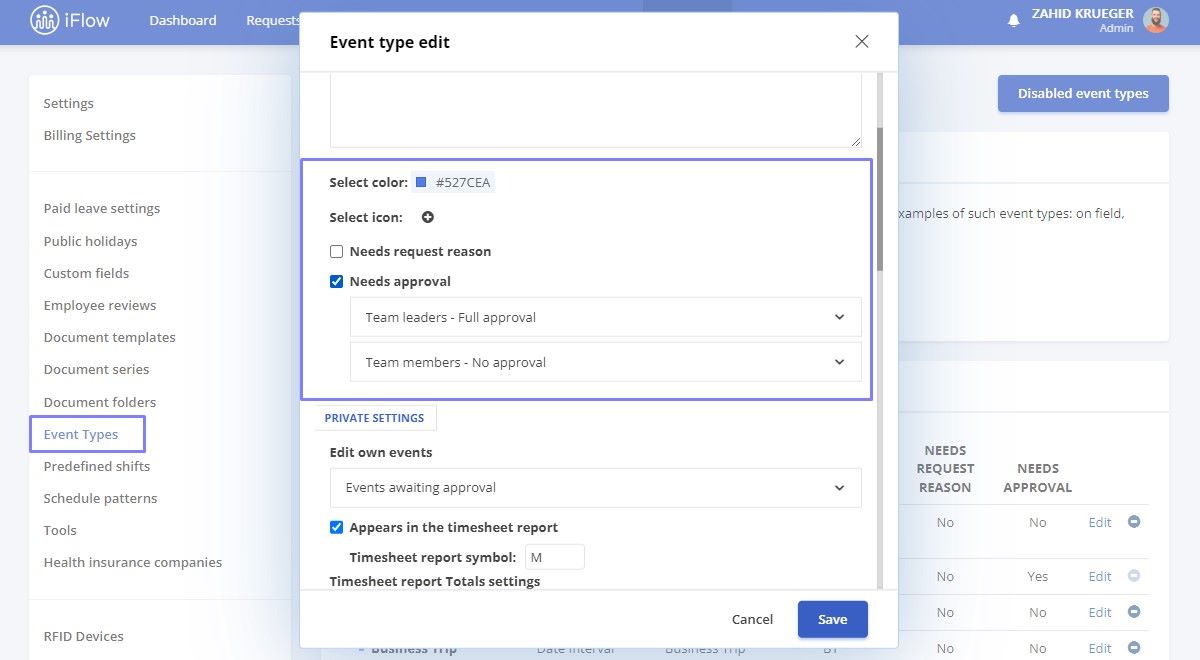
In the iFlow application, paid leave is a type of event that can be customized according to each company’s preferences.
To customize this event, access the Settings menu – Event Types.
Click on the Edit button next to the Paid Leave event.
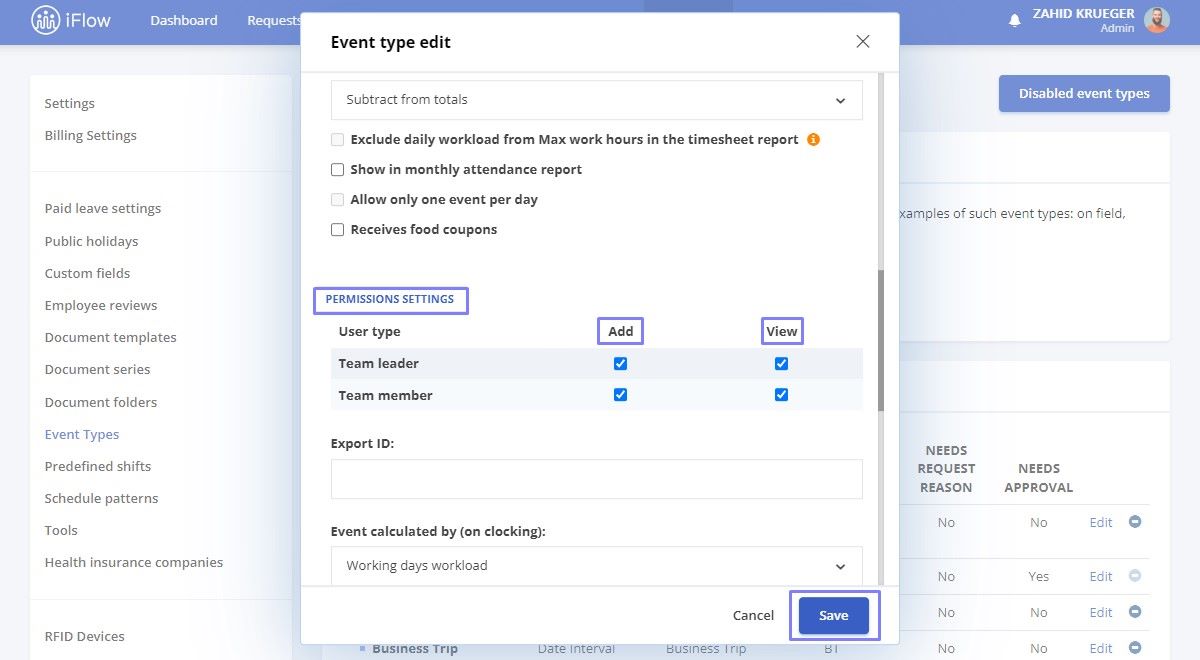
In the box that opens, you can set the following:
- Color – to distinguish it in the Dashboard
- Whether it Needs request reason
- Whether it Needs approval and whether team leaders and/or team members have any approval levels
- Whether it Needs a replacement
- Permissions based on user category
- How the event is Calculated
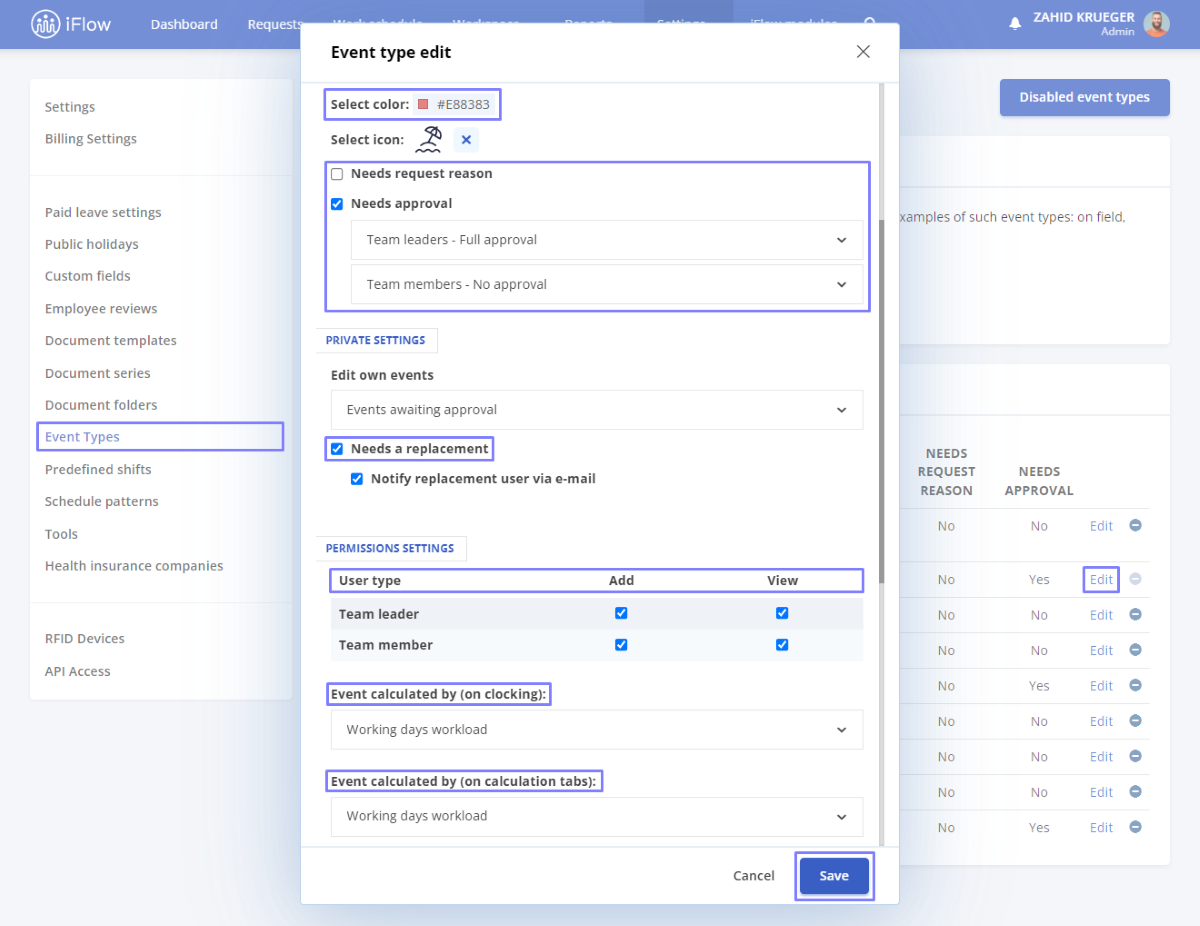
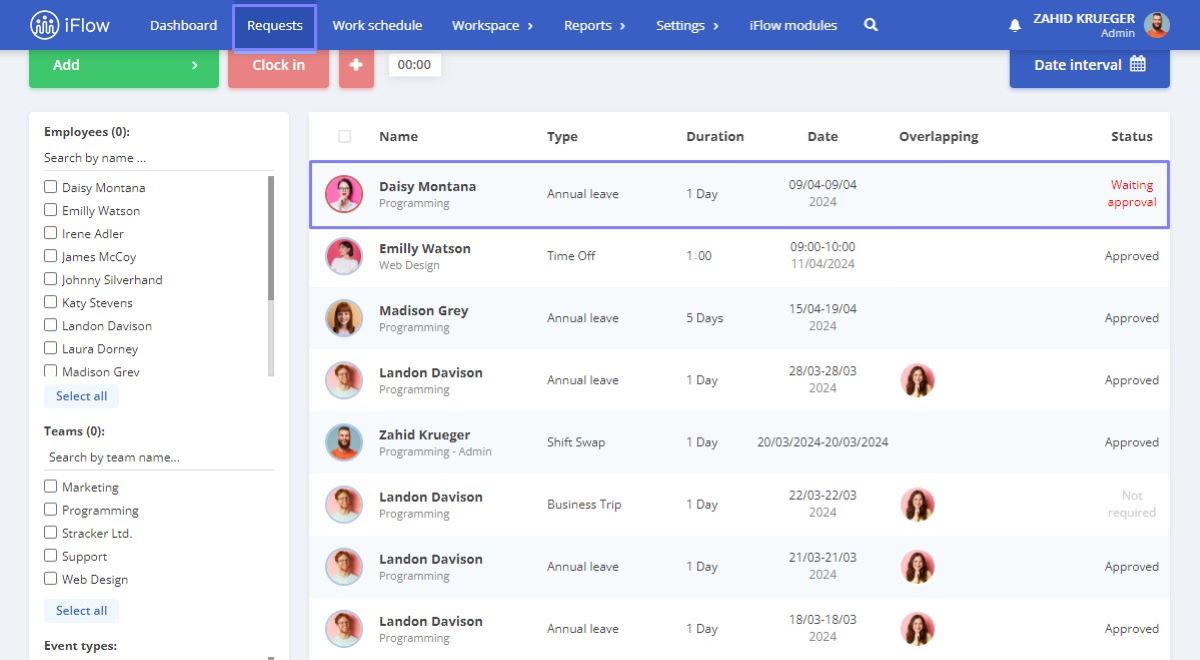
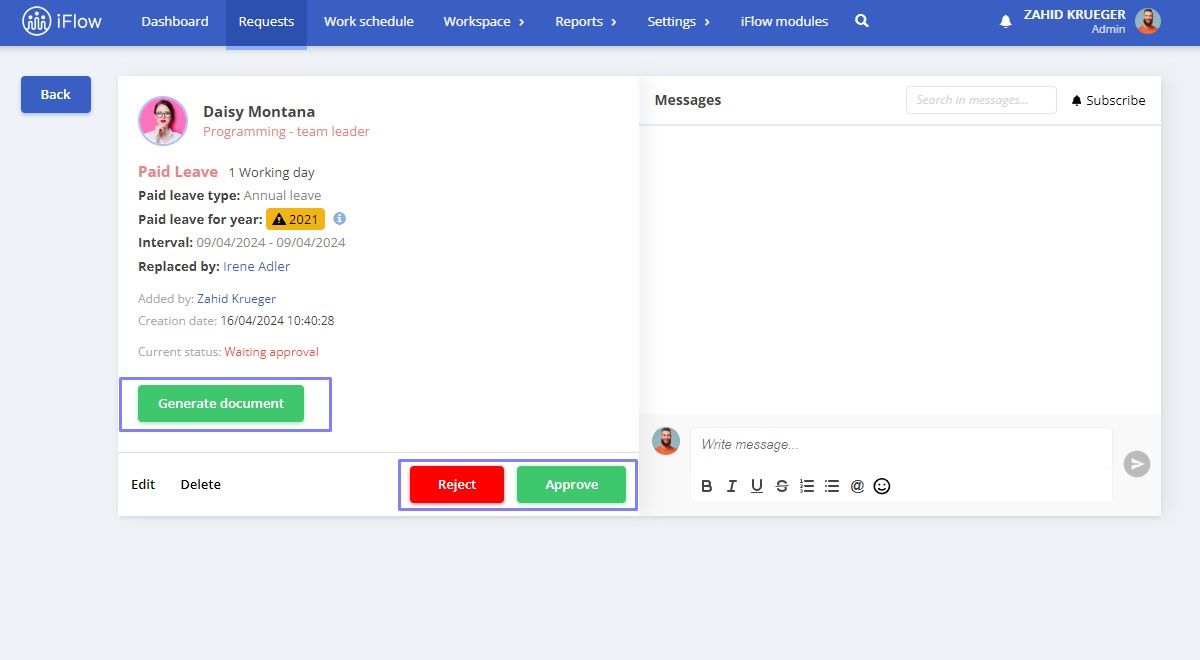
If you set the event to require approval, go to the Requests to view the added leaves and click on Waiting Approval.
To view the leave days in an employee’s profile, click here.
How to add paid leave days for multiple employees
To add paid leave for multiple employees, follow these steps:
- From the Dashboard
- Click on Add events
- Select Paid Leave
- In the add window, check the employees or, if applicable, click Select All
- Choose the desired type of paid leave – Annual or Special Leave Days
- Select the desired period and click Add
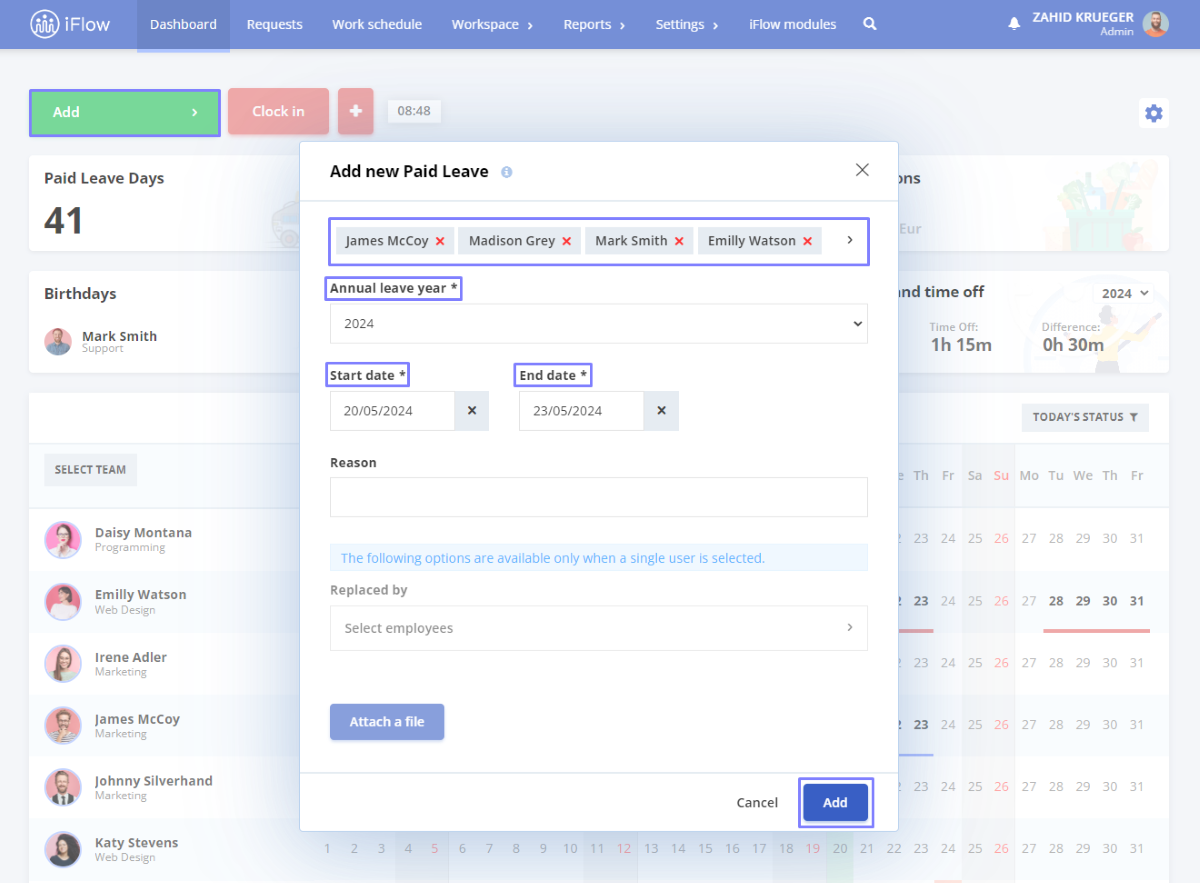
Attention!
- You won’t be able to attach documents for multiple leave days in addition
- You won’t be able to fill in additional custom fields for the event
- You can add vacation days for one specific year for all employees. In case some employees do not have vacation days for the selected year, you will need to remove them from the list and add their leave later
Updating leave days for all employees simultaneously
Updating leave days for all employees simultaneously is available in the main menu under Settings – Tools. To do so, you must fill in the number of days you wish to allocate to all employees.
Attention!
- These days will be allocated automatically to active employees without allocated days for that year. The application will not double them if the days have already been allocated.
- Furthermore, suppose you have employees with expired employment contracts and have yet to deactivate them. In that case, the application will not allocate leave days to them because their employment contract has expired.
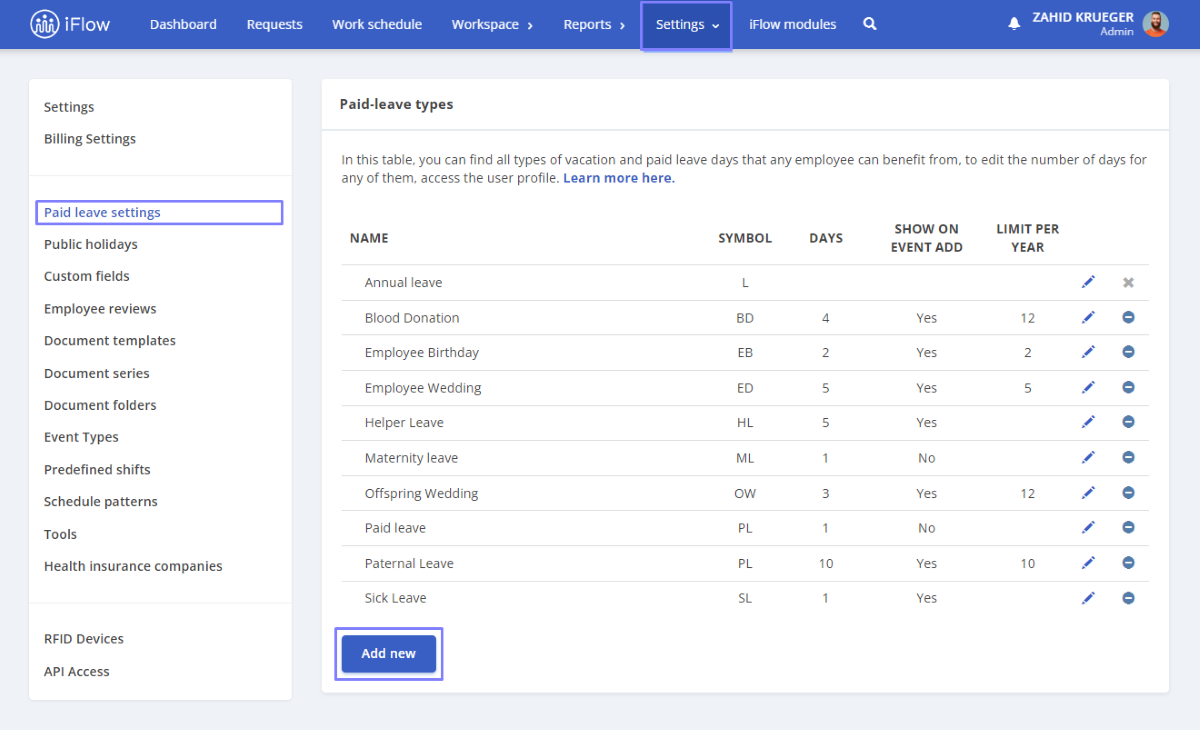
Special Leave Days
The application includes predefined standard types of paid leave or special event leave. Additionally, each company can control these aspects:
- It can create new types of paid leave
- It can set an annual limit for these
- It can modify the number of available days for each type of paid leave
- It can deactivate existing categories
Below, you will find the steps for each action mentioned above.
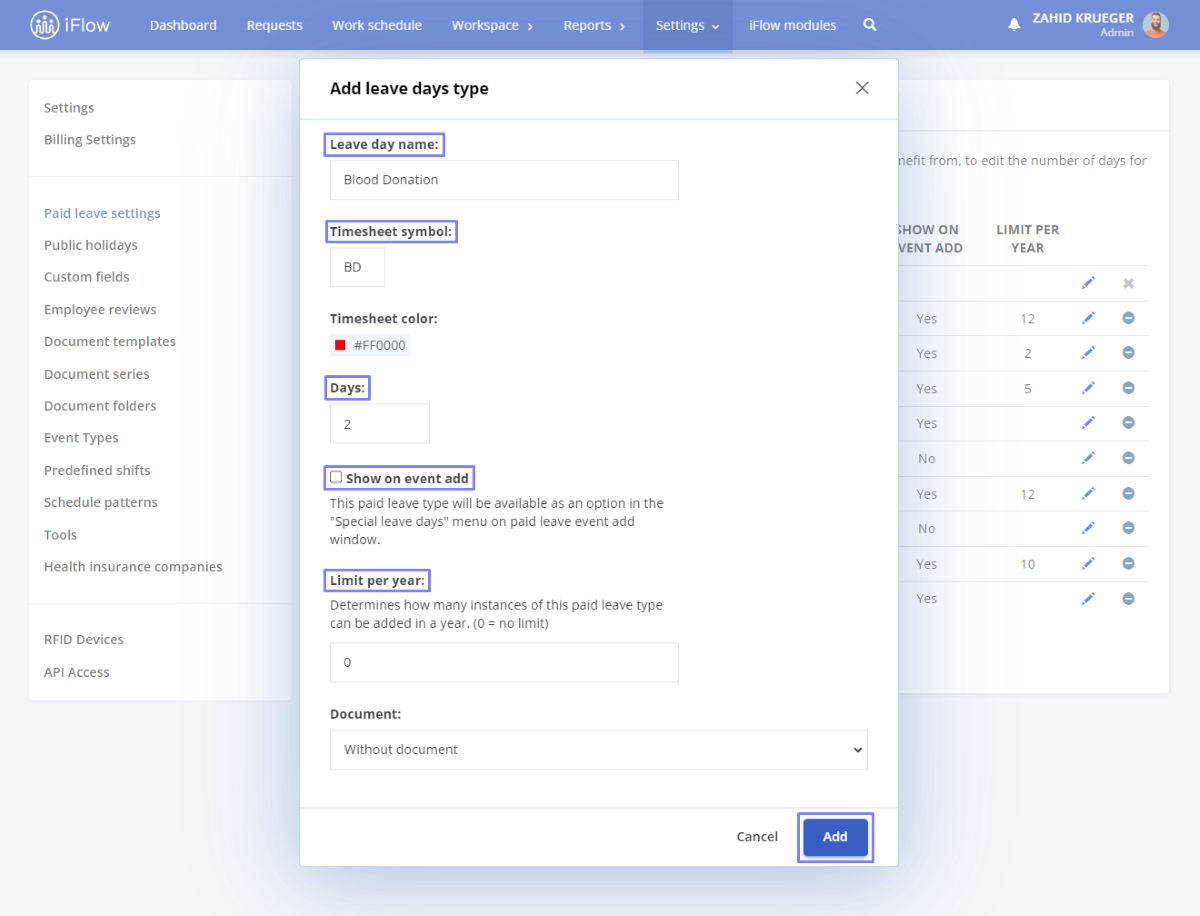
How to create new types of paid leave
If you need a new type of paid leave that is not available in the menu, you can create it by following the steps below:
- From the main Settings menu – Paid Leave
- Click on the Add new button
- Fill in the Leave day name of the paid leave
- Choose the Timesheet symbol to represent it in the attendance
- Fill in the total number of available Days
- Check the box Show on event add
- Set the Limit per year (explanations for this setting below)
- Click Add
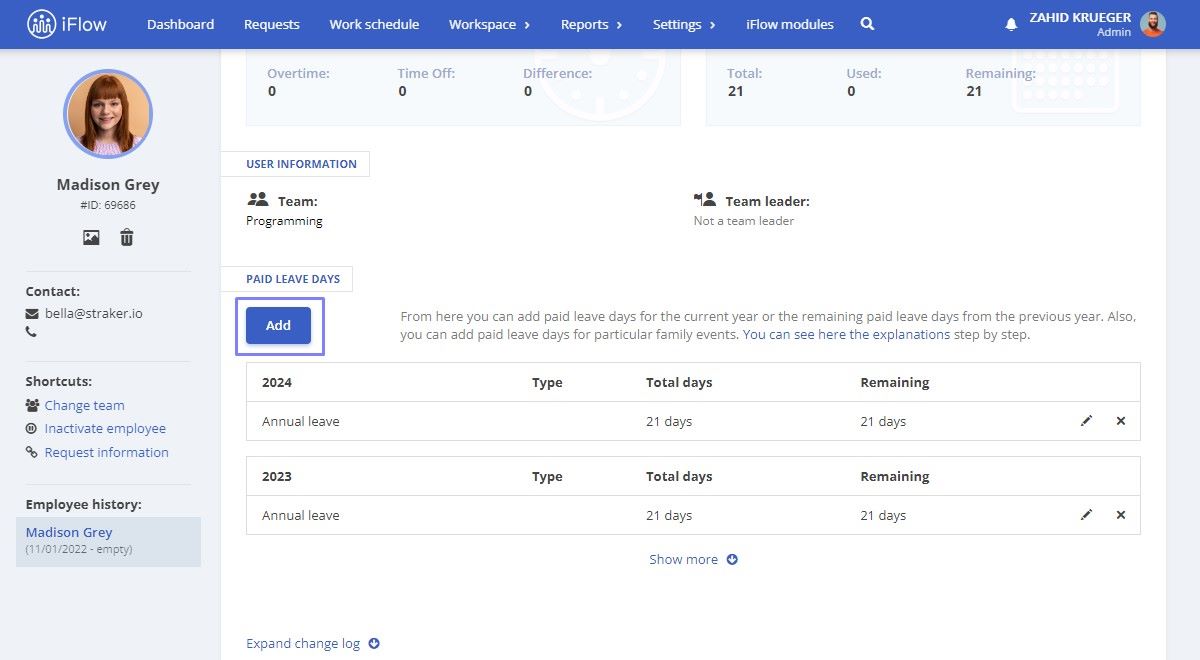
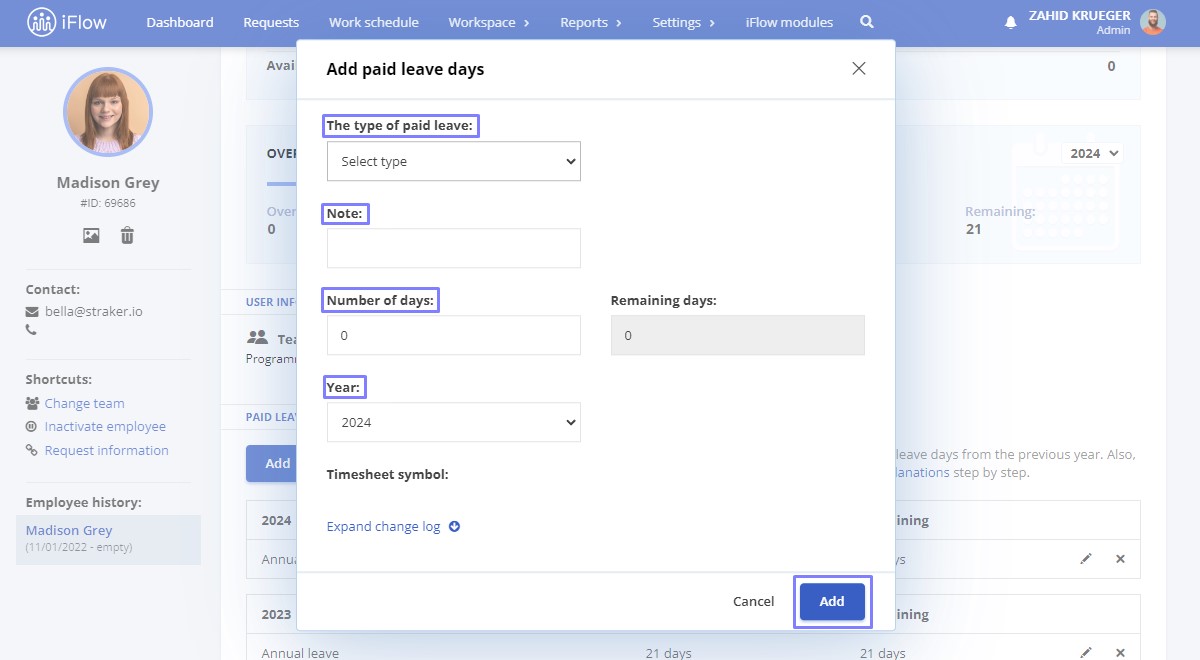
How to manually allocate paid leave/special event leave
- From the Dashboard
- Click on the employee name for which you want to add paid leave
- In the Paid Leave section, click on the Add button
- Choose the Type of paid leave
- You can modify the explanation Note
- Allocate the Number of days for this type
- Choose the Year (often used for paid leave days related to a year other than the current one)
- To complete the action, click on the Add button
Find out more about adding custom events with just one click here.
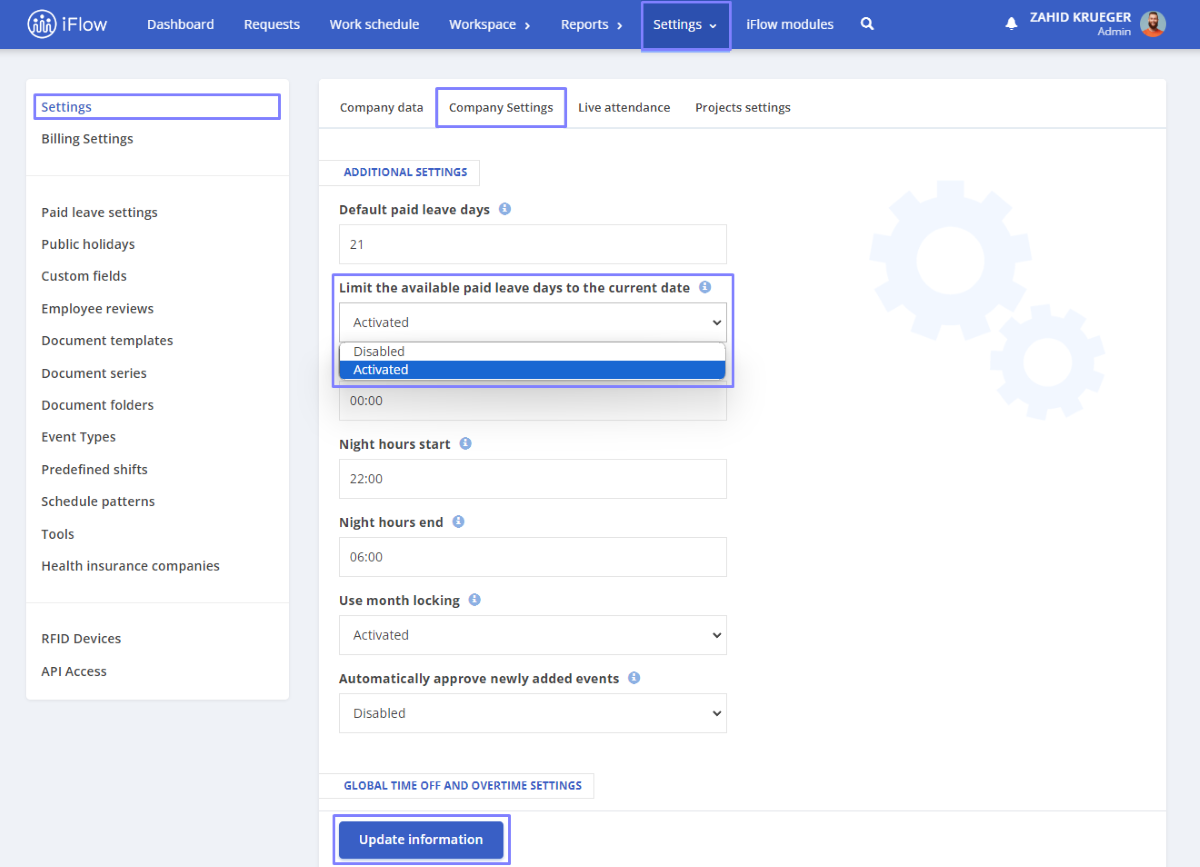
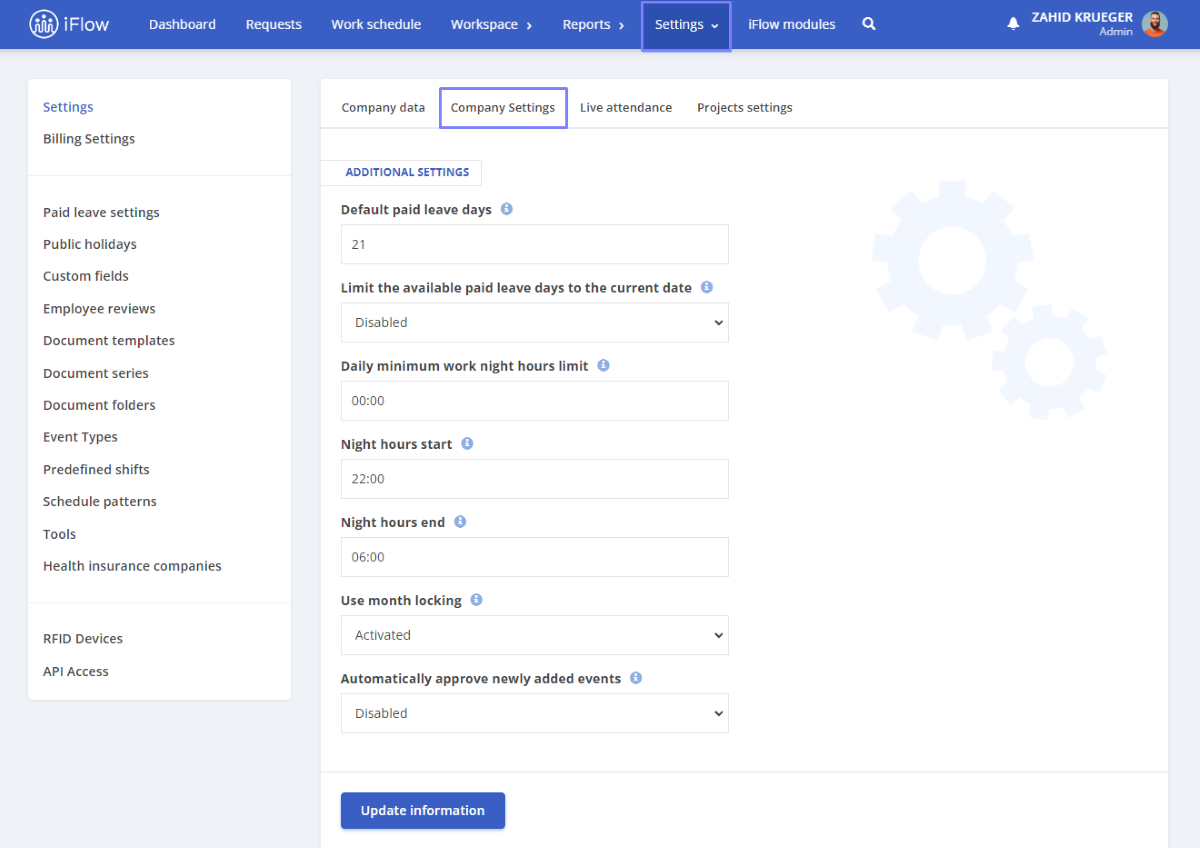
Limiting Vacation Day
How to activate the paid leave days limitation option
- From the main menu, go to Settings – Company
- Click on the submenu Company Settings
- Under the setting Limit the available paid leave days to the current date, choose the Activated option
- Then, click on the Update Information button
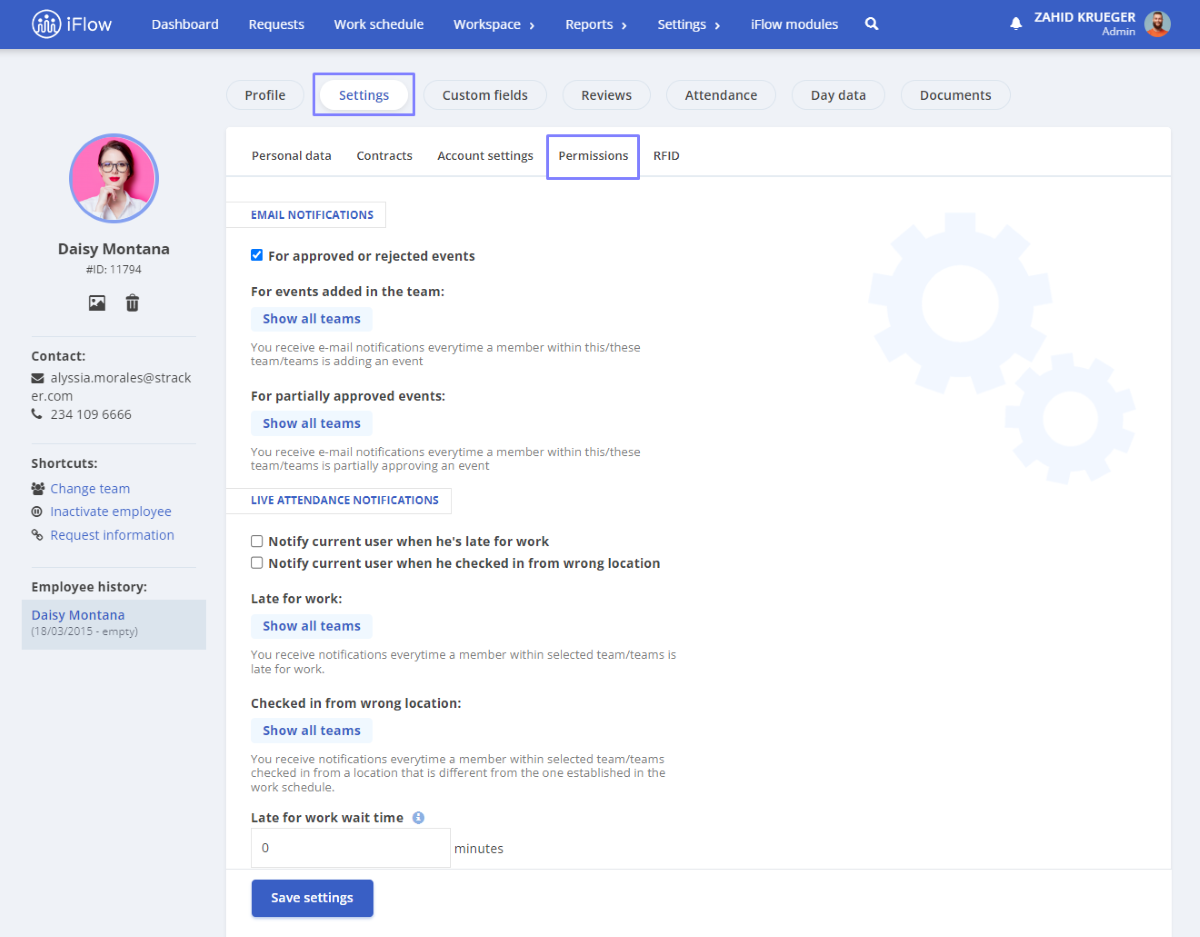
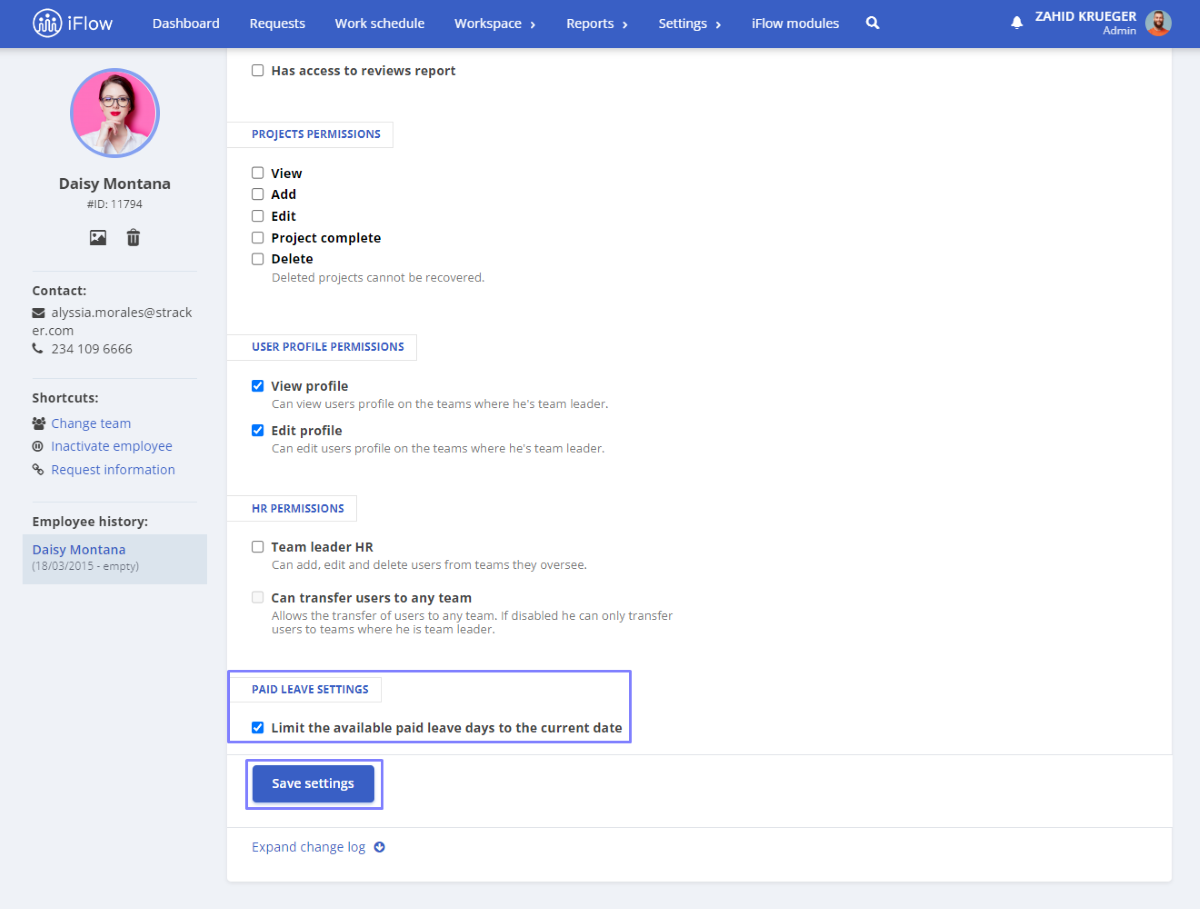
How paid leave day limitation works
The application automatically calculates the number of days an employee is entitled to when they create a request based on the total number of available days allocated to them.
It’s important to note that this limitation is also available in each employee’s profile. Therefore, if it’s enabled in the company settings but disabled in a specific employee’s profile, that employee won’t have that limitation.
To manage this option:
- Go to the Employee profile
- Click on Settings – Permissions – Paid Leave Settings – Limit the available paid leave days to the current date
- Check/Uncheck the setting
- Save the settings
How to View Overlapping Vacation Days
To activate this option:
- Access the Settings menu
- Company Settings – Global Viewing Permissions section
- View Events Overlap – choose either All Employees or Employees from the Same Team
- Click on Update Information
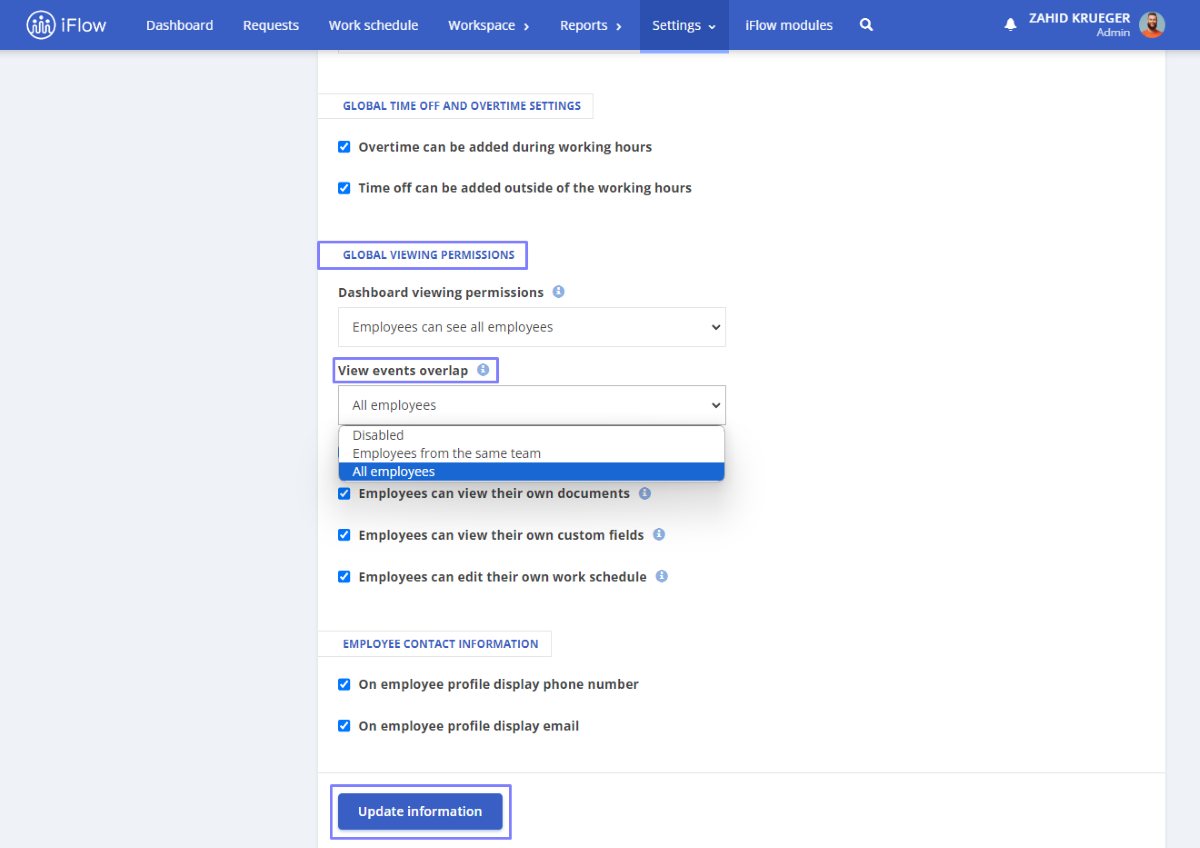
Thus, you can use the Dashboard and the Requests to view overlaps and maintain a clear record of employees scheduled for vacation.
Additionally, when adding an event, employees can see if it overlaps with those on their team or those they are scheduled to replace.
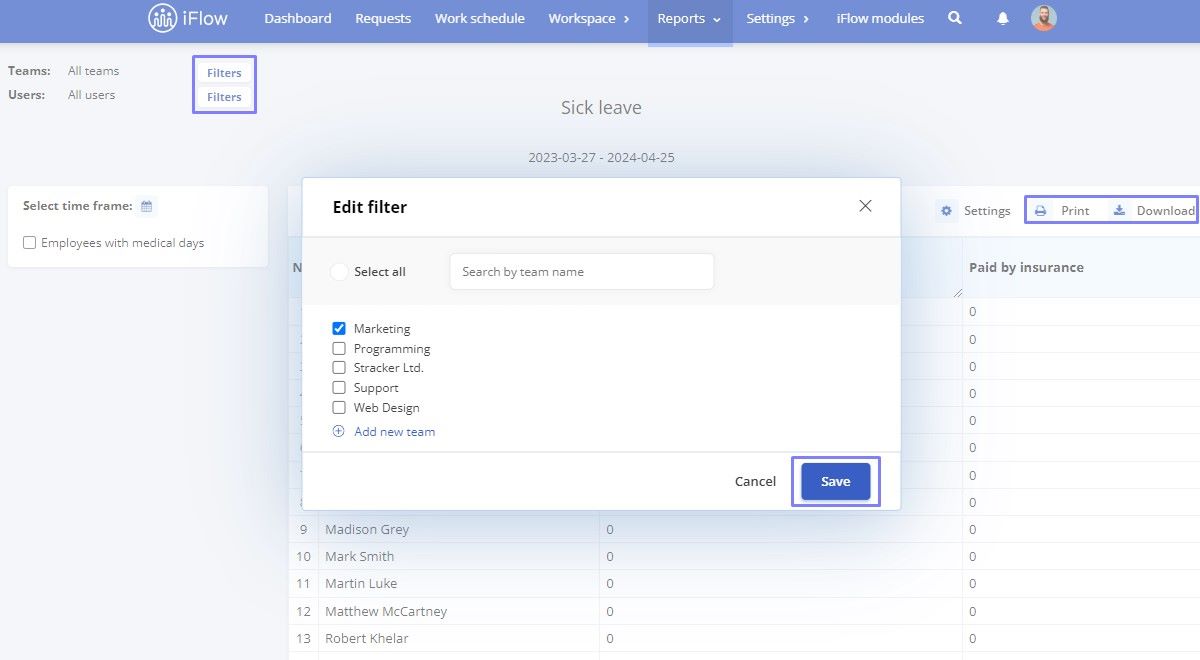
Sick Leave Report
The Medical Leave report is completed based on the medical leave events added to the application.
How to Modify the Report Structure
Follow the steps below:
- From the main menu, go to Reports – Sick leave
- Click on the Settings button (next to the Print button)
- Check the boxes for the columns you want to add
- Uncheck the boxes for the columns you want to remove
- Click Save
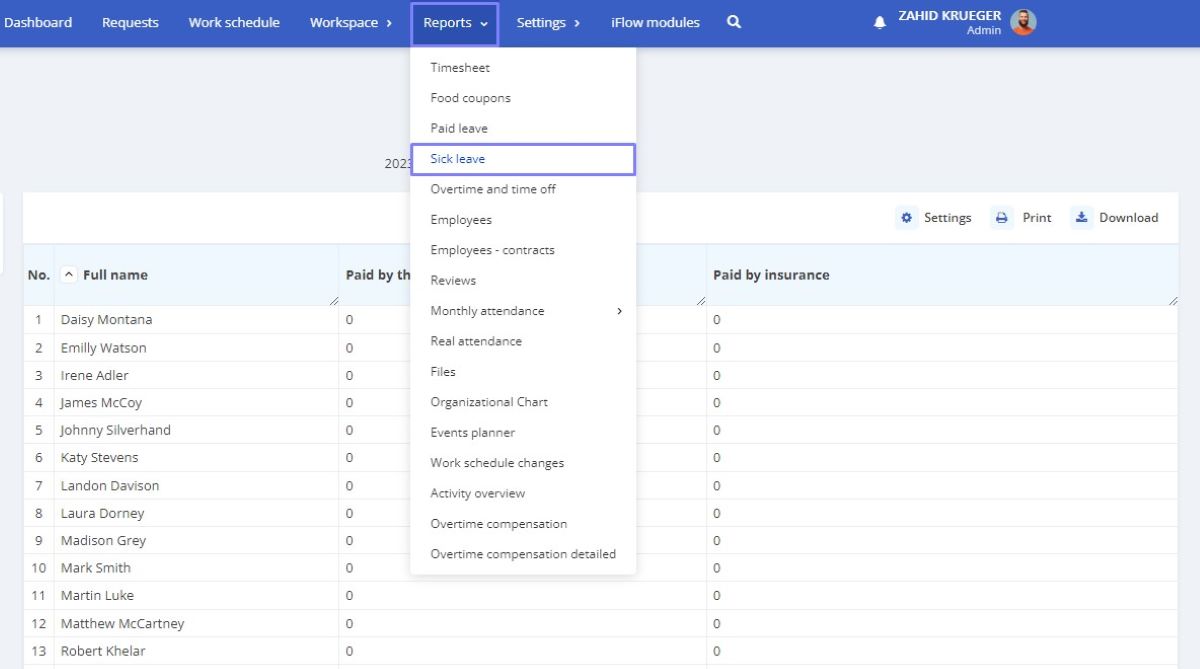
You can filter this report by department/teams using the Filter button. Additionally, you can select the option to display only employees who are on medical leave.
Using the Print and Download buttons, you can print or download this report anytime.
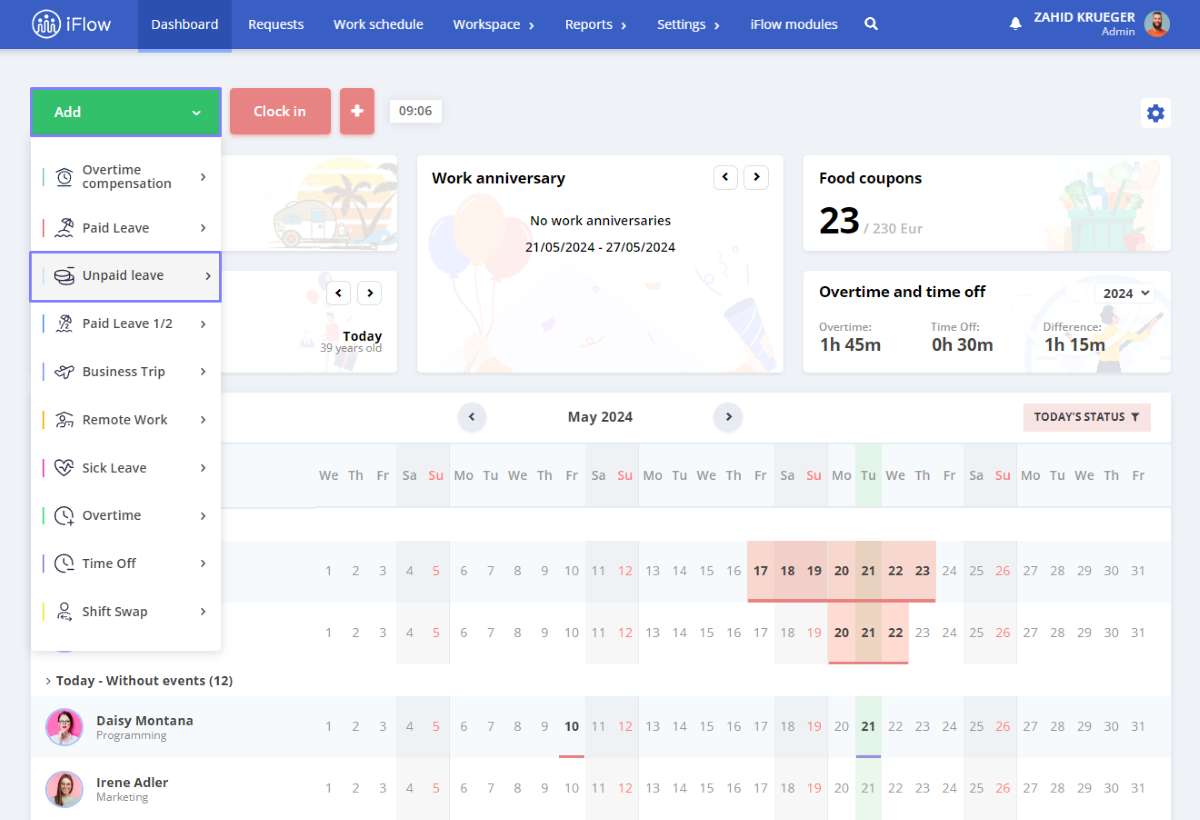
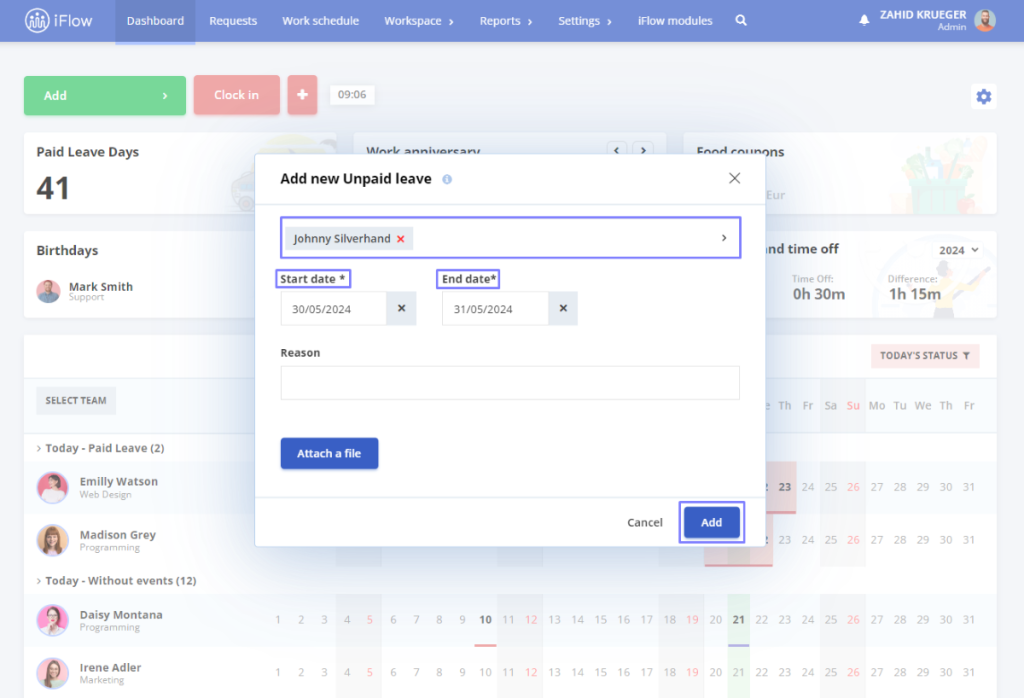
How to add unpaid leave for employees
- From the Dashboard
- Click on the Add button
- Click on Unpaid Leave
- Select the Employee
- Choose the Start Date and End Date
- Click on Add
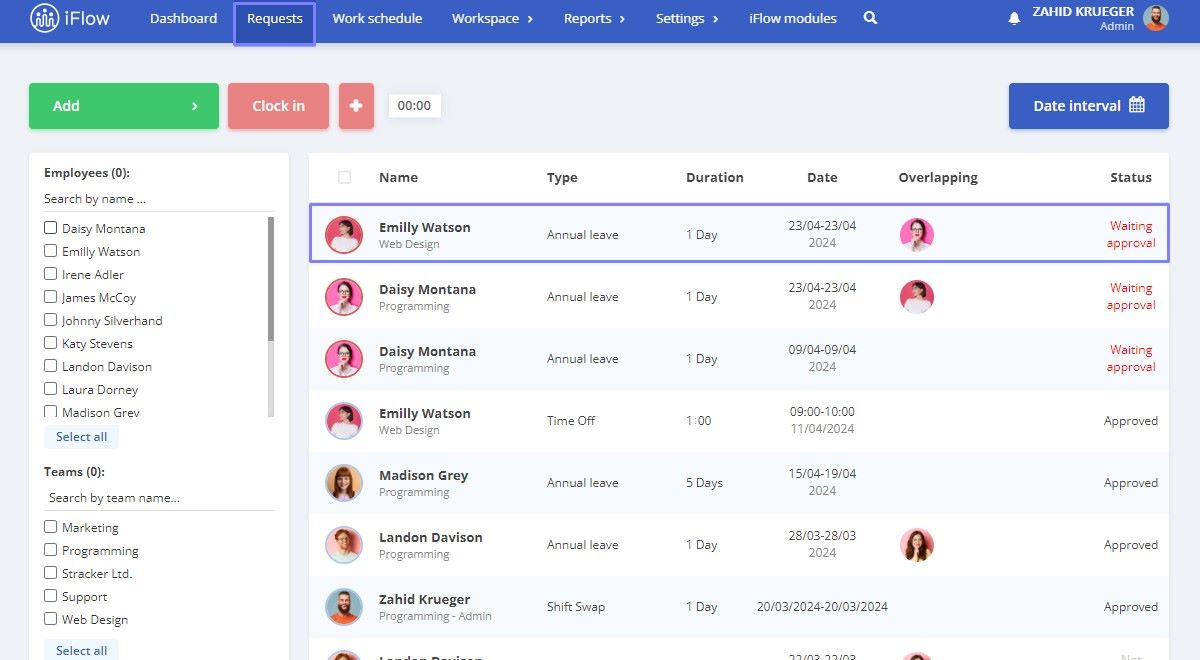
After adding the event, it’s time to approve it to be displayed in the attendance sheet and presence register.
From the main menu, go to Requests, click on Unpaid Leaves, then click on the Approve button.
You can follow the same steps for other similar events. iFlow allows you to record different types of paid leaves and vacations. You can configure them quickly and easily.
If you have any questions, please contact us at [email protected] or through the in-app chat.
Paid Leave Report
Access Reports – Paid Leave
With this report, you receive a clear record of paid leaves in the company, including:
- Full name
- Type of leave
- Number of allocated, taken, planned and remaining days
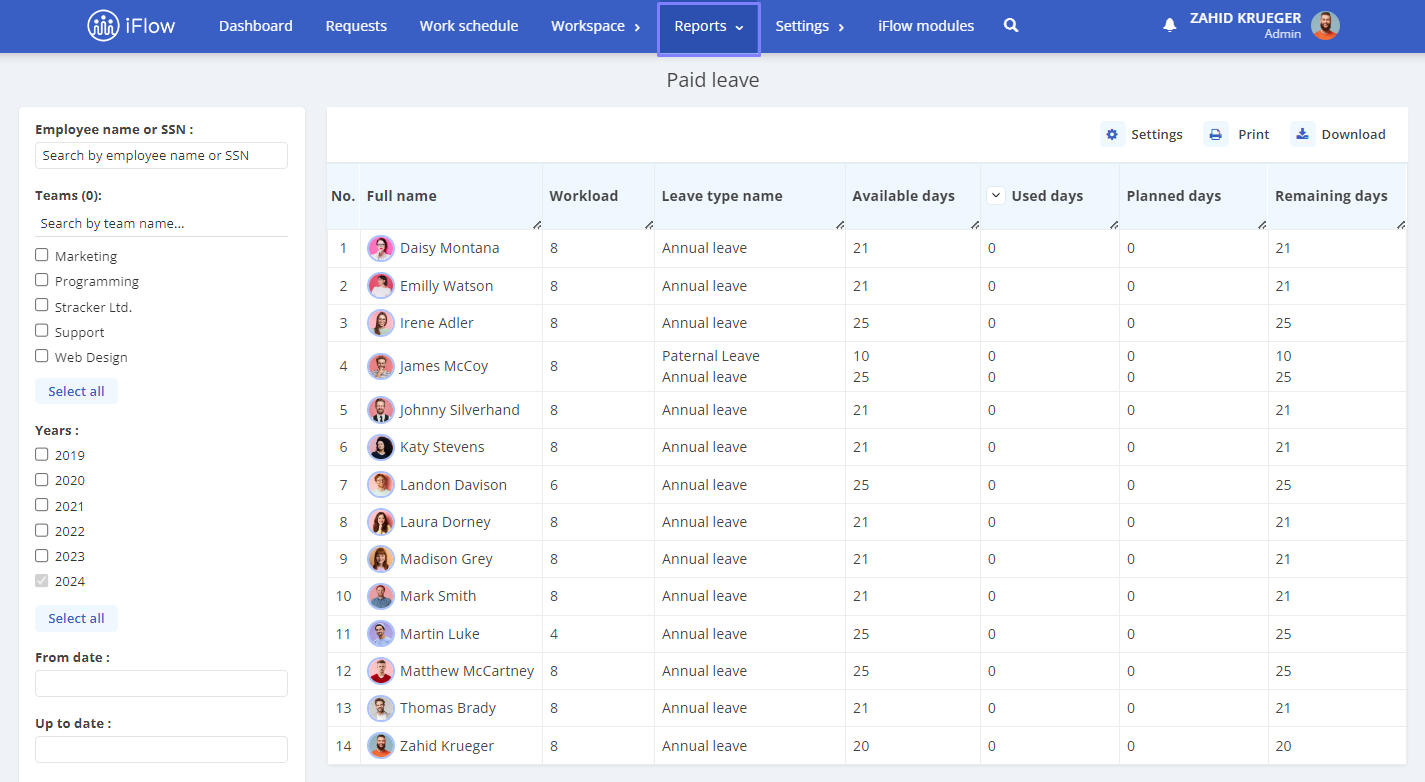
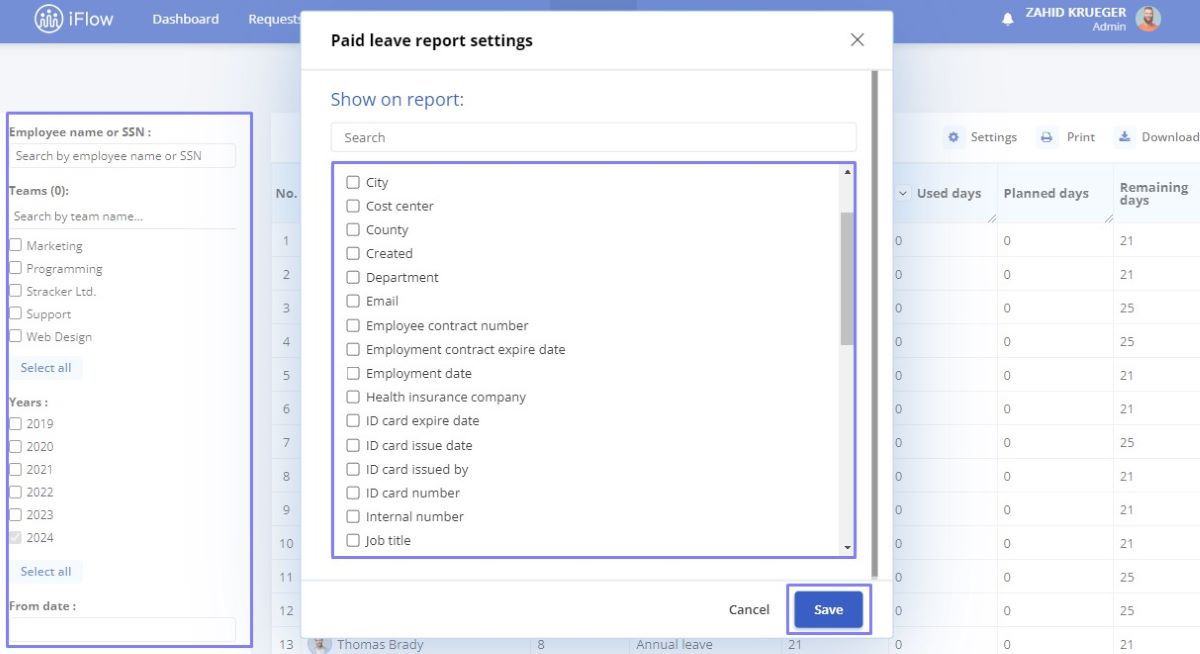
In the report, you can add optional columns from the settings found in the same section.
- Click on Settings and check the categories of additional information you need.
Additionally, the report can be filtered by:
- Employees
- Teams
- Years
- Periods
- Types of paid leave
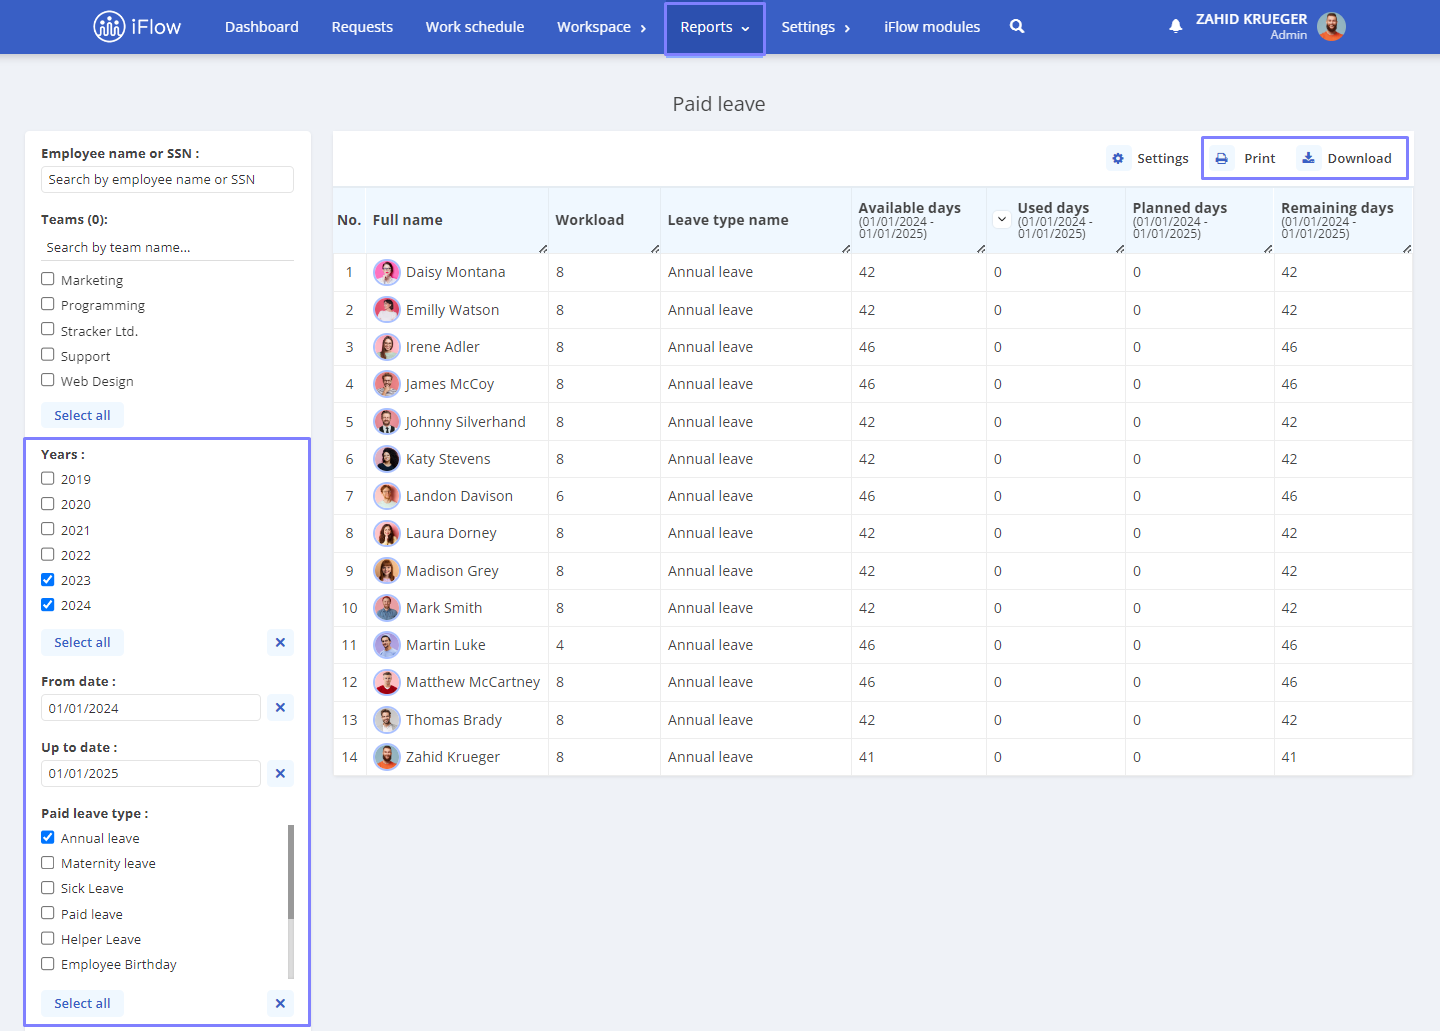
How to filter the report by periods
- In the left column, you’ll find the filters Years and From Date — To Date
- Fill in with the necessary year and date, and the report will be generated automatically
- The report can be downloaded or printed from the same menu with a click on the command of the same name
Filter by years
- Filtering by years and the period filter allows you to see, for example, the allocated leave days in 2023 and taken in 2024
- Check the year 2023, and for the period, choose from date: 01.01.2024 to date: 01.01.2025
Click here to find out how to add custom events to the attendance report.
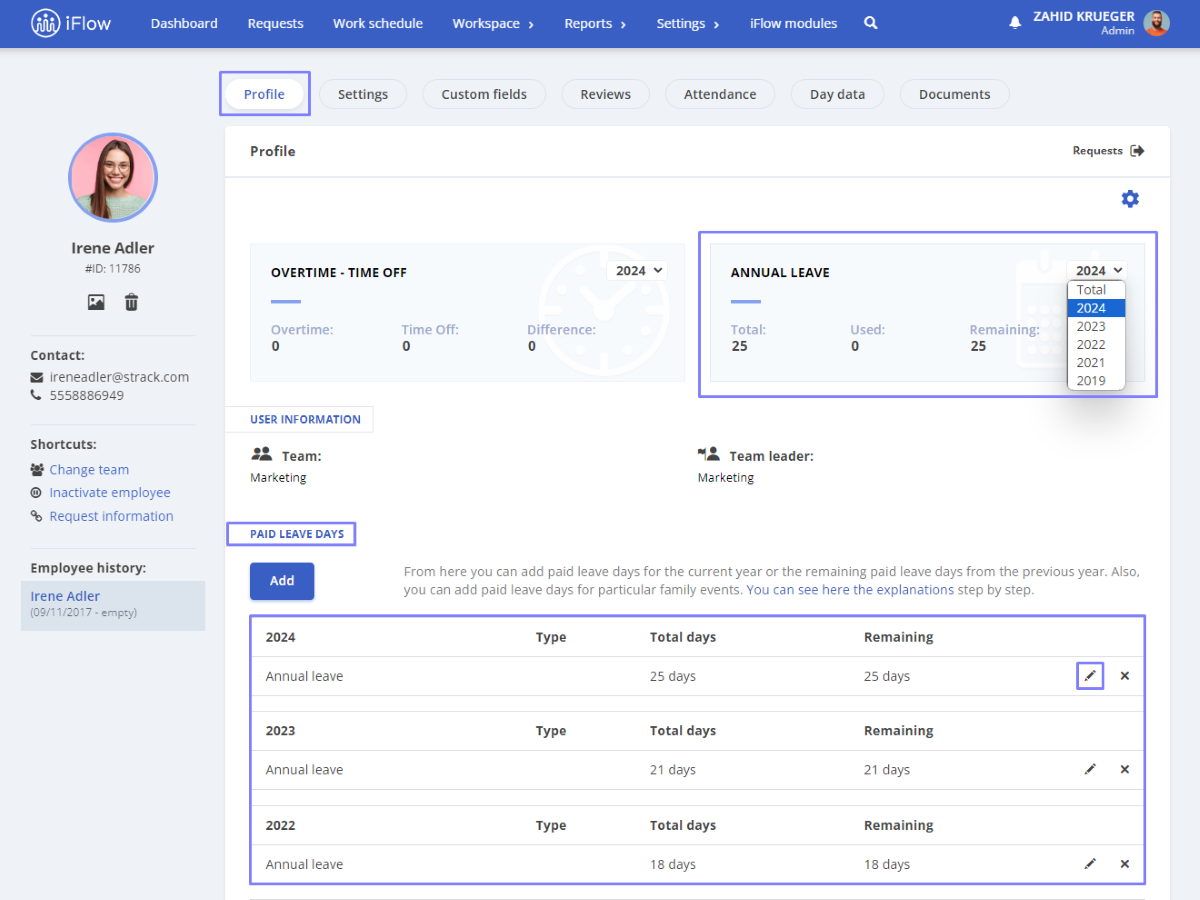
Leave days in the employee’s profile
The employee can view their leave days from their profile.
In the Annual leave box, you can filter by specific years or choose to display all years:
- Total
- Used
- Remaining
In the Paid Leave Days box, both vacation days and special leave days are displayed.
Administrators or team leaders can modify the number of vacation days using the Edit Pencil icon next to the leave.
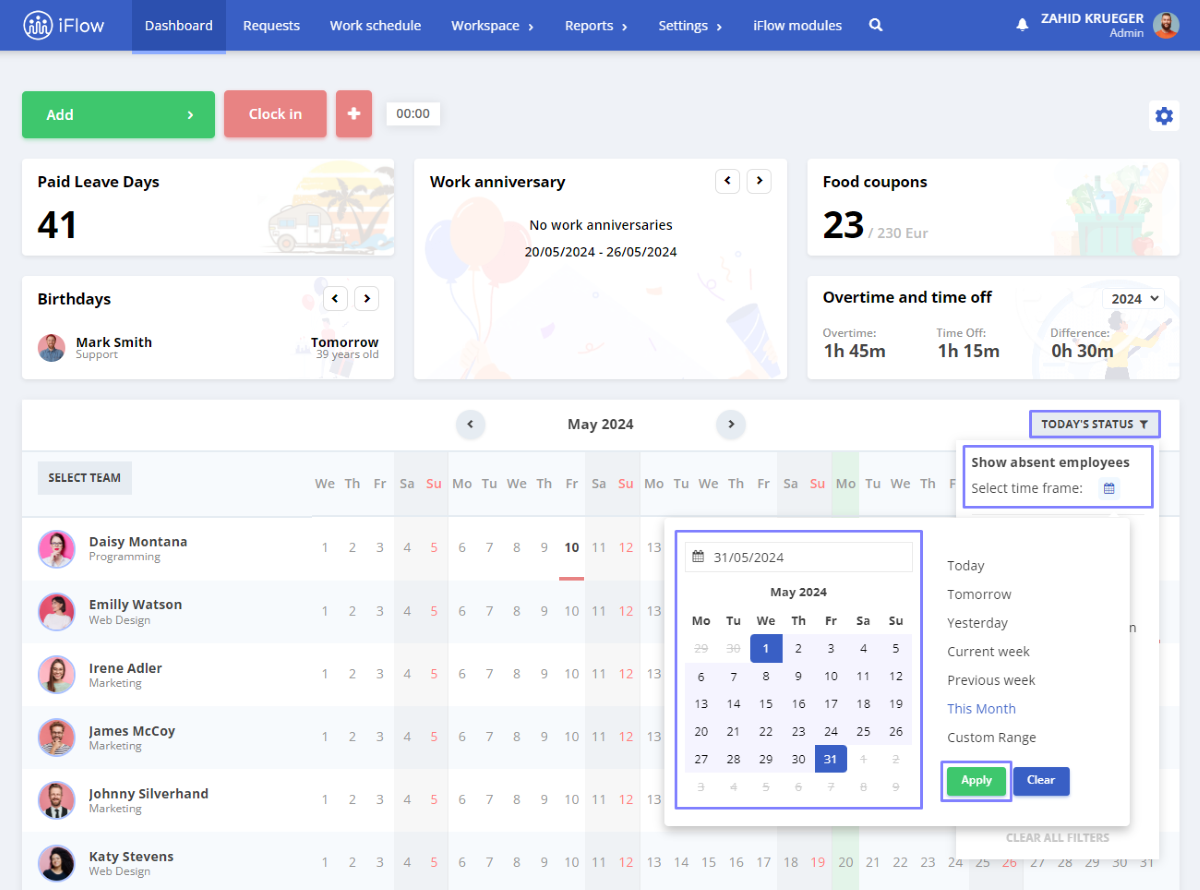
How to use the absence filter on the Dashboard
With the help of Today’s Status, you can see which employees were absent due to leave during a specific period.
- Go to the month for which you need verification
- Click on Today’s Status
- From the Show Absent Employees section, click on Calendar
- Choose the necessary interval
- Click Apply
Now, you will see all employee leave events in the selected period.
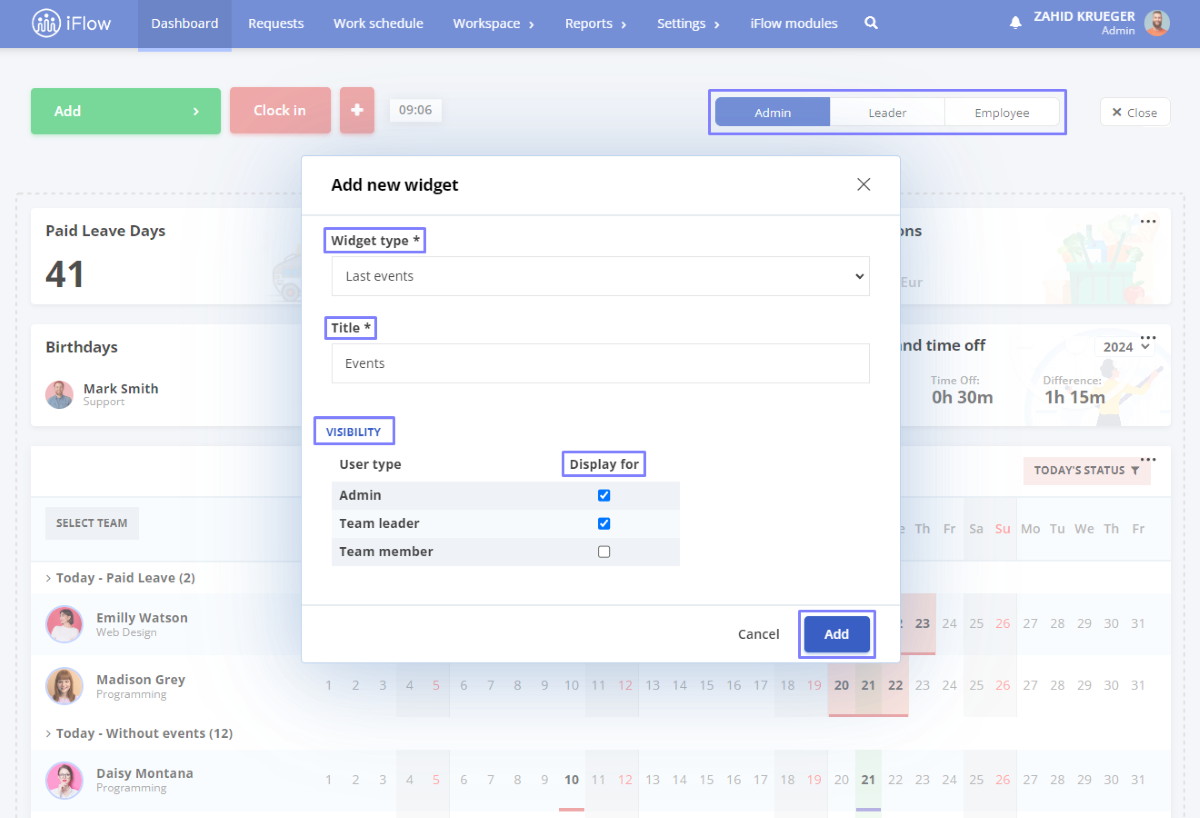
How to add a widget for paid leave on the Dashboard
You can personalize your Dashboard with widgets according to your preferences or needs. On the right side of the dashboard, click on the Settings icon, and three user categories will appear:
- Administrator
- Leader
- Employee
Click on the Add Widget button, and in the box that appears, select:
- Widget Type – Available paid leave
- Title
- Visibility – for which user categories this widget should appear
The Paid Leave widget brings a box with the available Available paid leave for each employee.
How to edit the medical leave event
Medical leave is an event category in the iFlow application. To customize it, click Settings – Event Types – and click the Edit button next to the Sick Leave event.
Here, you can select the following:
- Color
- Icon
- Whether it requires justification/approval and who can approve it
- Permissions – who can Add/View it
- Document – you can choose the HIF certificate template from the application
Click here to find out how you can add more events to iFlow.


