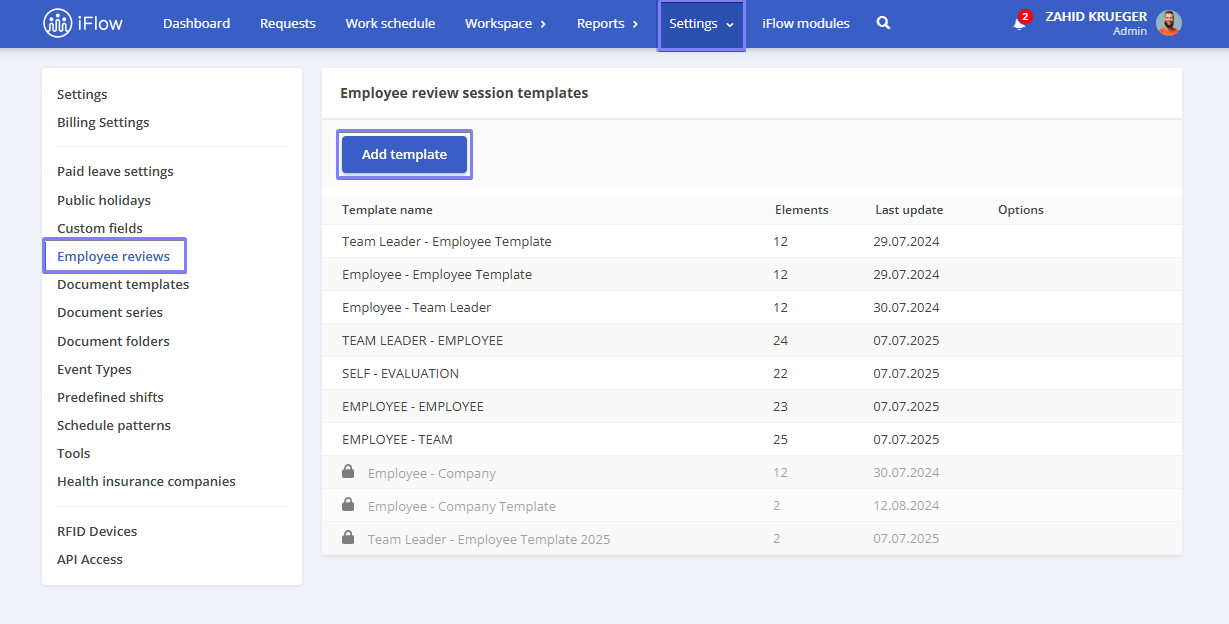
How to add review templates
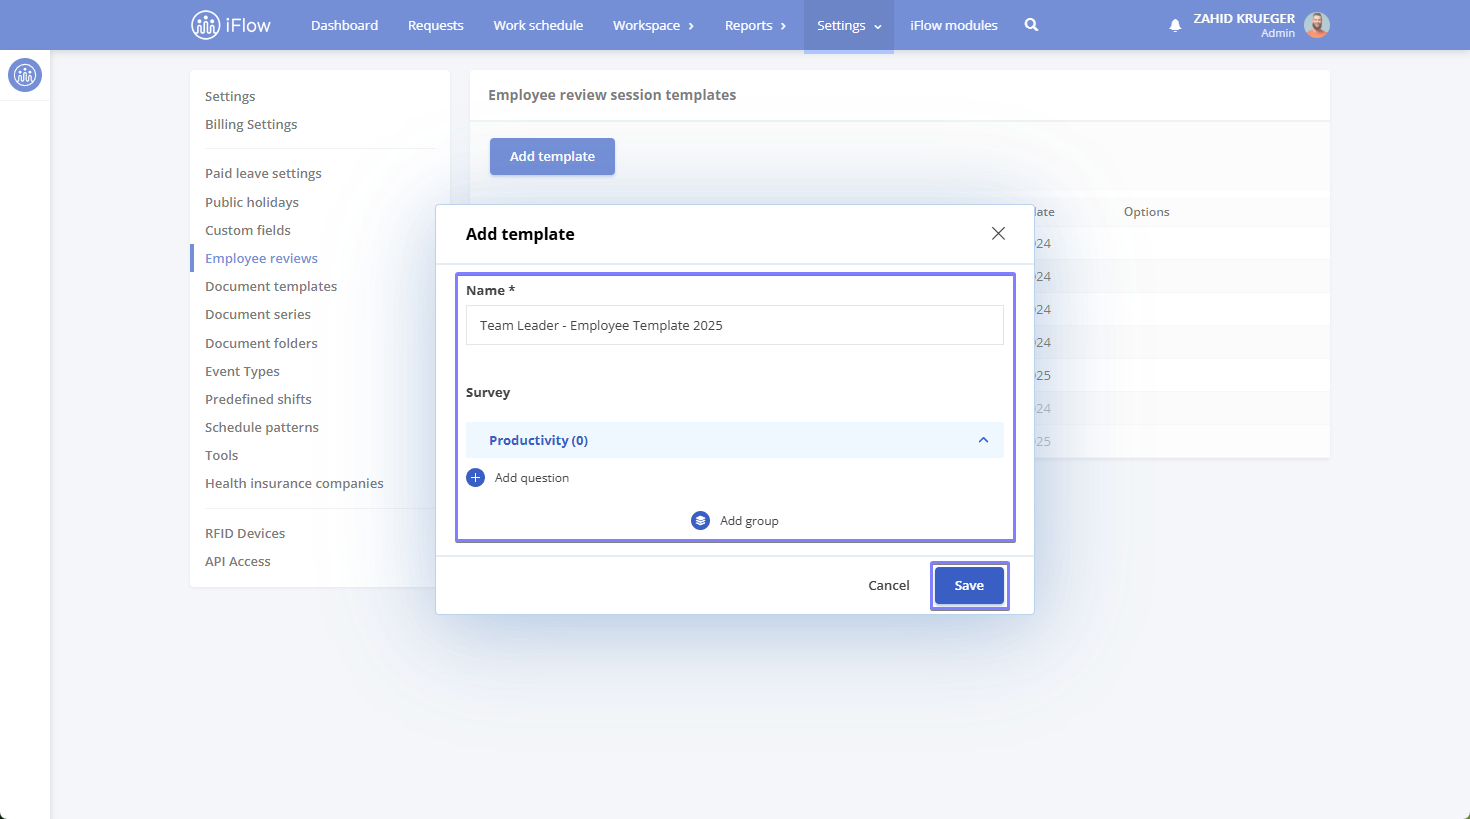
To create a review template in your company account, go to the main menu, Settings – Employee reviews, and click the Add template button.
In the window that opens, follow these steps:
- Enter the Template name
- Click the Add group button in the Survey subsection (this tool allows you to organize questions into categories)
- Enter a Section name for the added group and click Save
- Click the Add question button
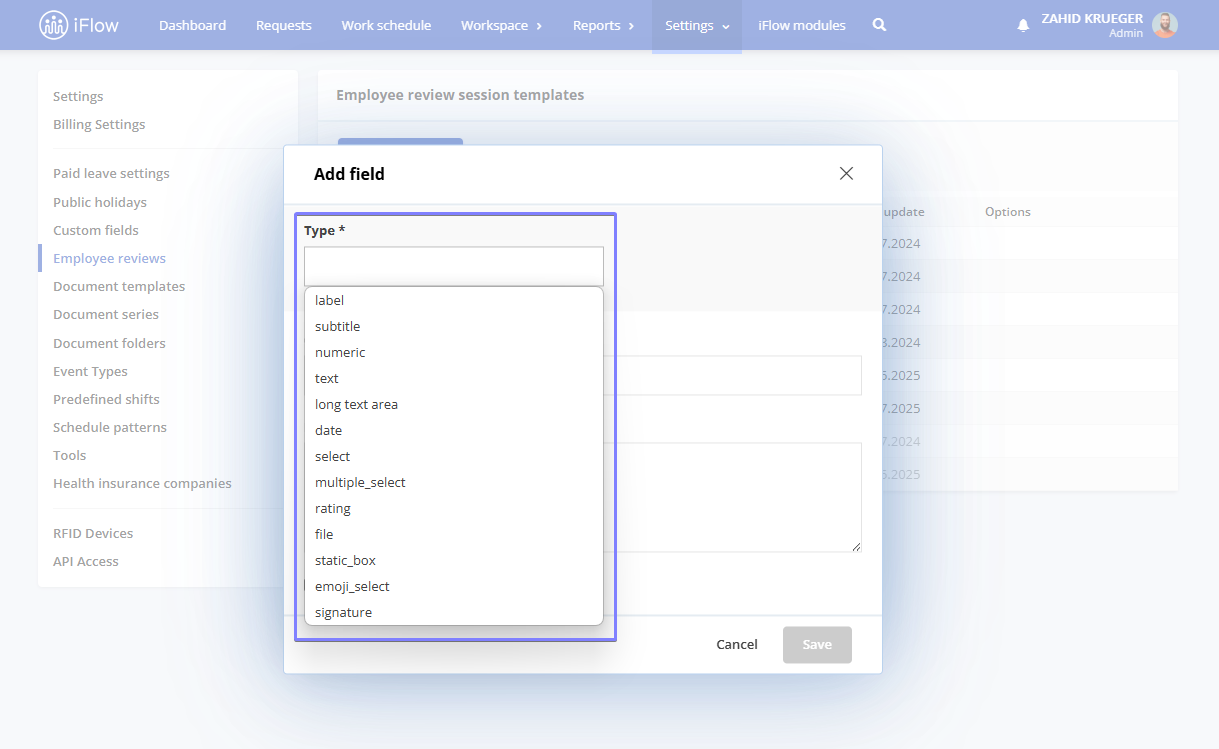
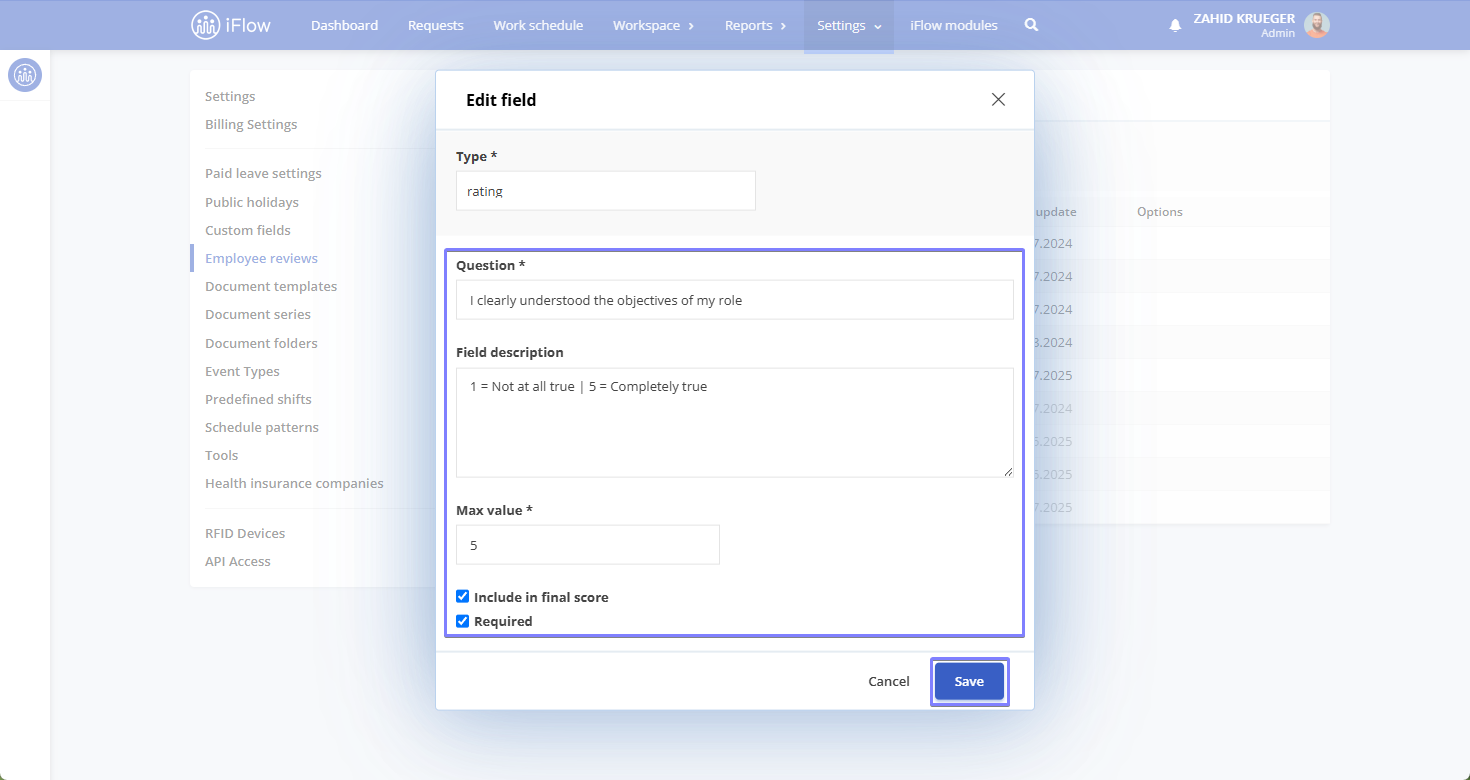
The questions can be of the following types:
- Label – a static label used to display text
- Subtitle – a smaller title or section heading
- Numeric – only numbers can be entered
- Text – a small input box for a brief answer
- Long text area – a larger input box for a detailed response
- Date – select or enter a date
- Select – opens a section where you must enter multiple possible values for the field, from which only one can be selected
- Multiple select – allows selecting multiple values using the mouse and the Ctrl key
- Rating – a numeric scale where the maximum value can be set in the field below
- File – a button will be provided to allow file attachments
- Static box – you can add any text, image, video, or link, and customize sizes, colors, and many other settings
- Emoji select – respond using an emoji; choose from existing ones or add a new one
- Signature – the reviewer can sign digitally at the end, confirming the accuracy of the completed review
After choosing the question type, fill in the following:
- Question – the text of the question
- Field description – optional
- Maximum value – applicable for scale-type questions
- Possible field values – for single select or multi select question types
- Optionally, check Required if answering this question should not be optional
- Check Include in Final score if you want the result of this question to be averaged with others to calculate a final score – this option is only available for numeric or scale-type questions
How to edit/delete a review template
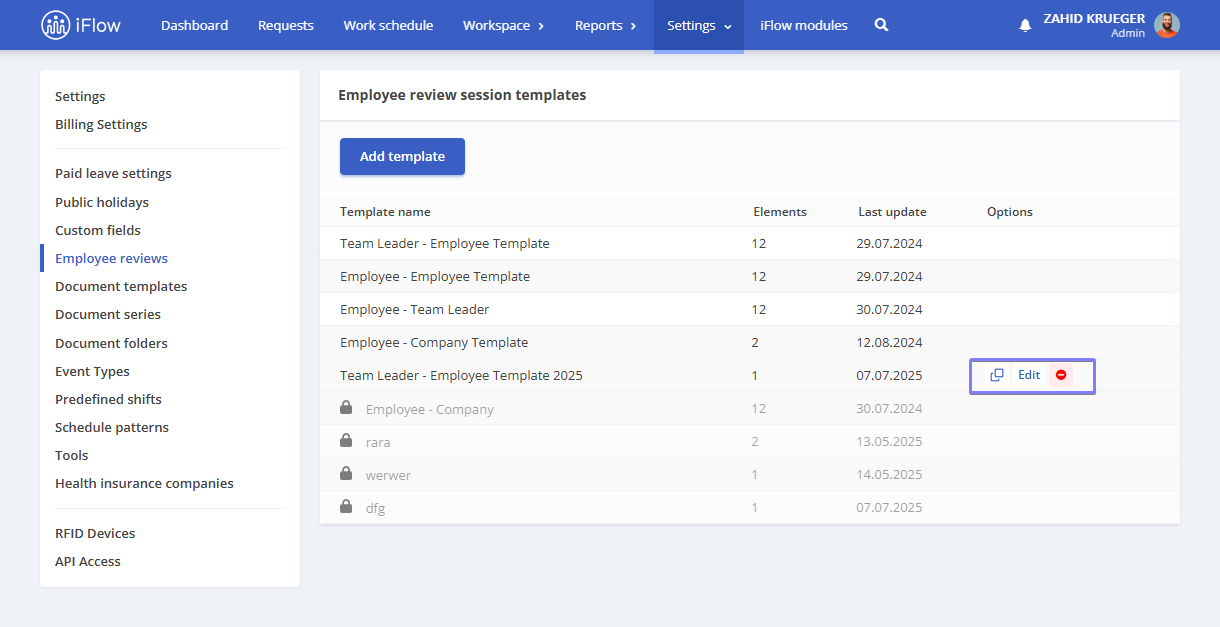
Next to each created template, you have the following options:
- Duplicate – create an identical copy of the template
- Edit – make changes to the template
- Deactivate/activate – deactivated templates will no longer be available in review sessions but will remain in the company account and can be reactivated at any time
- Delete – after deactivating a template, you also have the option to delete it if it is no longer relevant, but note that deleted templates cannot be recovered
Review sessions
How to create a review session
Review sessions can be created from the Workspace menu or from the Employee profile.
Review session from the workspace menu
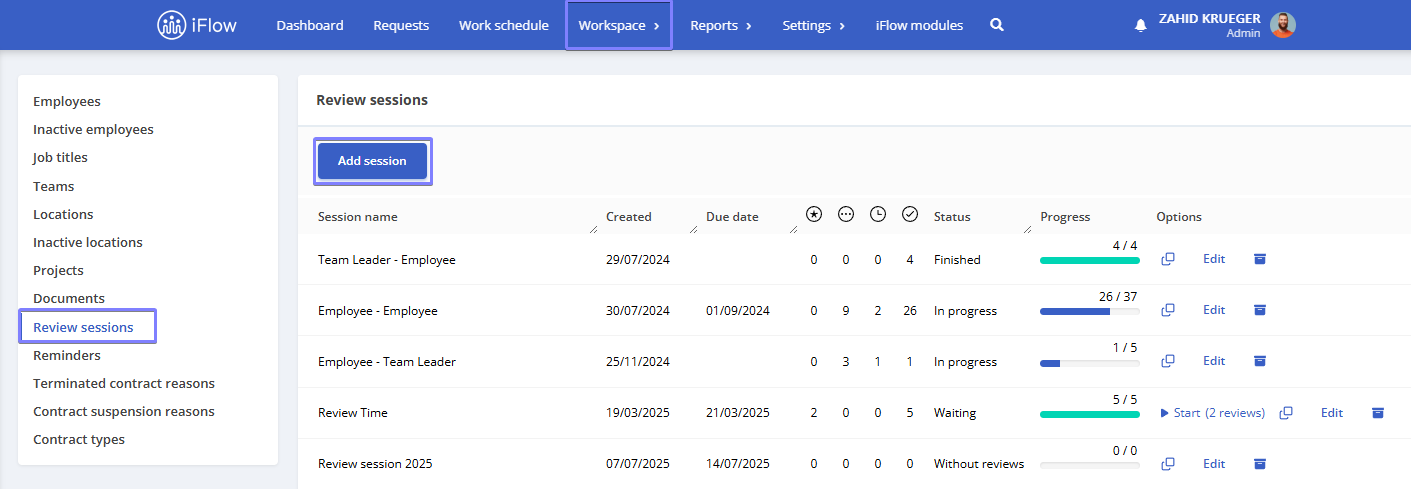
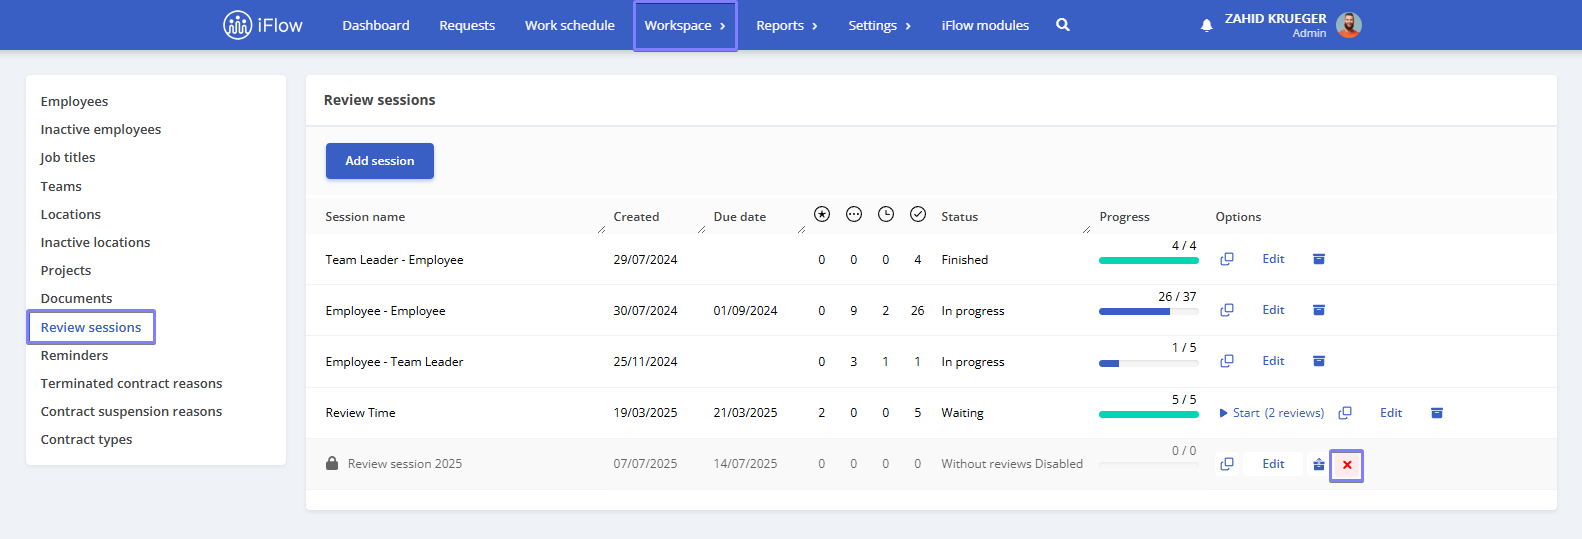
From the main menu, select Workspace, then Review sessions.
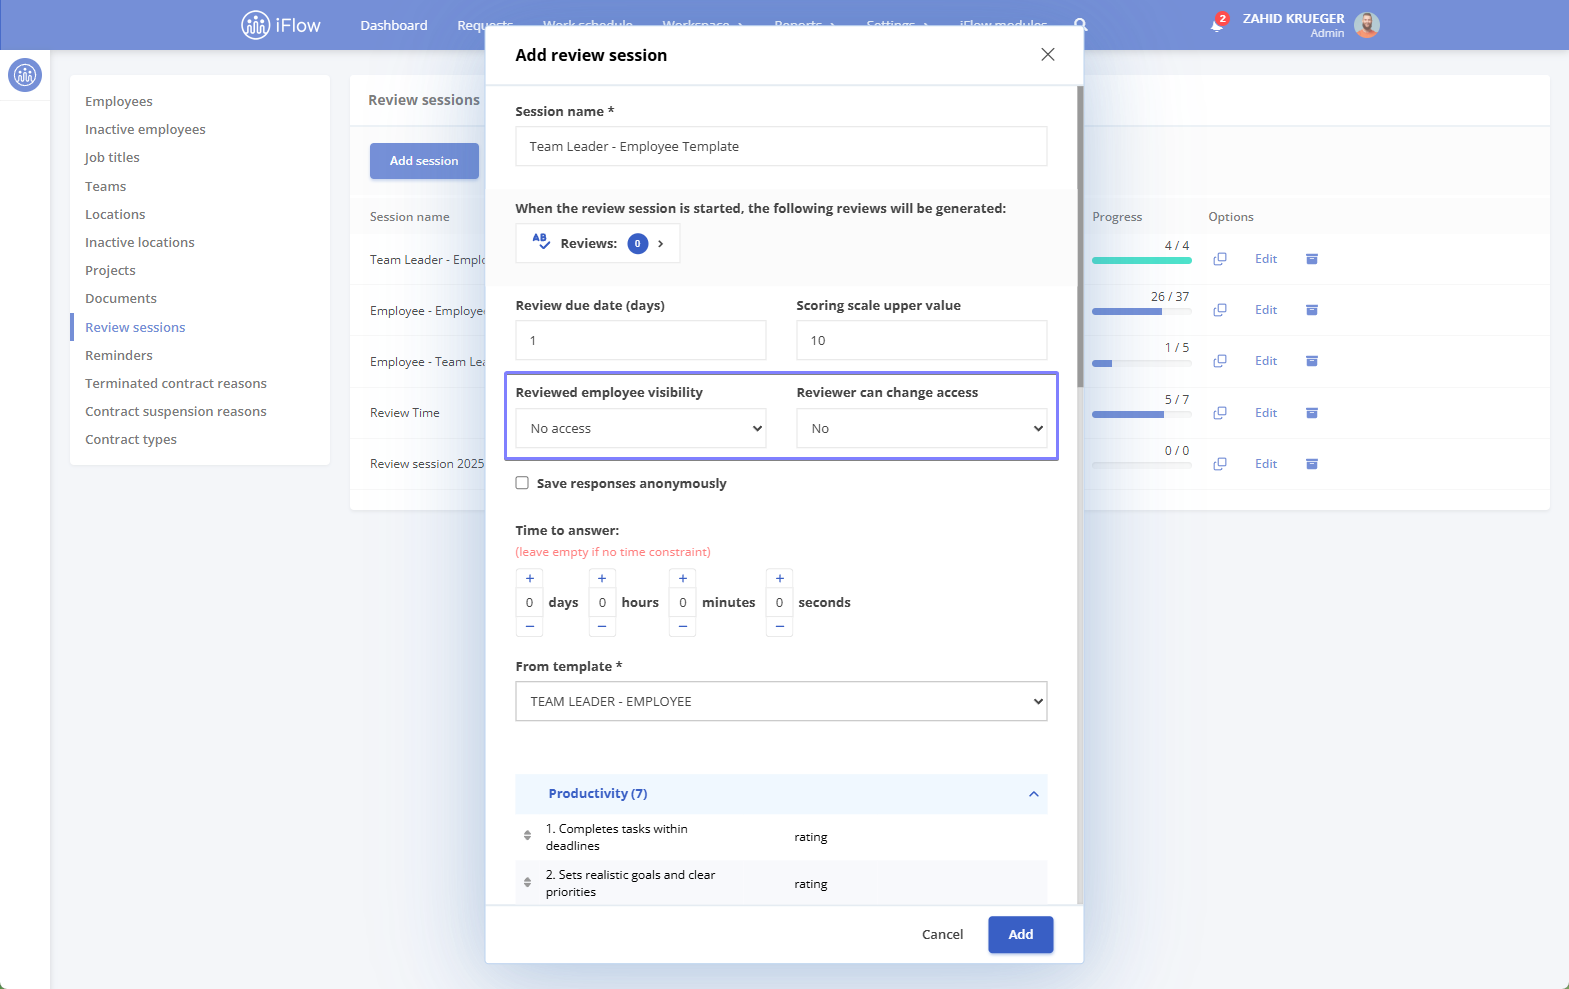
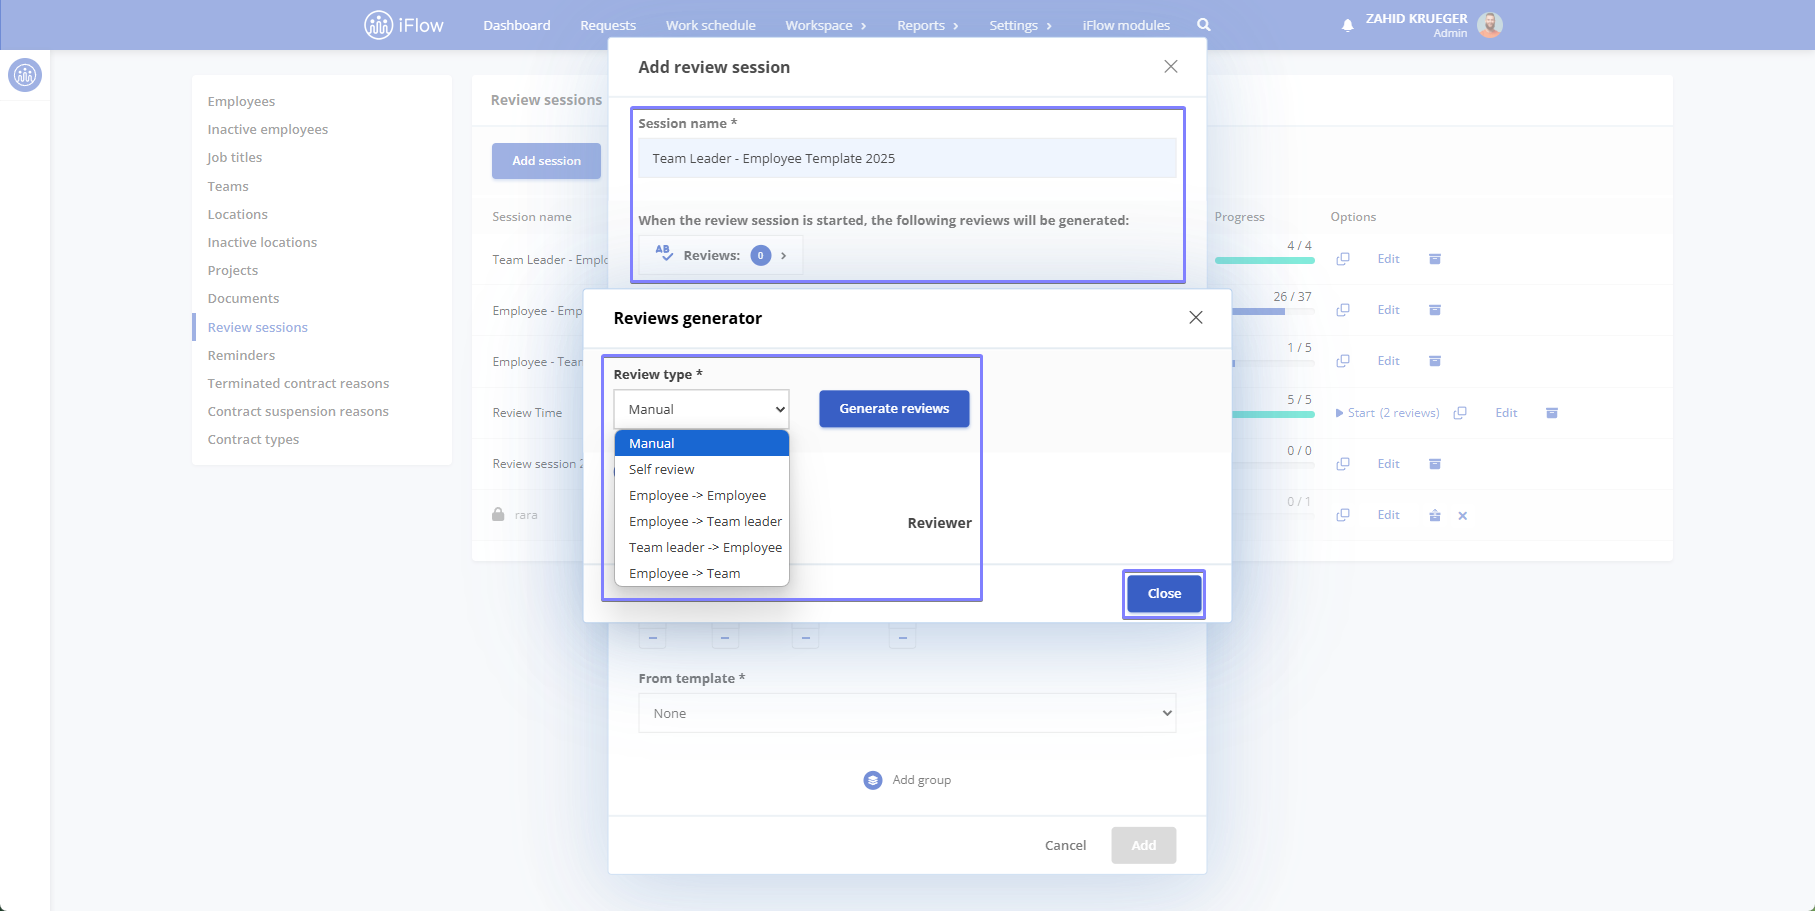
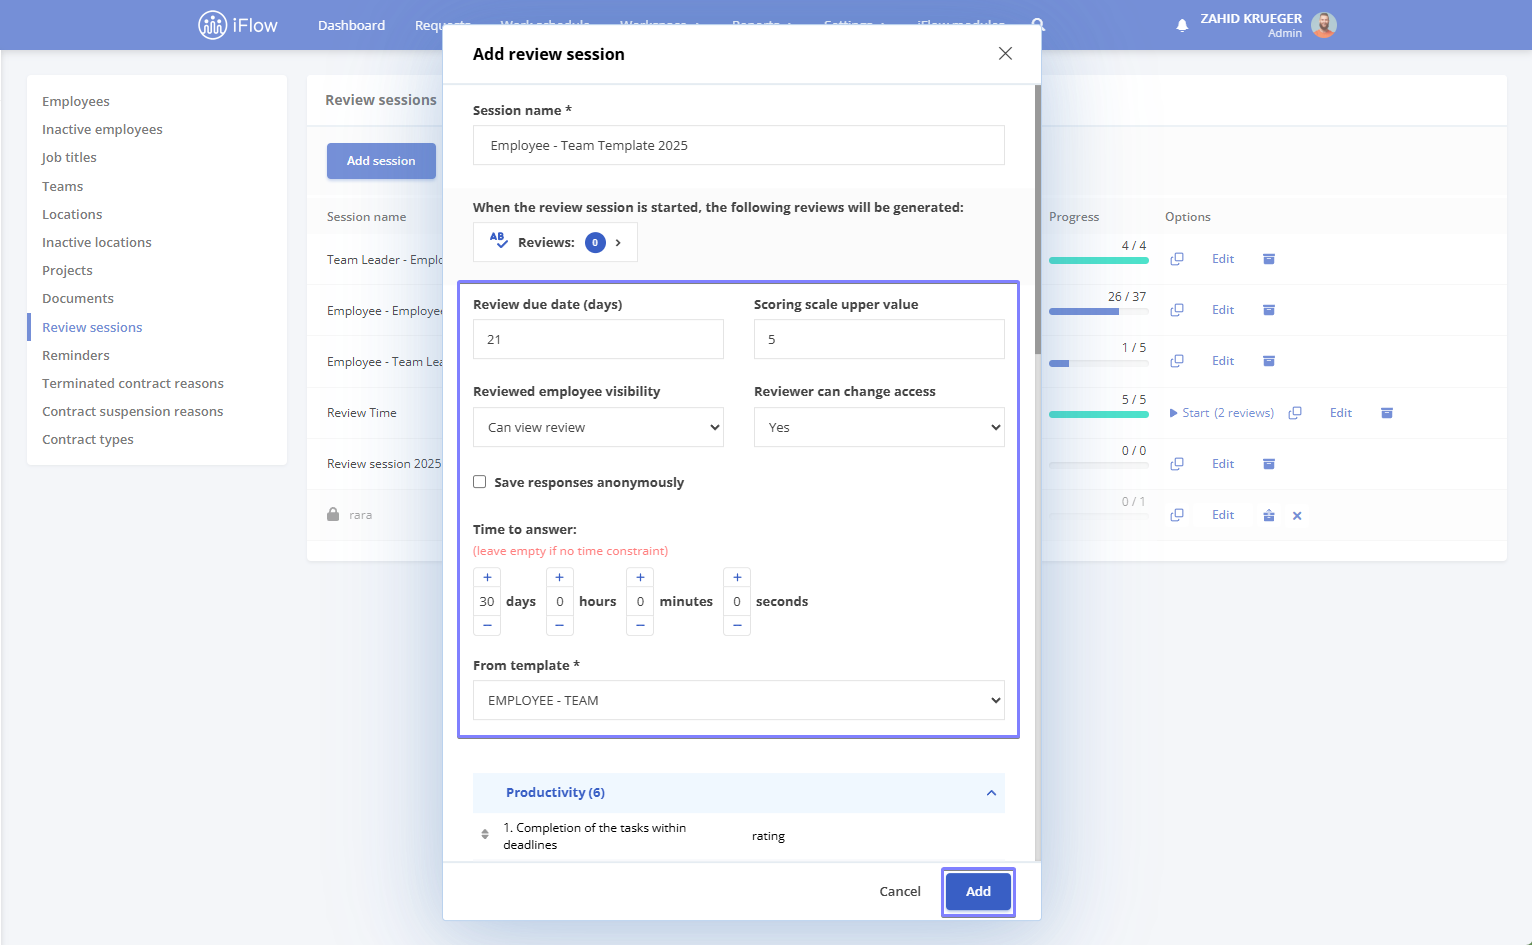
- Click the Add session button
- Enter the Session name
- Click the Reviews button to generate one of the following types of reviews:
- Manual (you must manually select both the reviewed employee and the reviewer)
- Self-review
- Employee – Employee
- Employee – Team Leader
- Team Leader – Employee
- Employee – Team
- Employee – Company
It is created based on the Employee–Team template, but in the Generate reviews – Select teams section, only the Company will be selected, not the teams.
- Add a Due date for the review if it must be completed within a specific number of days. If the due date is missed, the date will appear in red in the Reports and the General section of the review sessions
- Under Reviewed employee visibility, set whether the employee will be able to view their review. This access can be defined at the time of creation or later by the reviewer
- Choose between Can view review or No access
- Click Save responses anonymously if you want the feedback to remain confidential
- Set a Time to answer for completing the review; unlike the due date, once the response time expires, the review can no longer be filled in
- Choose the Template type you want to use for the new review session
- Click Add group if you want to include additional question sections in the form or if you want to create questions while adding the new session
- Finally, click the Add button
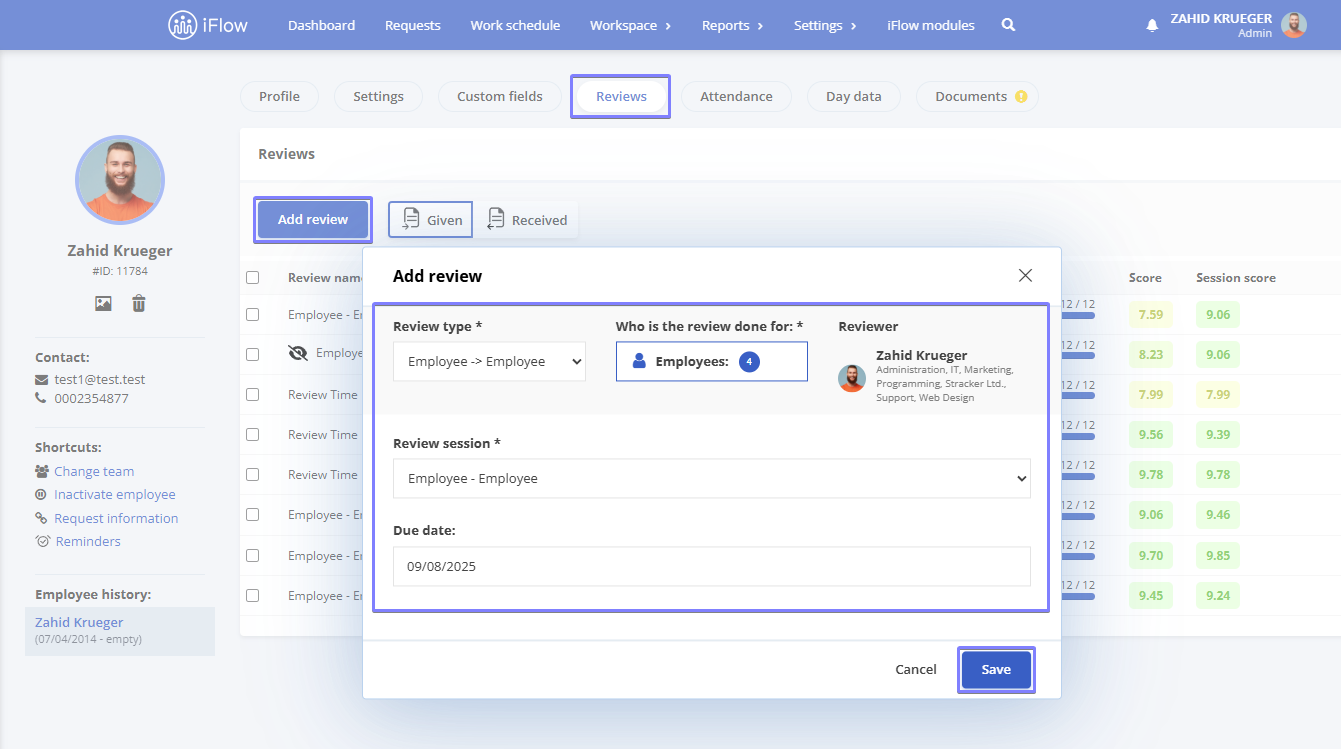
Creating a review session from the employee profile
From the employee’s profile, go to the Reviews tab, then click the Add review button; this button is only available to administrators.
To add a new review from the employee profile, follow these steps:
- Select the Review type
- Choose Who is the review done for
- The Reviewer will be automatically selected based on the administrator profile initiating the review session
- Select the desired Review session
- Optionally, set a Due date
- Then click Save
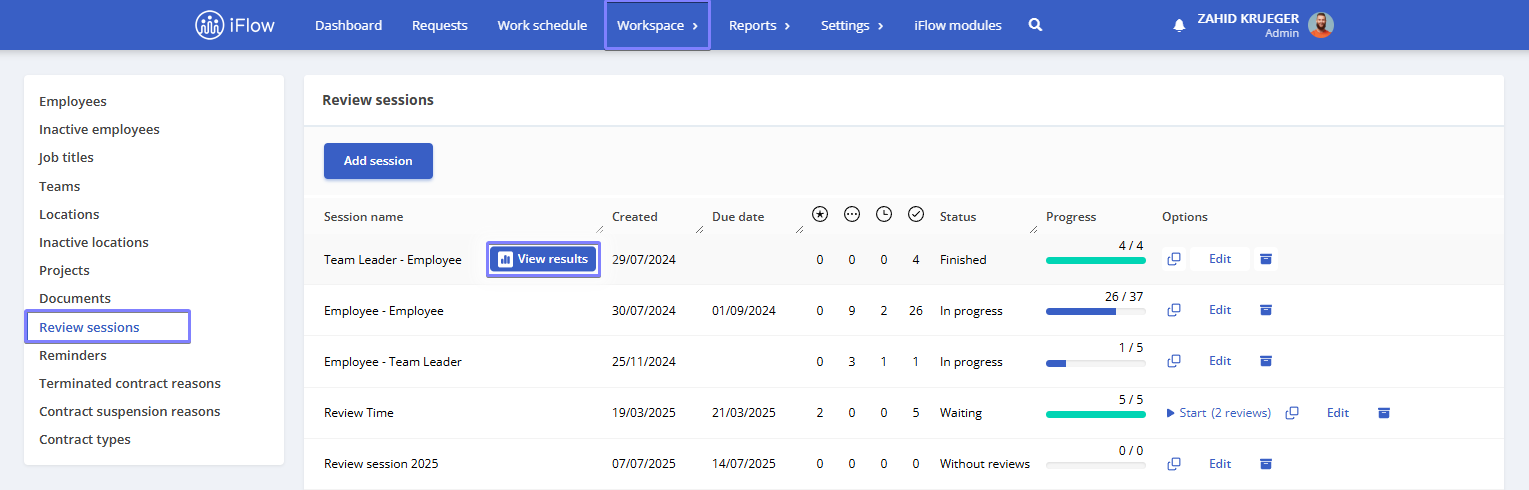
How to view the results of a review session
- From the main menu, go to Workspace – Review sessions
- Hover over the review session you want to review, then click the View results button
This button will take you to the Summary section of the review session
How to compare reviews
From the employee profile
You can select multiple reviews – both received and given, even if they belong to different sessions, in order to view or delete them.
- Go to the employee’s profile, then open the Reviews section
- Check the boxes next to the review you want to compare
- Click the View button to analyze the selected reviews

From reports
You can select multiple reviews at once to compare the responses of several employees across different sessions, making it easier and faster to analyze results.
- Go to Reports – Reviews
- Check the box next to each review you want to compare
- Click the View button
How to archive and delete a review session
Go to Workspace – Review sessions
To delete a review session, click the Archive button next to the session you want to remove. Once the session is archived, click the X button to delete it.
A review session can be deleted when it is no longer needed. Alternatively, it can be archived to retain the reviews for future reference without cluttering the active workspace.
Archived or deleted reviewed sessions will no longer appear in the employee’s profile.
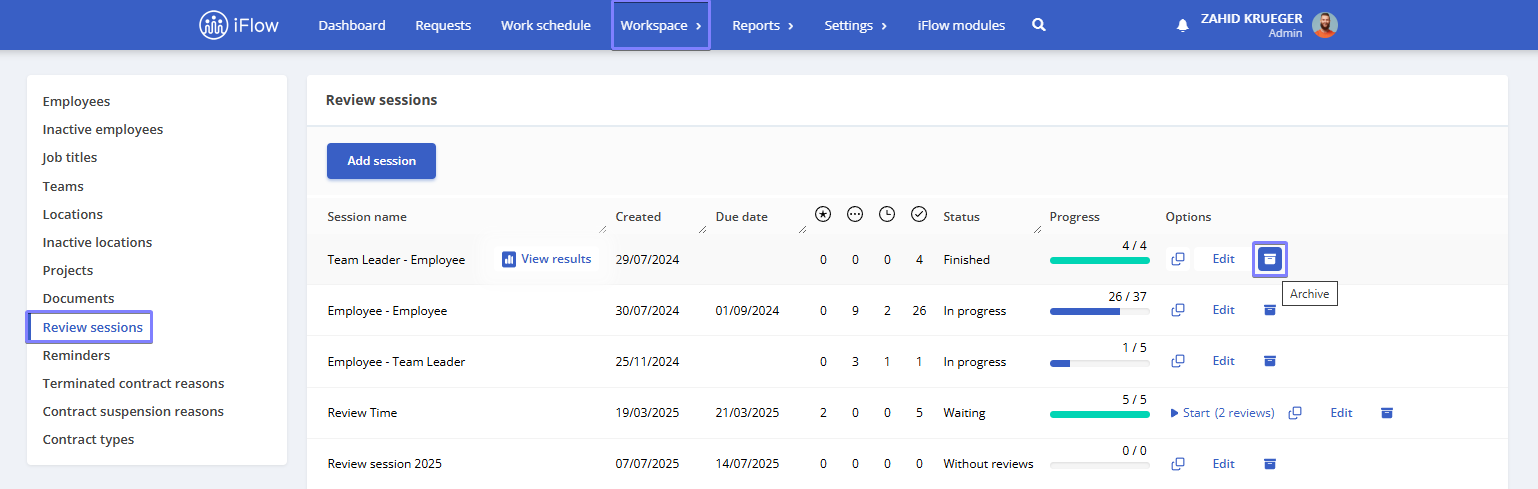
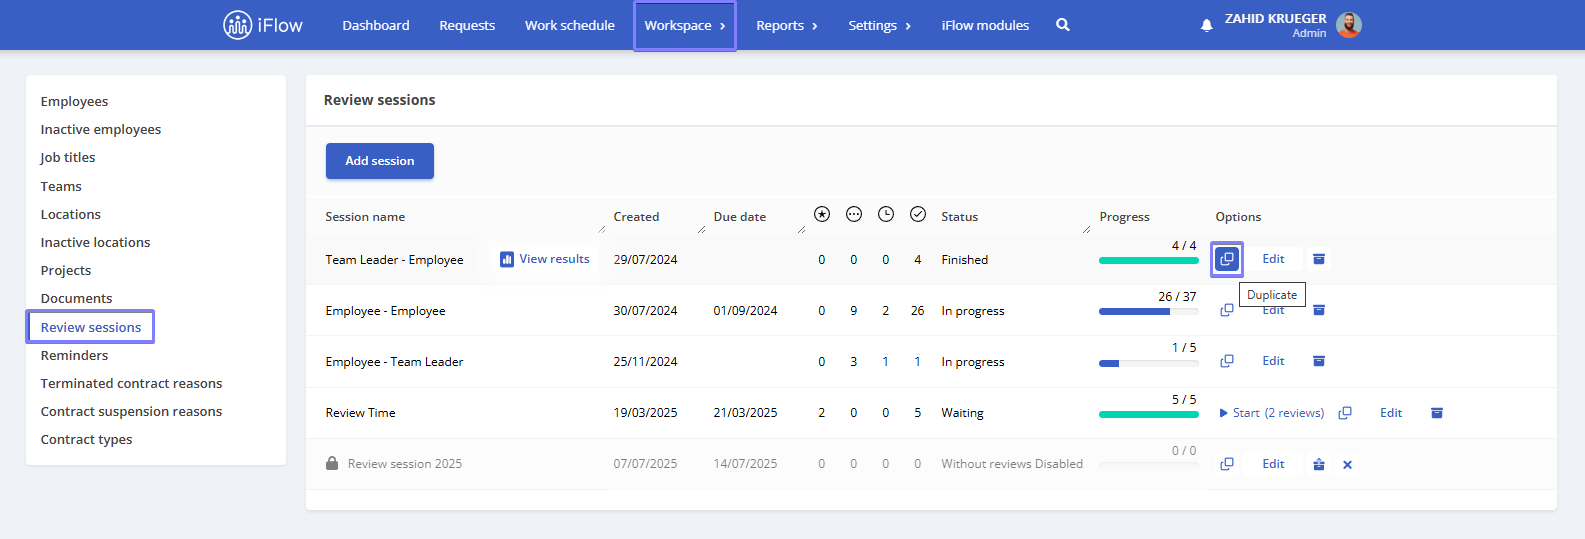
How to duplicate a review session
From Workspace – Review sessions
To duplicate a review session, click the Duplicate button located in the Options column next to the session you want to replicate.
This option is useful when the review session needs to be repeated monthly or at a specific time interval.
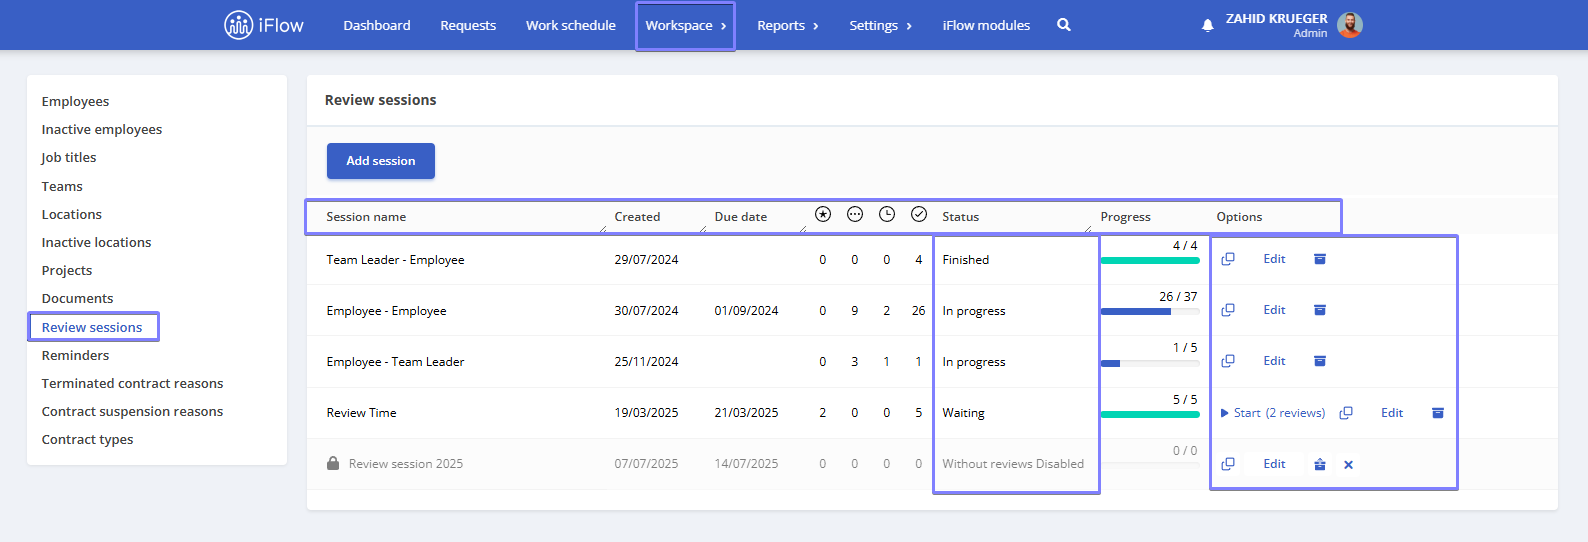
How to track the status of review sessions
For each review session, you can view the following information:
- Creation date – the date and time when the session was created
- Deadline – the due date for completing the review, if set
- Number of new sessions – represented by a star icon
- Number of not started reviews – represented by a three-dot icon
- Number of ongoing reviews – represented by a clock icon
- Number of completed reviews – represented by a checkmark icon
You can also see the status of each review:
- Pending – the review has been created but not yet launched
- In progress – the reviewers are currently working on the review
- No reviews – the session has been created, but no reviews were generated for employees
- Completed – all reviewers have finished the review
- Deactivated – the review has been archived
Additionally, a progress bar visually indicates the number of reviews that have been completed.
You’ll also have the following options available: Start, Duplicate, Edit, Archive, and Delete.
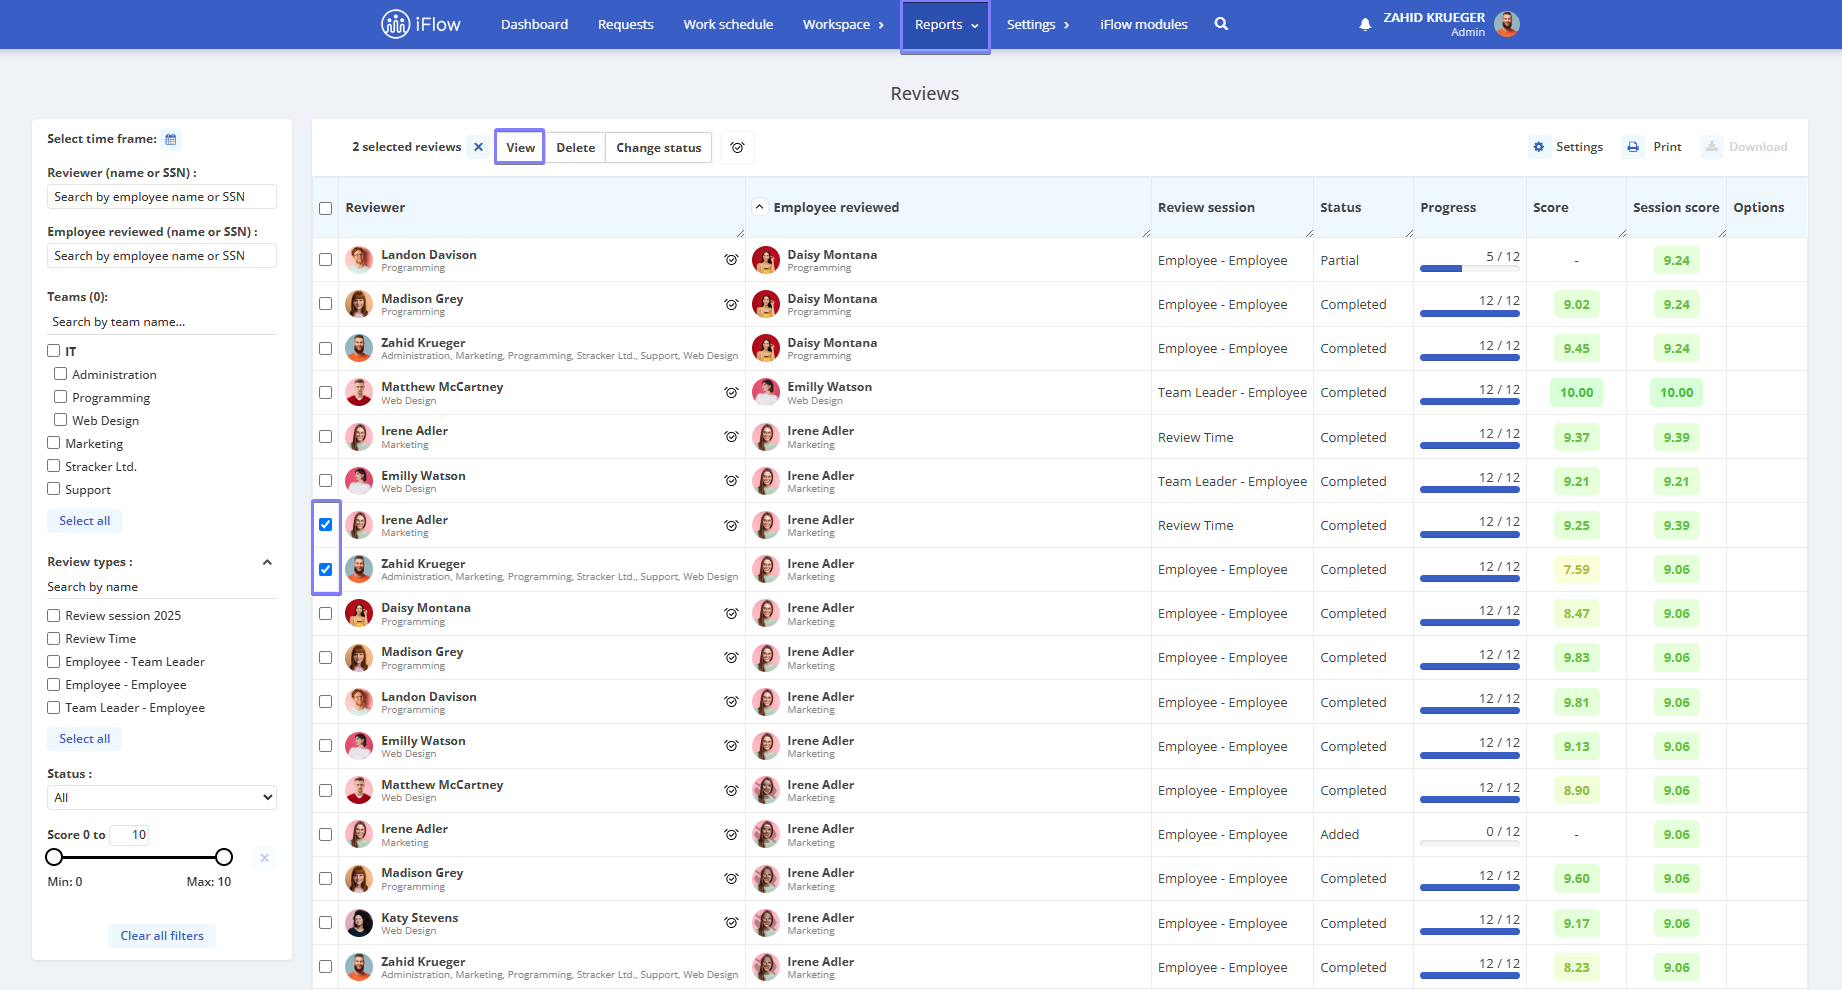
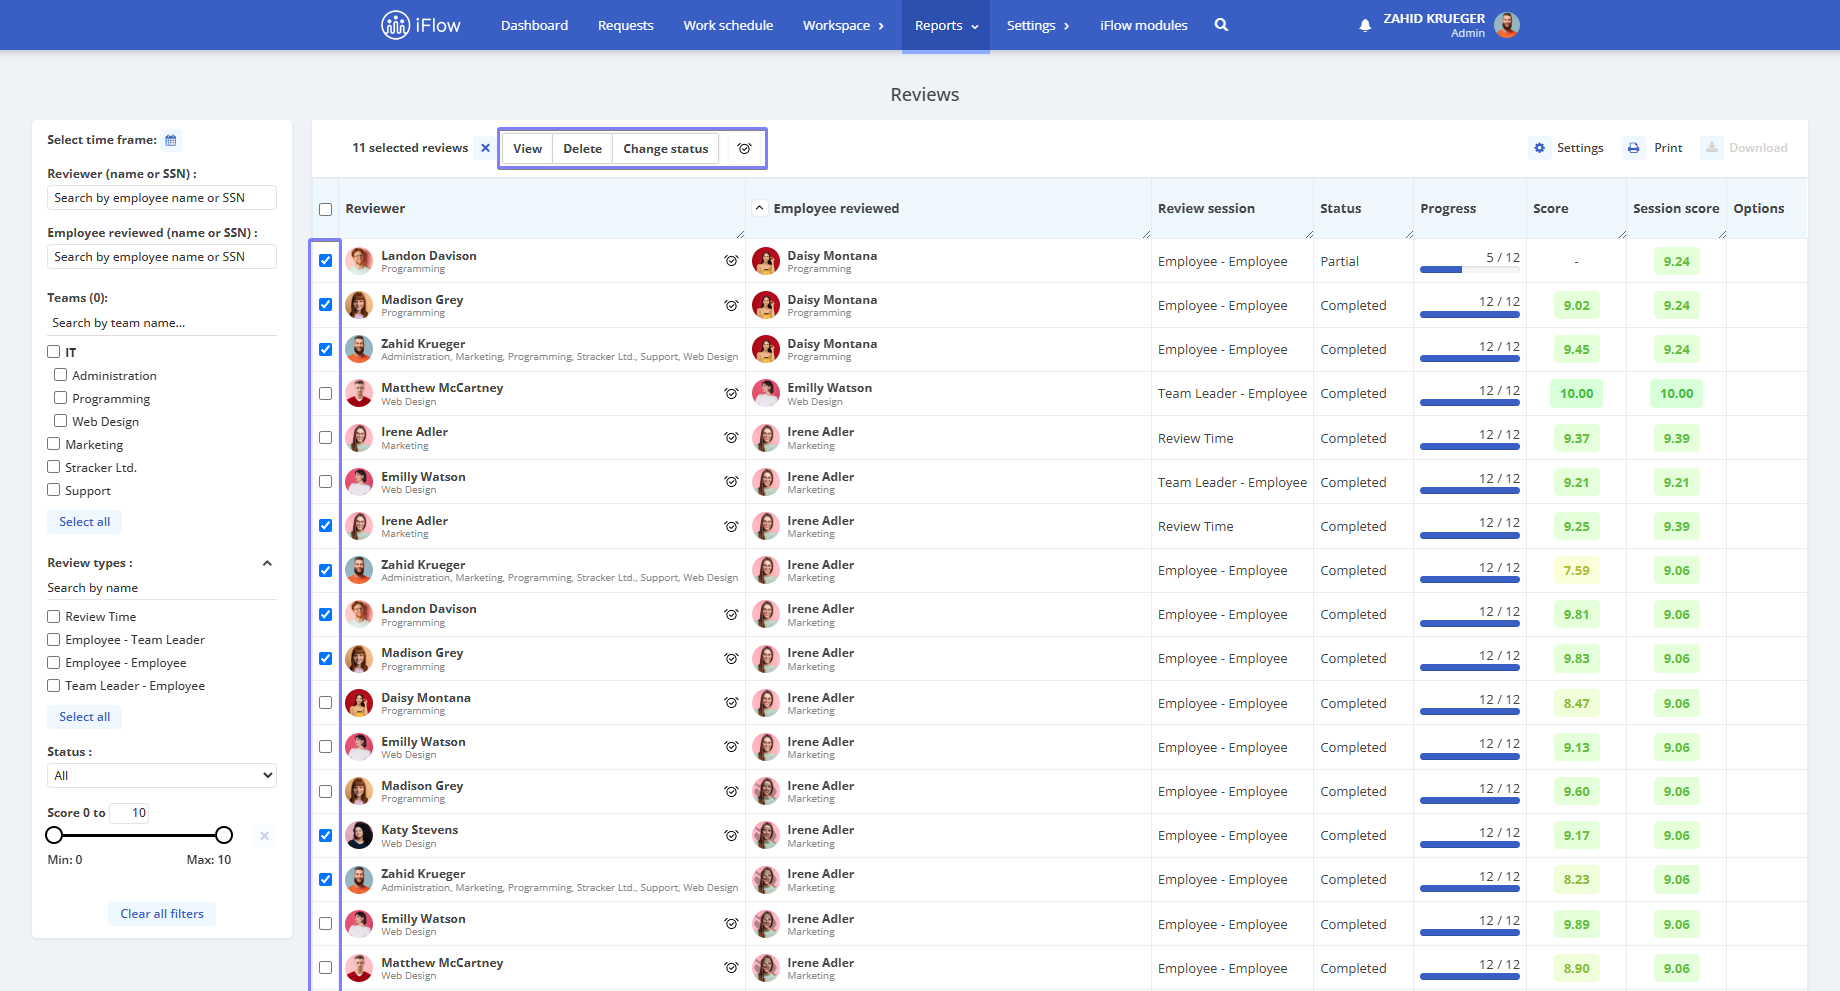
Company-level reviews report
Open the Reports menu, then select the Reviews submenu.
This report shows all reviews created, regardless of their status.
On the left side of the report, you’ll find several filters:
- Time frame
- Reviewer – the person conducting the review session
- Employee reviewed – the person being reviewed
- Teams – the team to which both the reviewer and the reviewed employee belong
- Review types – the name of the review session
- Status:
- All – displays all reviews
- None – if the session has not started
- Added – if the session has started
- Partial – review started but not completed
- Completed – review finished
- Score

You can select reviews by checking the boxes next to each reviewer’s name or perform a bulk selection by checking the box in the top-left corner of the table.
Also, at the top of the report, you’ll find options to view, delete, change status, or add a reminder.
Additionally, you can select multiple reviews simultaneously to compare responses from several members across different sessions, making it easier and faster to analyze employee feedback.
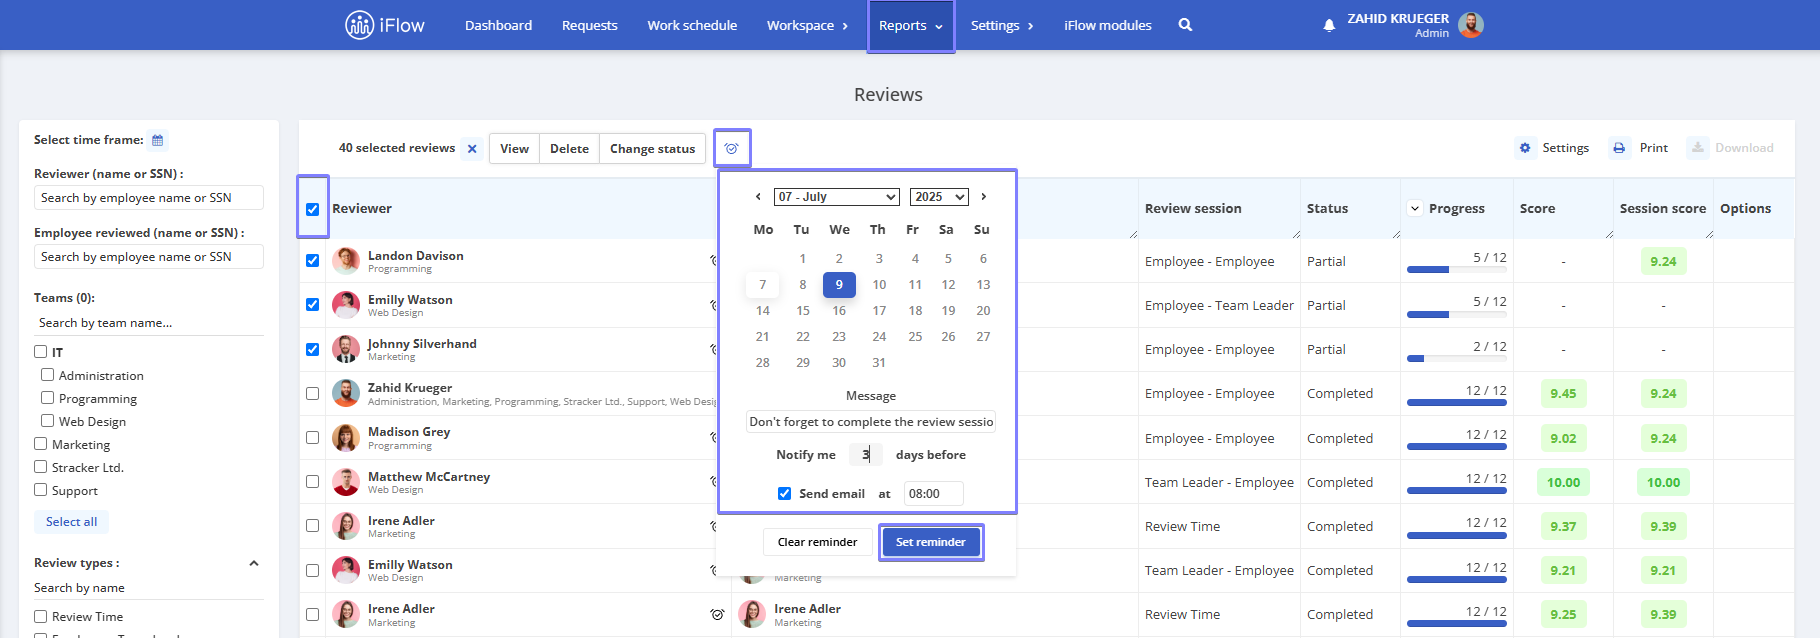
How to set a reminder on reviews
- From the Reports menu, go to Reviews
- Select the review for which you want to add a reminder
- At the top of the report, click the clock icon to open the reminder settings
- Choose the reminder day, how many days in advance the reminder should be sent, and check the option to send the review via email if desired
- Click the Set reminder button
Click here to see more information and settings about reminders in HR iFlow.
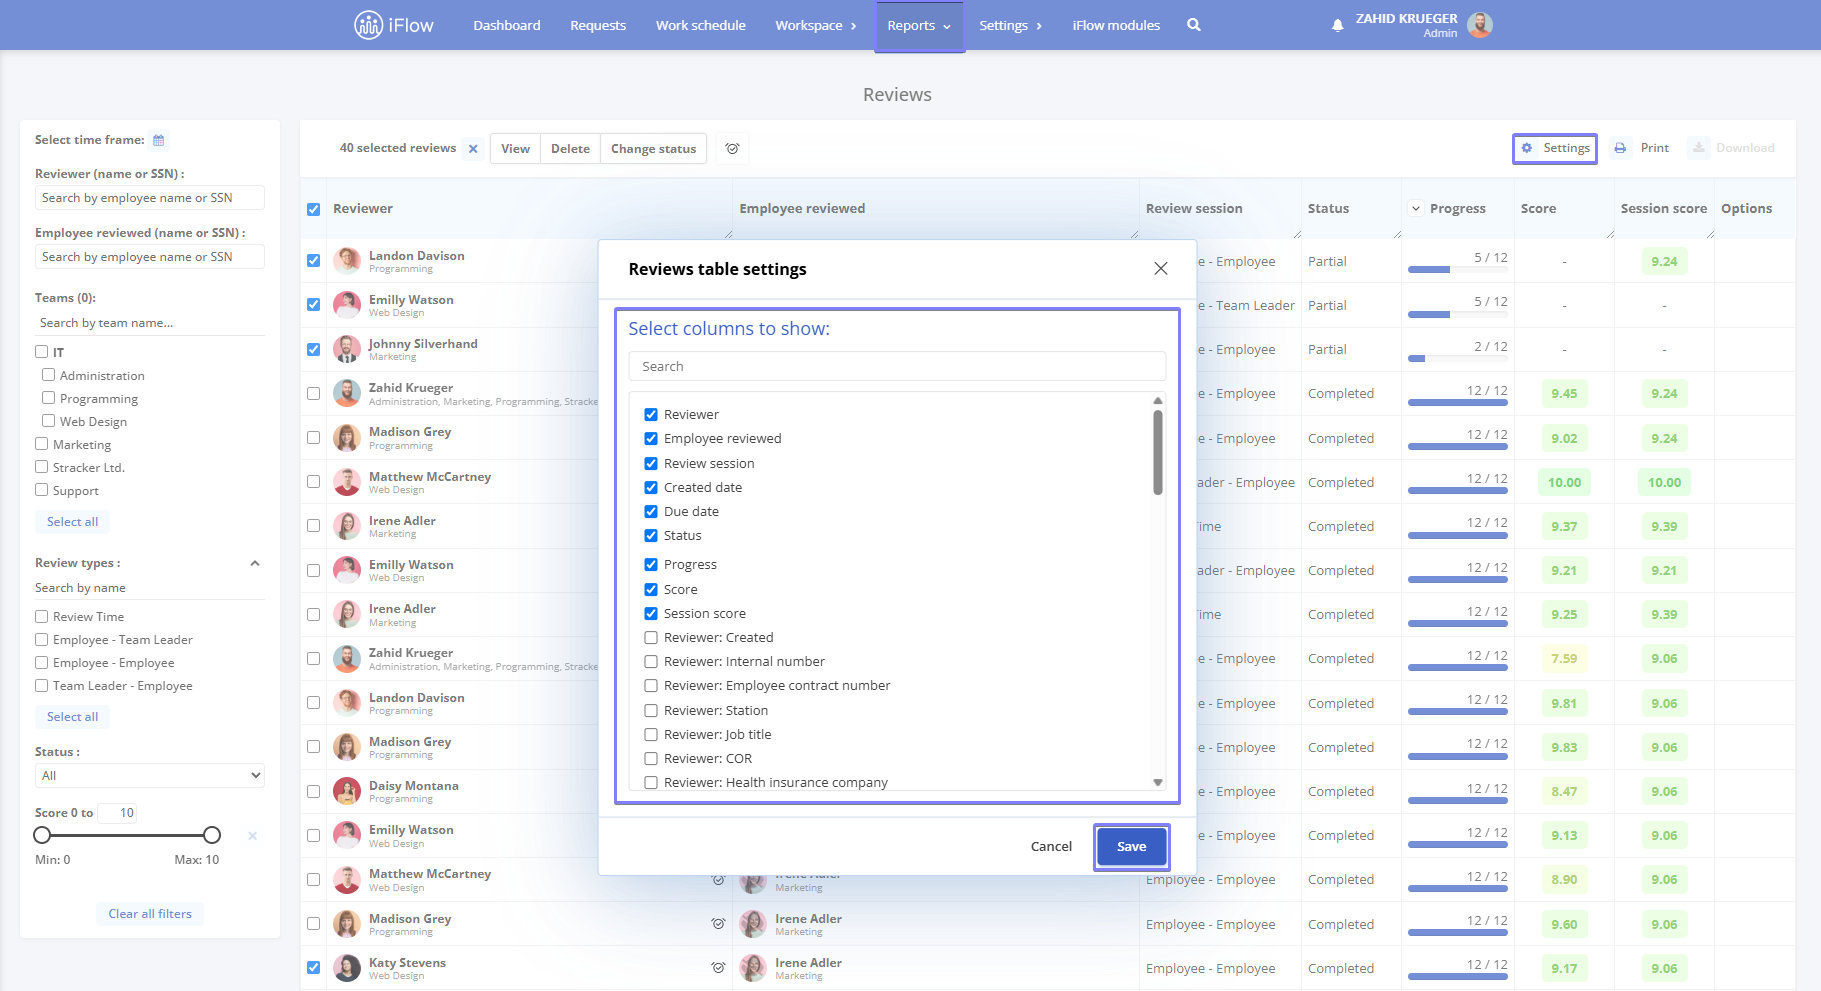
To customize the reviews report, click the Settings button in the top-right corner of the table and check the options you want to display in the report.
You can add or exclude columns in the table such as:
- Reviewer
- Employee reviewed
- Review session
- Created date
- Due date
- Status
- Progress
- Score
- Session score
- & many more
Session-level reviews report
- Open the Workspace menu, then select the Review sessions submenu
- Hover your cursor over a review session
- Click the View results button next to the session name
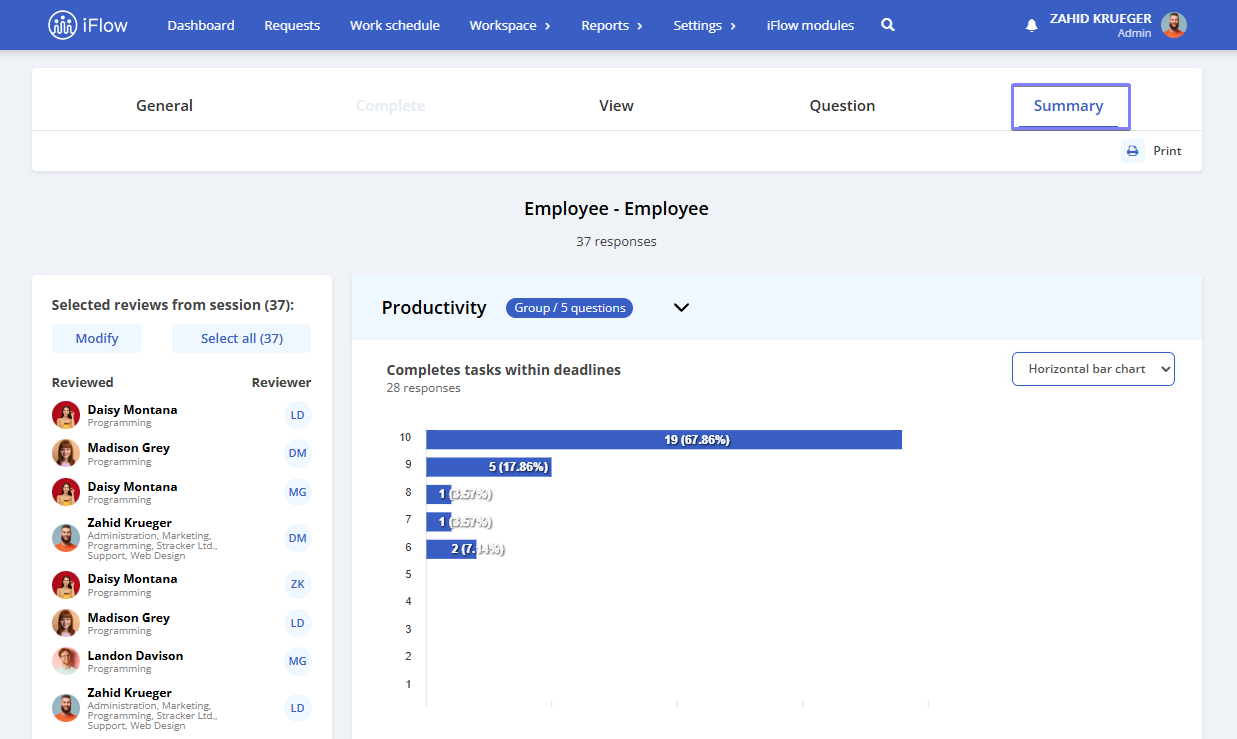
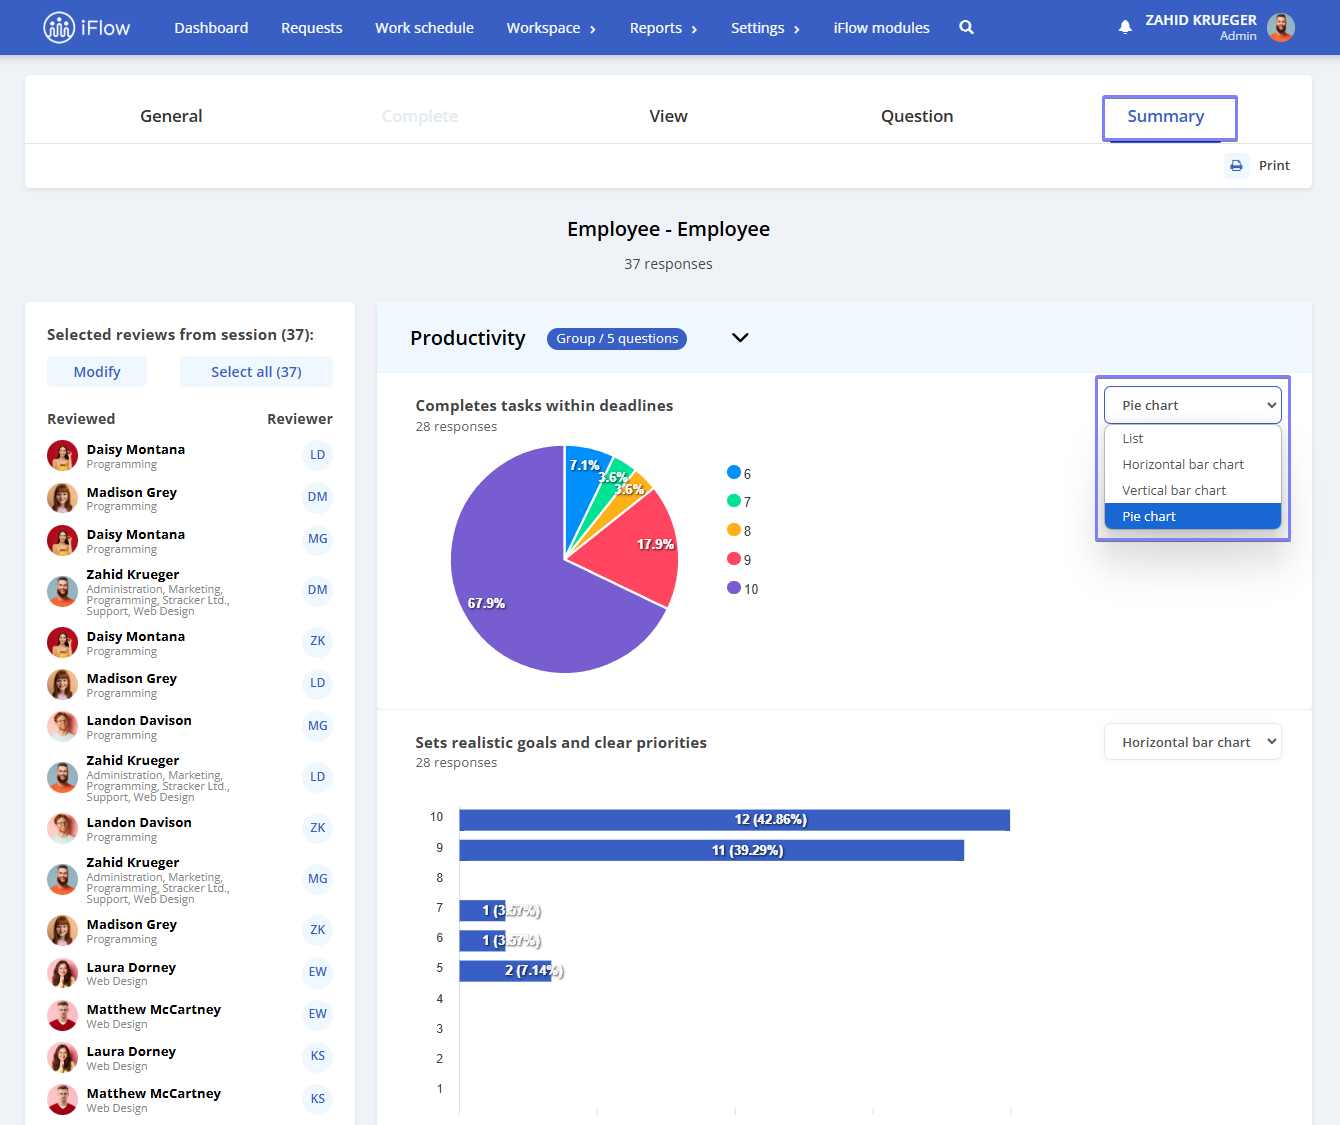
The review results are displayed in several views: Summary, Question, View, Complete, and General

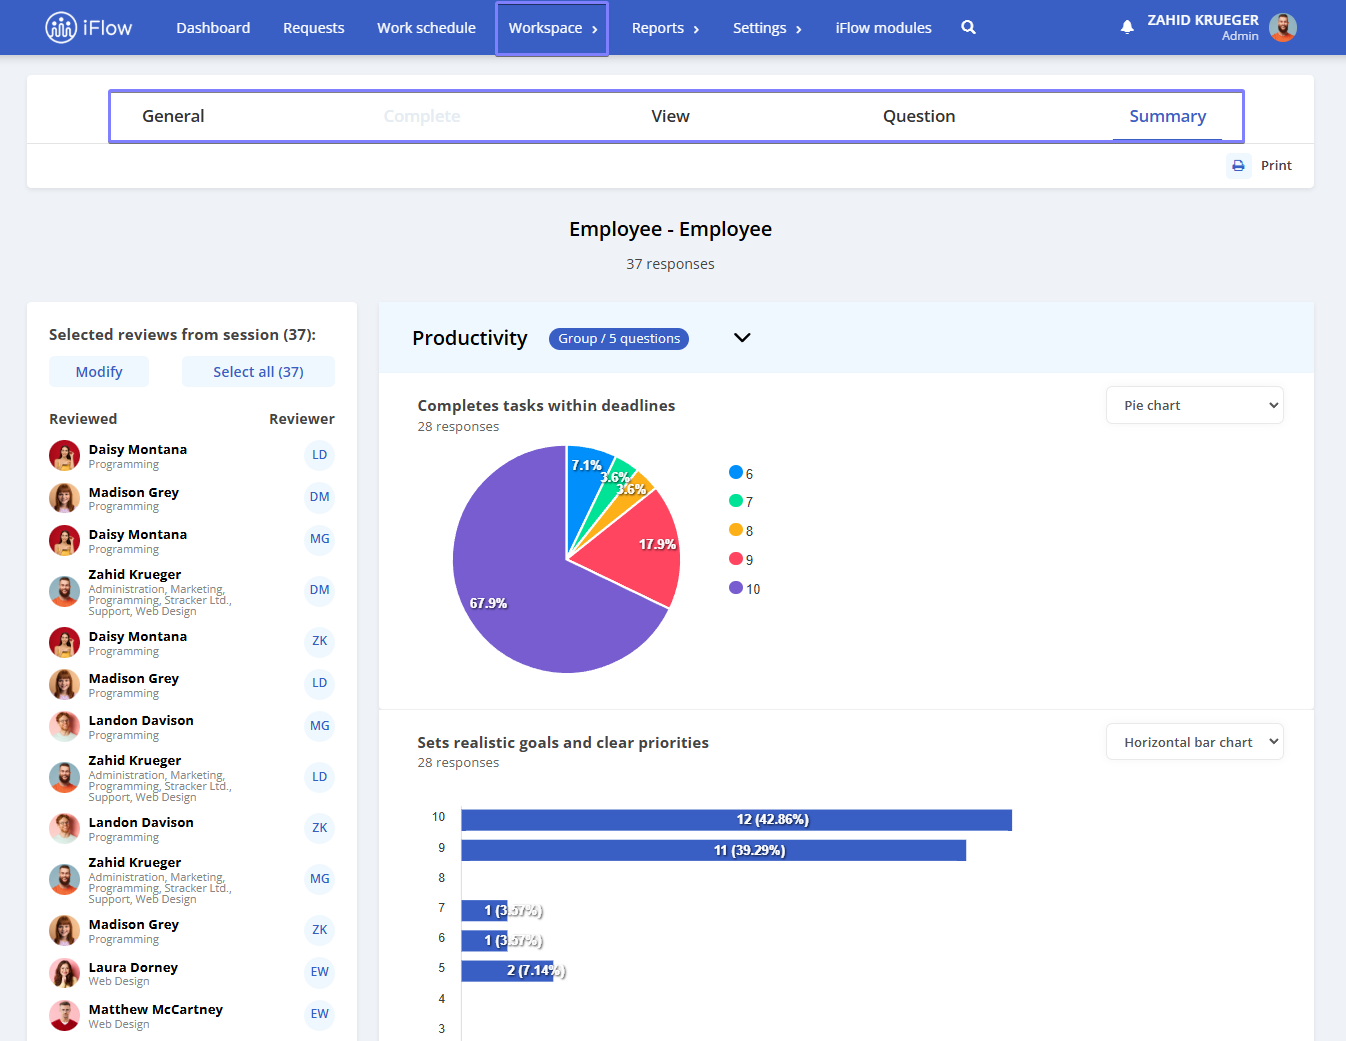
Summary
A summary of all responses collected for a specific question, which can be displayed as:
- List
- Horizontal bar chart
- Vertical bar chart
- Pie chart
You can change the display mode for each question using the options on the right side of the question.
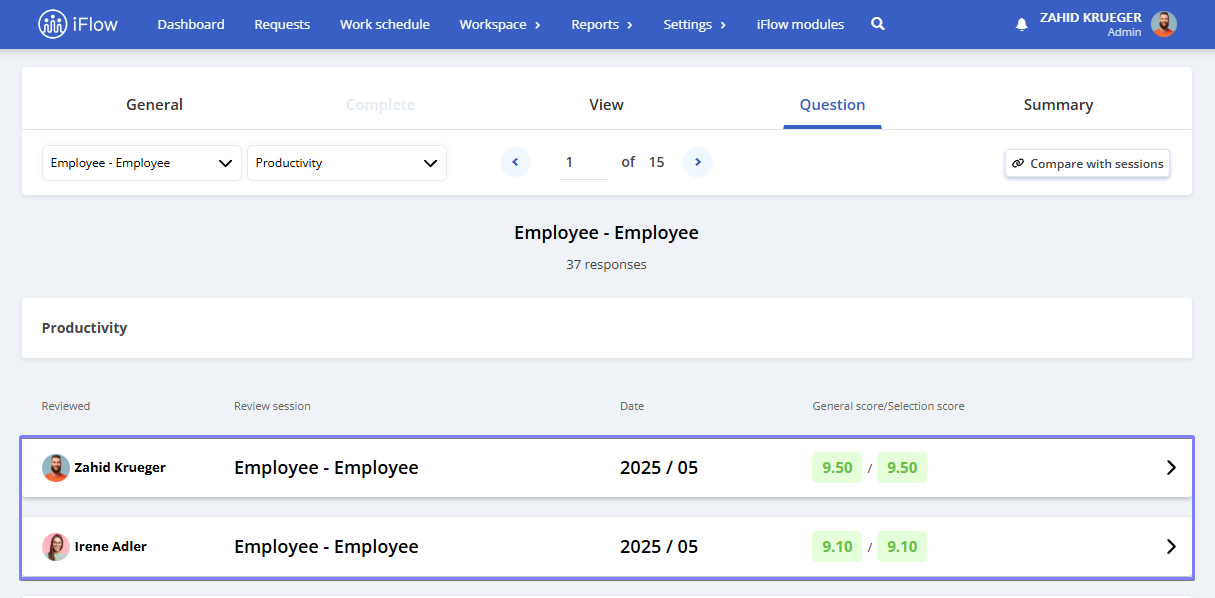
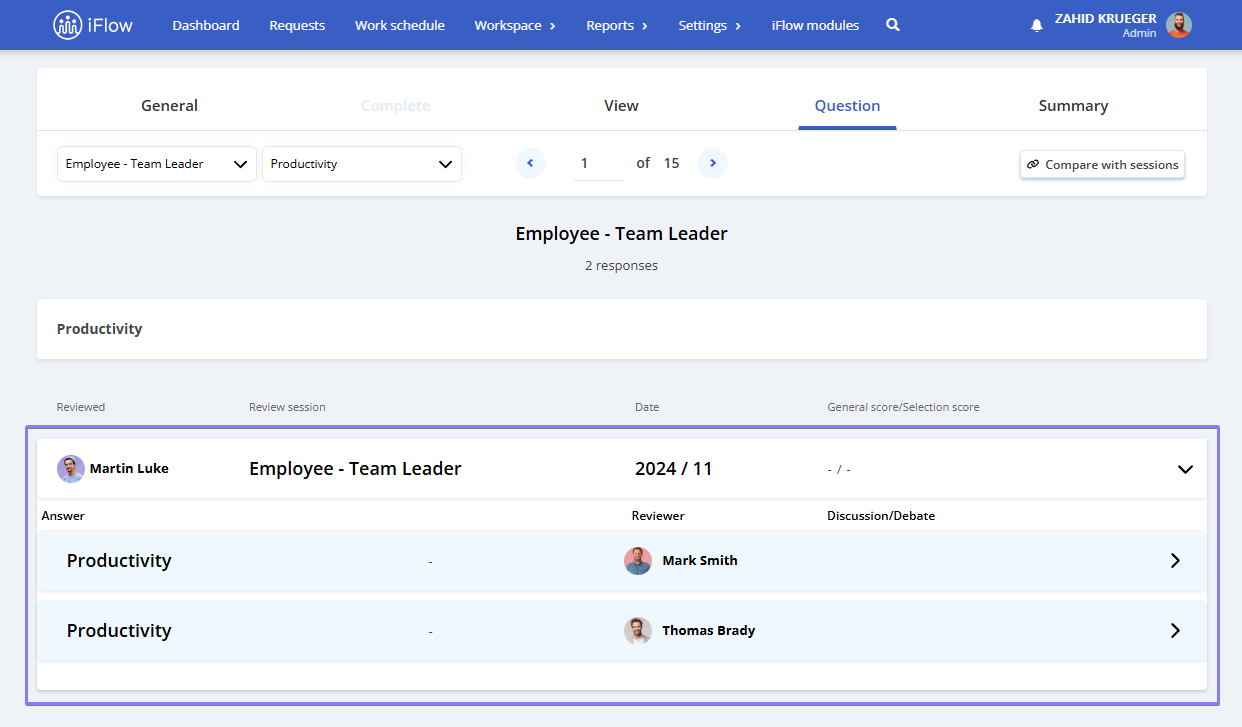
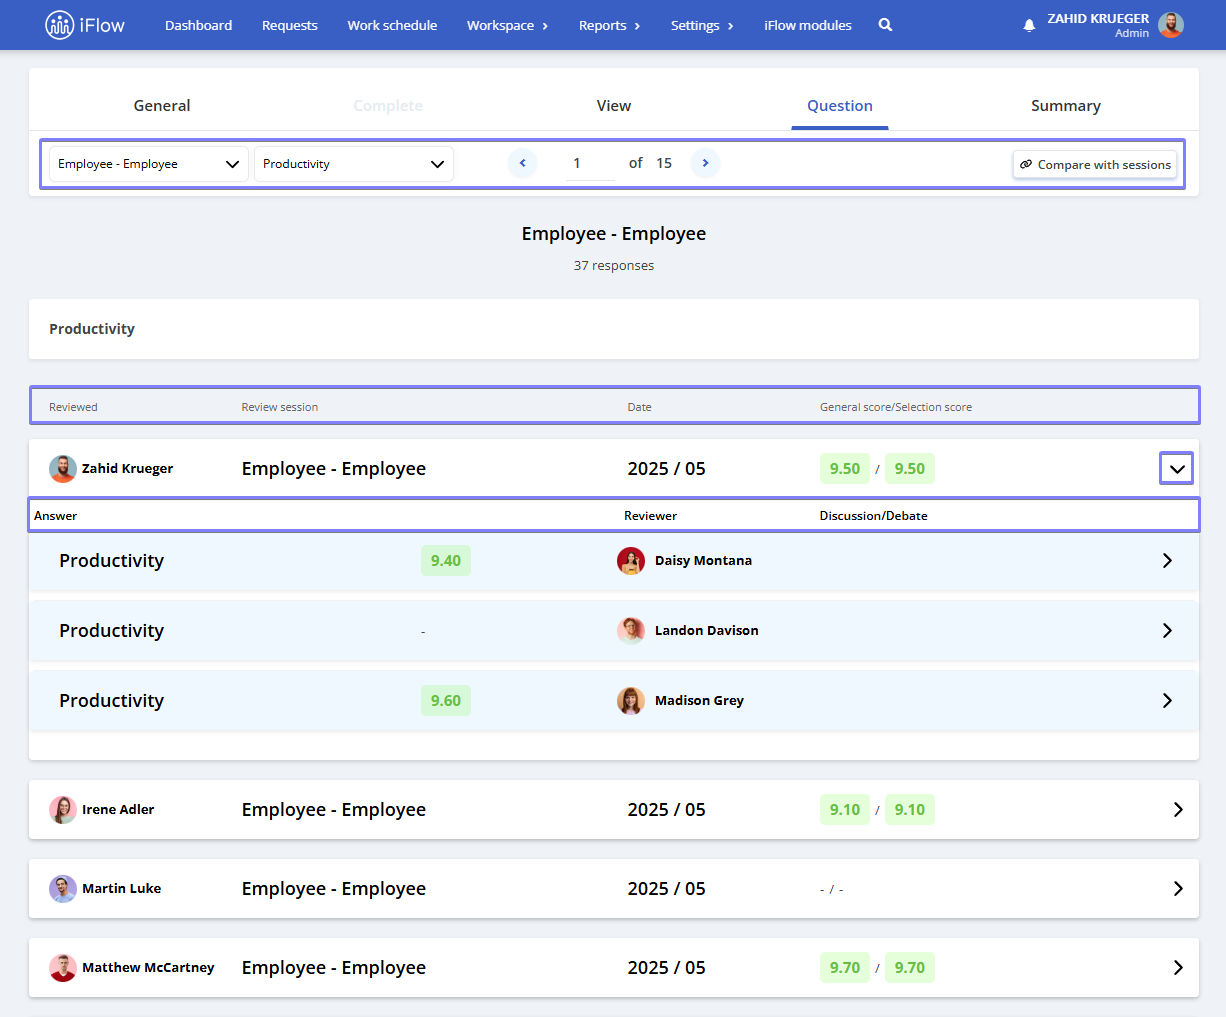
Question
In this section, you can see each reviewer’s individual response. The following information is displayed: Reviewed employee, Review session, Date, and Overall score/Selection score.
- At the top left, you can select the session and the question from the dedicated lists
- You can navigate between questions using the left/right arrows in the center
- Clicking the arrow next to a review will display detailed information about that review, including Response, Reviewer, and Discussion/Debate. If you have any unclear points or need more information, you can initiate a discussion based on the review responses. Also, if you want to leave feedback or other relevant information, you can add it in the comments section
- At the top right, there is a Compare with other sessions button that allows you to compare responses from two or more review sessions simultaneously
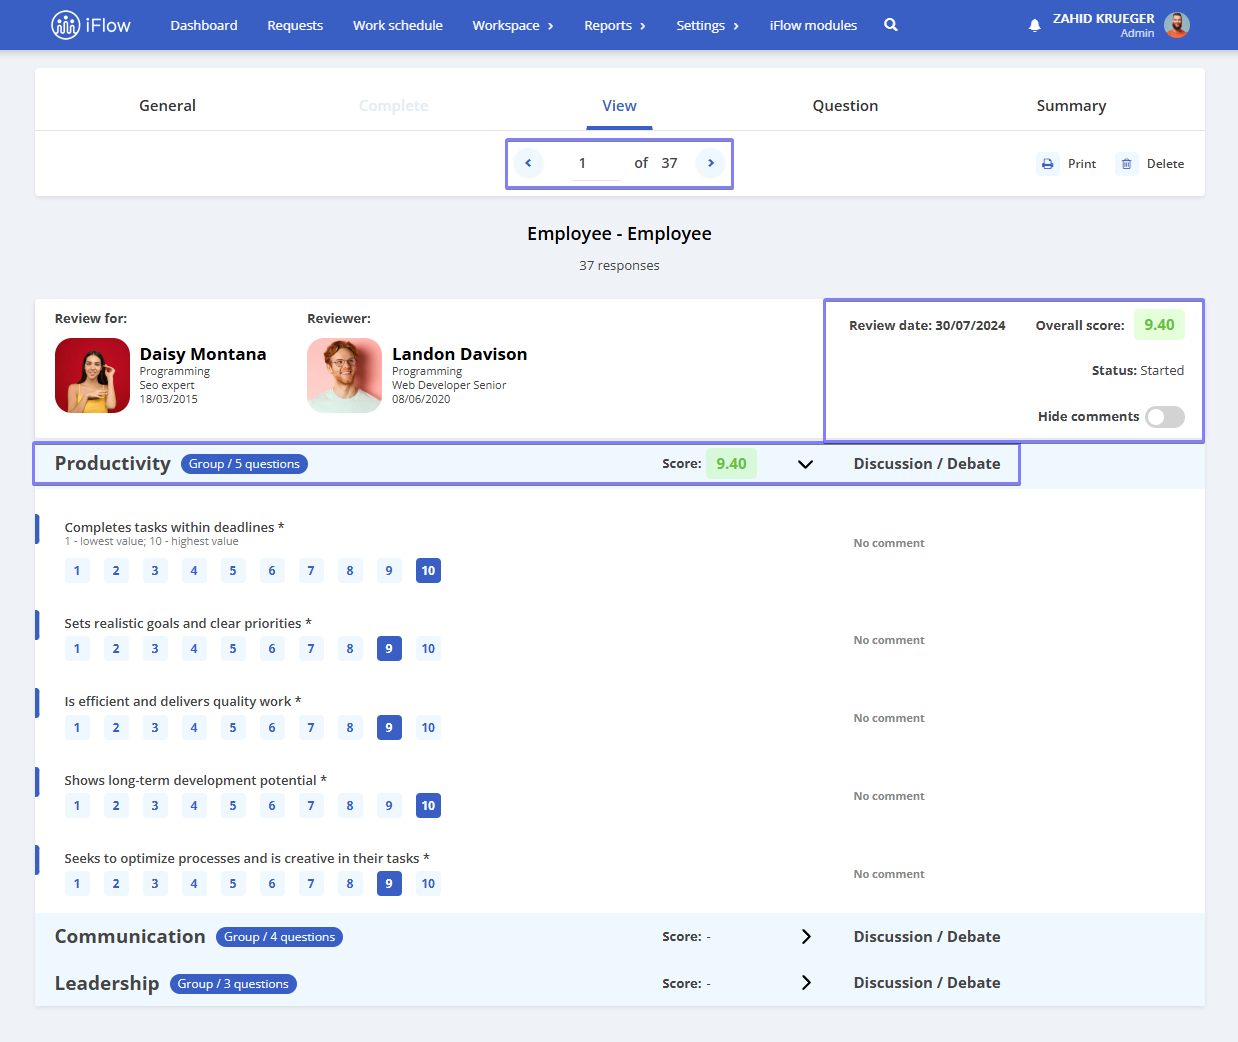
View
This section displays all the answers provided by a reviewer for the reviewed employee:
- In the top right corner, you can see the Review date, Overall score, Status, and a checkbox to Hide comments
- You can navigate between reviews using the left/right arrows in the center
- Below, you’ll find details about the completed reviews: Group name, Score, and Discussion/Debate. If you have any unclear points or need more information, you can initiate a discussion based on the answers provided in the review. Additionally, if you wish to leave feedback or other relevant information, you can include it in the comments section
By clicking the arrow next to the score, you can show or hide the responses completed by the group
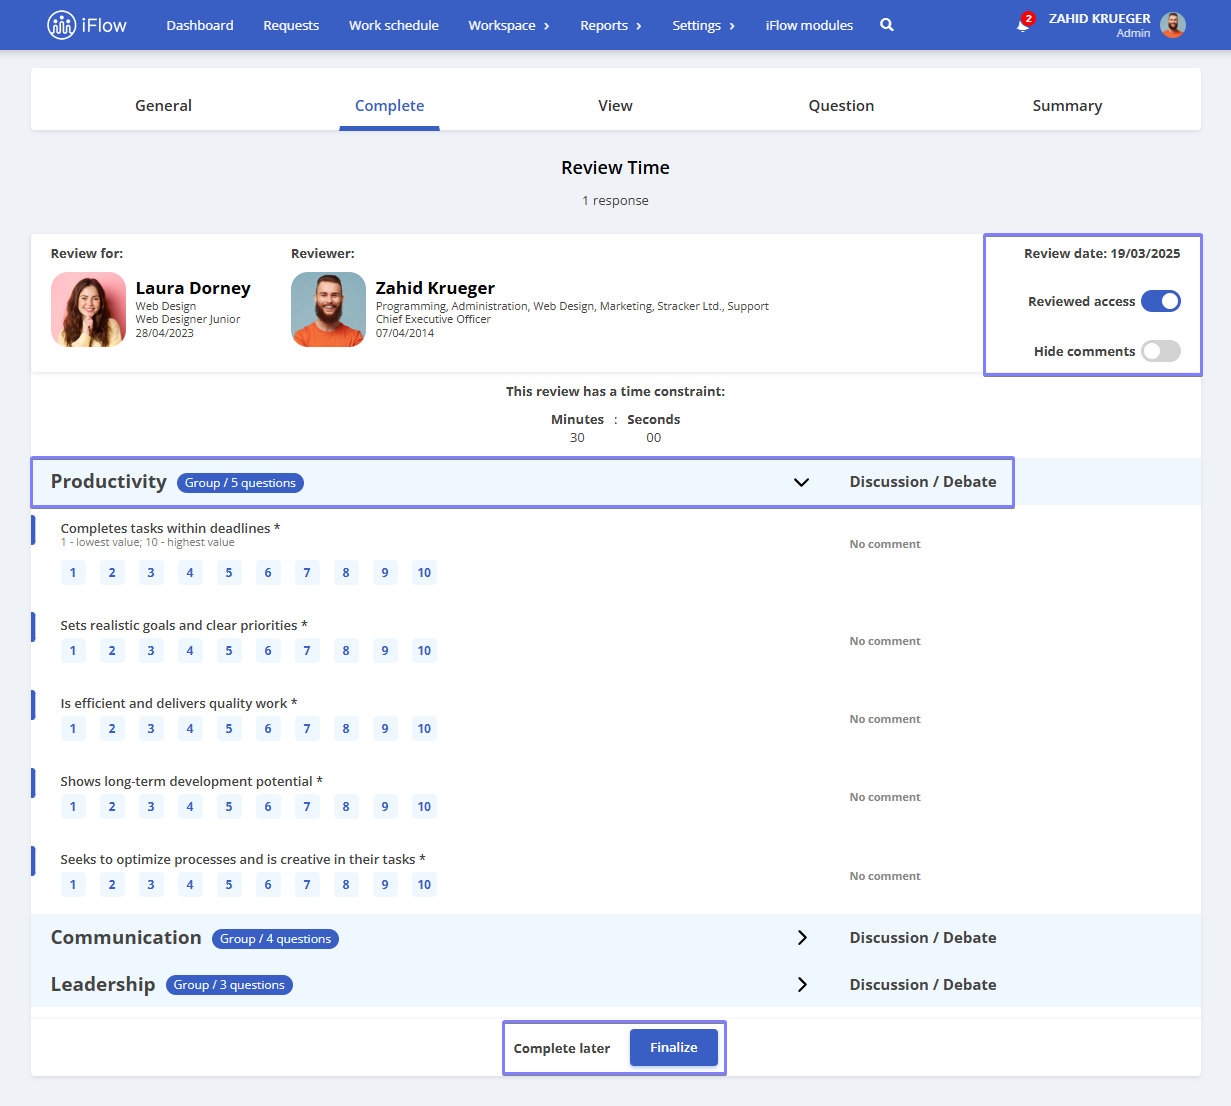
Complete
This section is active only when a review is not yet finished. It displays the following information:
- On the right side, you can see the Review Date and the option to Hide comments
- Below, you will find details about the reviews: Group name and Discussion/Debate
- If you have any unclear points or need additional information, you can initiate a discussion based on the responses provided in the review. Also, if you want to leave feedback or other relevant information, you can add it in the comments section
- By clicking the arrow next to the discussion, you can show or hide the completed responses
- Finally, you can choose between the options to Complete later or Finish review
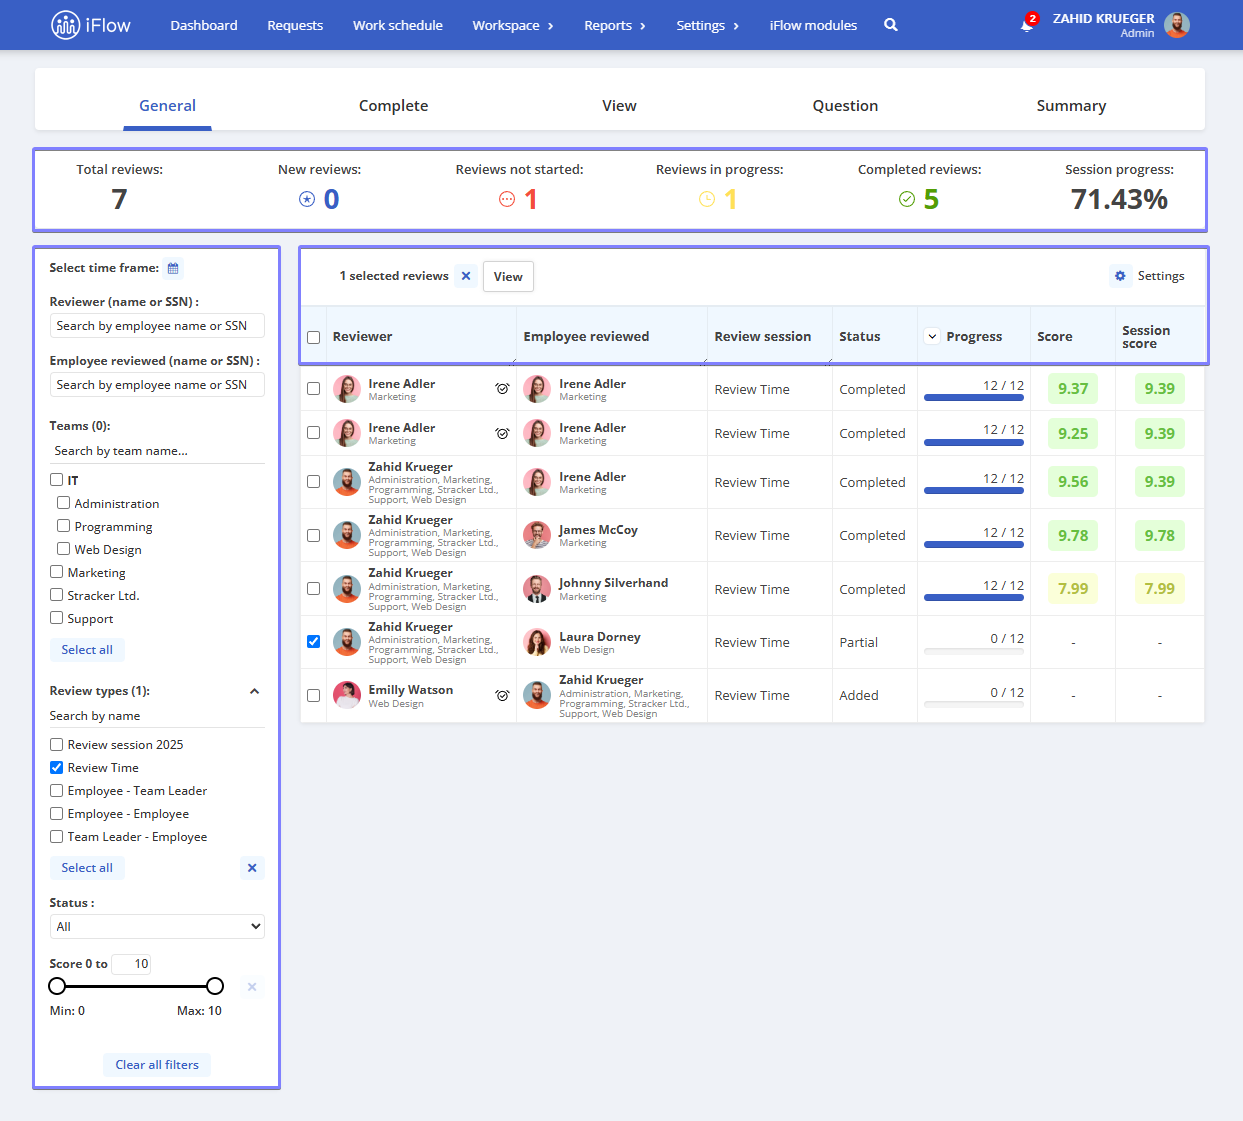
General
Displays the overall information from a review session, such as:
- Total reviews – the number of reviews added in the session
- New reviews – recently added reviews
- Reviews not started – reviews that have not yet been started
- Reviews in progress – partially completed reviews
- Completed reviews – fully completed reviews
- Session progress
On the left side of the report, you will find several filters:
- Select time frame
- Reviewer – the person conducting the review
- Employee reviewed– the person being reviewed
- Teams – the team to which both the reviewer and the reviewed employee belong
- Review types – the types of reviews added
- Status:
- All – shows all reviews
- None – if the session has not started
- Added – if the session has been started
- Partial – review started but not completed
- Completed – review has been finalized
- Score
To customize the report, click the Settings button in the top right corner of the table and check the options you want to display in the report. The following columns can be added or removed:
- Reviewer
- Employee reviewed
- Review session
- Created date
- Due date
- Status
- Progress
- Score
- & many more
Employee-level reviews report
- Go to the Dashboard
- Click on the employee’s name – then select the Reviews submenu
The Given section allows you to view the reviews that you have completed or those that are pending.
On the right side of each review, you have 3 options:
- Edit – fill out the review if the employee is facing difficulties or is struggling to work independently
- View – view the answers submitted by the employee for that review
- X button – permanently delete the review
The Received section displays the reviews for which the employee is being evaluated.
On the right side of each review, you have two options:
- View – view the responses of the review performed on the employee
- X button – permanently delete the review
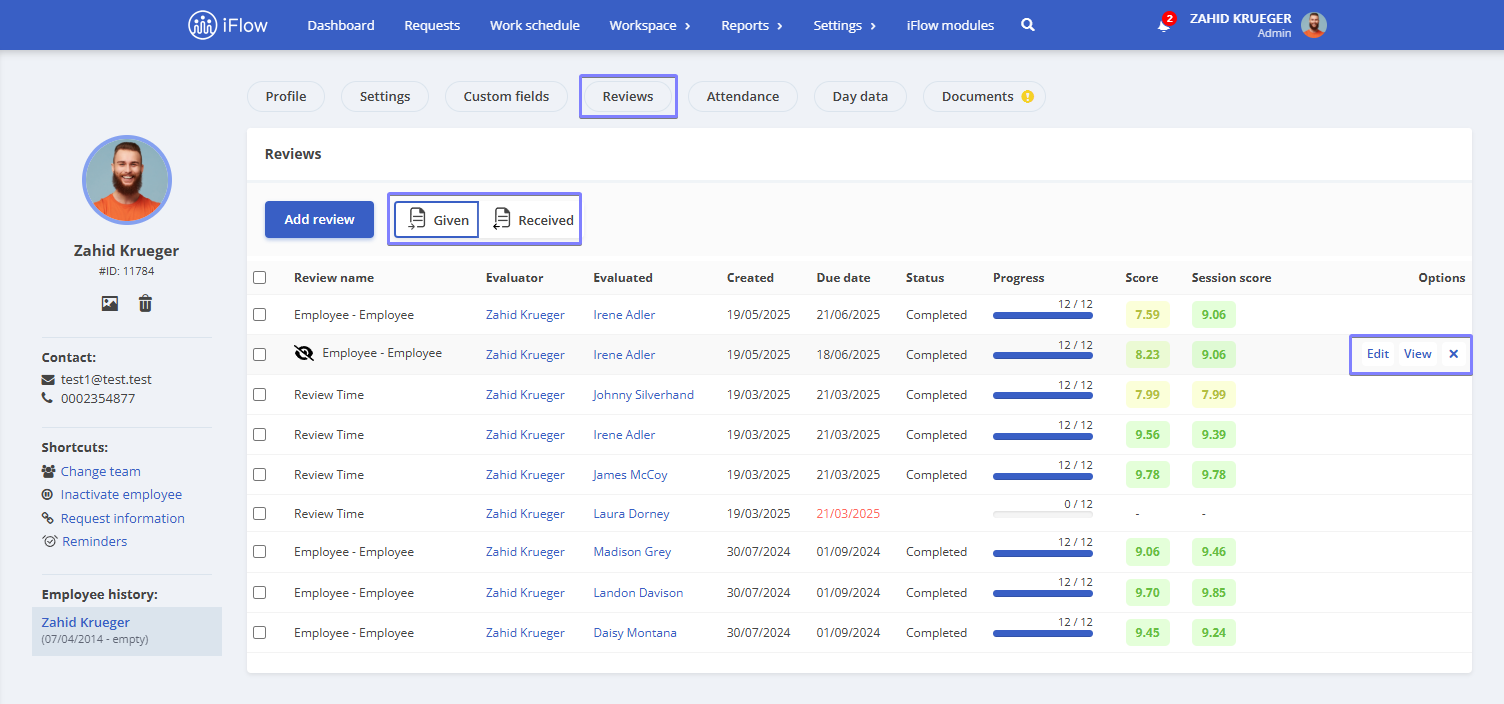
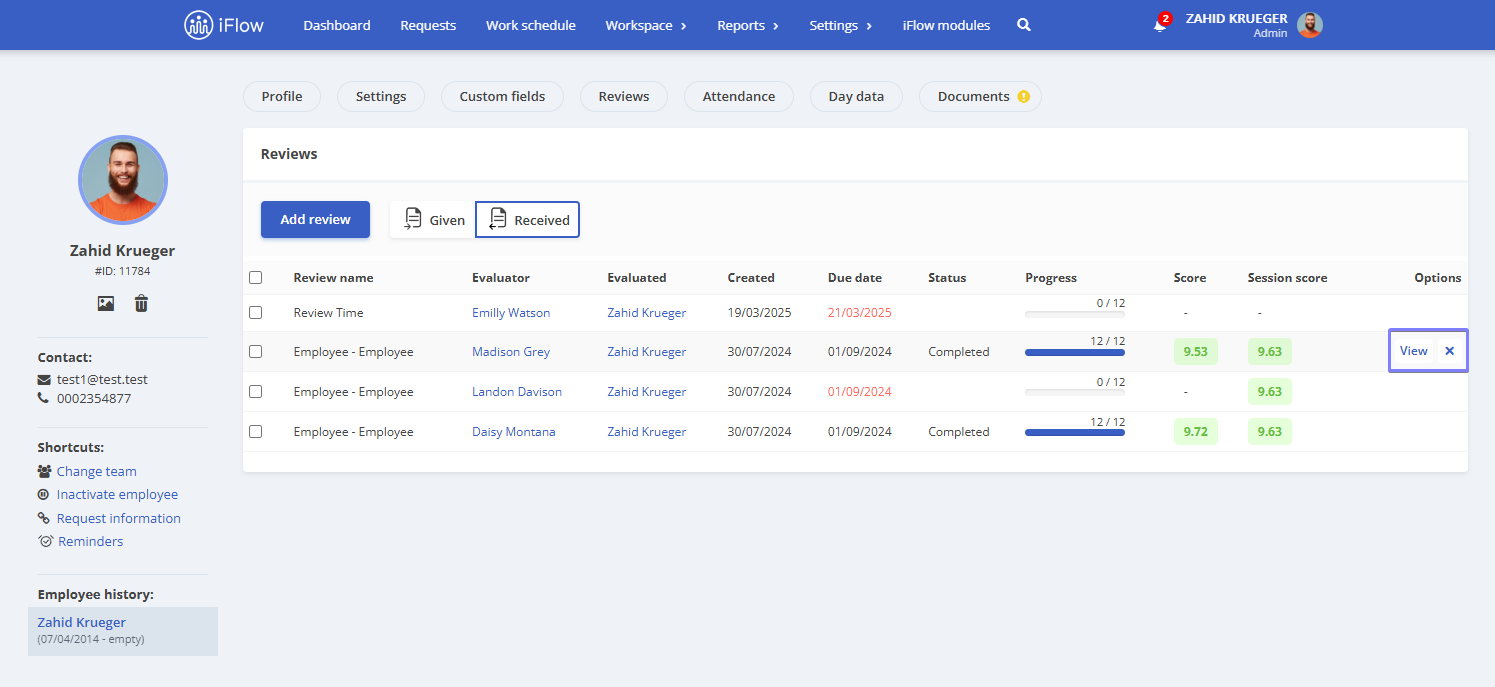
You can select multiple reviews, both from the Given and Received sections, to view or delete them, even if they belong to different review sessions.

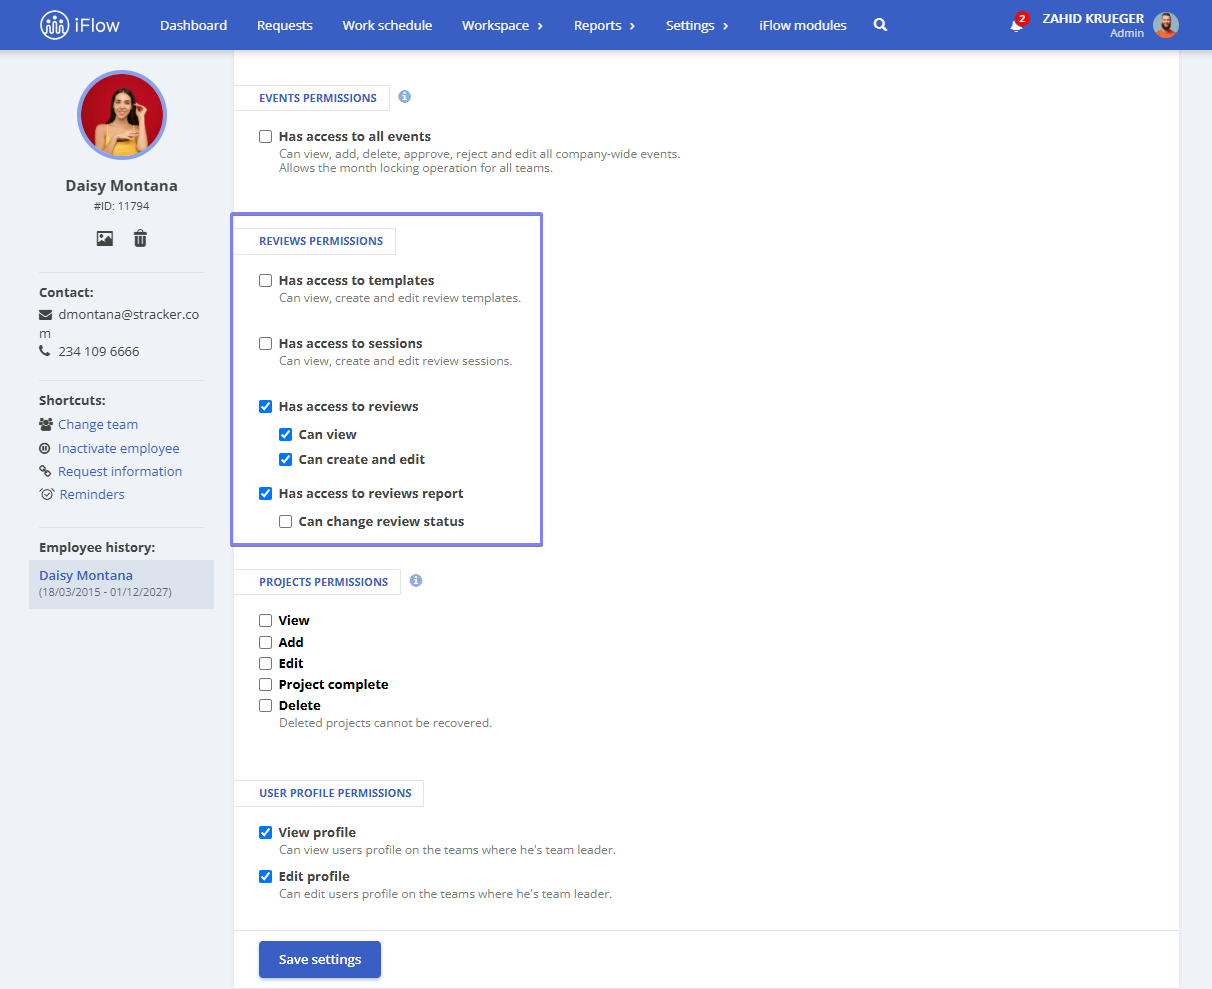
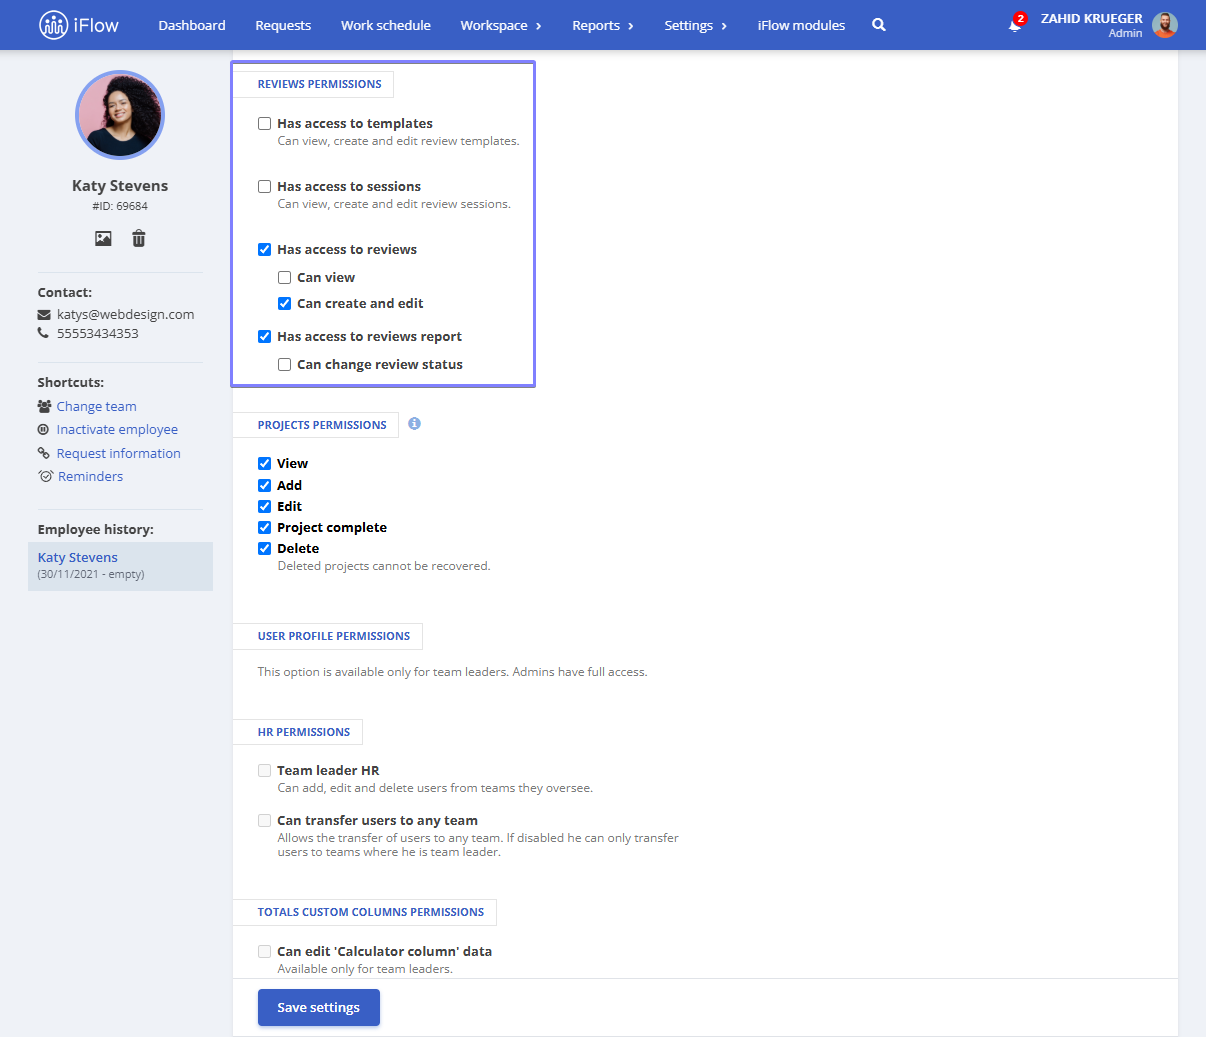
Review permissions
- Go to the employee’s profile
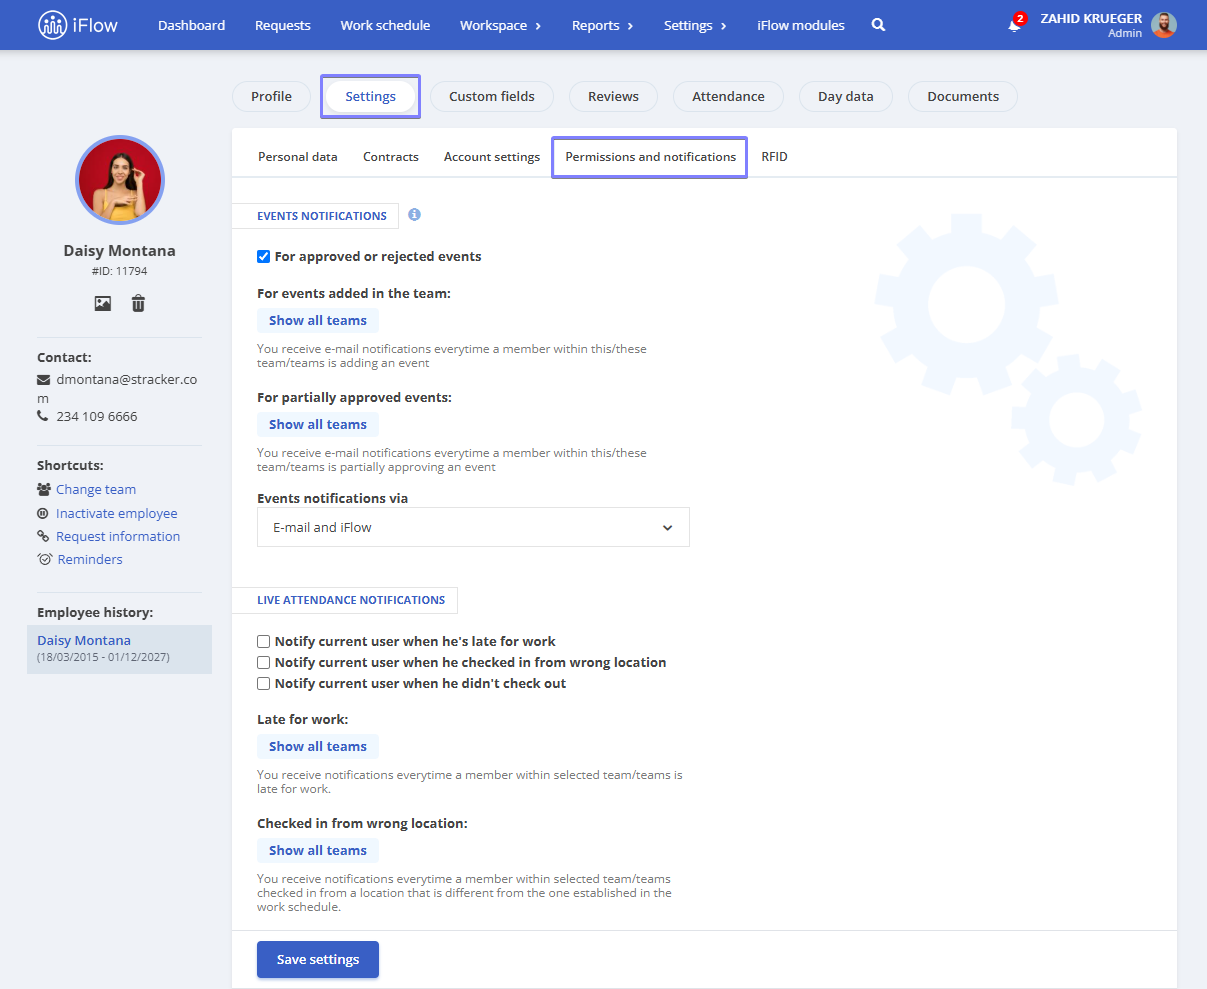
- Navigate to Settings – Permissions and notifications
- Then scroll down to the Reviews permissions section
Review permissions for administrator
- The administrator has implicit access to all reviews

Review permissions for team member
- Has access to templates – team members can view, create, and edit templates
- Has access to sessions – team members can view, create, and edit sessions
- Has access to reviews – team members have access to reviews
- Can view – team members can view reviews
- Can create and edit – team members can create and edit reviews
- Has access to the reviews report – team members can view the reviews report
- Can change the review status – team members can modify the status of reviews
Review permissions for team leaders
By default, the team leader has access only to the received and completed sessions. These permissions can be modified by accessing the team leader’s profile – Settings menu – Permissions and notifications – Review permissions section. There are three settings that can be enabled:
- Has access to templates – The leader can view, create, and edit templates
- Has access to sessions – The leader can view, create, and edit sessions
- Has access to reviews – The leader has access to reviews
- Can view – The leader can view the reviews
- Can create and edit – The leader can create and edit reviews
- Has access to reviews report – The leader can view the reviews report
- Can change review status – The leader can modify the status of reviews
Visibility permissions when creating a review session
When creating a review session, you have the following options:
- Reviewed employee visibility – the reviewed employee can or cannot see the review
- The reviewer can change the access – the reviewer decides whether the reviewed employee will see the review or not