

Within the application, there are two methods available for tracking time worked on projects:
Clocking on a project: Employees select a project at the beginning of the day, and the time will be recorded in the actual attendance. The projects appear in the employee’s daily activities section in their profile.
Project work time logging: The time spent on projects is recorded separately through a widget available in the main dashboard or in the personal profile. Multiple work intervals can be logged on projects without affecting the daily attendance records.
Separate reports will be used accordingly, based on the method used for tracking project time.
How to activate projects
- From the main menu, go to Settings – Company
- Select the Projects settings submenu
- In the Projects field, choose Activated
- Then, click the Update information button

From this section, you can also modify the label name. This allows you to replace the default name in the application with a term that is more familiar to your company’s employees.
Attention!
Basic accounts are limited to 3 projects. If you want to use more projects, you need the iPM business module. To start your trial period, email [email protected].
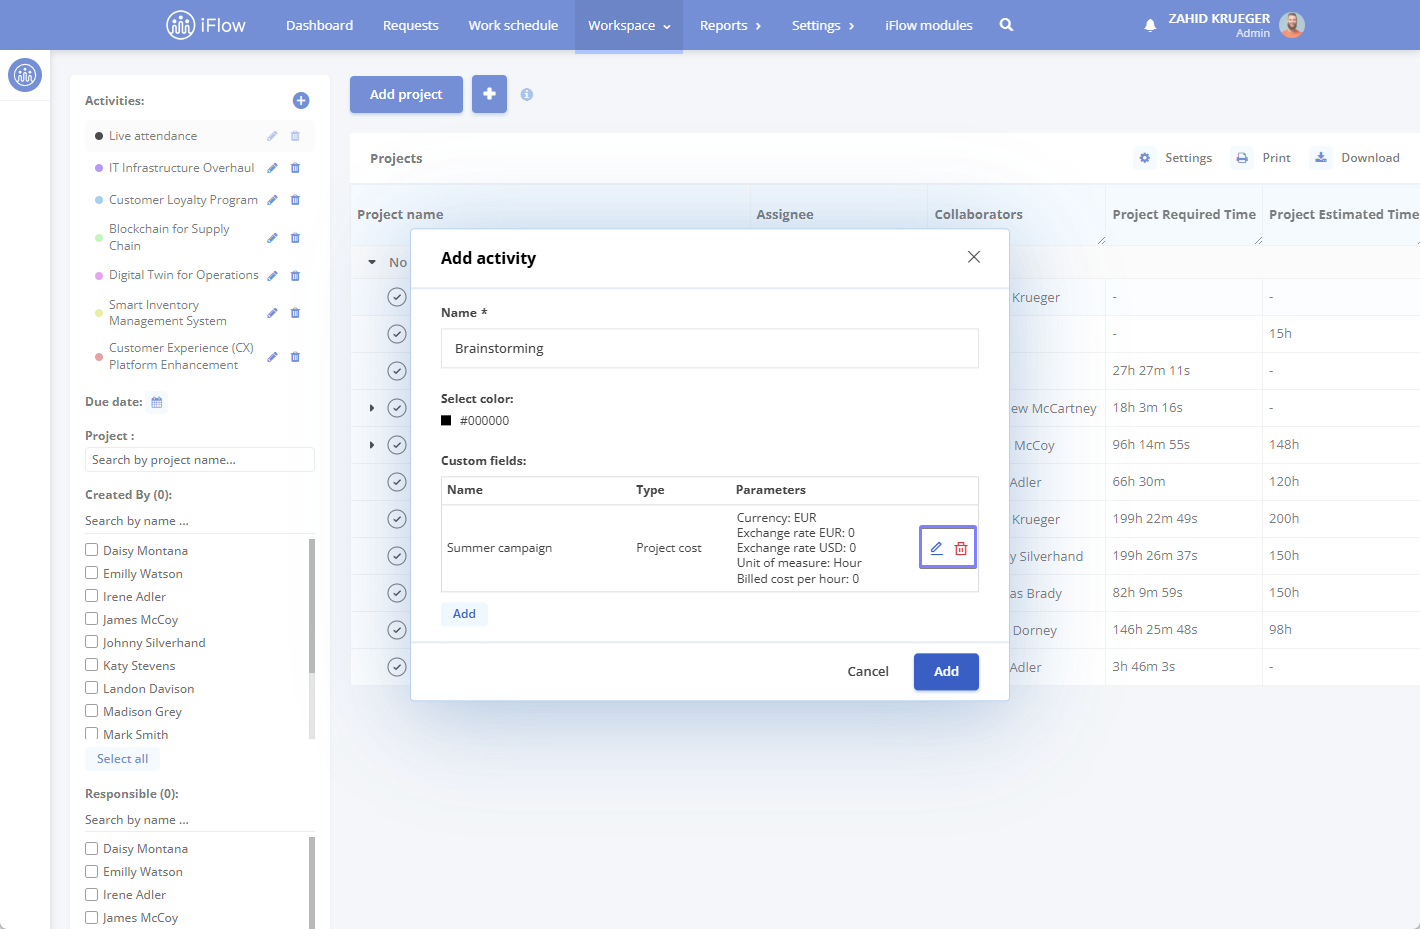
How to create an activity
An activity is a broader entity that includes and manages multiple individual projects. You can create an activity as follows:
- From the main menu, go to the Workspace – Projects section
- Click the “+” button located at the top left of the project table
- Enter the name of the activity and, optionally, select a color to visually differentiate the activity
- Click the “Add” button to complete the creation of the activity
The activity called Real attendance contains the projects on which employees should record their worked time when clocking in or out of the workplace.
If you want to track project time separately from real attendance, you need to add a new activity and create the projects within that activity.

How to set project costs
Custom fields allow you to add additional information related to the costs associated with activities and projects. They provide flexibility for detailed cost tracking and can be adapted to the specifics of each project.
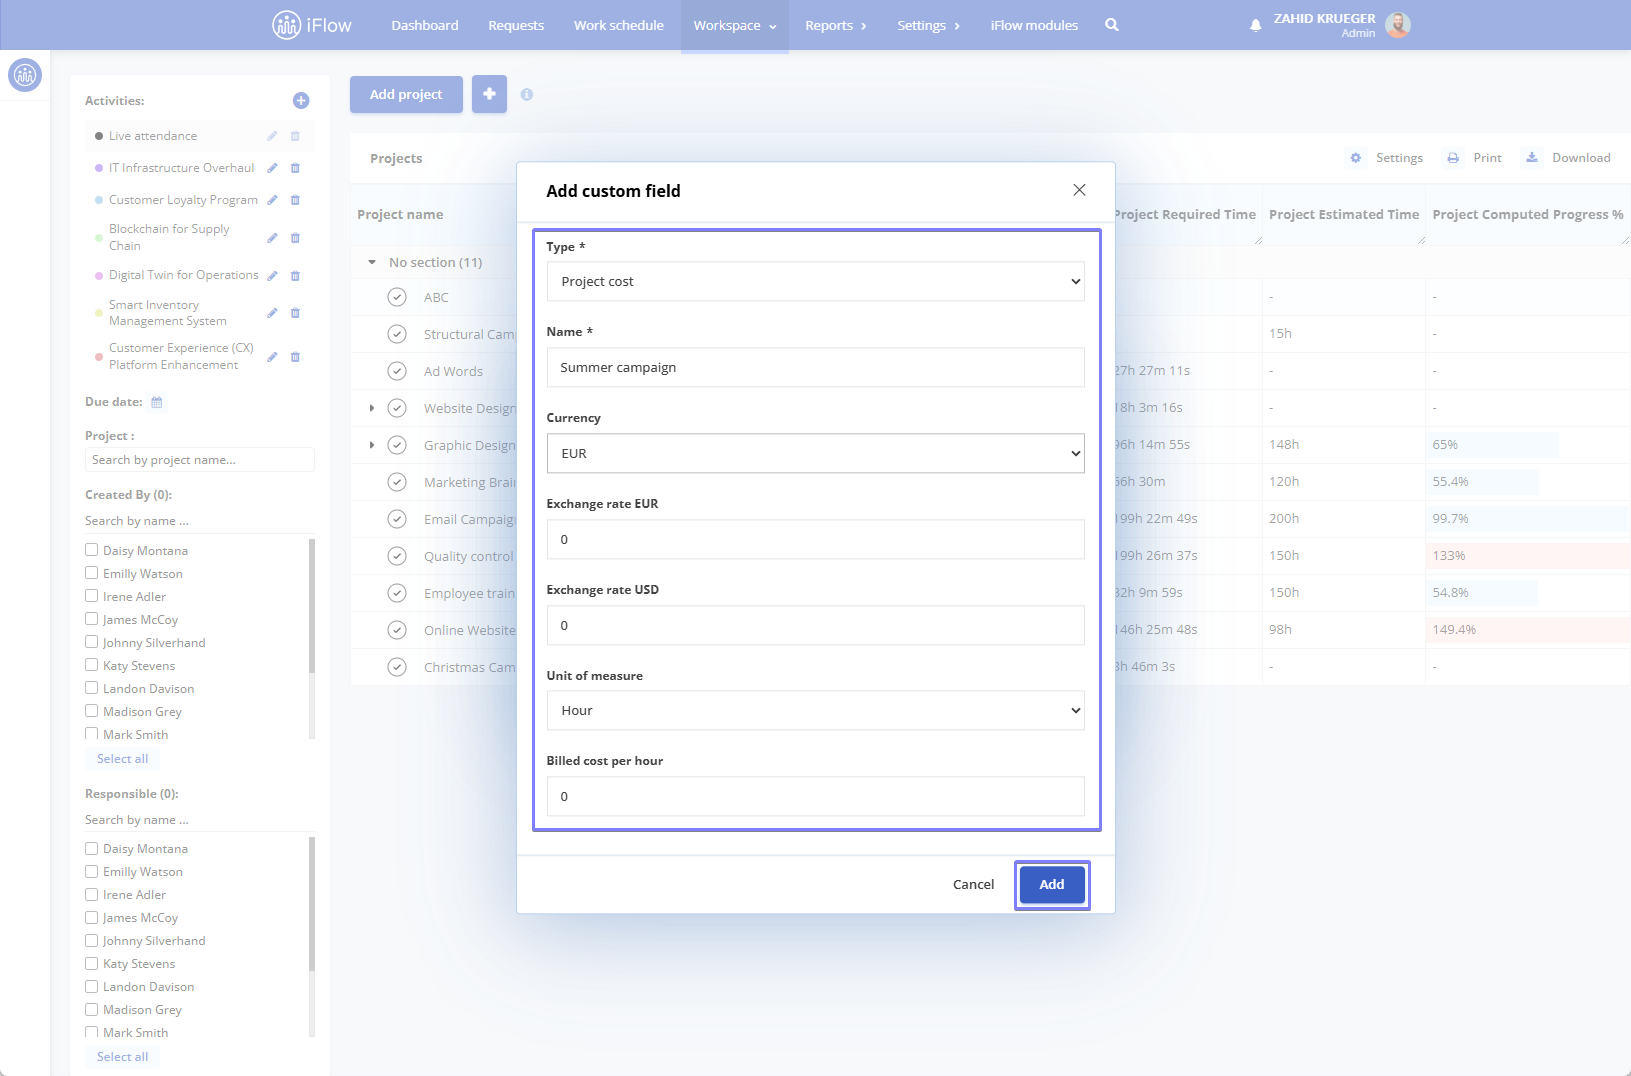
How to add a custom field
When creating or editing an activity, click the Add button in the Custom fields section.
Fill in the relevant information:
- Type: project cost
- Name: the name of the field (e.g., Billed cost per hour)
- Currency: RON / USD / EUR
- Exchange rate EUR / USD: if applicable
- Unit of measurement: Hour / Square meter / Unit
After completing the fields, click Add again to save the custom field.
How to use fields in projects
Once you have created a custom field for an activity, you can use it as follows:
- Go to the list of projects and click the Details button on the right side of the project
- In the opened window, fill in the custom field with the appropriate value
- The same process applies to sub-projects – access the details of each one to add or edit the relevant information
Description of available custom fields
- Currency – The currency in which all financial calculations for the project are made. Examples: RON, EUR, USD
- EUR exchange rate – Used to convert costs or revenues expressed in euros
- USD exchange rate – Used to convert costs or revenues expressed in US dollars
- Unit of measurement – Represents the unit used to measure the activity or services provided (e.g., hour, square meter, unit)
- Employee cost per hour – The total company cost for one hour worked by the employee
- Hours worked by employee – The total number of hours an employee worked over a given period
- Employee cost – The total cost of the employee’s work, calculated as:
- Employee cost per hour × Hours worked by employee
- Billed cost per hour – The hourly rate charged by the company to the client for the employee’s work
- Billed hours worked – The number of hours worked by the employee that were billed to the client
- Billed cost – The total amount billed to the client
- Paid billed cost – The amount actually received from the client
What happens when you modify a field
If you modify a custom field (e.g., activity cost), the change will NOT apply retroactively.
The new values will only apply to projects and sub-projects added after the modification.
Filling in values in attendance
When employees or team leaders record attendance:
- They can fill in how many square meters, units, or hours were completed
- This information will be automatically reflected in the Activity Report, providing a clear view of the work volume performed
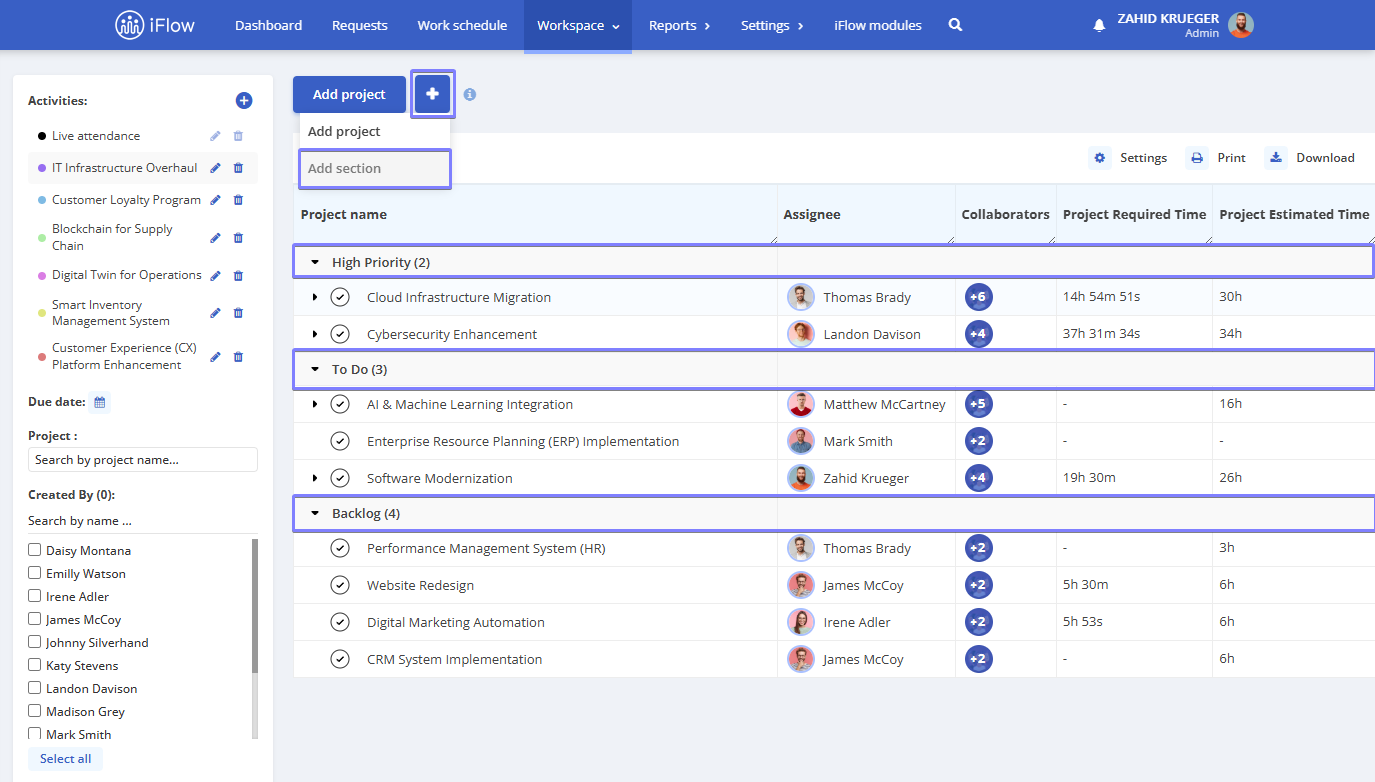
How to create a section
A section can be used to organize and group projects based on specific criteria or categories.
- Click the “+” button next to the Add project button
- Click on Add section
- Enter the name of the section, then click outside the field to save it
- To edit, click the pencil icon when hovering over the section with your mouse
- To delete, click the “x” button
- To add a project to the section, click the “+” button
How to create a project
- From the main menu, go to Workspace – Projects
- Click the Add project button
- Enter the Project name
- Click outside the name field to finalize the action
- To add more details, hover over the project and click Details
- Visibility – Private or Public; all new projects are automatically set to Private. Visibility can be changed by the employee who created the project, or by project owners and collaborators who have permission to edit projects. (More details about permissions can be found here.)
- Select Owner and Collaborators (if applicable). The project owner will automatically be added to the collaborators field to give a quick overview of all project members.
- Logged time: Tracks the time entered by employees for the project
- Estimated time: Set by the person creating the project to help monitor progress and estimate the time needed to complete tasks
- Calculated progress: Represents the ratio between estimated time and logged time
- Estimated progress: Entered by the project owner once the project starts, to help set realistic expectations for duration and required effort
- Due date: Specifies when the project should be completed. Based on this date, the application will also calculate any delays.
- Unique project code: Used for quick project identification
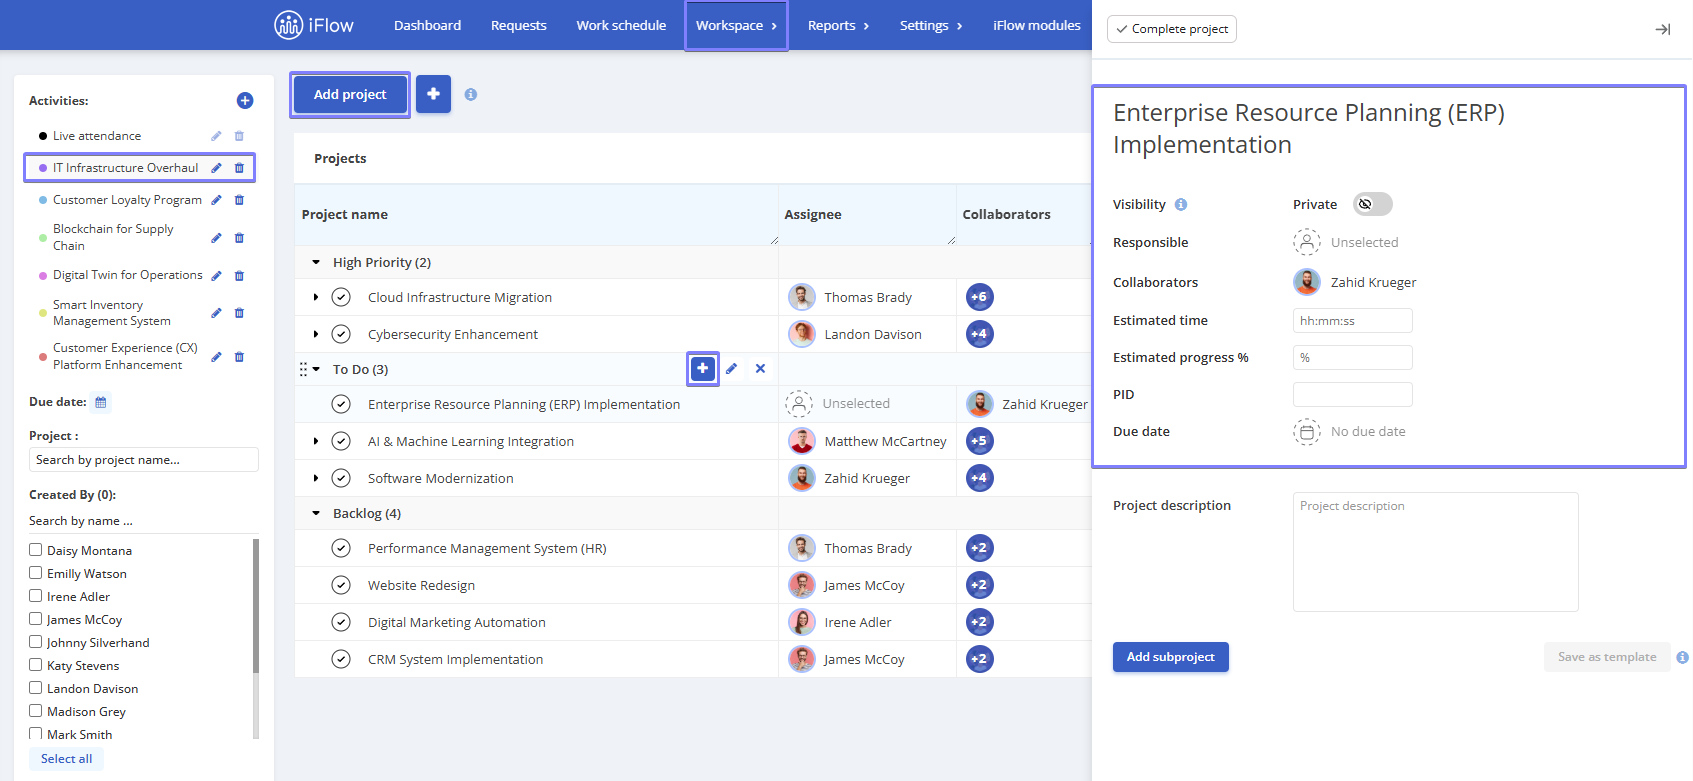
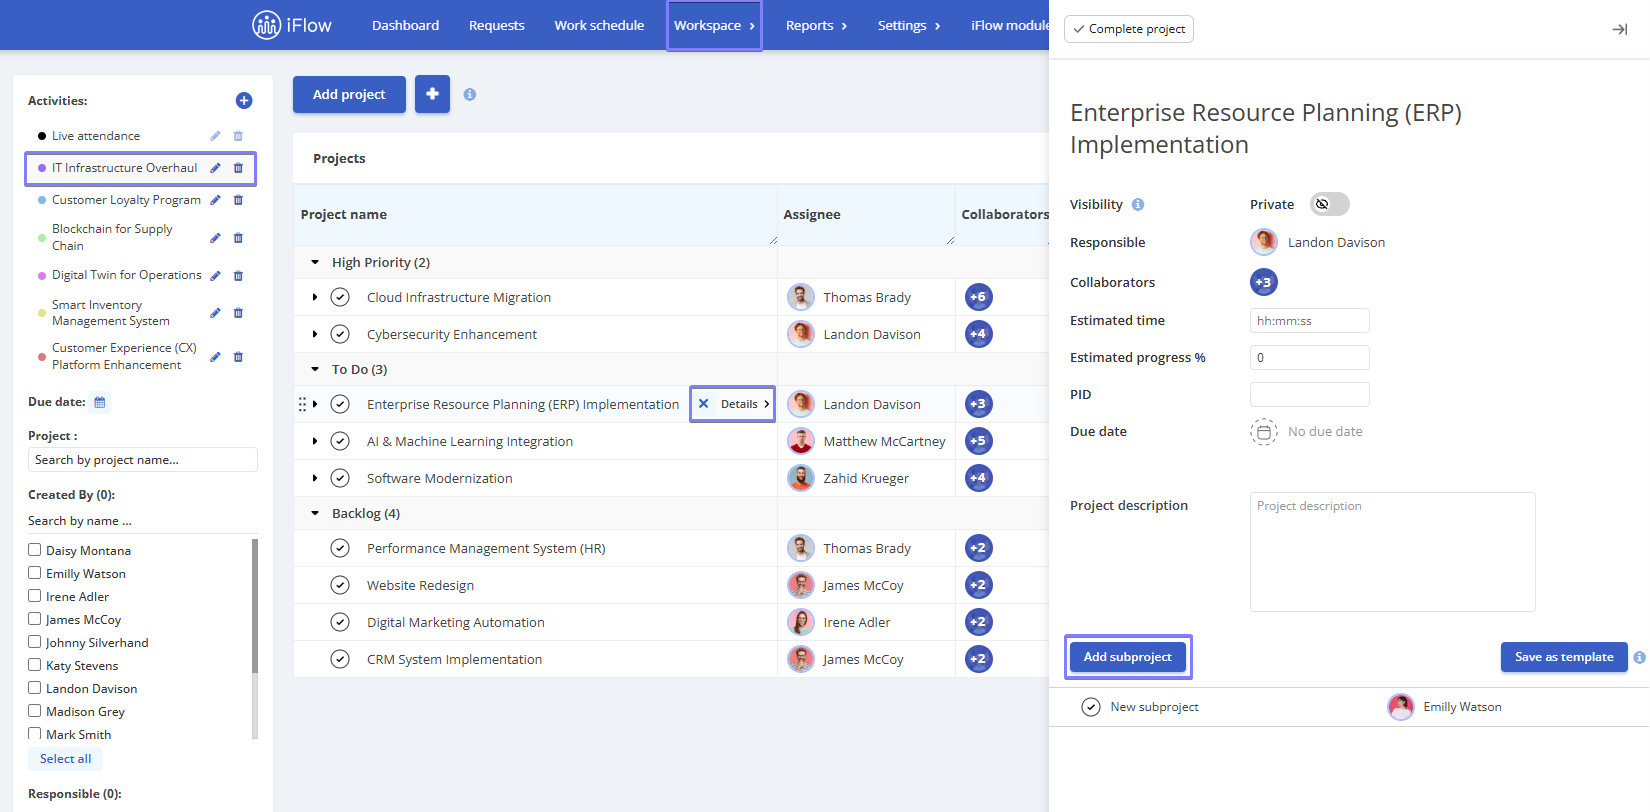
How to create a subproject
- From the Workspace – Projects menu
- Click on the project to which you want to add subprojects
- Click the Add subproject button
- Click Details to fill in the remaining information
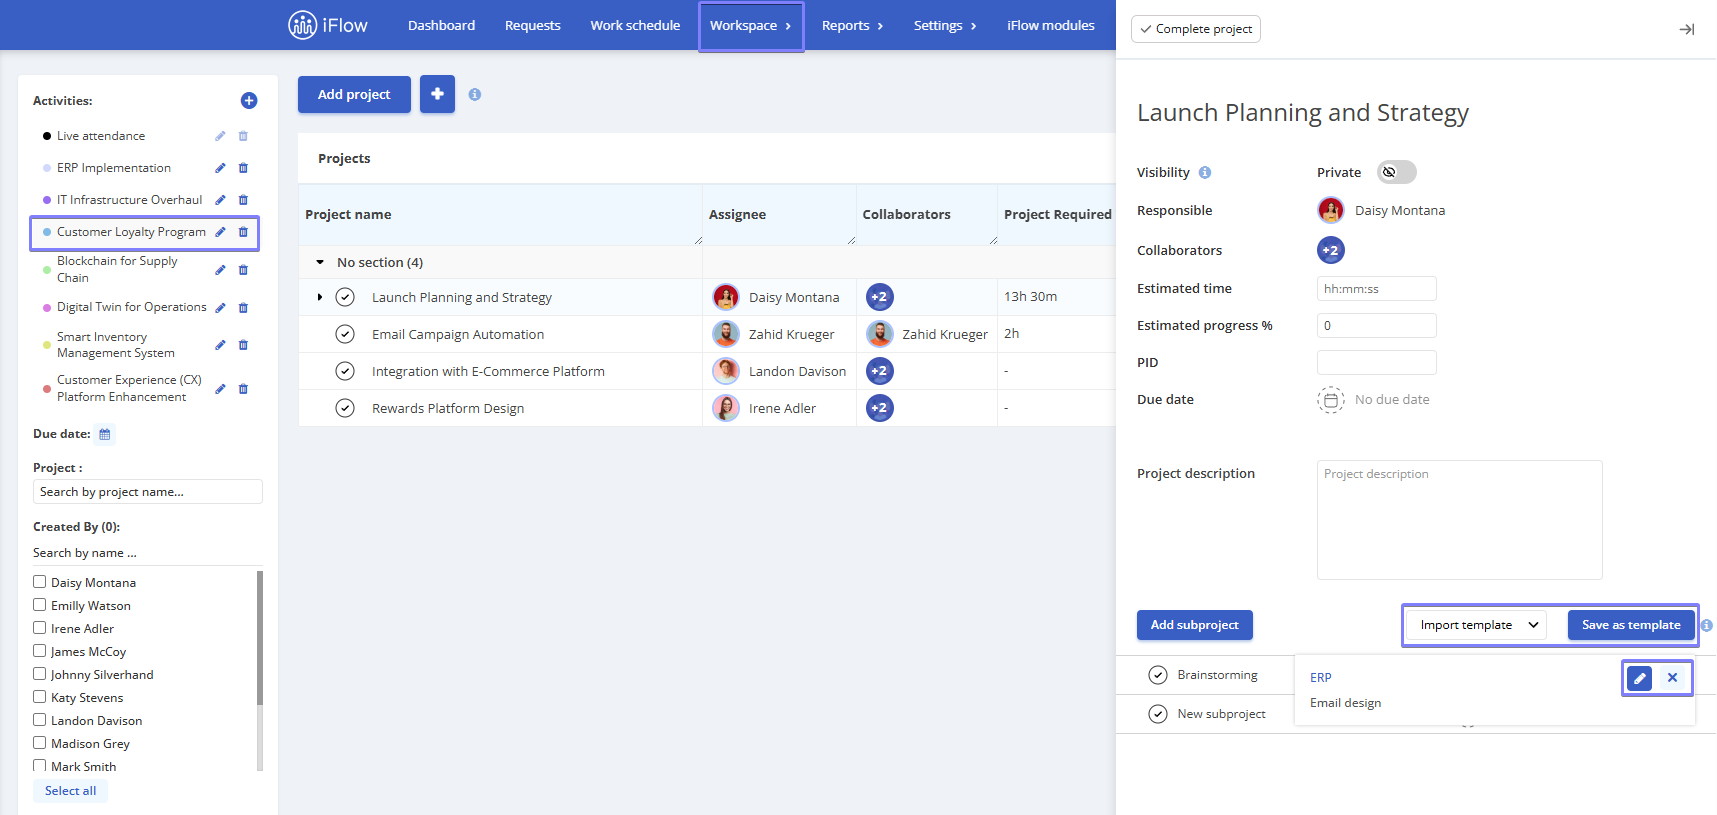
How to save projects as a template
Templates are used to be reused in future projects, saving time and ensuring consistency. To save a template:
- Open the desired project
- Click the Save as template button
- Enter the template name — all existing subprojects within that project will be saved as part of the template
To use it in a future project, create the project, click Import template, and then select the desired template. The subprojects saved in that template will be imported, and you can then complete the necessary information for each: owner, collaborators, estimated time, estimated progress, etc.
To delete or edit a template, hover your cursor over the template and choose the desired option.
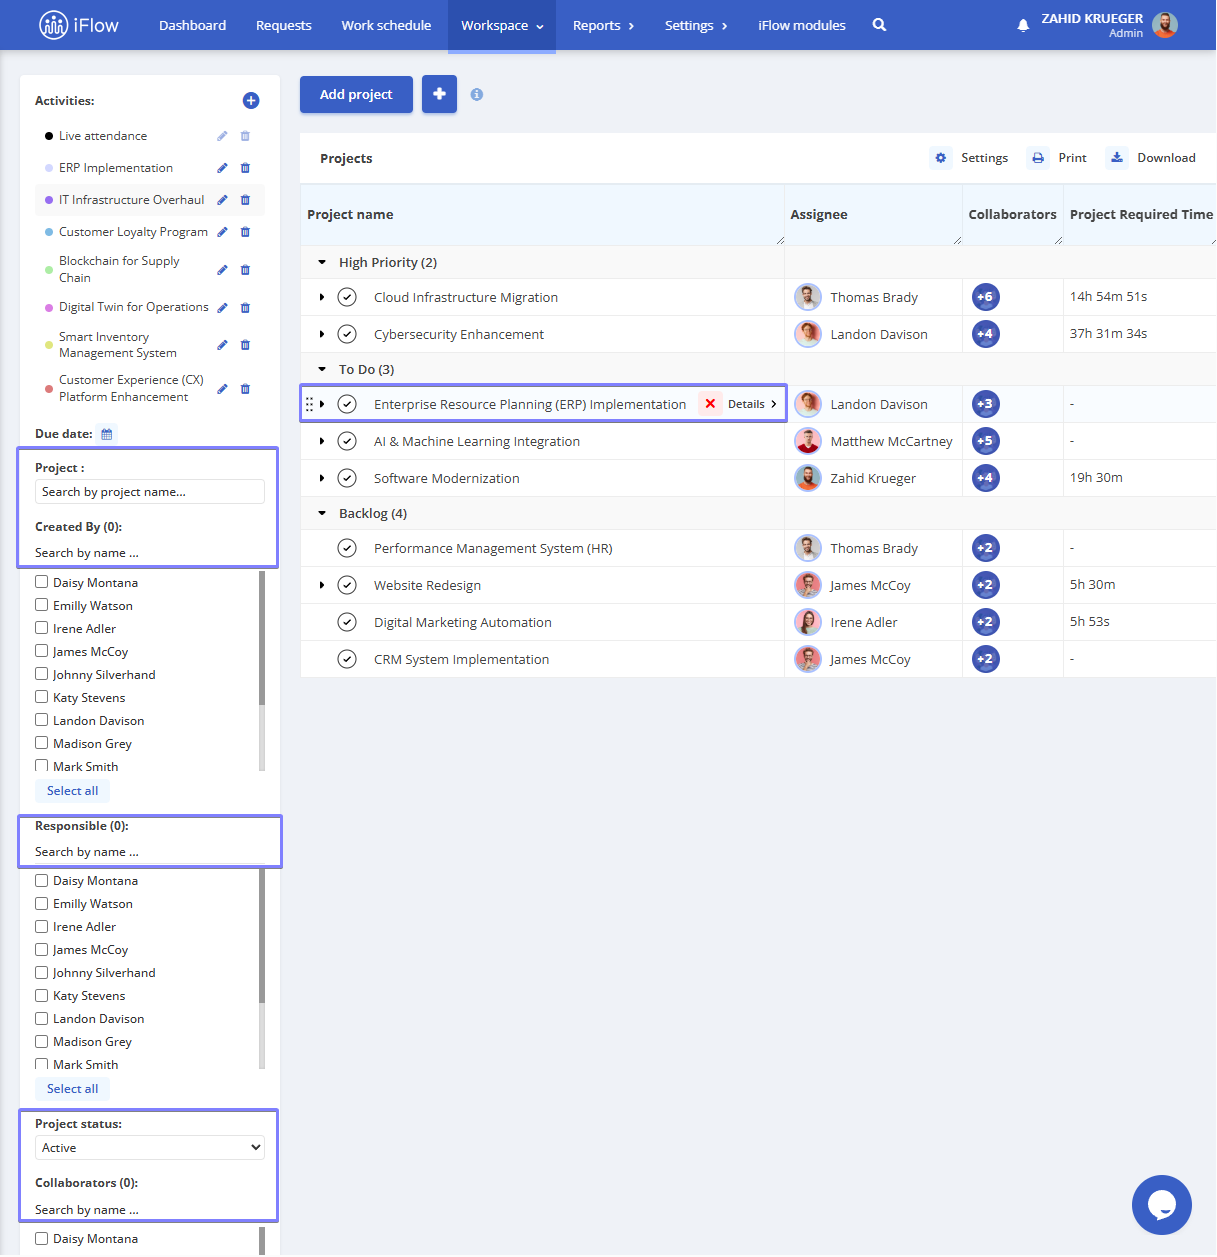
How to edit, complete, or delete projects
- Go to the Workspace – Projects main menu
- Click on a Project to edit it
- Click the checkmark icon in front of the project to mark it as completed
- Click the X to delete the project, then click Delete again to confirm the action
On the left side, you’ll find filters that help you quickly search for projects. You can filter by project name, creator, owner, status, due date, and collaborators.
Attention!
Deleting a project is only recommended if it was created by mistake. Once deleted, all related information and time entries will be permanently lost.
Custom fields for projects
Custom fields for projects help you allocate more information for a project or subproject, whether you need a unique piece of information, such as a project code, to identify the project or simply additional information, like a description.
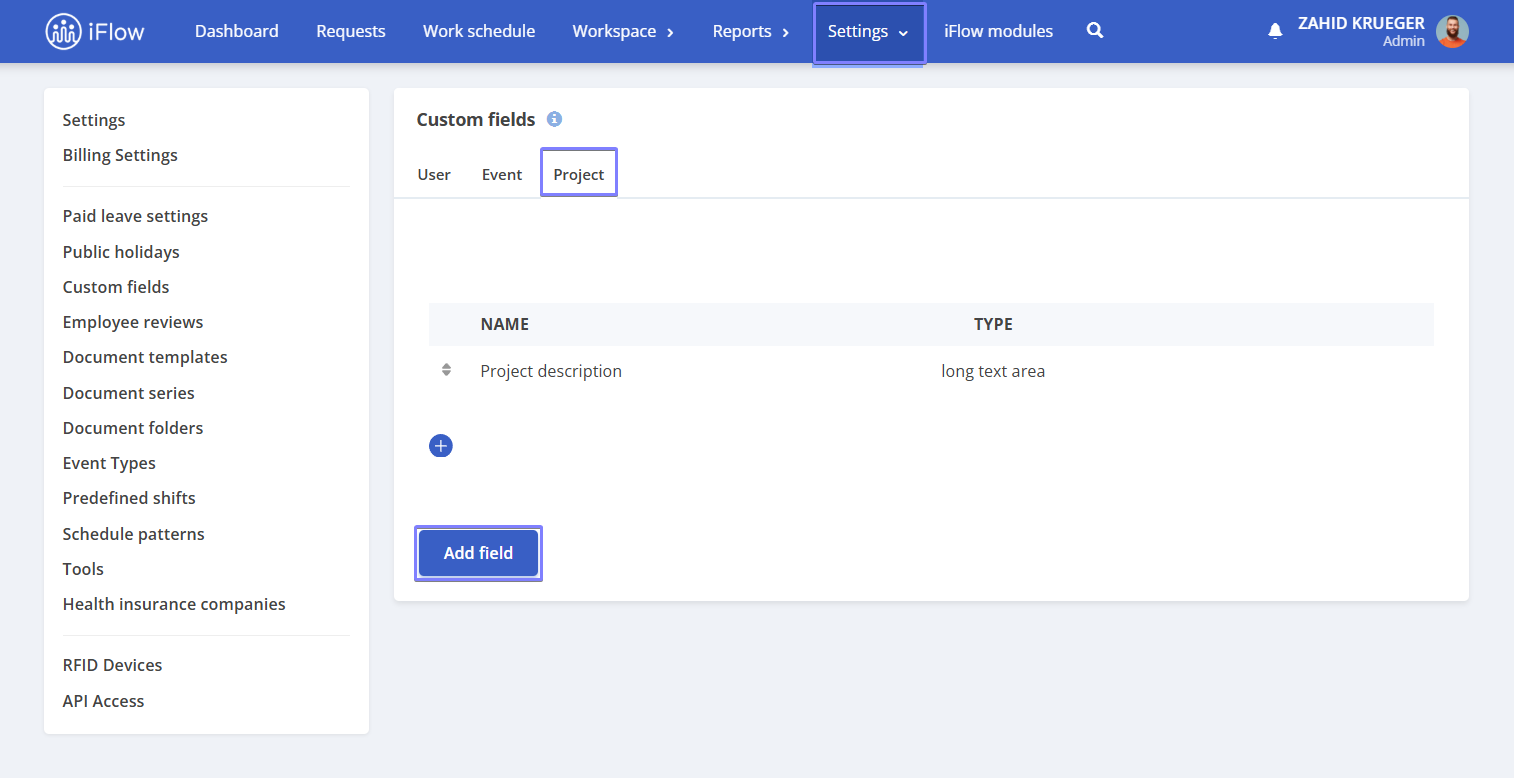
How to create a custom field for projects
Follow the steps below to create custom fields for projects. These can be filled in later when adding a new project or through project update/import.
- From the main menu, go to Settings – Custom fields
- Select the Project submenu
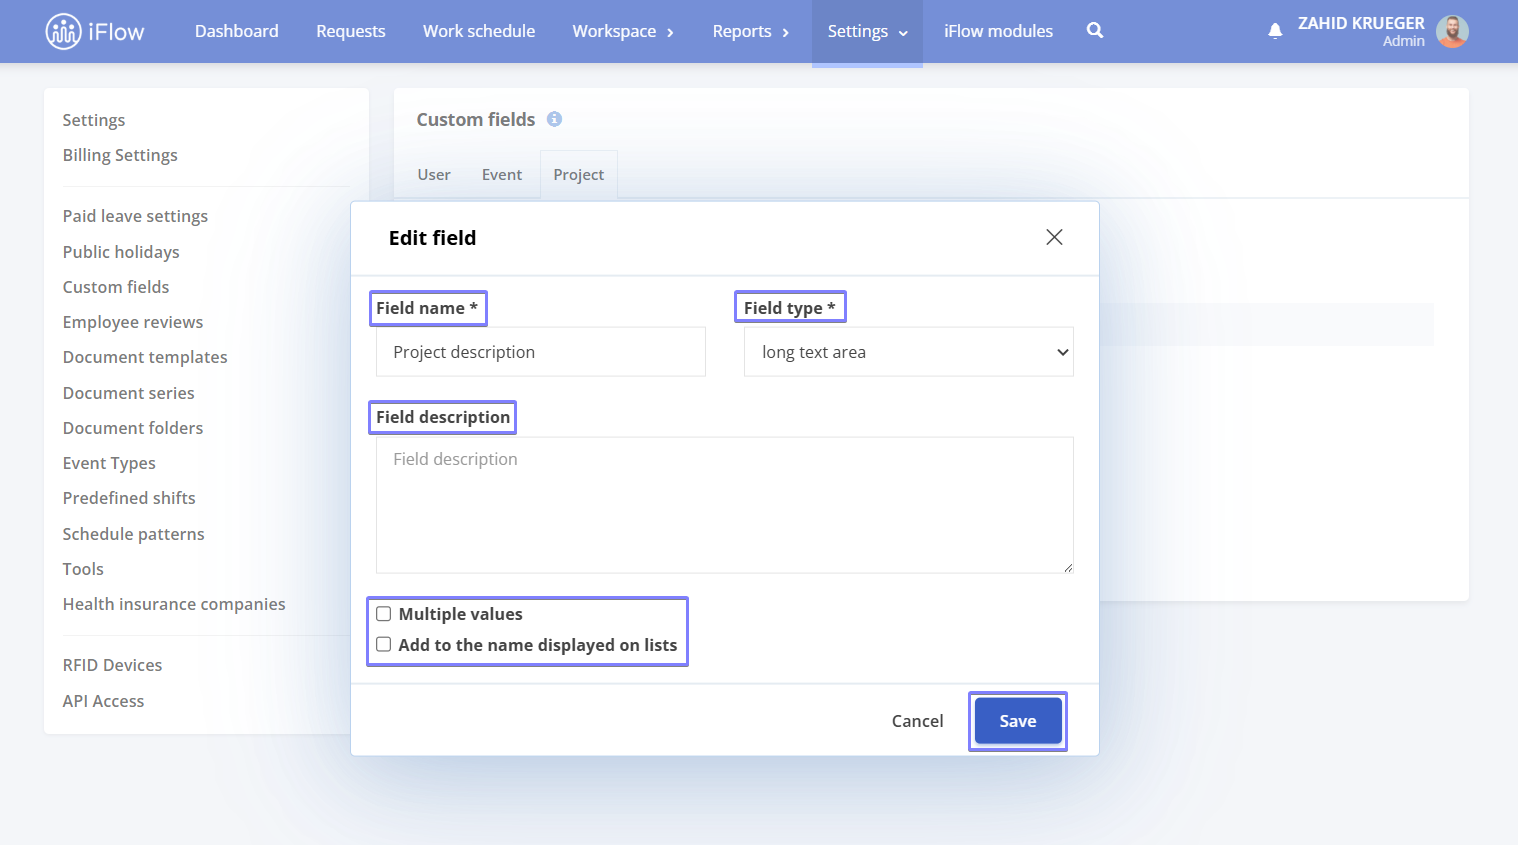
- Click the Add field button
- Enter the Field name
- Choose the Field type
- You can also fill in the Field description (optional)
- Check the Multiple values box if you want to add multiple values.
- Check the Add to the name displayed on lists box if you want the entered value to be attached to the name
- Click Save
Attention!
If you choose the Dropdown or Multiple dropdown field type, fill in the available options for the response variants in the designated box.
Project permissions
These permissions are available for each individual user and can be accessed from the profile of any employee, regardless of their user category.
To assign project permissions, follow the steps below:
- Navigate to the employee’s profile
- Click on the Settings menu (next to the profile button)
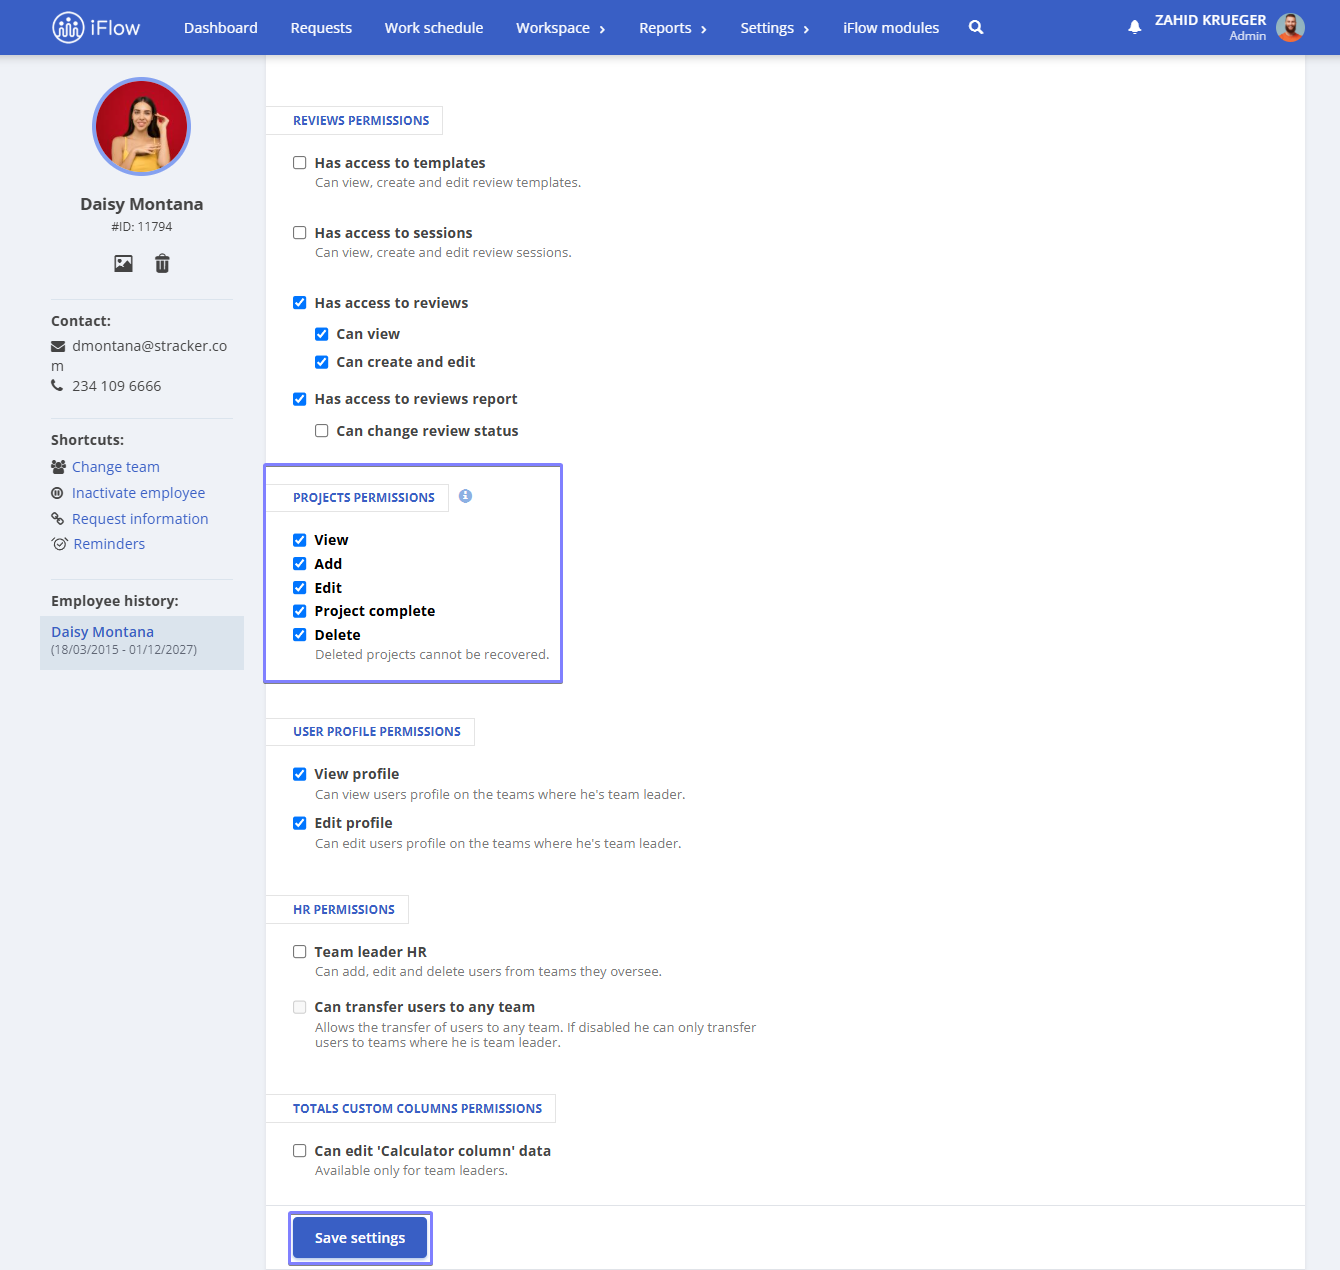
- Click the submenu Permissions and notifications – Project permissions, and check the desired options:
- View
- Add
- Edit
- Complete
- Delete (note: deleted projects cannot be recovered)
- Click Save settings
Administrators do not have these settings, as they have full access to all projects by default.
These permissions apply to all projects, both those recorded via real-time attendance and those tracked through working time allocated to projects.
Depending on the user category, access rights and project management permissions may differ. Below is a specific note for each category:
The Administrator has full access to all platform functionalities and settings by default.
Team leader permissions:
- View:
- Unchecked: Can only see public projects and those where they are set as a collaborator or project owner
- Checked: Can see both public and private projects
- Add:
- Checked: Can add a project, but can only edit it to import a template
- Unchecked: Cannot add projects
- Edit:
- Checked: Can edit projects and assign as owner or collaborator only the employees they are responsible for
- Unchecked: Cannot edit anything
- Complete:
- Checked: Can complete any visible task
- Unchecked: Cannot complete anything
- Delete:
- Checked: Can delete any visible project
- Unchecked: Cannot delete anything
Team member permissions:
- View:
- Unchecked: Can only see public projects and those where they are assigned as a collaborator or responsible person
- Checked: Can see both public and private projects
- Add:
- Checked: Can add a project, but can only edit it to import a template
- Unchecked: Cannot add projects
- Edit:
- Checked: Can edit the project and can only assign themselves as responsible or collaborator
- Unchecked: Cannot edit anything
- Complete:
- Checked: Can complete any visible task
- Unchecked: Cannot complete anything
- Delete:
- Checked: Can delete any visible project
- Unchecked: Cannot delete anything
How to record time on projects
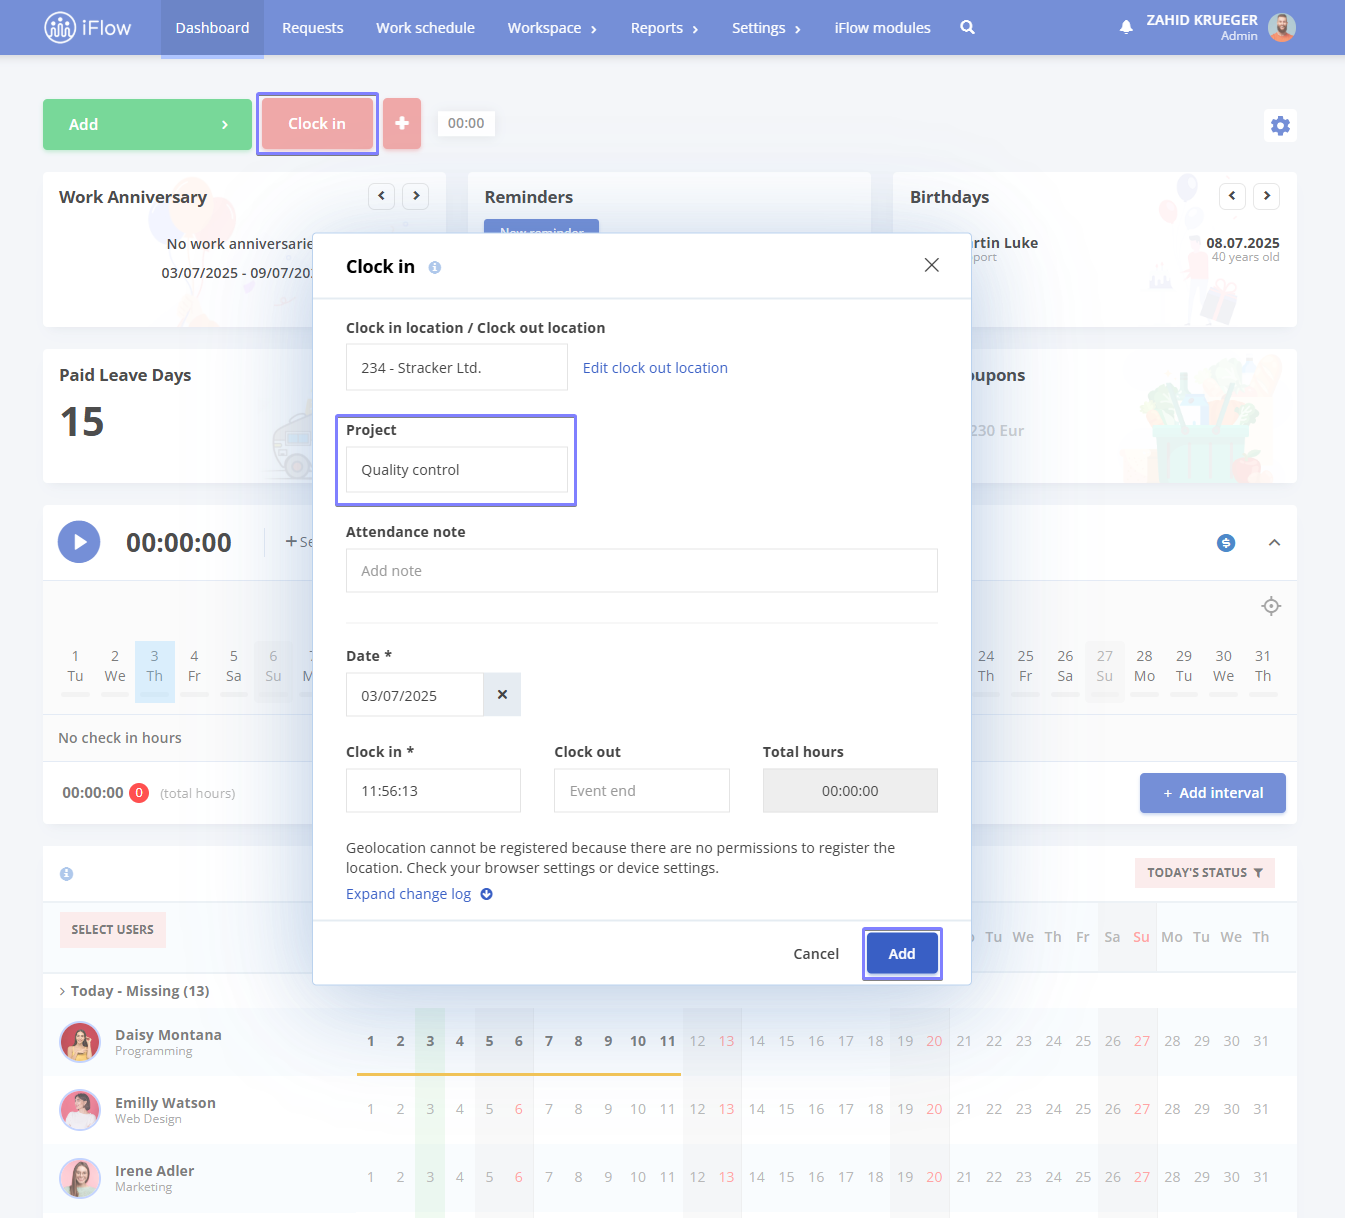
- Click the Clock in button
- Select the Location and Project
- Add a note to the attendance entry if needed, then click Add
If the employee has permission to edit the clock-in and clock-out date and time, they will be able to modify these details. Otherwise, the system will automatically register the real-time date and time. To add these permissions, refer to the guide here.
This time-tracking method is also available on industrial kit devices, for employees who do not clock in through the app but work on specific projects.
How to set a mandatory project for time tracking
If you need accurate monitoring of hours worked on projects in order to track their progress precisely, you can enable the option to make project selection mandatory during clock-in. Here’s how:
- Go to Settings – Company – Project settings
- Check the Enabled option for the field Require employees to select a project when clocking in from the web interface
- Click Update information to save the changes
How to record work time on projects
Project work time is recorded using a dedicated widget, either from the employee’s profile or from the General dashboard (if visibility settings are enabled). To log time on a project:
- Click the Start button in the Time on Projects widget
- Select the activity and the project/subproject
- Indicate whether the time spent on the project is billable by clicking the $ icon
- To stop tracking time, click the Stop button. You can log multiple time intervals in a single day, either on the same project or across different ones
The widget displays a calendar for the current month, with a progress bar below each day representing time spent on projects. The bar can appear in three colors:
- Red: Total hours on projects are less than the scheduled working hours
- Green: Total hours on projects match the scheduled working hours
- Yellow: Total hours on projects exceed the scheduled working hours
Below the calendar, you’ll find the time intervals recorded for projects, along with their details: total time spent on the project, the $ icon (which appears blue if the time is billable), start time, end time, activity, and the associated project or subproject. Next to each interval, there is a delete button in case you want to remove that specific entry.
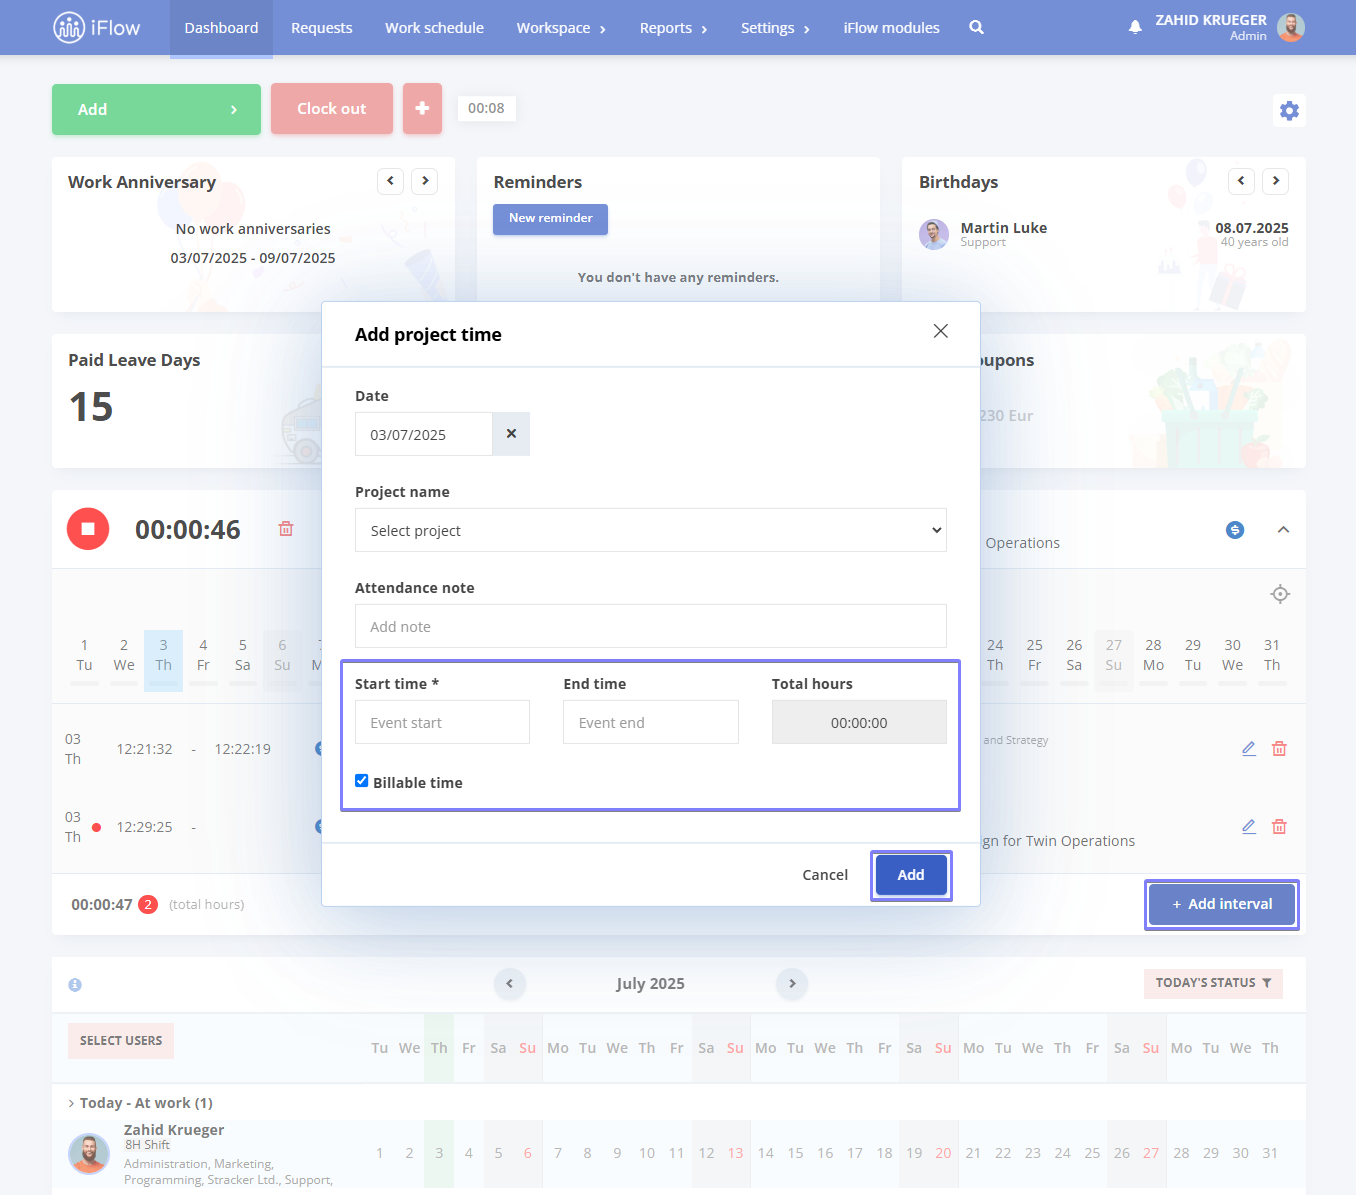
At the bottom of the widget, the total time spent on all projects for the current day is displayed. On the right side, there is the Add interval button. This can be used to insert additional time intervals, either when working on multiple subprojects simultaneously or when logging time for a different date than the current one. To add an interval, you select the date, indicate whether the time is billable, specify the start time (and end time if needed), choose the relevant project or subproject, and then click Add.
Attention!
The option to add work time on projects using the Add Interval button is available only for administrators. If you want employees to be able to use this button, you must enable the real presence editing setting in each employee’s profile.

How to add the project time tracking widget
From the general dashboard:
- On the General Dashboard, click the Settings icon located on the right side of the panel
- Click on Add Widget
- In the field where you select the Widget Type, choose Project Time
- Enter a Title
- Select the User Category that should have visibility over the widget.
Click the Add button
From the employee profile:
- Access the employee’s profile, then click the Settings icon on the right side.
- Click on Add Widget.
- In the field where you select the Widget Type, choose Project Time.
- Enter a Title.
- Click the Add button.
For more information on how to use widgets in HR iFlow, refer to the dedicated guide.
How to edit project work time
Administrator – can edit and record attendance for any user on any project.
Team leader – can edit and record attendance for team members if they have permission to edit real attendance.
Team member – can edit their own attendance if granted permission.
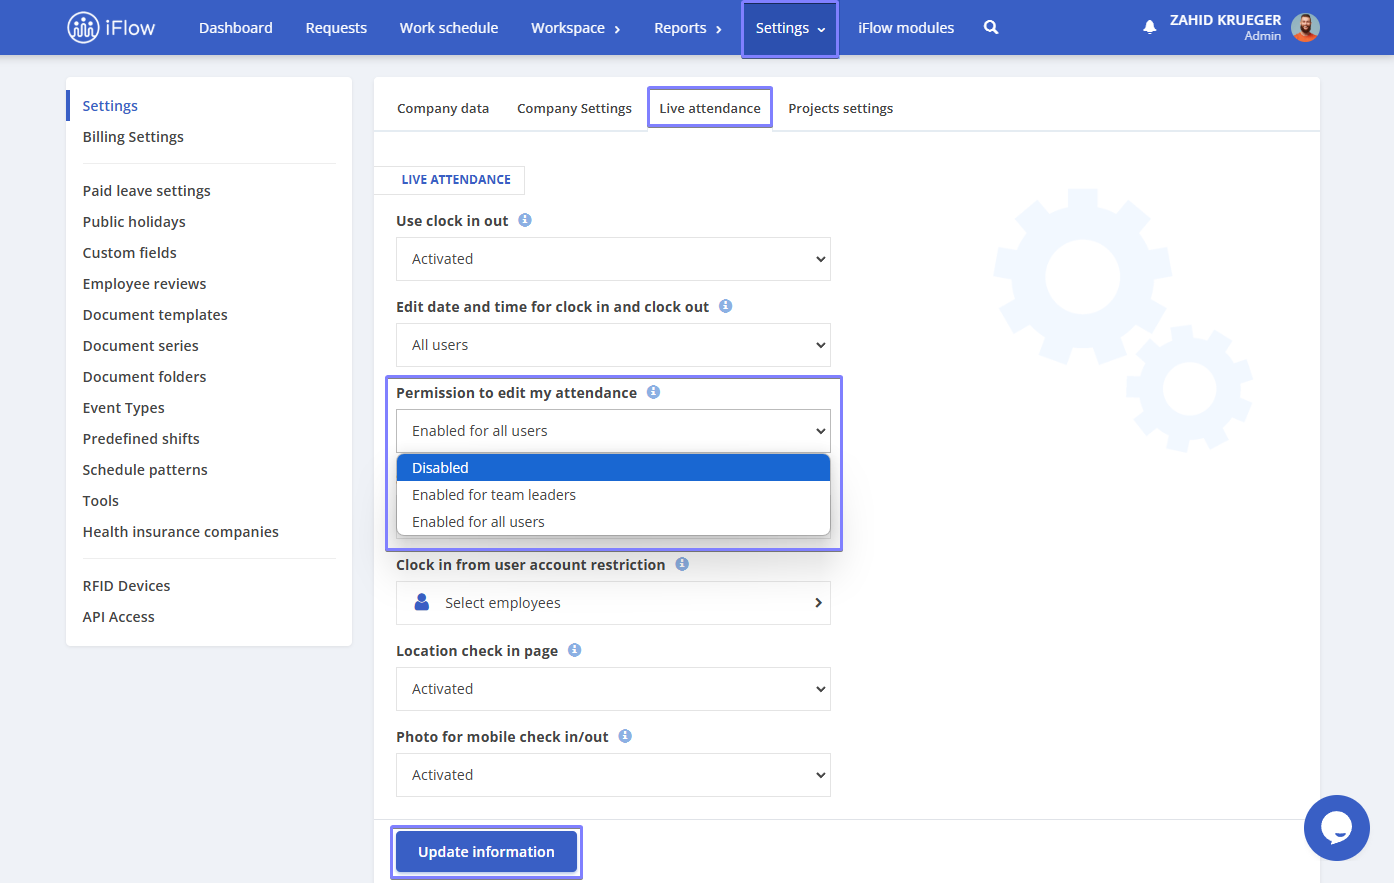
To enable the permission to edit work time:
- Go to Settings – Company Settings
- Access the Real Attendance section – Permission to edit own attendance
- Select the user category you want to grant this permission to
- Click on Update information
How to associate projects with the industrial device
This option is practical when employees need to clock in and select the project they will be working on.
When employees clock in using the industrial device, the screen will display the projects that have been linked to the device.
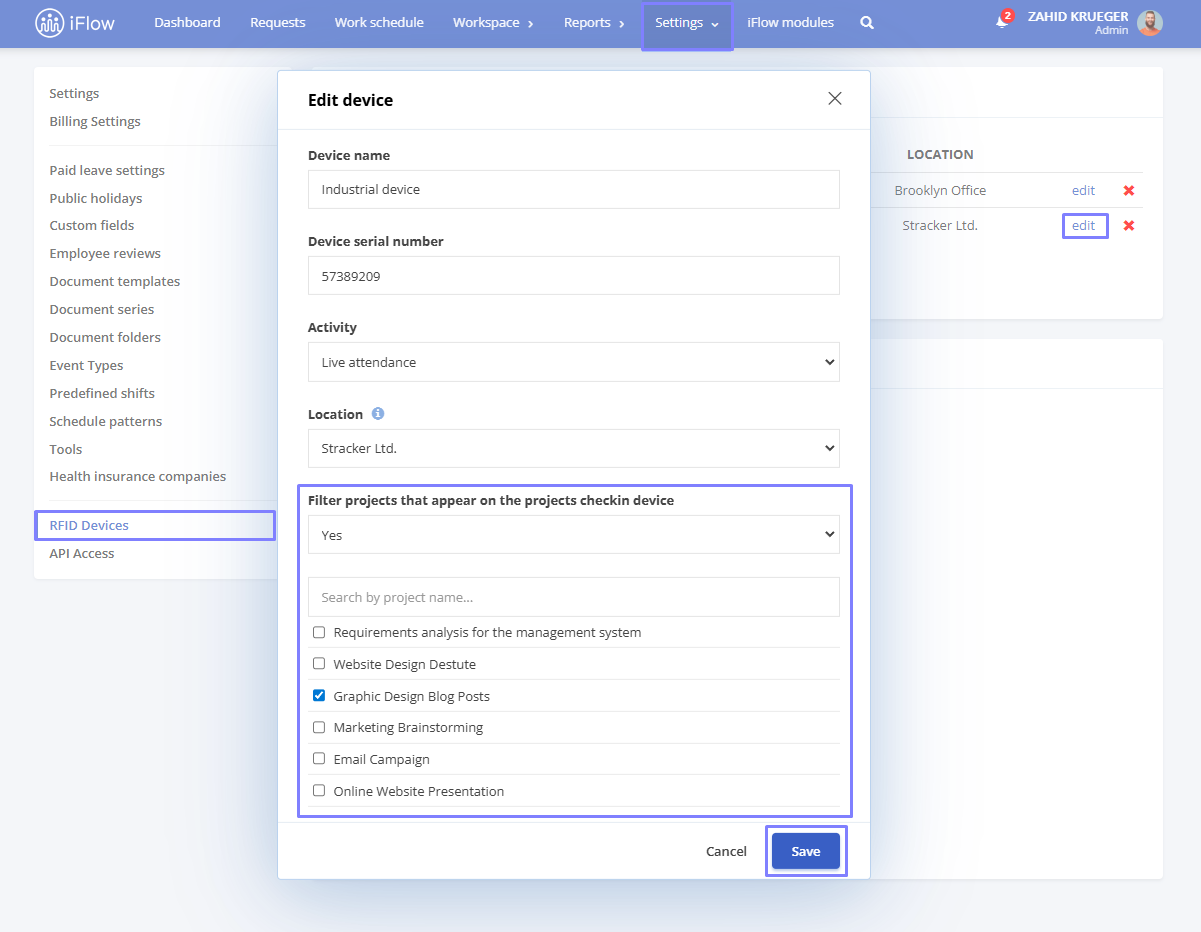
Here are the steps to configure it:
- From the main Settings menu
- Go to the RFID Devices section
- Click the Edit button next to the device
- Filter projects that appear on the projects check in device by setting them to Yes
- Select the project(s) you want to link to the device
- Click Save
Activity overview
This report is used to view either attendance on projects or the time recorded on projects. By default, the report is set to display projects with real attendance, but you can filter by specific activities. If you access the project filter at the top left, you have the option to select the activity for which you want to view the time intervals. From this same section, you can also choose to display the billability of projects and set their status.
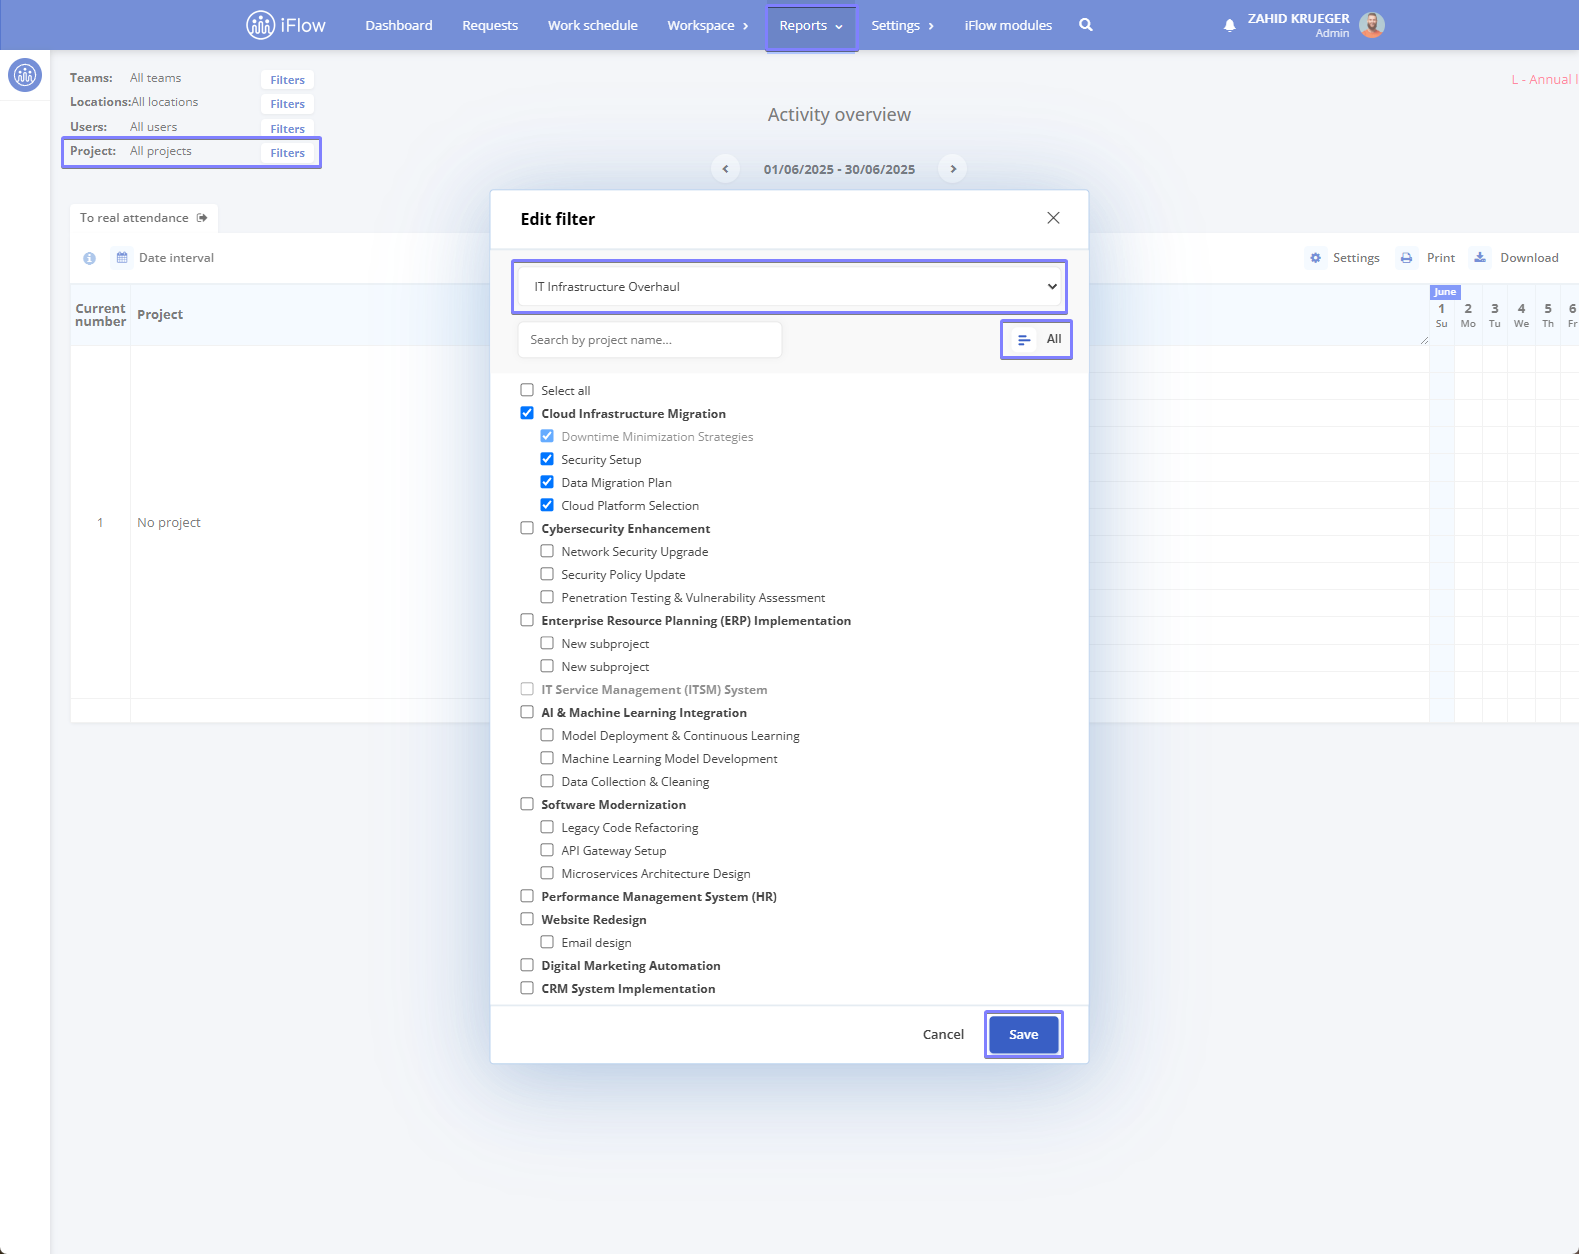
The report can be filtered by:
- Teams
- Locations
- Projects/Subprojects
- Users
- Date interval
This report includes a range of sorting options:
- Name
- Name > Project
- Name > Location
- Project > Name
- Location > Name
- Name > Project > Location
- Name > Location > Project
- Location > Name > Project
- Location > Project > Name
- Project > Name > Location
- Project > Location > Name
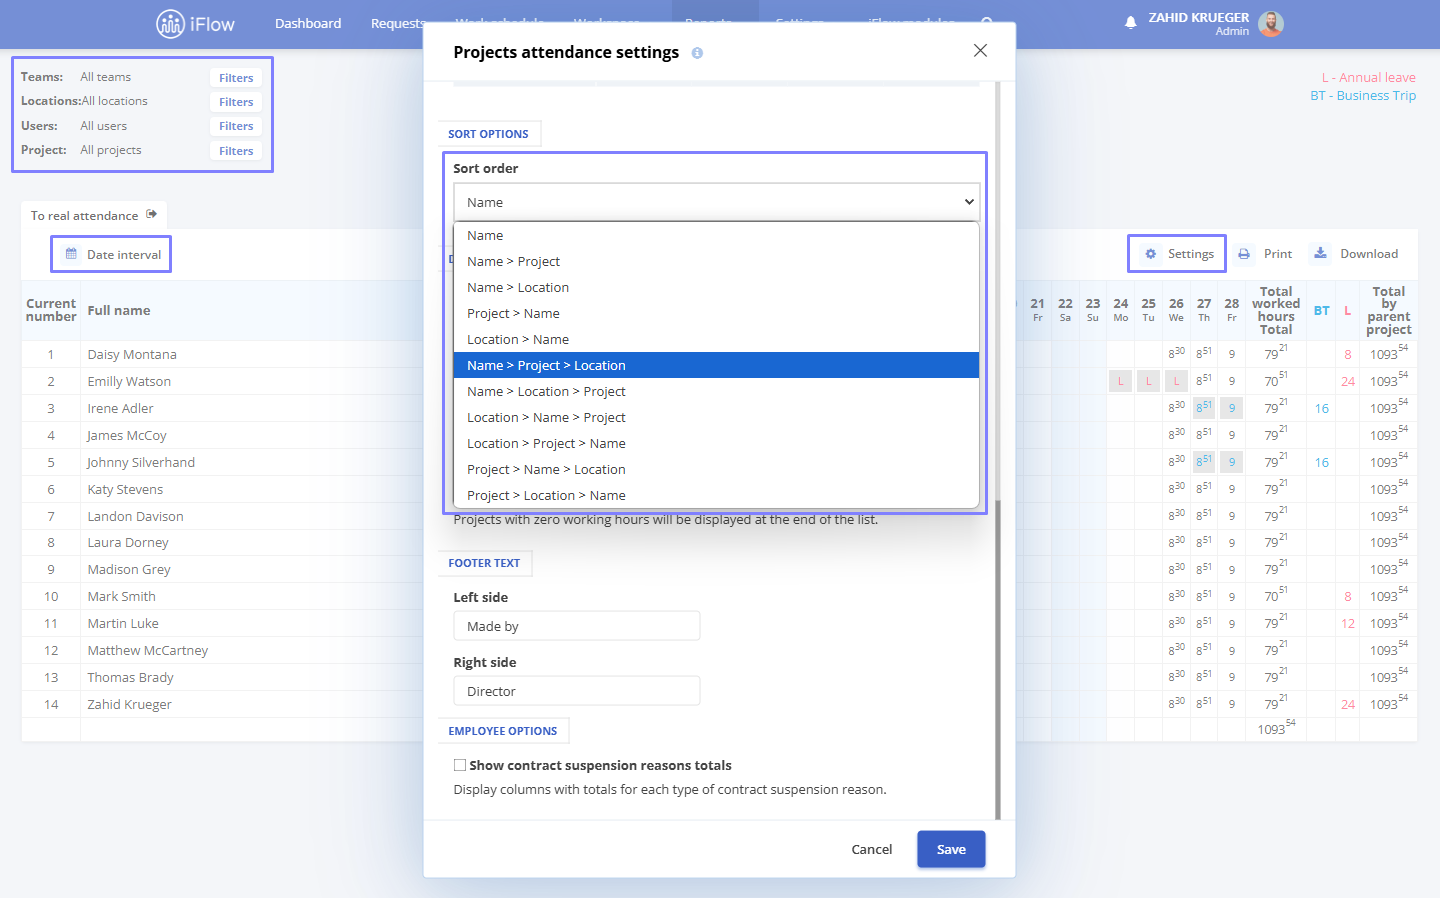
Attention!
These sorting options are used to display the report.
Example: In the case of Name > Project > Location, the report will start with the employee’s name, then the project(s) they worked on, and the location where those projects took place. At the end of the table, there will be two columns: Total by project and Total by name. The totals at the end of the table are displayed according to the chosen sorting option.
Below, you will find the list of personal data that can be displayed in the report:
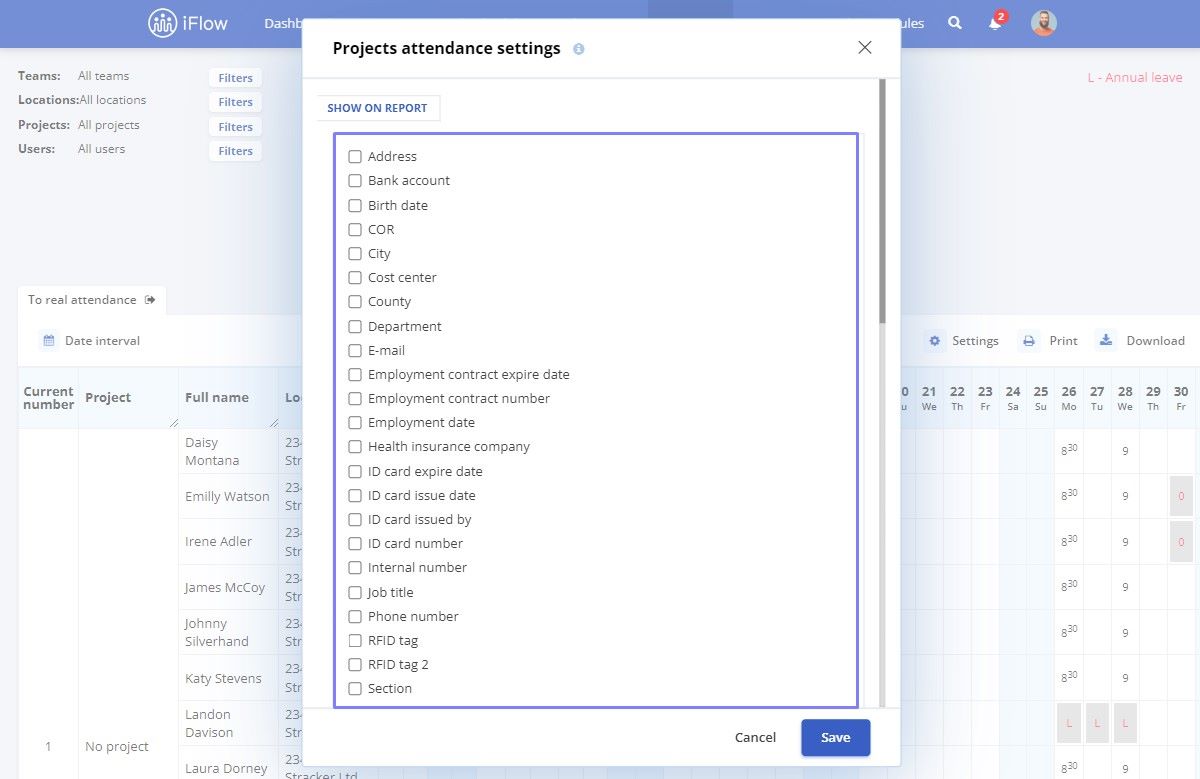
Data options
Display Source
To customize how data is displayed, select the desired source:
- Hours – displays data based on the hours recorded in activities.
- Project custom fields – uses the values entered in the custom fields defined at the activity level.
Choose the appropriate source depending on the type of information you want to analyze or present in reports.
The Activity overview can display each day of the month, allowing you to see how much time employees work each day.
The report facilitates viewing employees’ time spent on a specific project or location.
Feel free to contact us for assistance configuring the settings by emailing [email protected] or using the application’s chat.
How to import projects
Use the Import projects feature when adding the full list of projects into the application. If you need additional fields for your projects, make sure to create them beforehand. You can find the steps in the guide for creating custom project fields.
Follow these steps to use the Import rojects function:
- From the main menu, go to Workspace – Import – Import projects
- Upload the file or paste data from Excel
- Map the columns to the corresponding information
- Click the Next button until the import is complete
Additional information – import projects
You can now create templates in the application for importing projects. To create a project template, follow these steps:
- Add a project
- Add subprojects to this project
- Click the Save as template button
- Enter the Template name and click Add
To import a project based on the created template, simply include a column with the Template name in your import file.
Information that can be imported for projects:
- Project pame
- PID – Unique project code
- Parent PID – Unique code of the main project
- Template name
- Due date
- Estimated progress
- Estimated time
- Responsible person’s SSN – Using this information, you can import the person responsible for the project
- Responsible person’s email – Using this information, you can import the person responsible for the project
- Responsible person’s ID number – Using this information, you can import the person responsible for the project
- Custom fields created by you
How to prepare the import file
Ensure a column for each piece of information you wish to import (considering the list provided above).
Important!
To activate the project import functionality and enjoy all the application’s features, please email [email protected].


