How to Add Work Schedule
In the iFlow application, the work schedule panel has multiple roles, and you can perform several actions in this place. Below is a list of actions you can take:
- Set the work schedule
- Plan the work schedule for an extended period
- View and add events
- Edit, approve/reject events
How to Set the Work Schedule
You can set the work schedule in three ways:
- Using predefined shifts
- Using schedule templates
- From the main Work Schedule menu: In the panel, double click on a cell– Set the time interval for the schedule and breaks + choose the location (optional)

With the iFlow application, you can efficiently set the work schedule, which can be later copied for employees with just a few clicks. Simply right-click to copy and paste or use the keyboard shortcuts, specifically Ctrl + C and Ctrl + V.
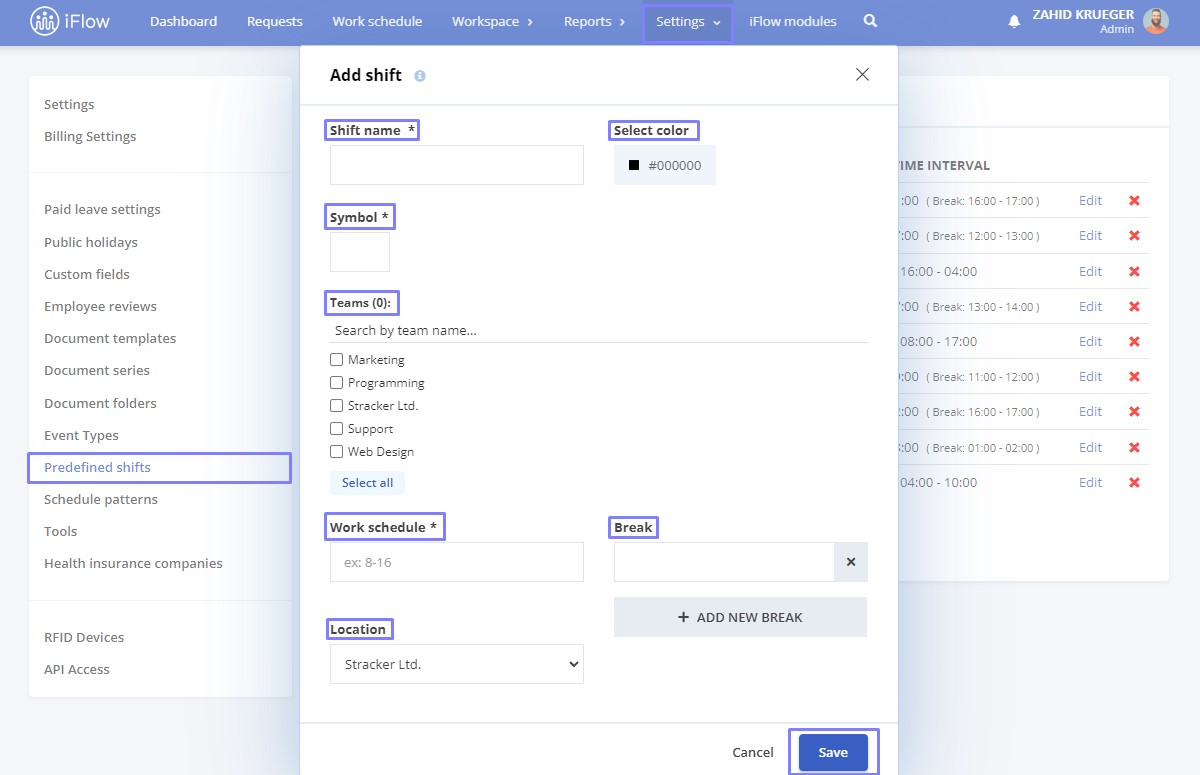
How to Create Predefined Shifts
The predefined shifts option is typically used by factories with shift work schedules. These shifts are distinguished by colors on the Work Schedule panel and predefined symbols on the Timesheet report (which can be downloaded and handed to employees for planning).
Below are the steps to create a predefined shift and a video tutorial.
- From the main menu, go to Settings
- In the Predefined Shifts section, click on the Add button
- Fill in the shift name
- Select the color with which it will be displayed in the work schedule
- Enter the symbol, which will be displayed on the timesheet
- Choose the team for which it should be available
- Select the time interval for the work schedule and breaks
- Choose the location (optional)
- To finish, click the Save button
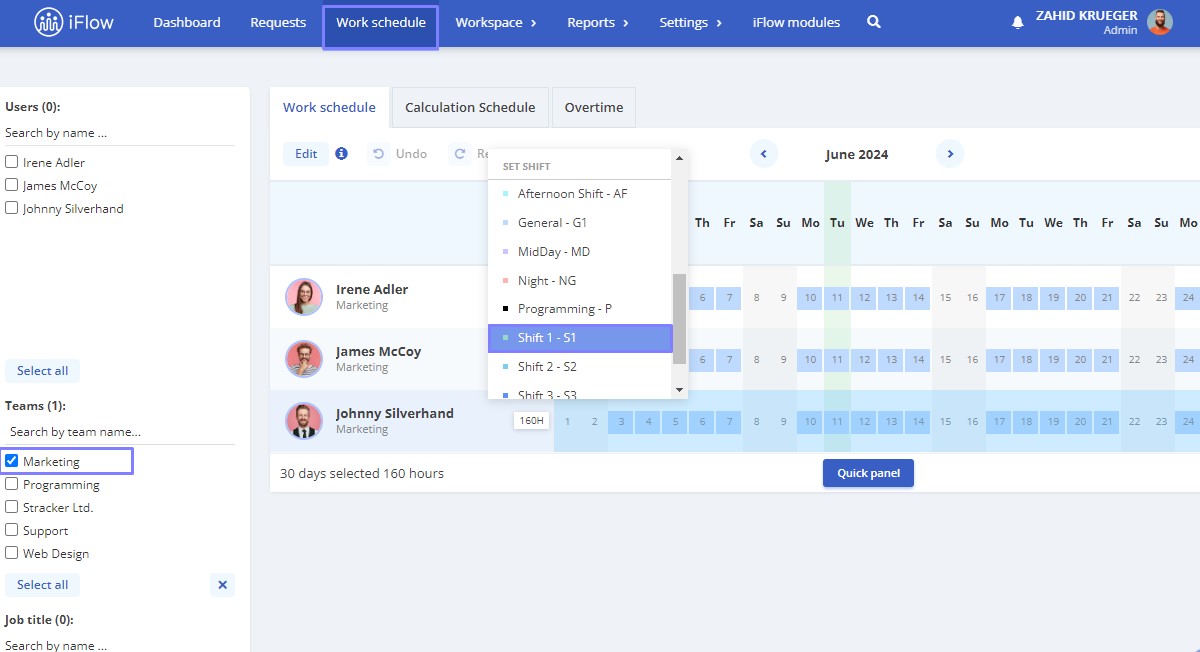
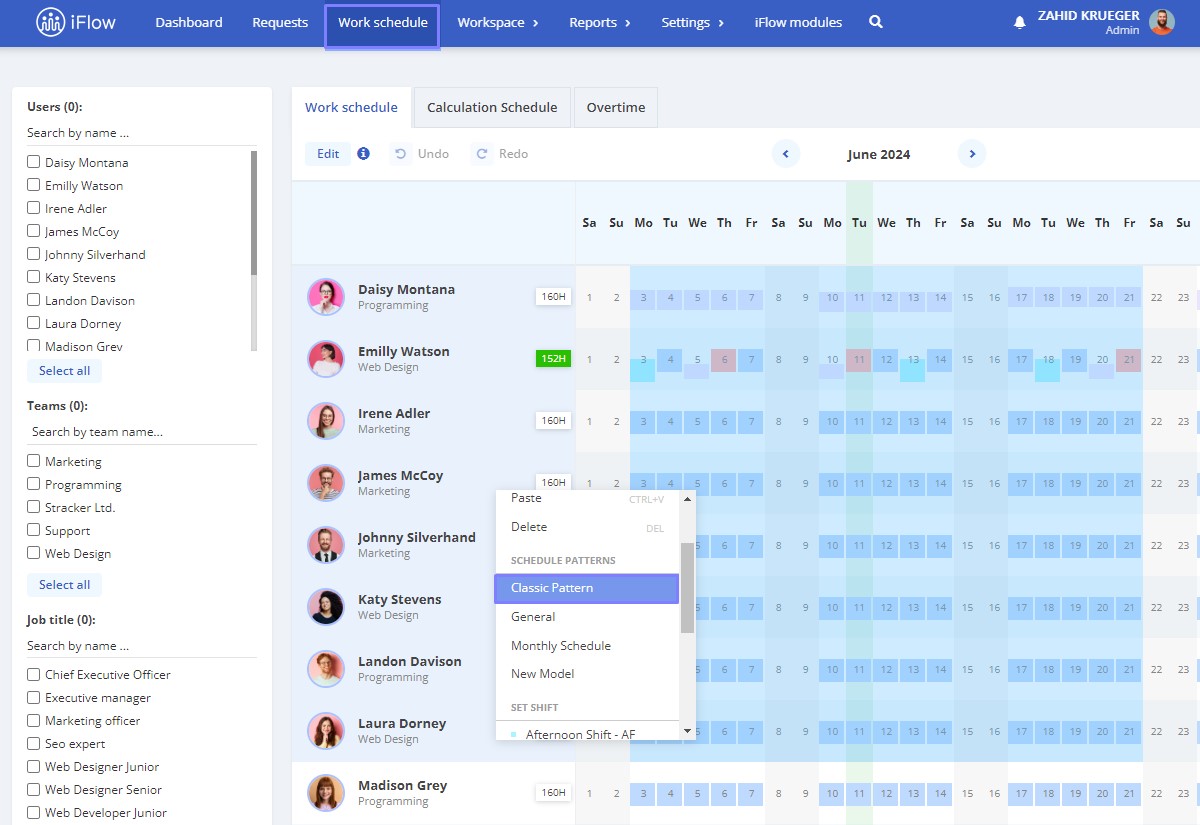
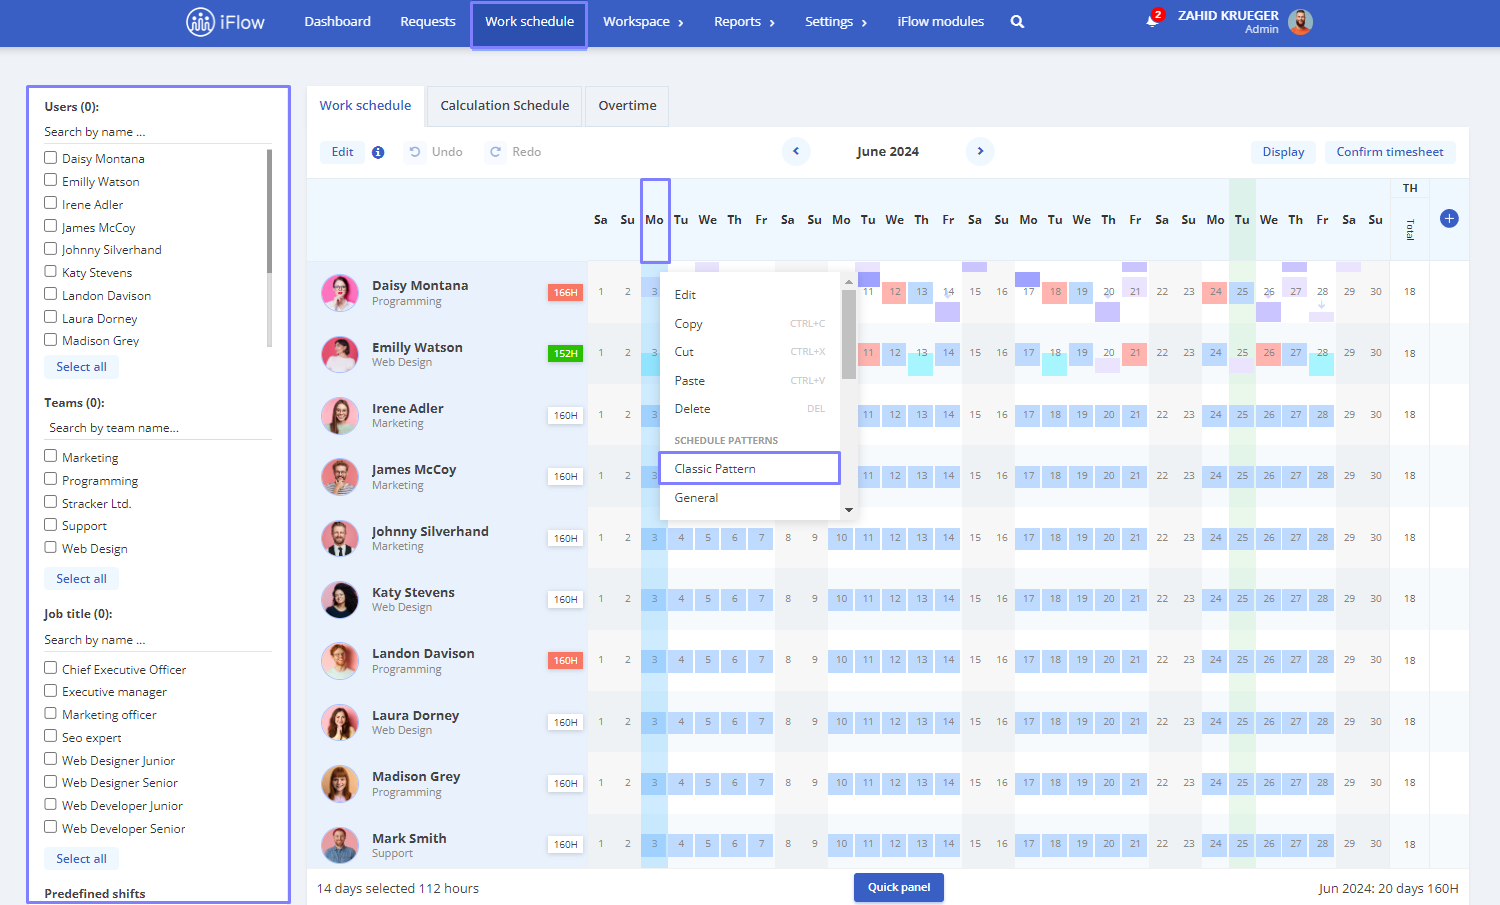
Shifts are assigned easily in the Work Schedule panel – select with the mouse one or more days, up to a month, next to the employee to whom you want to assign a shift – right-click on the selection, and a box with predefined shifts will appear for you to choose from. Additionally, you can filter employees by the team to assign the same shift to all of them.
You can create as many predefined shifts as you need.
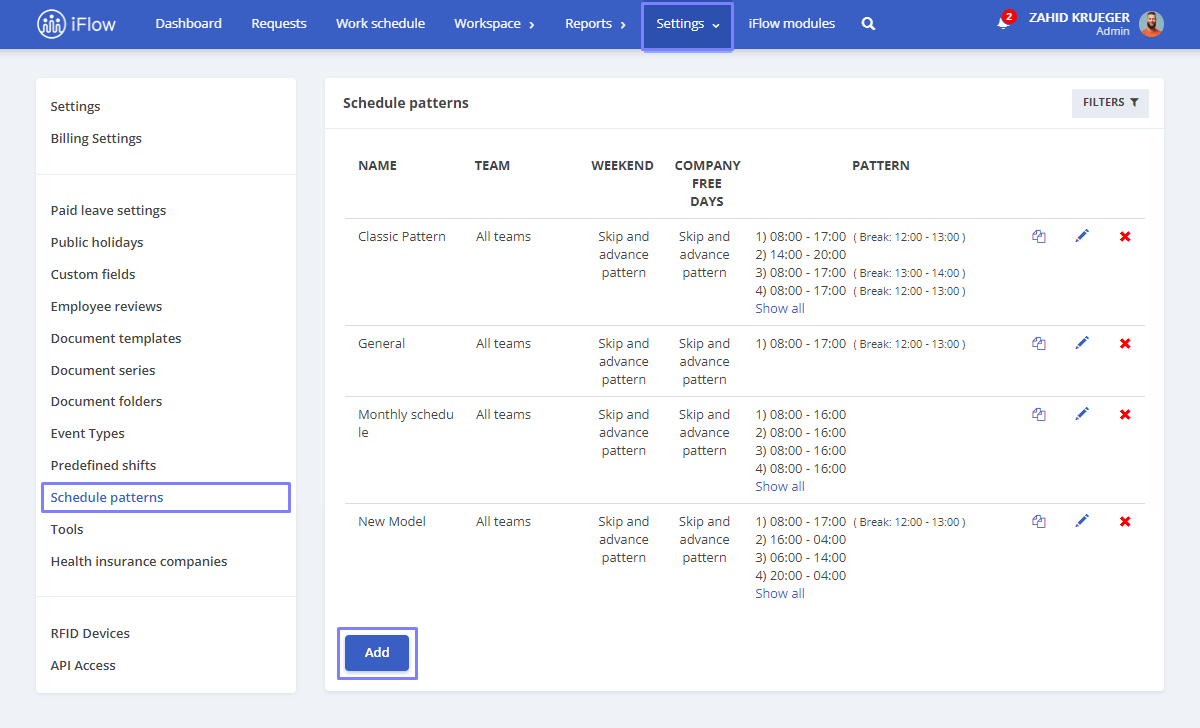
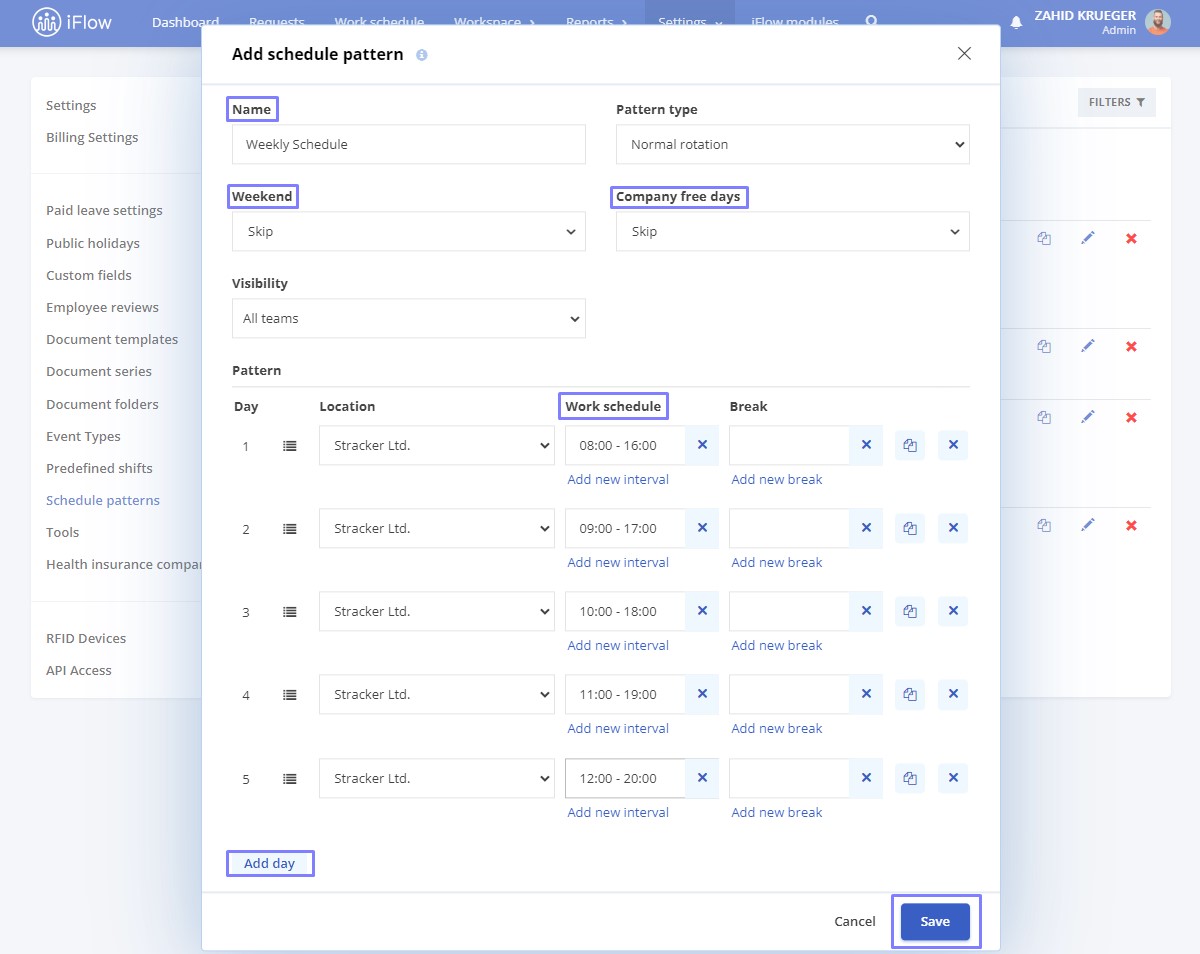
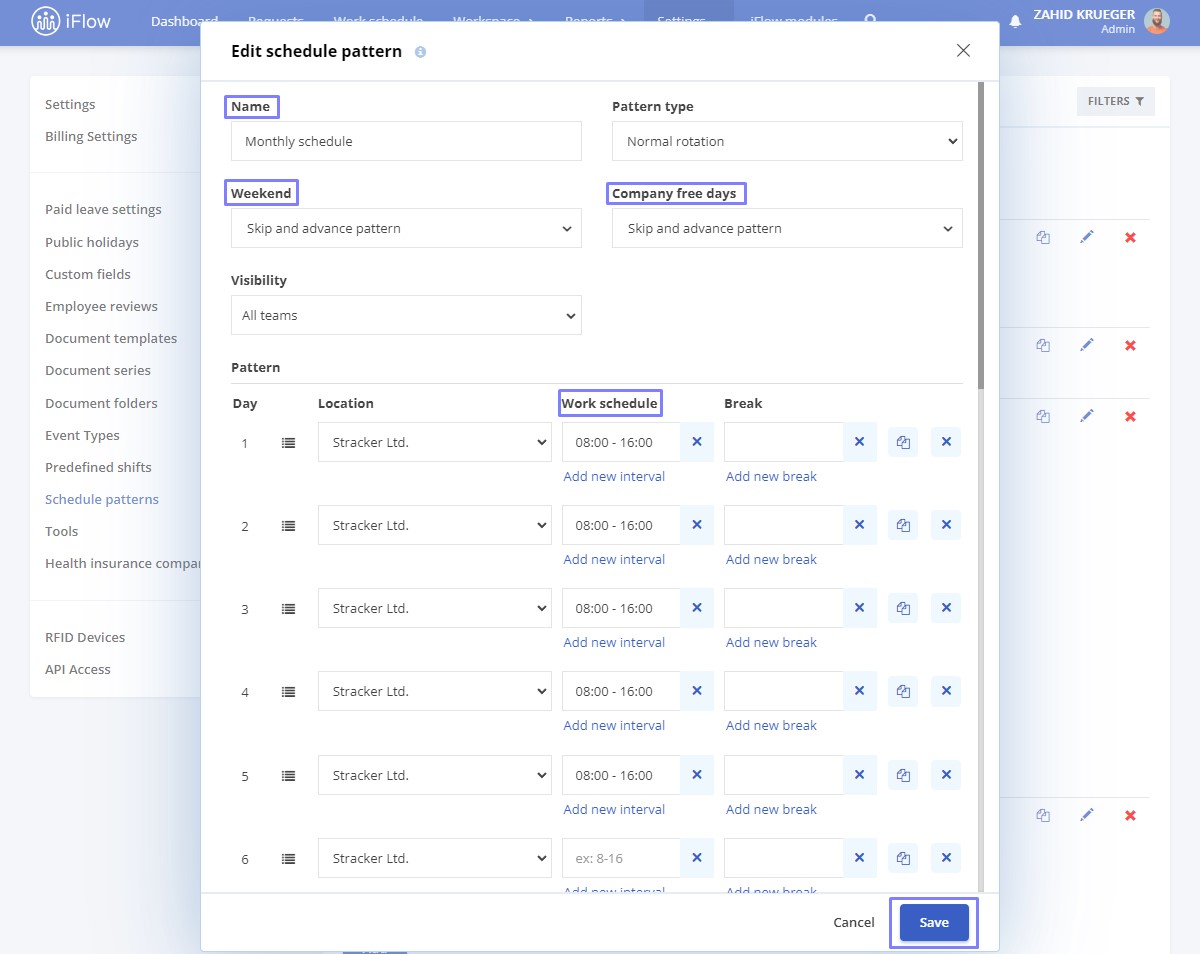
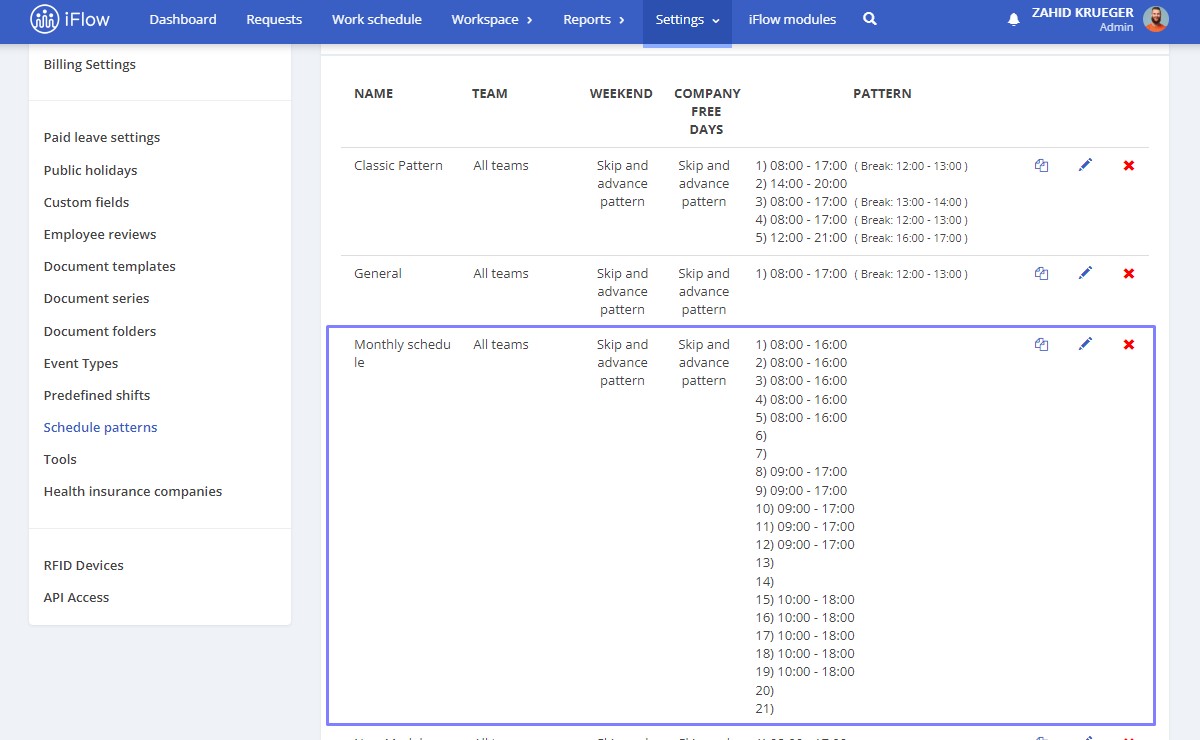
How to Create Schedule Patterns
Schedule patterns differ from predefined shifts in that you can set rotation rules (such as whether they apply on weekends or public holidays, etc.). Once created, you can allocate a work schedule pattern for the period needed.
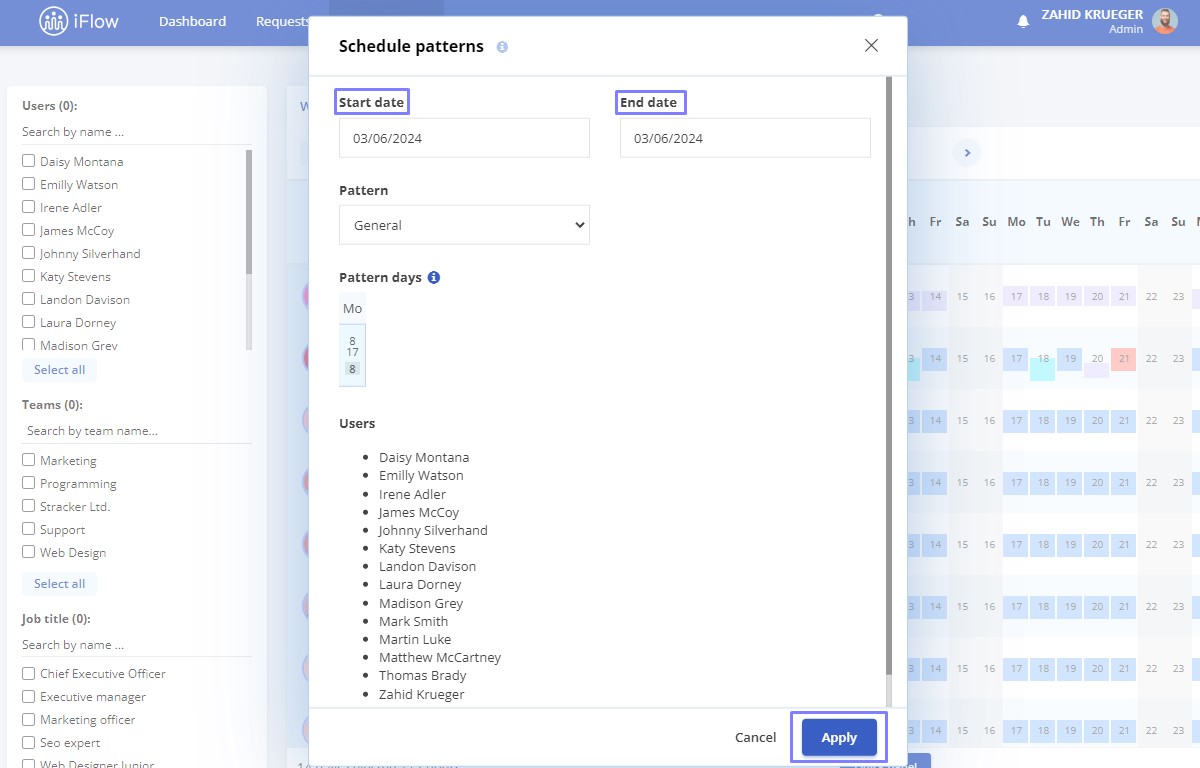
- From the main menu, go to Settings – Schedule patterns
- Click the Add button
- Enter the name of the model
- Configure the appropriate settings for weekends and company free days (explanations and examples below)
- Select the team that has visibility for this model (optional)
- Add work and break schedules (and multiple days, depending on the model; examples below)
- Choose the location (optional)
- Click Save
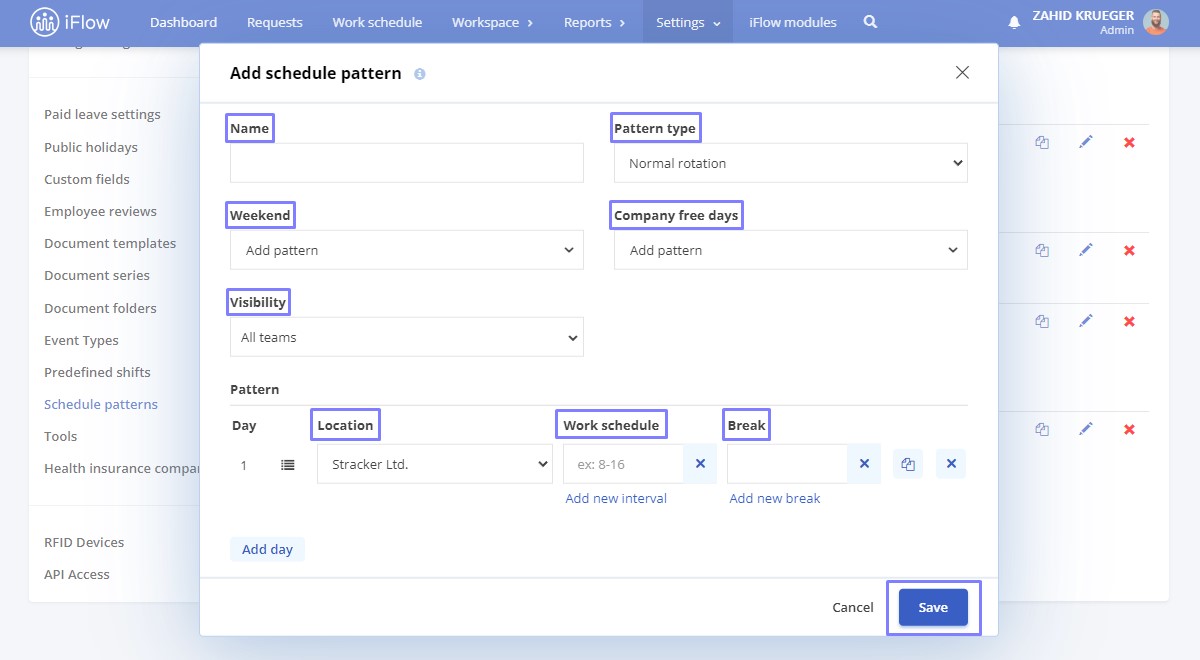
The option to choose predefined shifts – instead of manually filling out a work schedule, you can select from the list of predefined shifts you have already created.
The duplicate option – is available for both a work schedule within a model and an entire model.
Filters – You can filter models by Name and Team.
Explanation of options
Add pattern– This option will apply the model to weekends or public holidays, depending on your choice. If selected for weekends, the application will also apply the model on weekends. The application will include public holidays in the model if selected for public holidays.
Skip and advance pattern —This option skips weekends and continues the model without maintaining its original structure. For example, if you have a model with five days labeled 1 – 2 – 3 – 4 – 5, and you choose “skip and advance” with the weekend falling on days 2 – 3, the application will skip the schedules for days 2 and 3 (Saturday and Sunday) and continue with 4 – 5 for Monday and Tuesday.
Skip – This option will skip weekends while preserving the model’s structure. If you have a model with days labeled 1 – 2 – 3 – 4 – 5 and choose “skip,” with the weekend falling on days 2 – 3, the application will skip the schedules for days 2 and 3 (Saturday and Sunday) and resume the model starting from day one on Monday.
Location – You can select a different location for each day, which helps plan across multiple locations.
Below are various work schedule models and instructions on how to set them up.
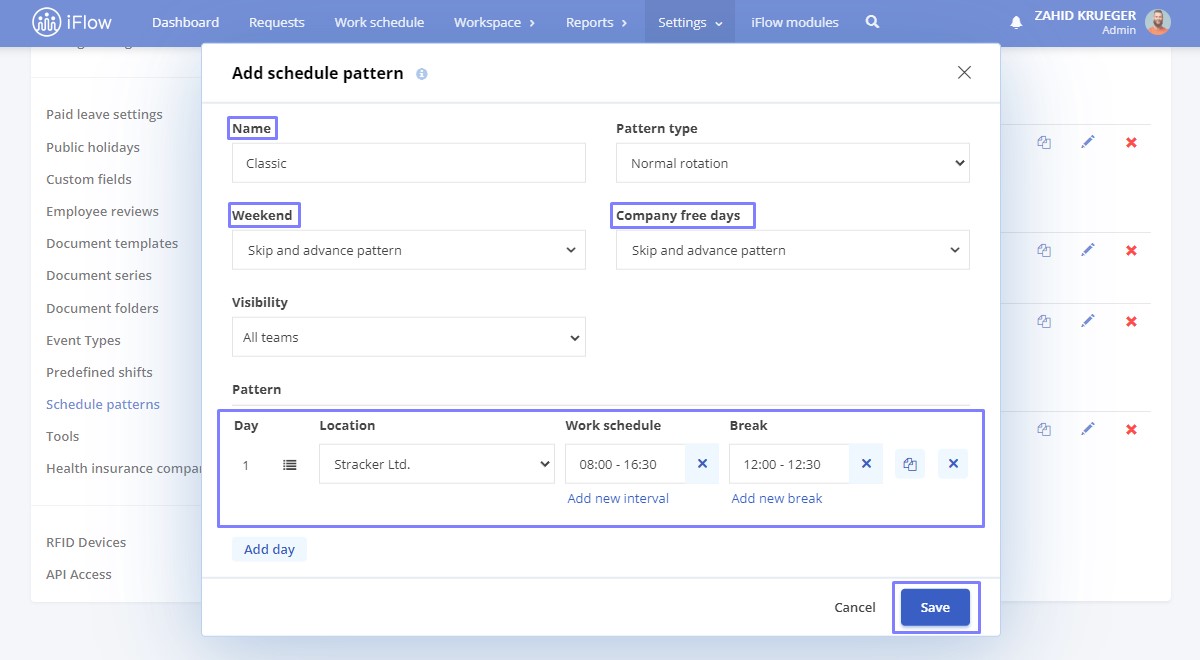
Work Schedule Template: Classic
Create the Classic template using the settings shown in the image below.
Work Schedule Template: 12/24 or 24/48
Create the 12/24 or 24/48 template using the settings in the image below. Essentially, you will set the schedule for the working day and then add two days without a work schedule, providing the 48 hours off.
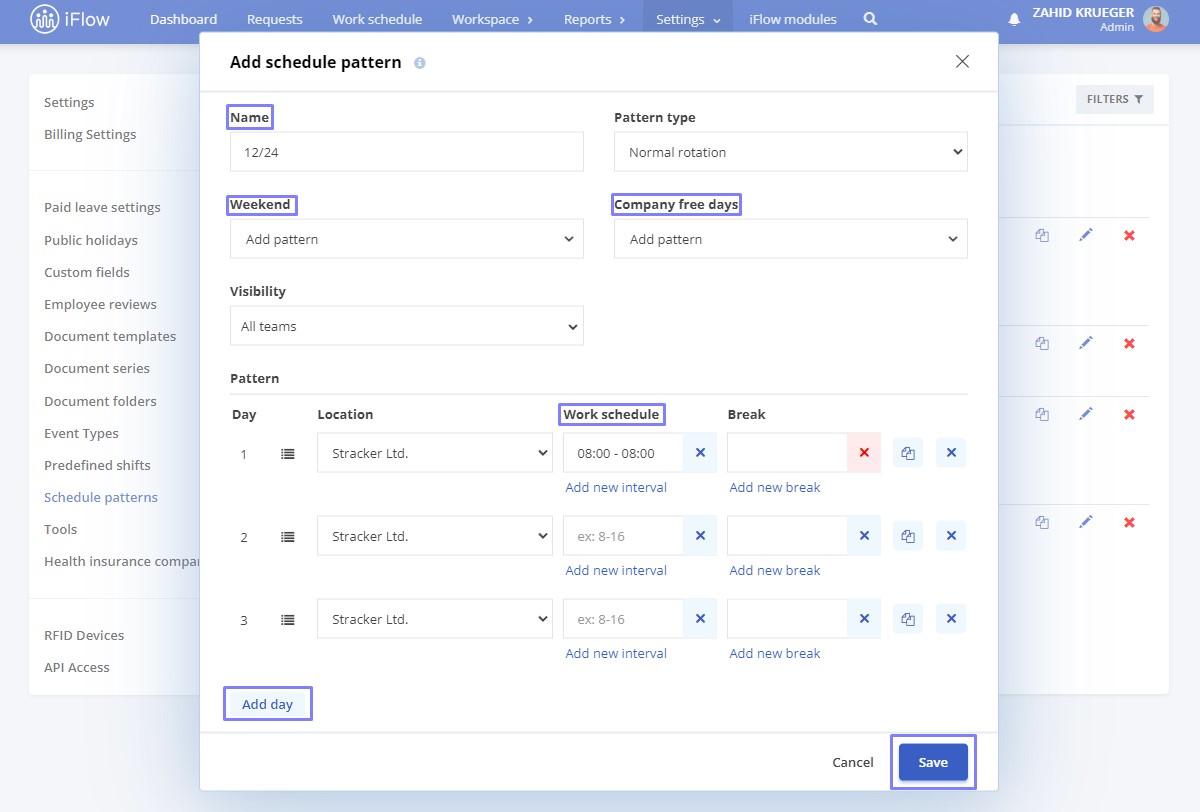
Then, in the work schedule, from the main menu, right-click on any day, choose the relevant template, select the end date of this shift, and click Apply.
Weekly Work Schedule Template
Create the weekly template using the settings shown in the image below. Essentially, you set a work schedule for each day of the week (this is ideal for employees who have a different schedule for each day of the week but the same each week).
Monthly Work Schedule Template
Using the settings in the image below, create the template for the entire month or partially, depending on the weekly rotation. Essentially, you set a work schedule for each day of each week in this template (this is ideal for employees who have a different schedule for each week or day). If weekends are off, select omit.
Then, in the work schedule, select the employee, right-click on the selection, choose the monthly template from the list, then from the template, choose the starting day for the application to manage the template, and click Apply.
How to Assign a Work Schedule
Once the work schedule templates are created, you can assign them to employees from the Work Schedule menu.
- Right-click on an employee, and choose the Work schedule or shift you want to assign from the box that opens
- To assign to multiple employees, select them with the mouse, then right-click, and a window will appear where you can assign them a work schedule from the models in the list
- If you want to select all of them automatically, click on the first day of the month, and everyone on the list will be selected automatically. Additionally, on the left side, there are several filters where you can select employees by name, position, team, and more
After selecting the schedule, the application allows you to assign it for a more extended period.
How to Add Custom Columns
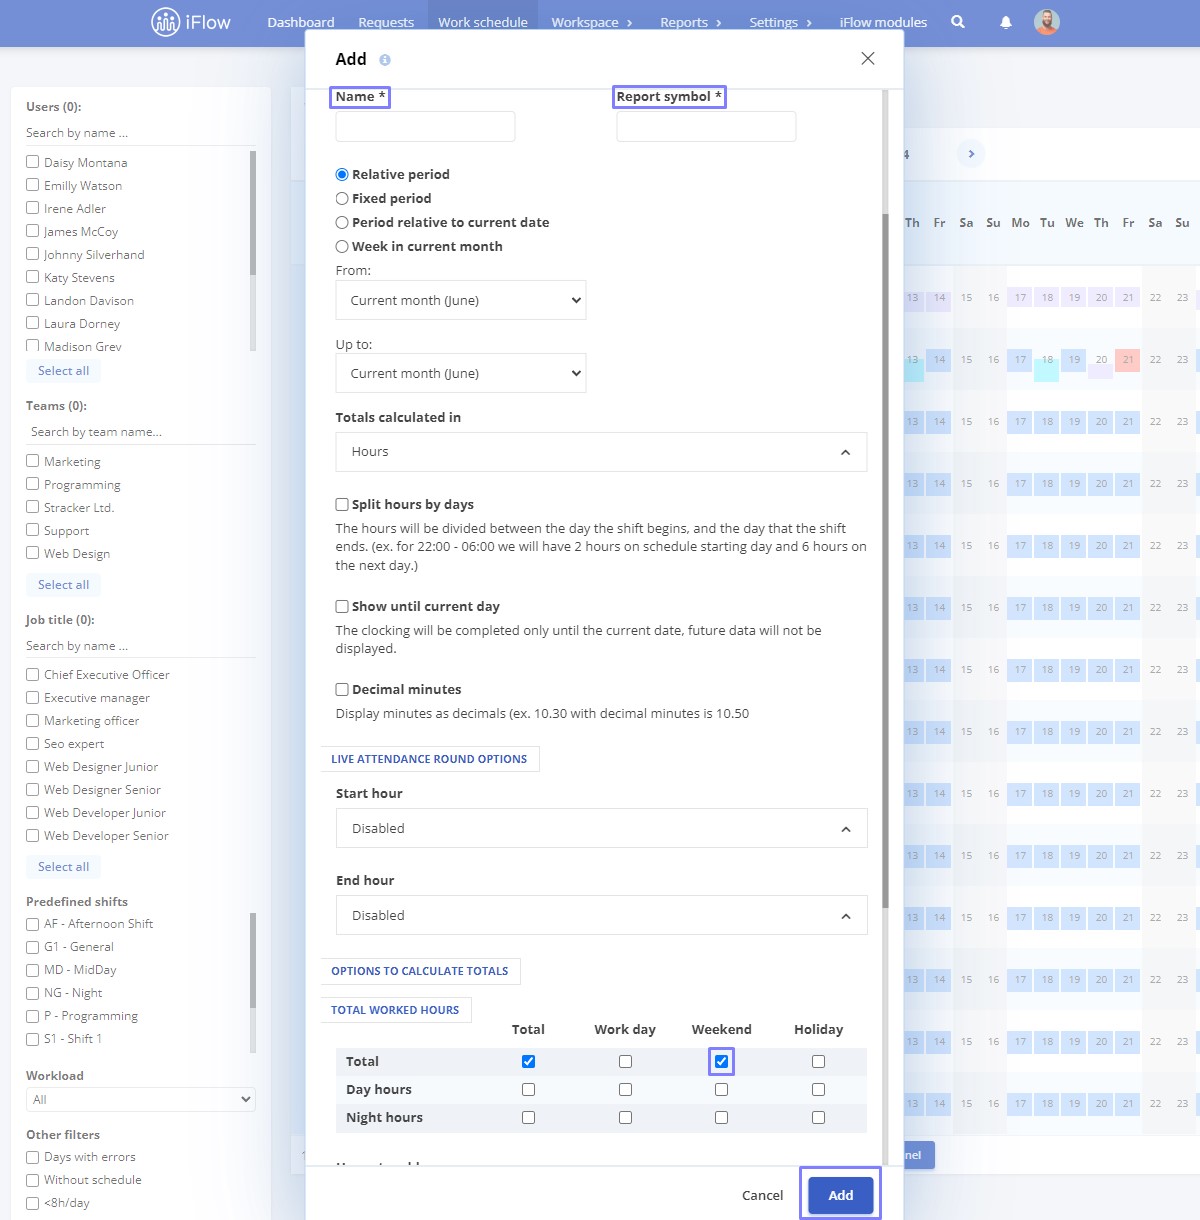
In the Work Schedule menu, you can add special columns to calculate various totals from the employees’ predefined schedules.
On the right side of the page, click on the plus icon at the end of the work schedule table. A window will open where you can choose what you want your column to calculate. Fill in the name and symbol, then customize the column according to your preferences.
For example, you can calculate the total hours from the work schedule and the total hours worked on weekends or subtract the live attendance from the work schedule to see if there is a discrepancy between them.
What does the customized table include?
Column name:
- Name – the name of the column displayed in the table
- Report Symbol – the symbol that will be displayed in the timesheets or work schedule
Period Selection:
- Relative Period – this type of period is used for a dynamic interval that will be consistent month-to-month
- Example: In the first-month selection box, choose Current month -5, and in the second box, choose Current month. The interval will calculate the information from 5 months ago to the current month
- Fixed Period – this type of period is used for a specific interval, which can be for a day/week/month/year
- Example: If you want to track hours for a week in February -> select that week, and the respective hours will be displayed only for the set week interval
Option to display in hours or days:
- Hours: the total added information will be displayed in hours
- Days: the total added information will be displayed in days
Column Settings:
- Split hours by days – Hours will be split between the day the shift starts and the day the shift ends
- Show until current days – Timesheet will only be completed up to the current date; no data will be shown for future days
- Decimal minutes – Displays minutes expressed in decimals
Hours to add – Hours to remove:
You can add all available events (paid leave, medical leave, and other events) in these two boxes.
Other Data:
- Work schedule (days containing events, with the option to exclude from active timesheets totals, are excluded)
- Work schedule total
- Live attendance
- Workload (excludes days with events that are excluded from totals)
- Workload total
Example of customized records:
Below is a list of examples of using this module for employee performance.
Customized record of overtime hours worked last month for shift employees
- Sometimes, employees working in shifts exceed the set work schedule, accumulating overtime. You can create a column to track these hours accumulated a month before observing each employee’s performance
The column will be created as follows:
- Choose the relative period; in both boxes, set Current Month -1. Then, in Hours to add, enter Live Attendance, and in Hours to remove, enter Workload
Customized record of night hours worked in the last month
Certain employees may have a work schedule that includes night hours. You can create a column highlighting these hours for each previous month compared to the current one.
The column will be created as follows:
- Choose the relative period; in both boxes, set Current Month -1 and the calculation mode to hours; in the Total worked hours table, check only the box next to Night hours, then enter Live attendance in added hours
Month-End Closing
This function allows the locking of a month. During a closed month, no actions that modify timesheet data can be performed, such as adding events, modifying work schedules, adding live attendance
Who can close the month
- Administrator
- Team Leader (for all teams if granted work schedule editing permission)
To grant a team leader the permission to edit the work schedule, follow these steps:
- Go to the Employee Profile
- Settings
- Permissions
- Schedule edit permissions
- Select the team or all teams (if you want this leader to have the ability to close the month)
Who can reopen a month after it has been closed
Whoever closes the month can open it again.
Below are the situations for month-end closings and reopenings:
- If an administrator closes a month, only he and the team leader with editing permissions can reopen it
- If a team leader closes a month, only he or the administrator can reopen it
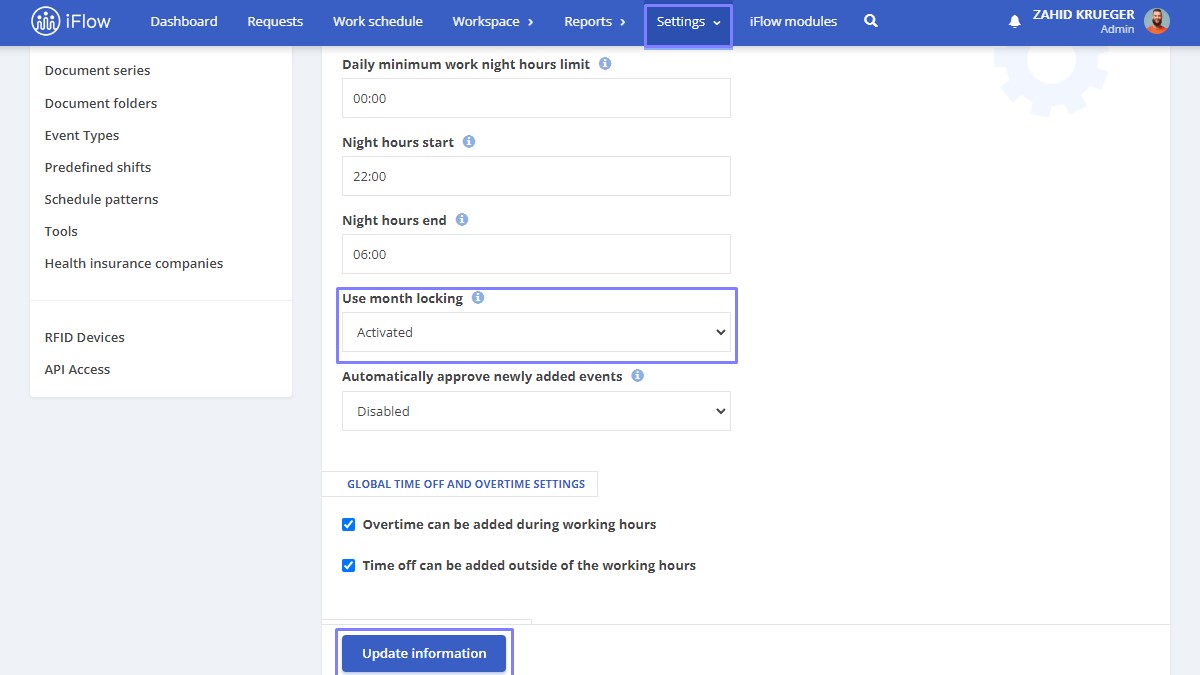
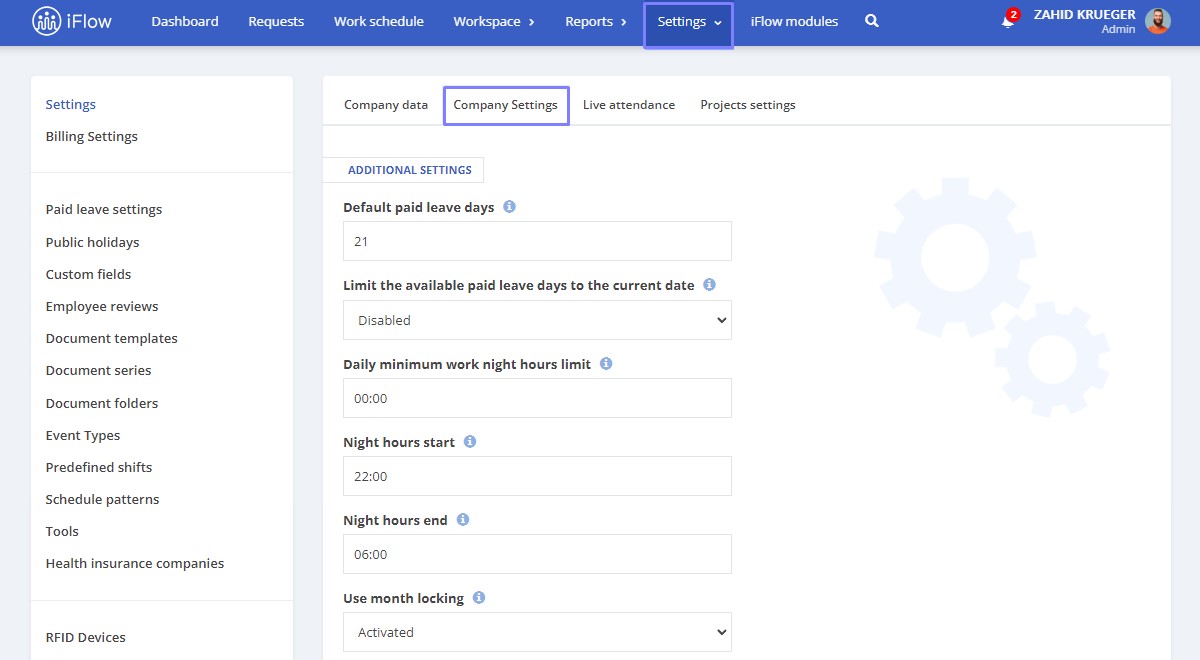
How to enable this feature
- Go to the main menu and select Settings
- Navigate to the Company section
- Click on the Company Settings button
- Select Activated for Use month locking option
- Finally, click the Update Information button
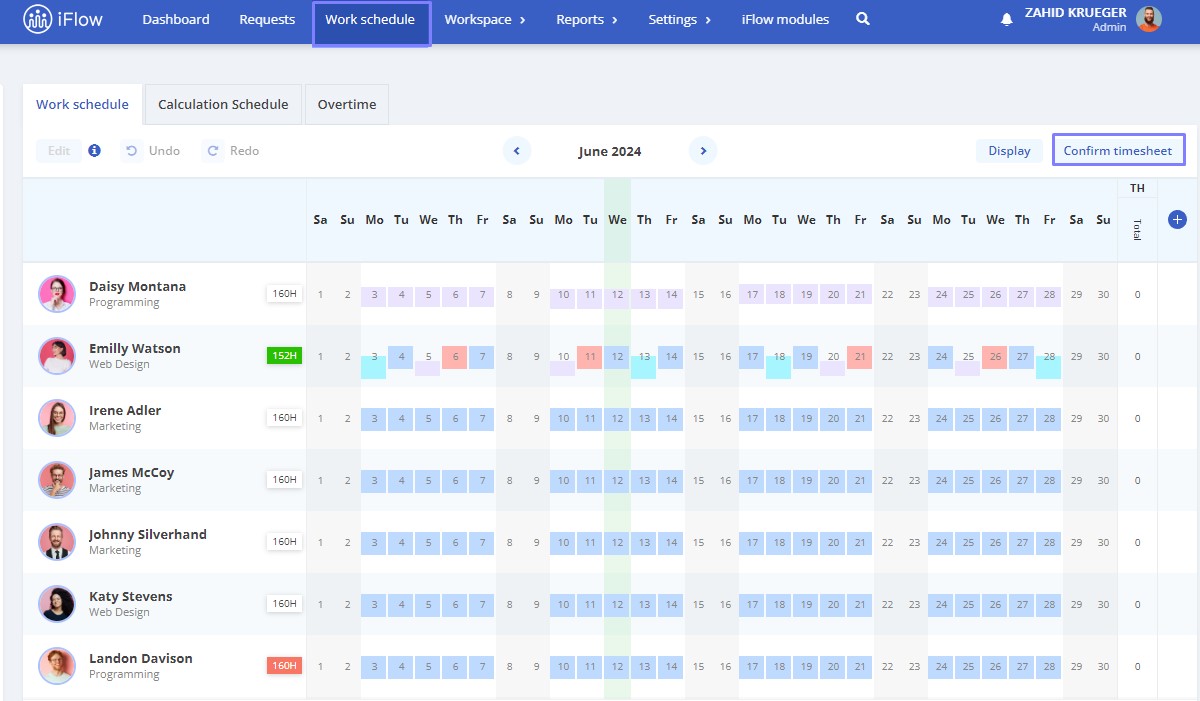
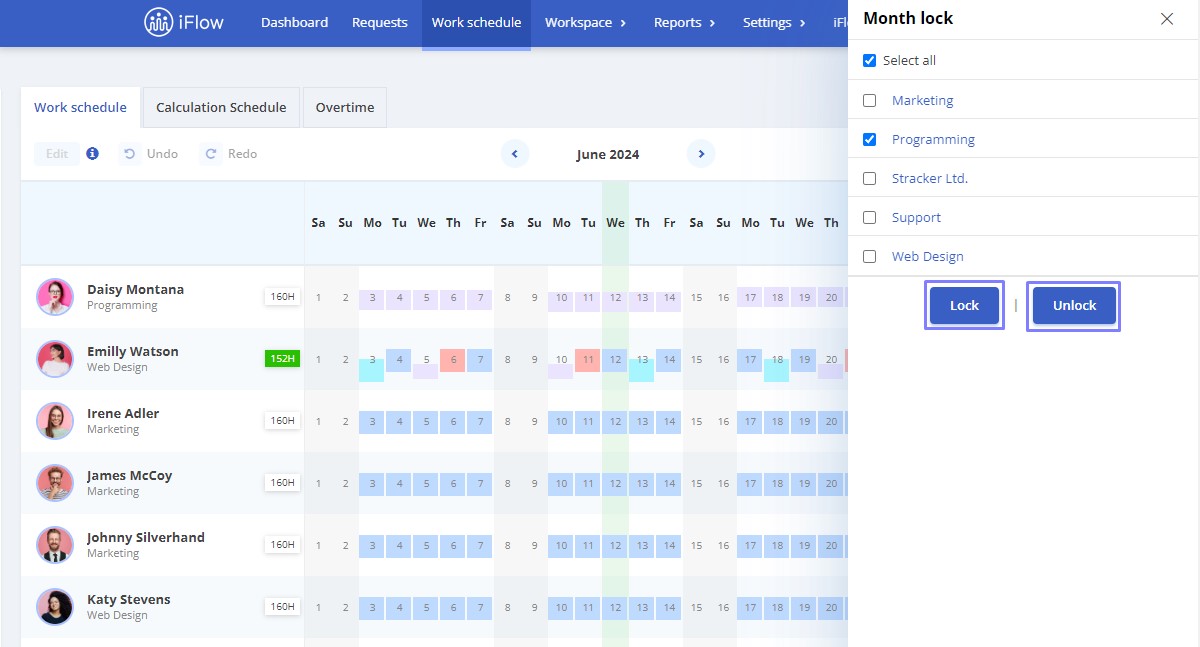
How to close or reopen a month
- From the Work Schedule panel
- Click on the Confirm timesheet button
- Select the team(s) for which the month will be closed or reopened
- Then, click on the Lock/Unlock button
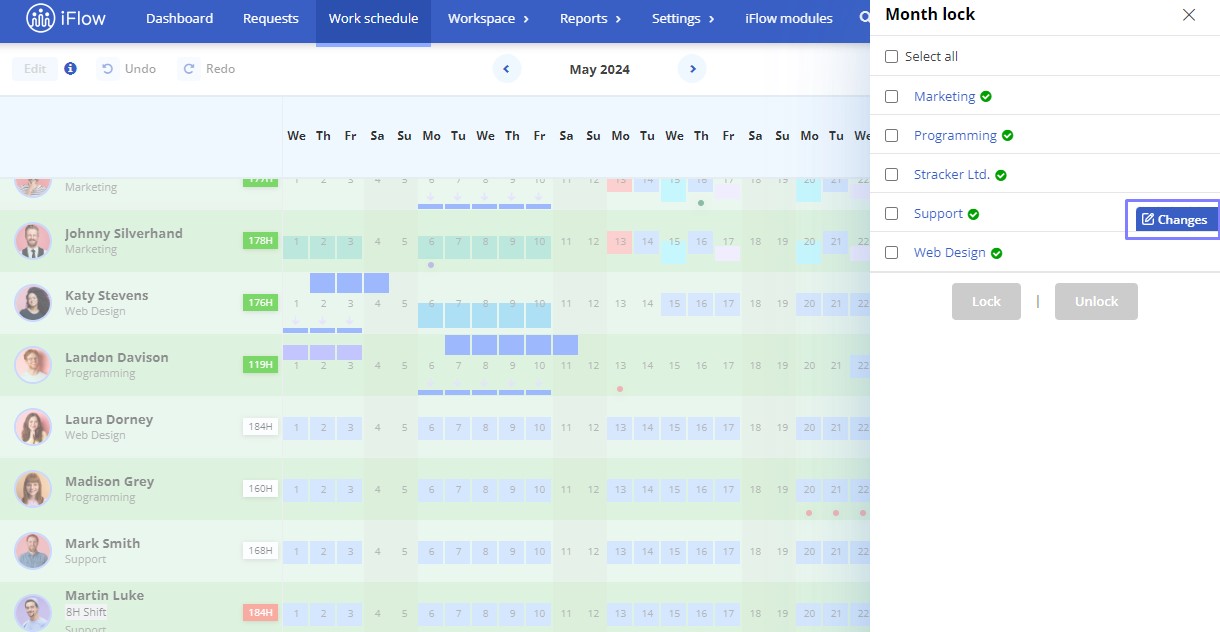
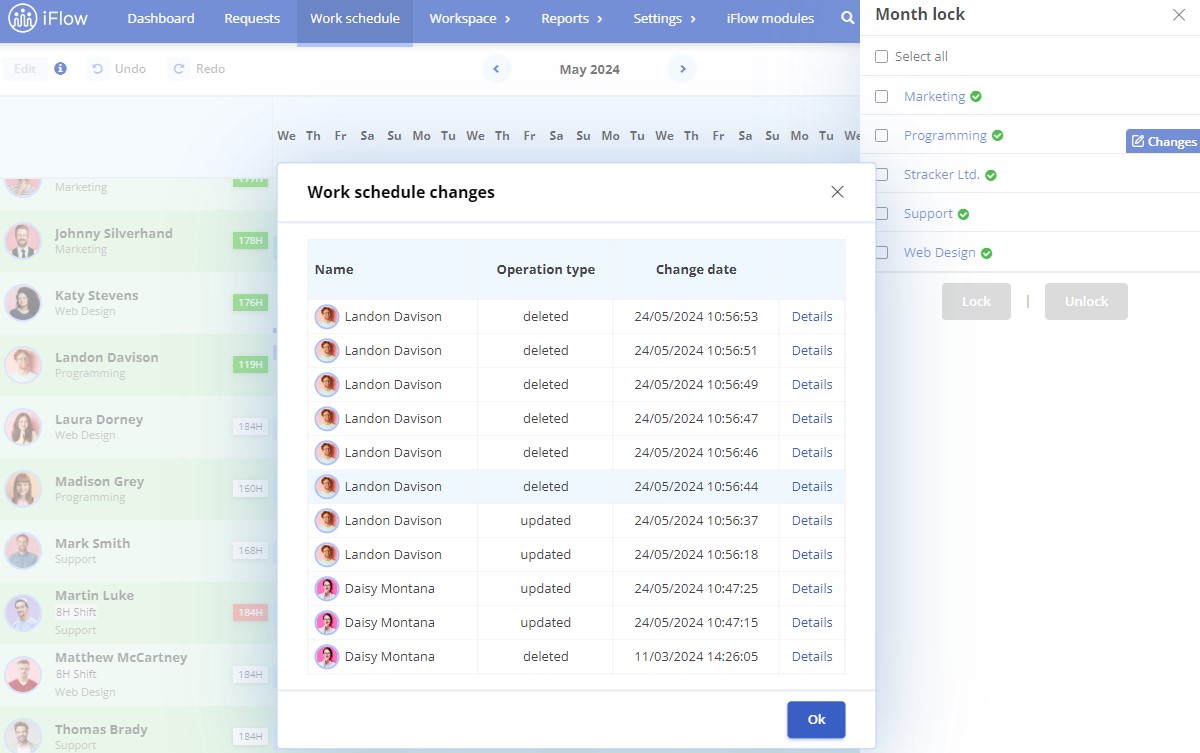
Additionally, if month-end closing is activated, you can view the work schedule changes for the respective month. Click on Confirm timesheet and a corresponding window will open on the right. Click the Changes button next to the team whose changes you want to view.
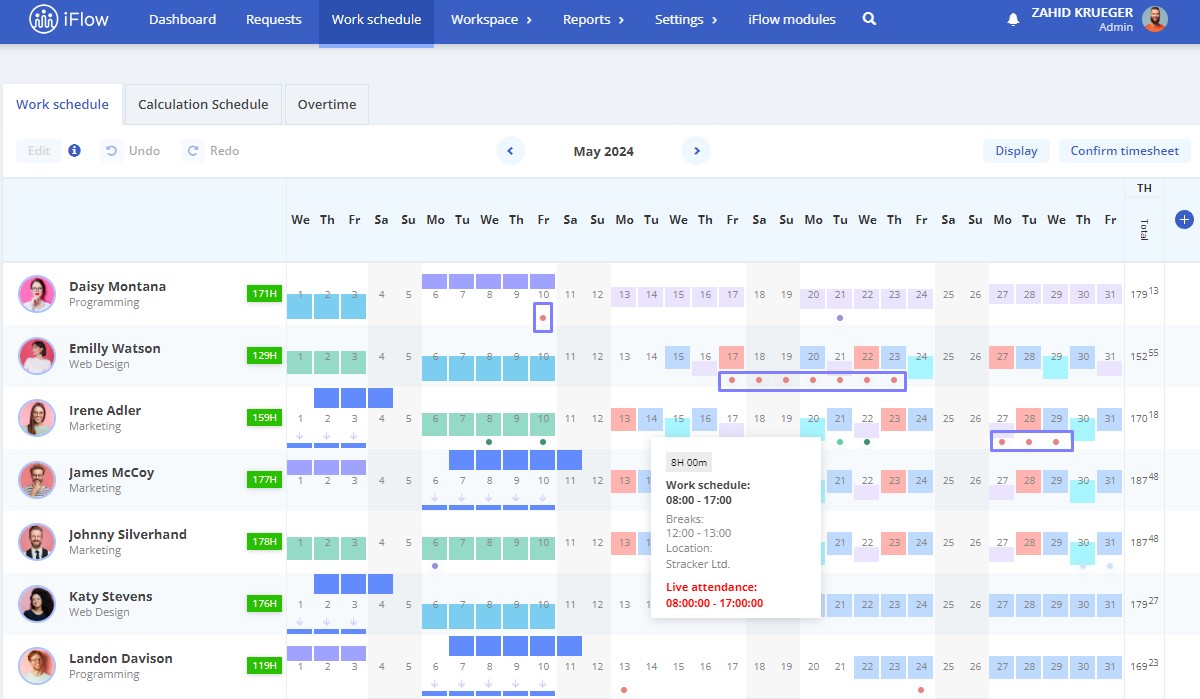
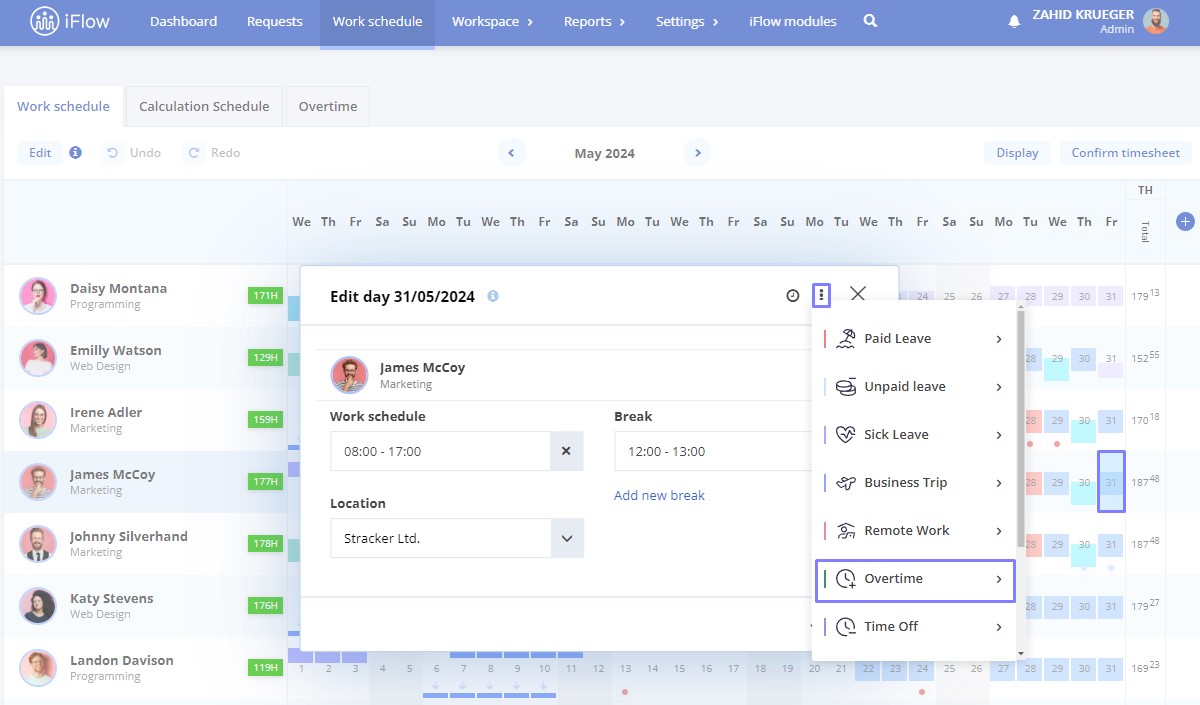
How to view events
If you already have events added, in the Work Schedule panel, you will find not only the representation of the work schedule but also the representation of events. This is done through small colored circles, as shown in the images below.
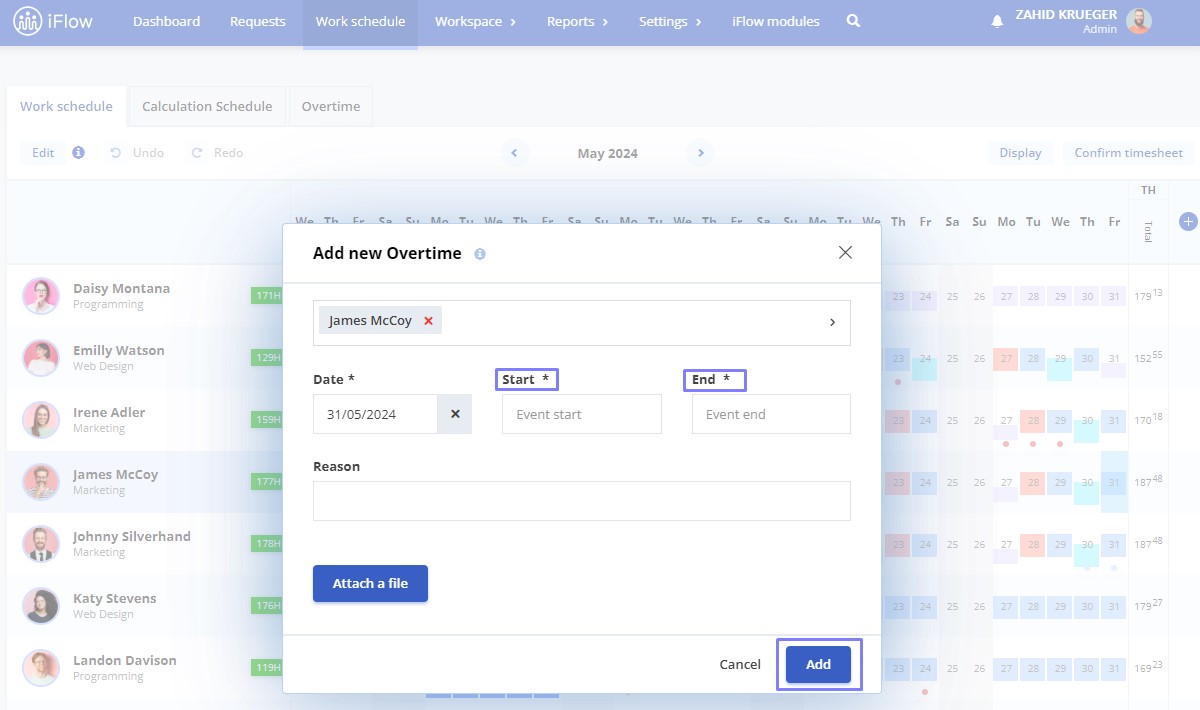
To add an event directly from the work schedule panel, all you need to do is:
- Double-click on the day’s cell where you want to add the event
- Then, click on the symbol with three dots on the right side of the window
- Choose the event you want to add
- After setting days or hours, click on the Add button
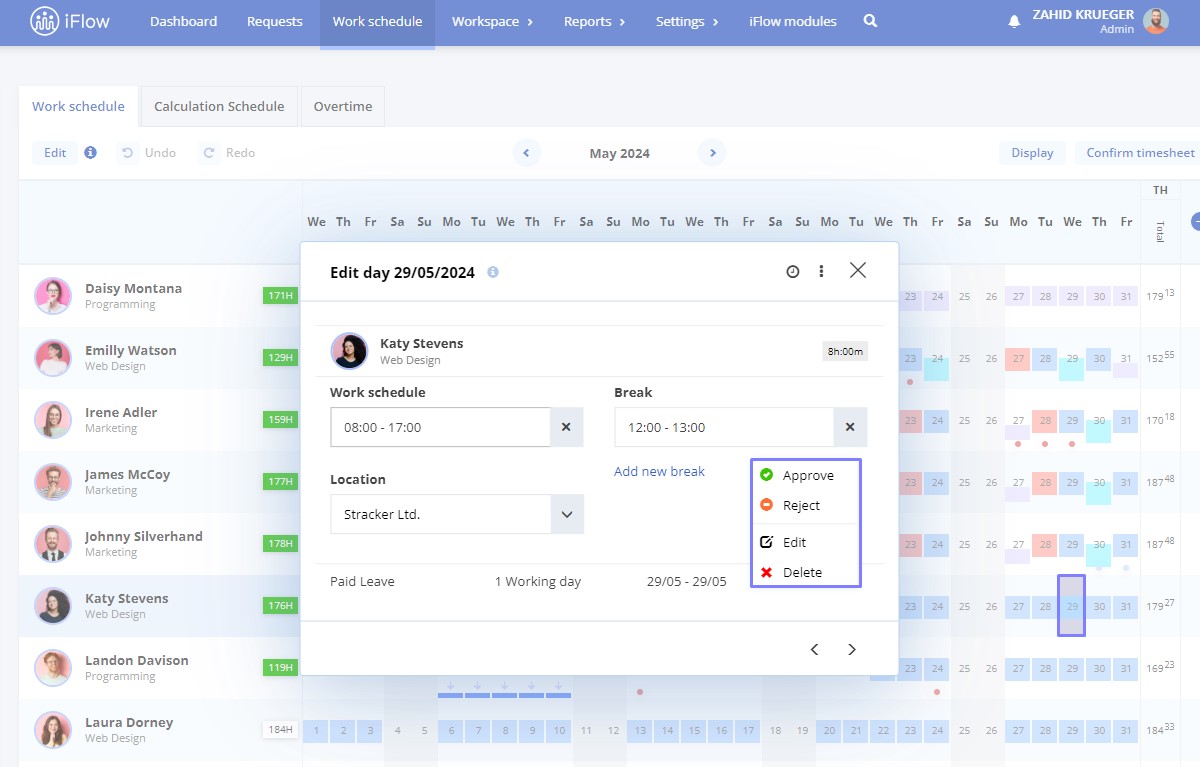
How to edit/approve/reject an event in the work schedule
- Double-click on the box of the day where the event is scheduled
- Click on the symbol with three dots at the bottom of the window
- Choose an option: Approve/Reject/Edit/Delete
- If you want to modify the date/interval, click Edit to make the changes and then click the Save button
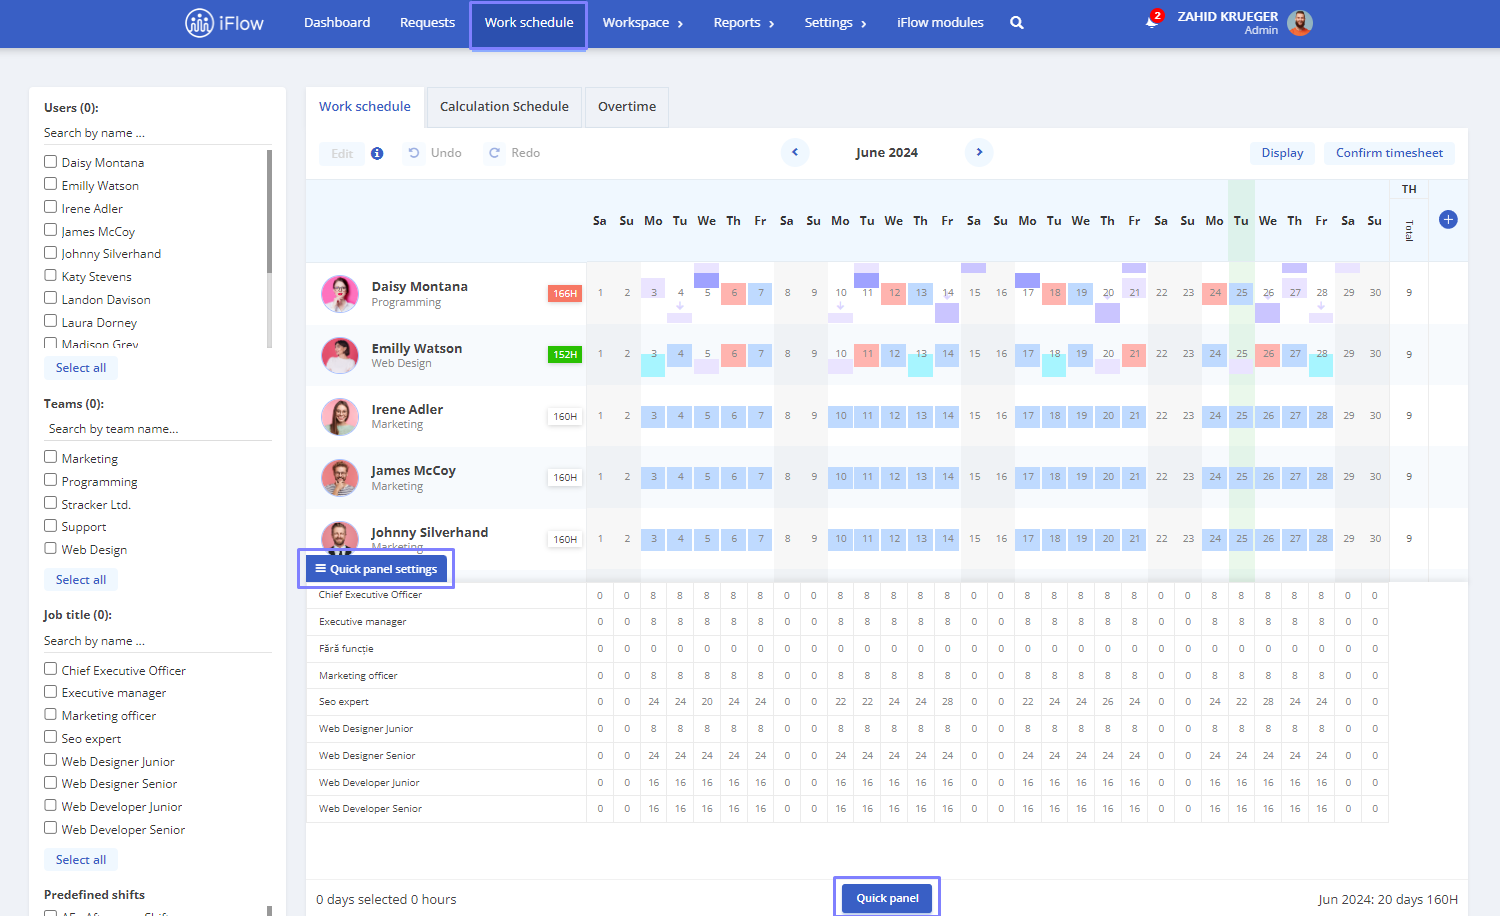
The Quick Panel for the Work Schedule
This panel will provide you with a quick calculation of working hours based on various predefined filters, such as:
- Total hours per shift
- Total hours per role
- Total hours per team
- Total hours per location
- Total employees per shift
- Total employees per role
- Total employees per team
For example, this panel can quickly tell you how many employees are scheduled for a particular day or calculate the planned hours for a specific location.
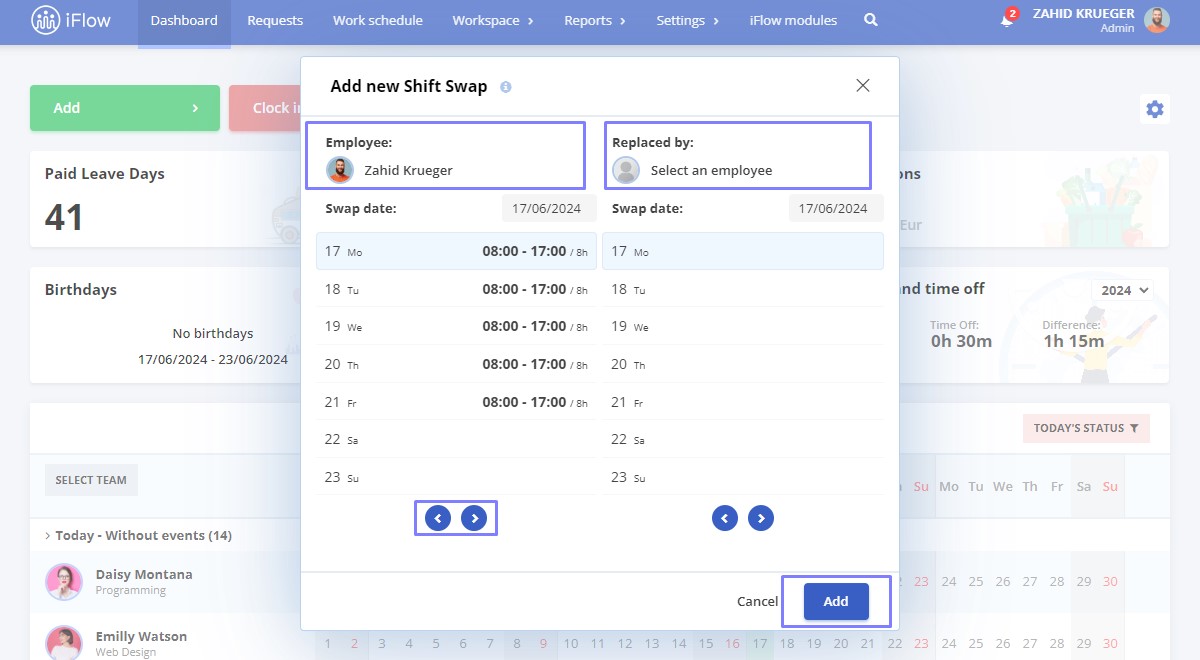
How to use the “Shift Swap” event
Shift swap is the functionality that allows employees to help each other by swapping their work shifts.
The event will be recorded in the Dashboard – Add event
- Click on Shift Swap
- Choose the employees and the days for the shift swap
- Click on Add
The list of employees will appear after clicking on the name of the first displayed employee. You can change the displayed workdays using the forward/backward arrows.
The event will be displayed in the Dashboard and Requests, and after approval, the changes will automatically be reflected in the Work Schedule panel.
Report of Work Schedule Changes
How does the Work Schedule Changes report work?
This report serves as an archive of changes made in the Work Schedule panel. This report shows who modified the work schedule, on what date, at what time, whose schedule was changed, and what modification occurred. The report can be found in the Reports menu.
Filters in the Work Schedule Changes Report
The report is straightforward to use with the help of filters on the left side of the report:
- Date – Select the date for which was made the change
- Employees – the employee whose schedule was modified
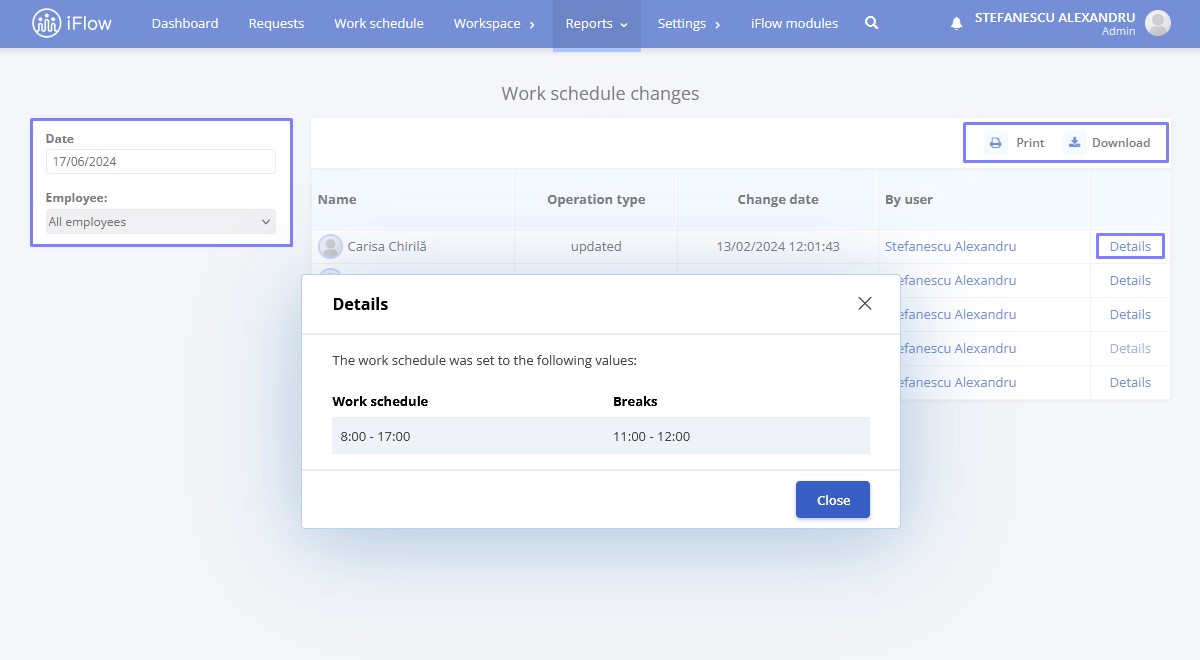
Information from the Work Schedule Changes Report
There are five columns in the modification report.
- Name – this column will display the name of the person whose schedule has been modified
- Operation Type – there are two update statuses (when the schedule was replaced and deletion)
- Change date – here will be the date when the schedule was modified, along with the exact time
- By user – the user within the application who modified the schedule (applicable in cases where there are multiple admins)
- Details – here, a new window will open displaying the newly added work schedule
The report can be printed or downloaded in Excel format.
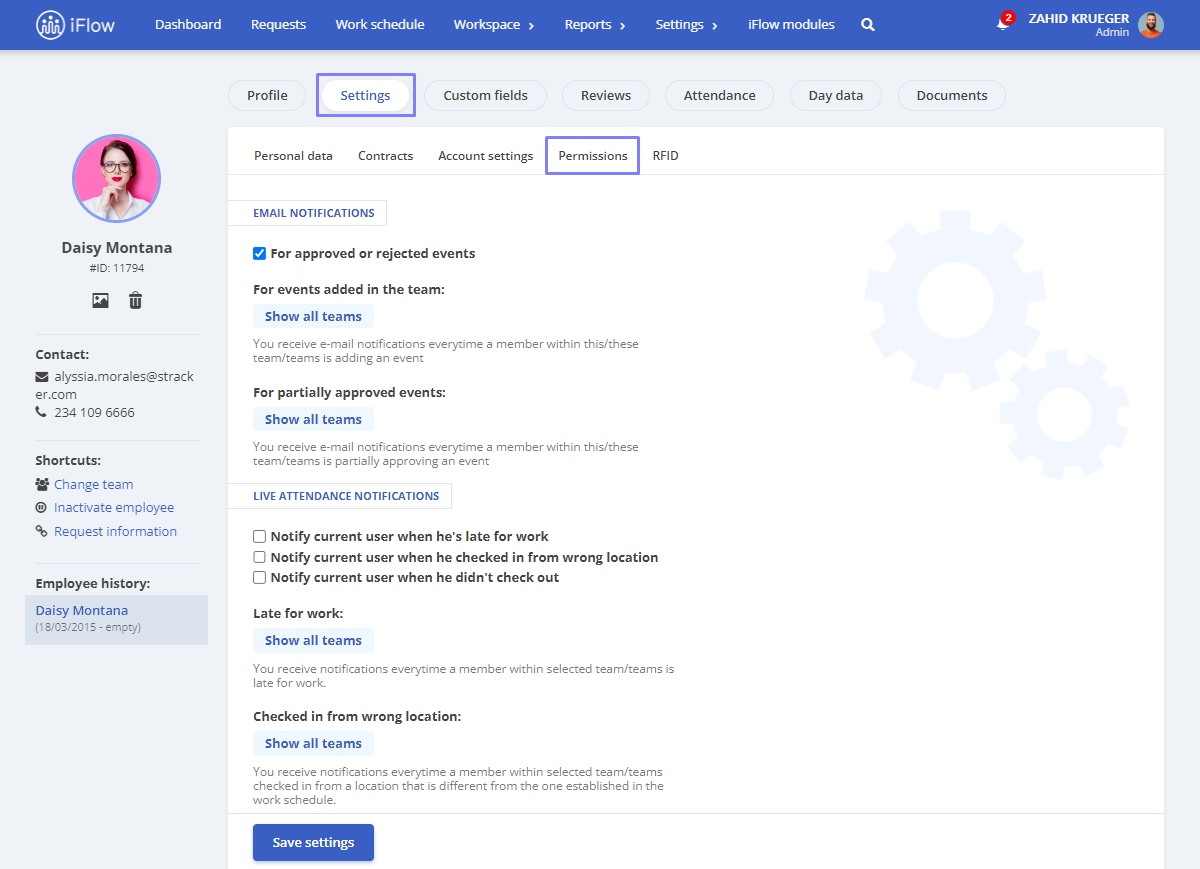
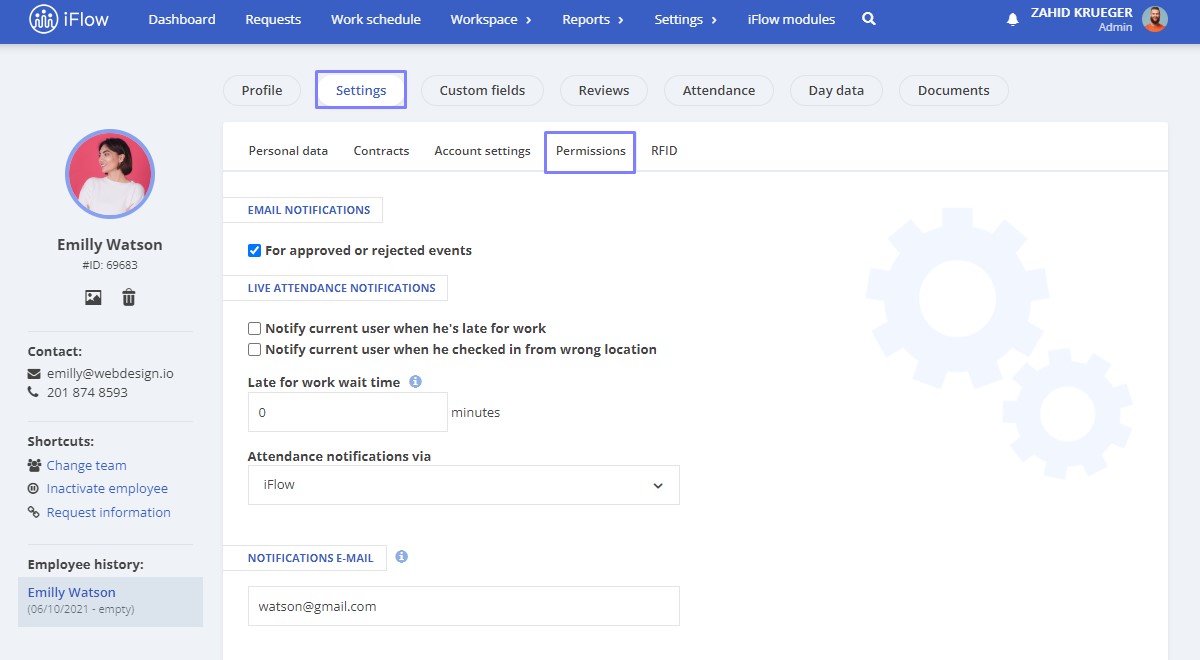
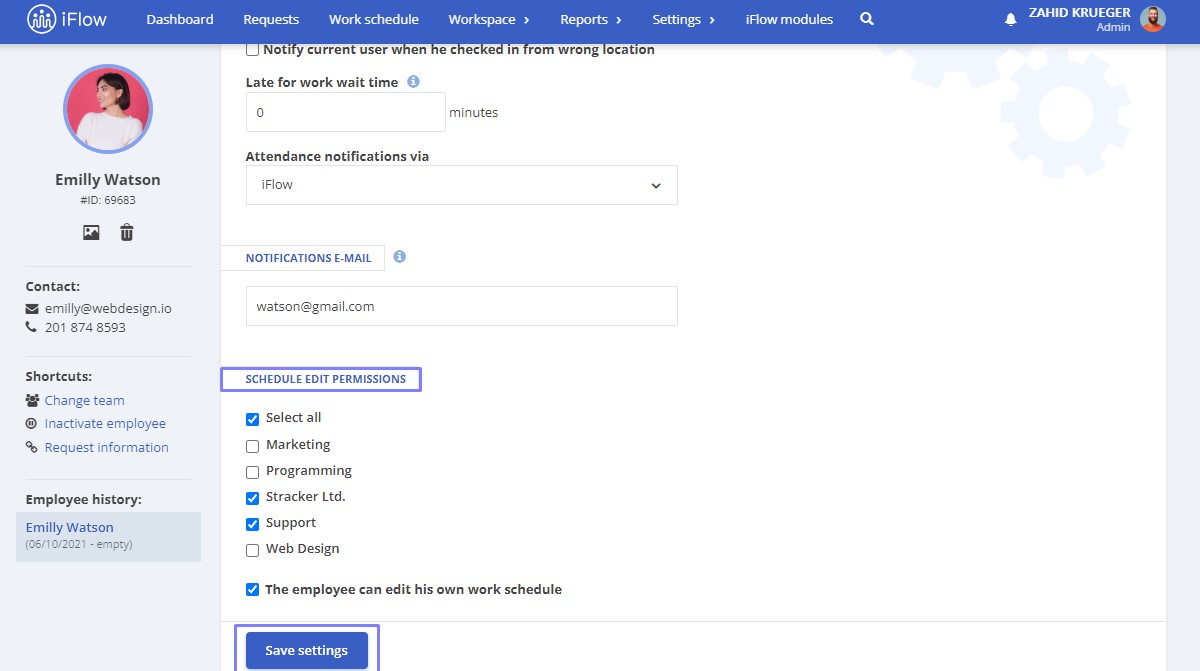
Editing Work Schedule Permissions
This setting allows employees to edit the work schedule on any team they want, whether they are part of it or not. Follow the steps below to grant this permission to your employees.
- From the General panel
- Click on the employee’s name to whom you want to grant this permission
- Click on Settings from the menu located in the employee’s profile
- Permissions section
- Choose the teams for which this employee has the right to edit the work schedule
- To finish, click on Save Settings
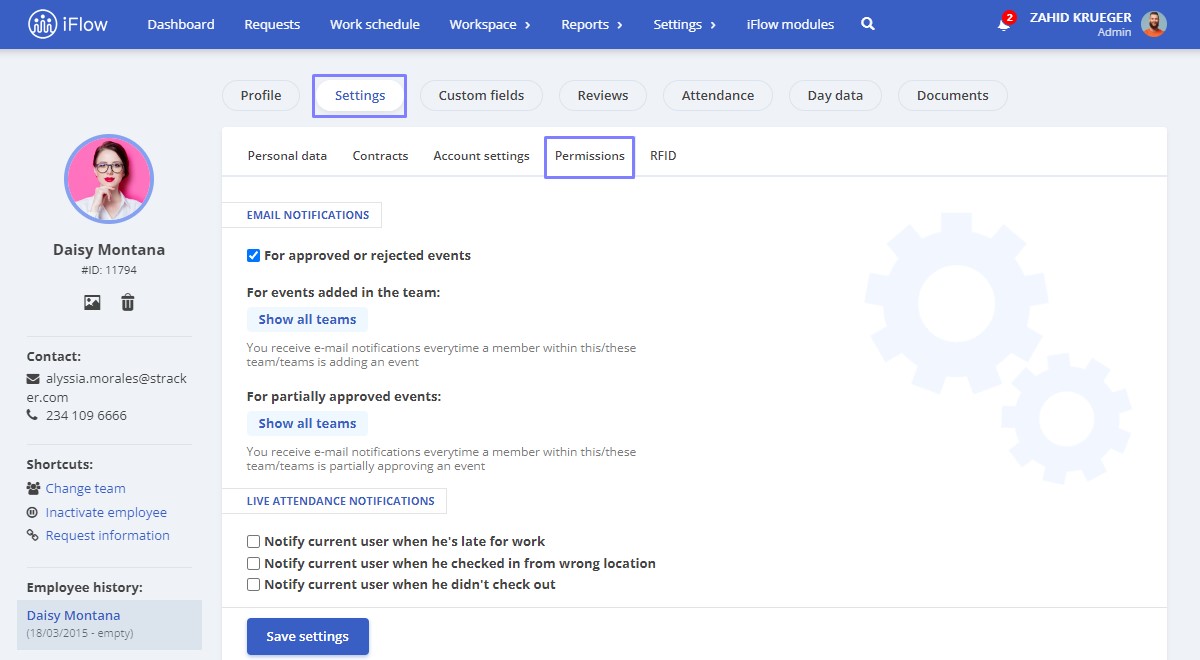
This setting is used when a single employee wants to be able to edit the schedule of one or more teams.
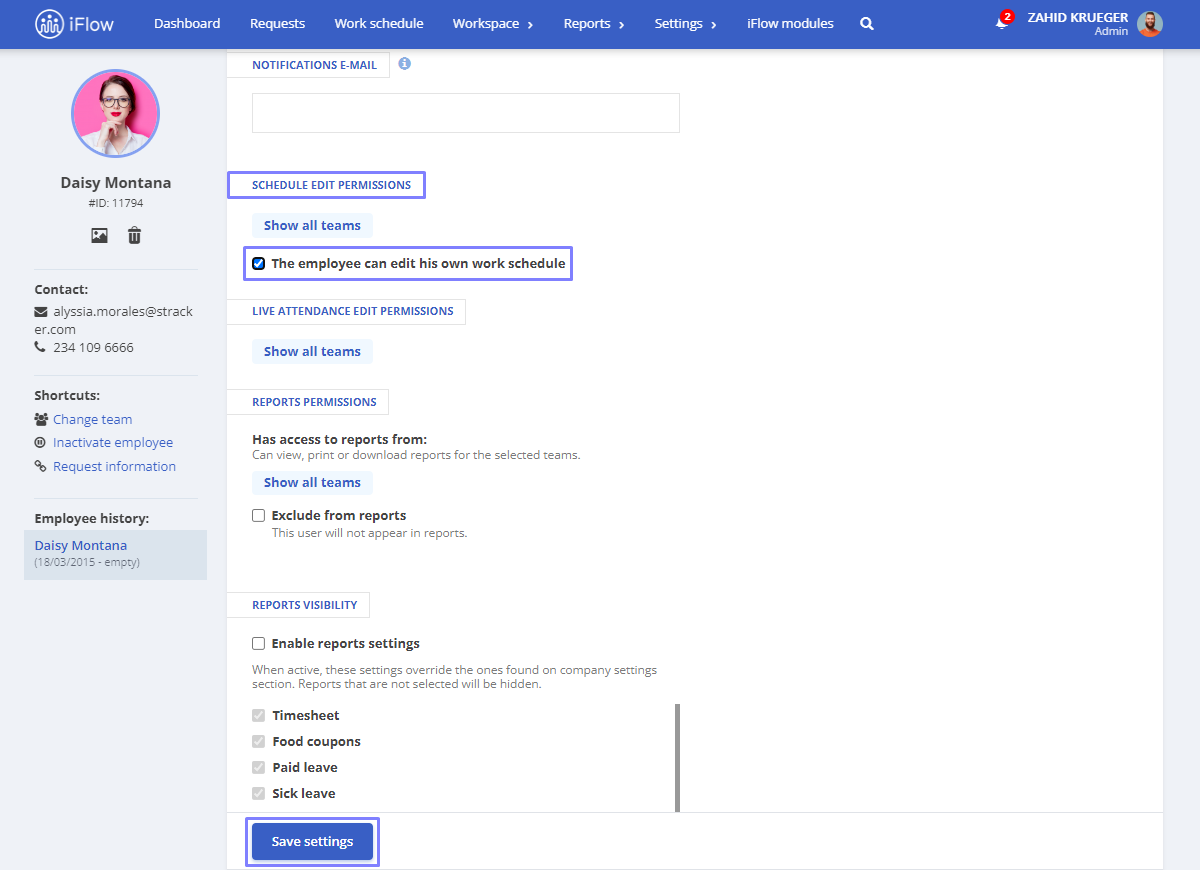
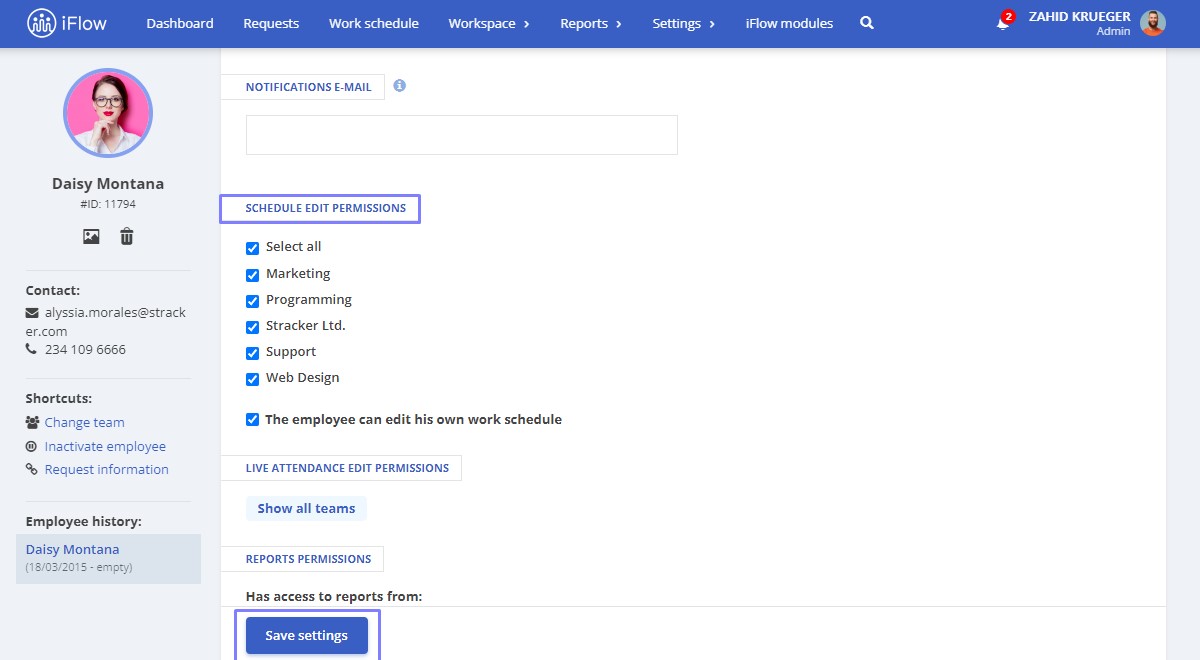
Employees can modify their work schedules
This permission grants all employees the right to edit their work schedules regardless of user category. Therefore, if you want them to be able to set their work schedules, follow the steps below:
- From the main menu, go to Settings – Company
- Click on the Company Settings submenu
- Check the box for Employees can edit their work schedules
- Then click on Update Information
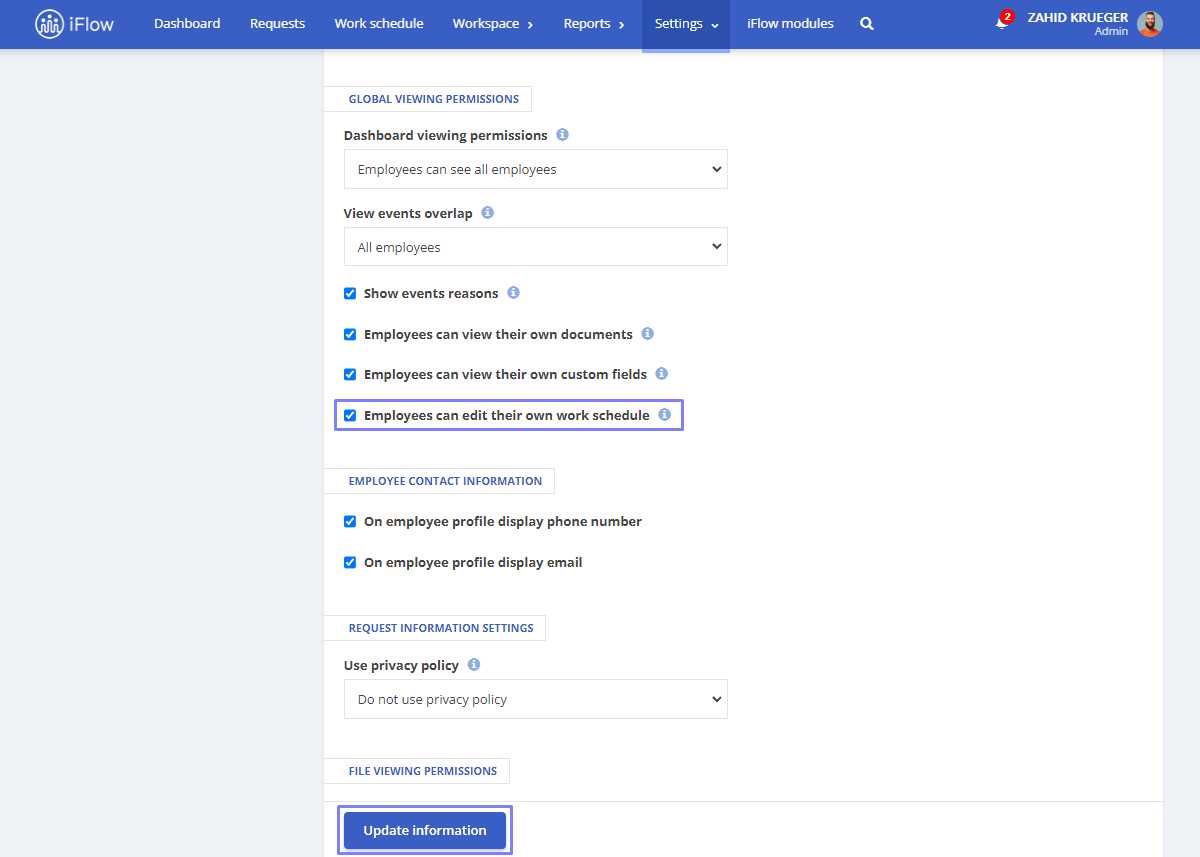
This setting is used when you decide, at the company level, that each employee should be able to edit their work schedule.
If you want to grant this editing permission to only certain employees, follow these steps:
- Navigate to the employee’s profile
- Go to Settings
- Select Permissions
- Find the Schedule editing permissions
- Check the box: The employee can modify their work schedule
- Save settings