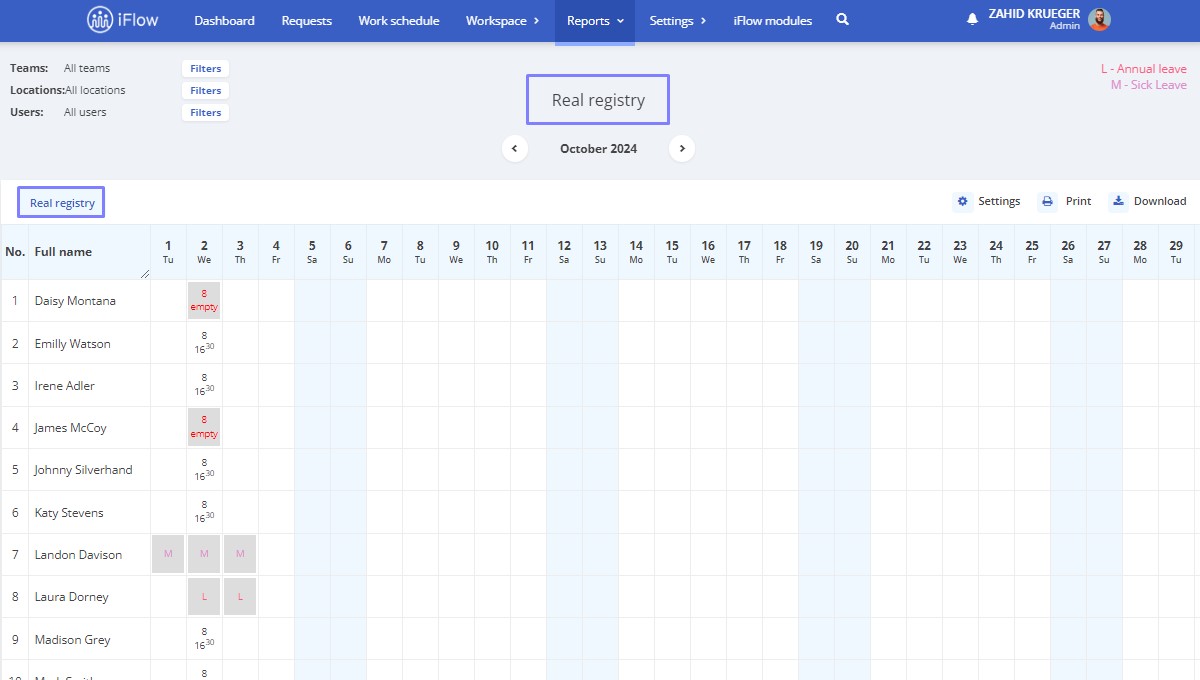
Real registry report
Real registery is designed for companies that use the Clock in – Clock out function.
How to access real registry
- From the main menu, go to Reports
- Select Work time records, then Real registry
This report includes records of Clock in – Clock out events, regardless of how they checked in: through RFID, card clocking, direct clocking on a PC, Smartphone, or manual entry.
The report contains a legend with the names of the events displayed during working hours. Each box contains a link to the employee’s Day data panel.
Additionally, any issues will be highlighted in each cell with a symbol like the one in the image below. With a single click, you are directed to the page where you can solve the issue quickly and easily.
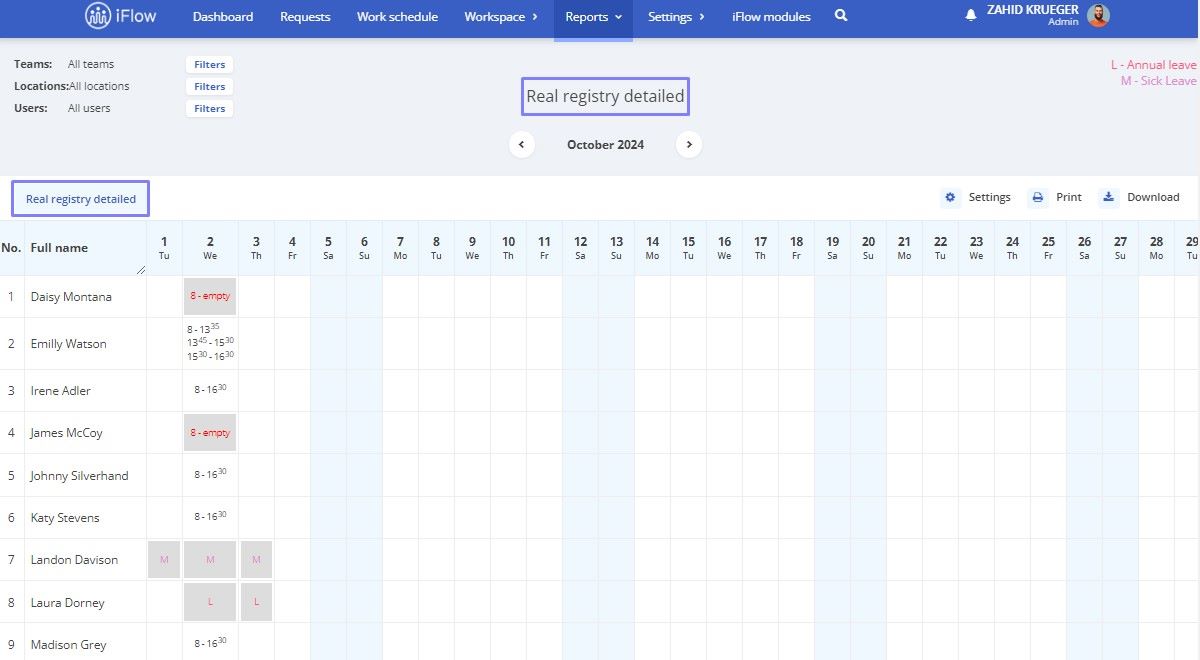
Real registry detailed report
The Real registry detailed report is designed for companies that use the Clock in – Clock out function with multiple attendance intervals.
How to access the real registry detailed report
- Go to the Reports from the main menu
- Select Work time records, then Real registry detailed
This report includes Clock in – Clock out events, regardless of how employees clock in; whether by RFID card, direct PC entry, smartphone, or manual input.
The report contains a legend with the names of the events displayed during working hours. Each box contains a link to the employee’s Day data panel.
The report highlights any issues in each cell with a prominent color for companies managing multiple attendance intervals, indicating if an interval remains unclosed. This report is designed to handle multiple attendance intervals efficiently.
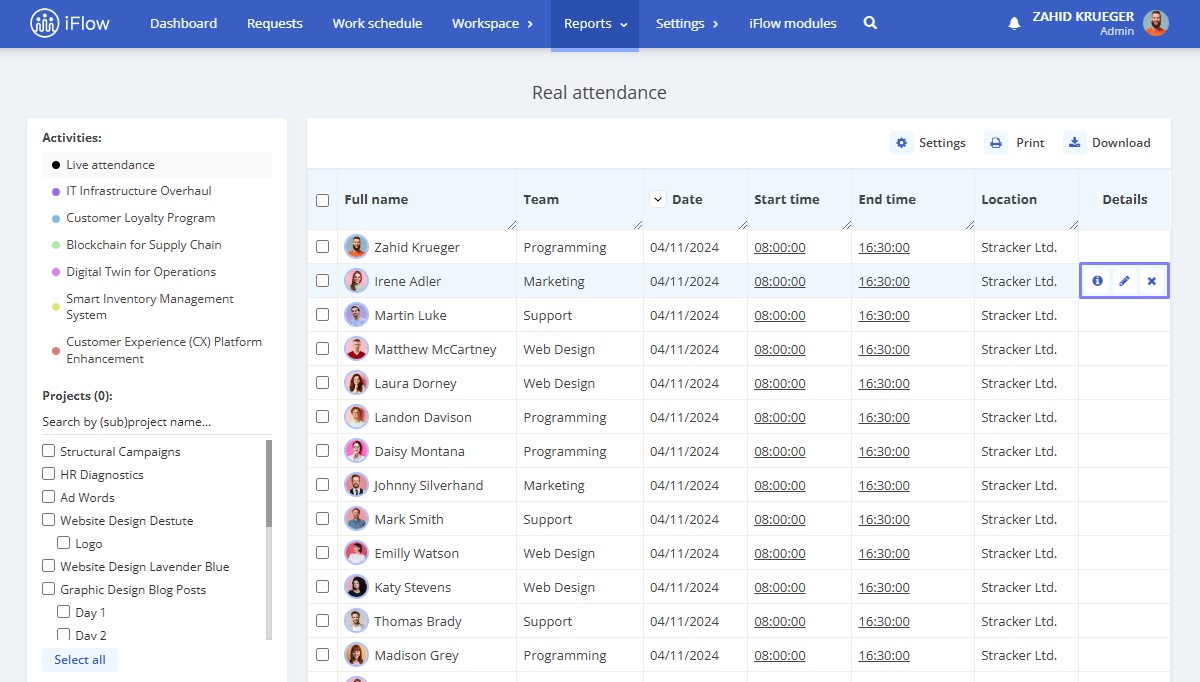
Real attendance report
The Real attendance report displays data for the current day. It includes the following information:
- Employee Name
- Team
- Date
- Start Time
- End Time
- Locations
- Details
This report also includes a series of filters to help you synthesise the information you want, such as:
- Activities
- Projects (if the project module is activated)
- Billable
- Users
- Teams
- Locations
- Interval type
- Terminal type
- RFID device
- Hours interval (from hour – to hour)
- Select time frame
Additionally, in the last column of the table, there is a details section with three icons, depending on the action you want to perform: Details, Edit, and Delete.
- Details – here, you can view details about the recorded attendance, such as the date, check-in time, terminal type, the device that recorded the clocking, GPS coordinates, the location on the map, and the history of any changes recorded
- Edit – here, you can modify the date, time, location, and clocking project. All changes made are recorded in the history
- Delete – here, you can delete the clocking interval
How to personalize the real attendance report
The Real attendance report can be customised using the Settings button in the table’s top-right corner. The report includes the following data:
- Address
- Bank account
- Birth date
- City
- Cost center
- County
- Created
- Department
- Employee contract number
- Employment contract expire date
- Employment date
- Health insurance company
- ID card expire date
- ID card issue date
- ID card issued by
- ID card number
- Internal number
- Job title
- Phone number
- RFID tag
- RFID tag 2
- Social security number
- Station
- Team
- Workload
- Working car
- Emergency contacts
- Date
- Start time
- End time
- Terminal type
- RFID agent
- Closed RFID agent
- IP public
- Location
- Project
- Subproject
- GPS status
- GPS longitude
- GPS latitude
- Added by
- Added date
- Closed IP public
- Closed GPS status
- Closed GPS longitude
- Closed GPS latitude
- Closed by
- Closed date
- Closed location
- Closed is mobile device
- Photo start
- Photo end
- Attendance note
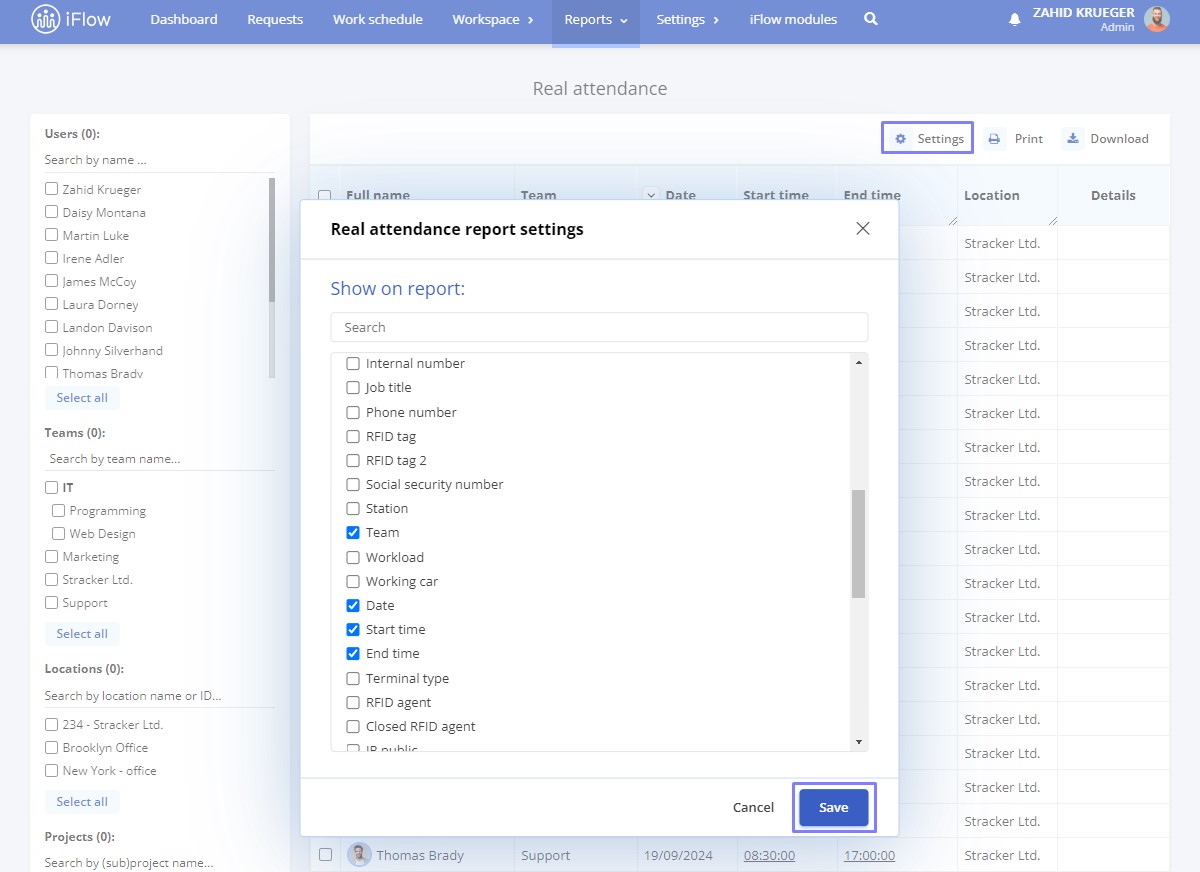
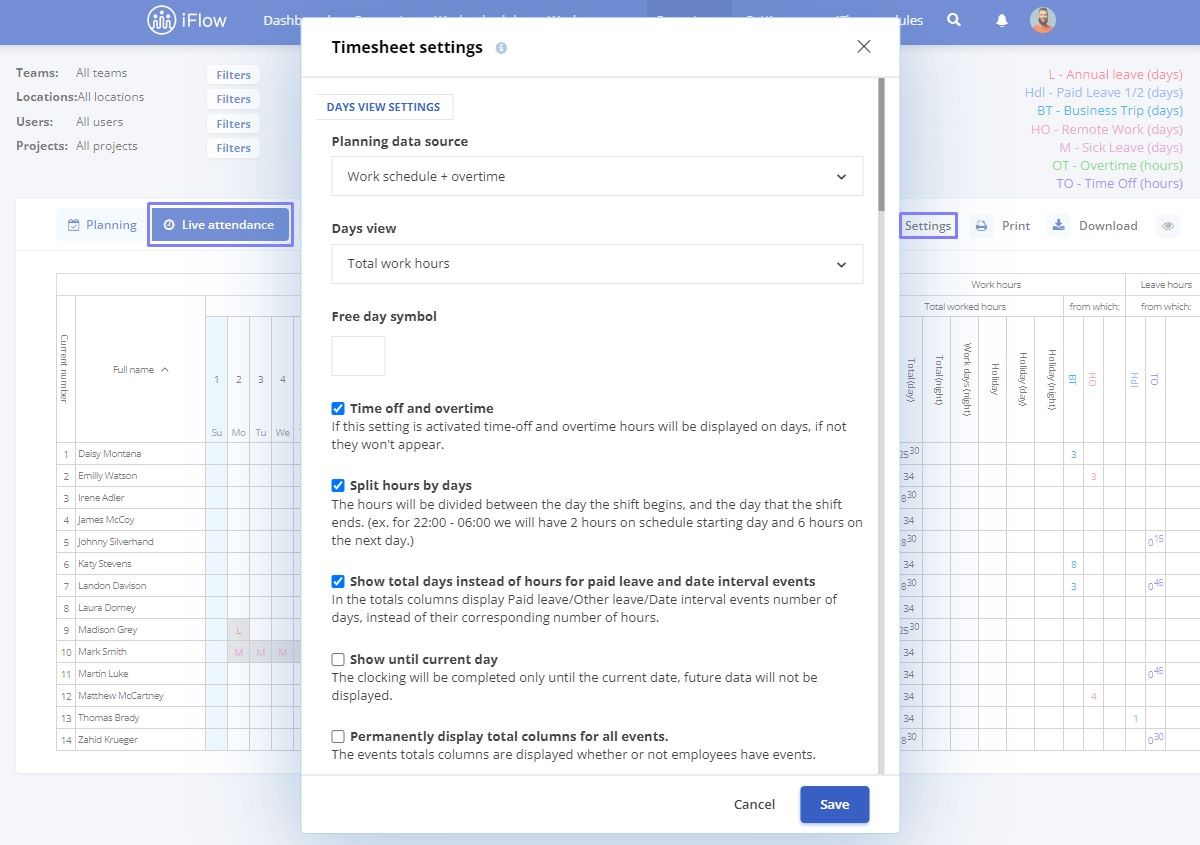
Timesheet report with live attendance data source
This type of report is used if you want to display the hours recorded by each employee through check-ins and check-outs and see the total hours worked by your employees.
This report does not have the Display by day section, so it does not have display modes.
Below is the list of available settings for this type of report:
- Free day symbol
- Time off and overtime
- Show total days instead of hours for paid leave and date interval events
- Permanently display total columns for all events
- Options for Employee data columns
- Options for Total worked hours columns
- Options for Work schedule hours columns
- Options for Overtime columns
- Hide negative values
- Group other leave
- Other leave symbol
- Printing Settings
- Live attendance round option
Don’t hesitate to contact us for assistance configuring settings by emailing [email protected] or using the application’s chat feature.
Live attendance permissions
How to edit live attendance permissions
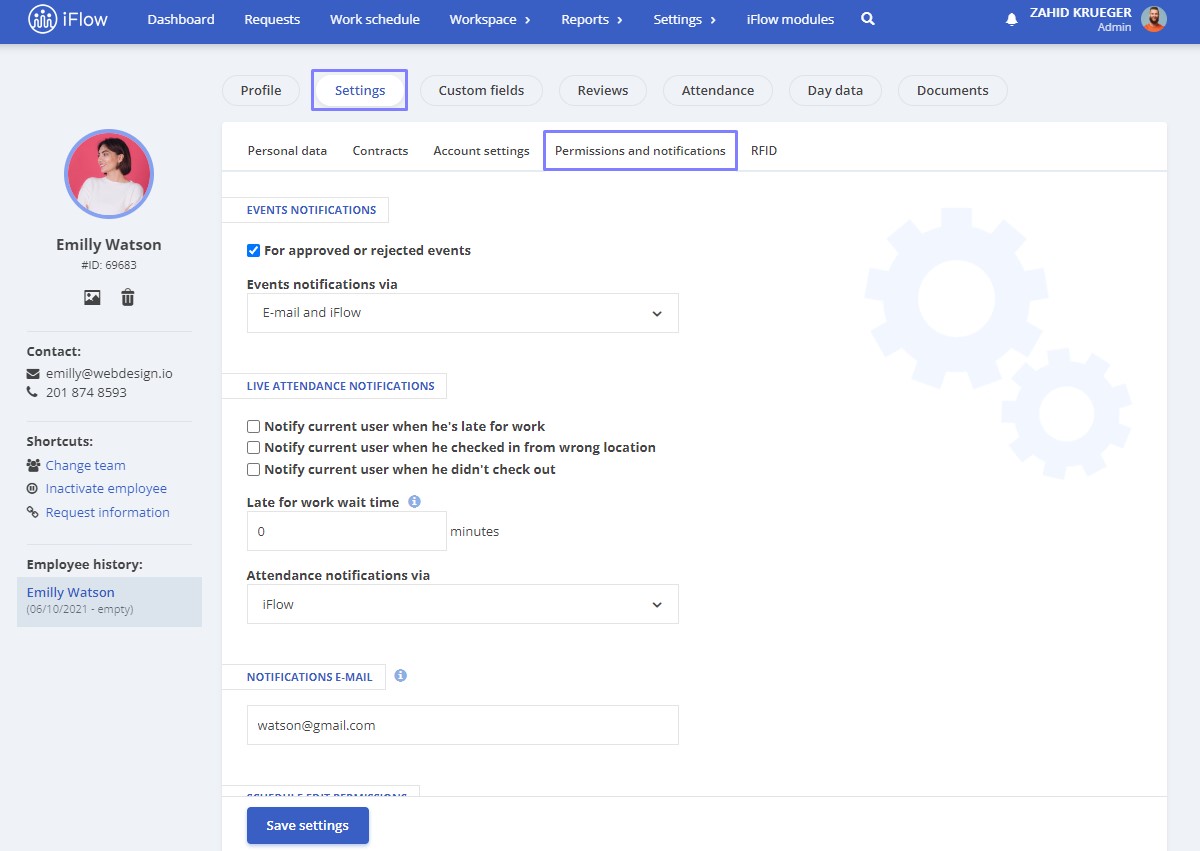
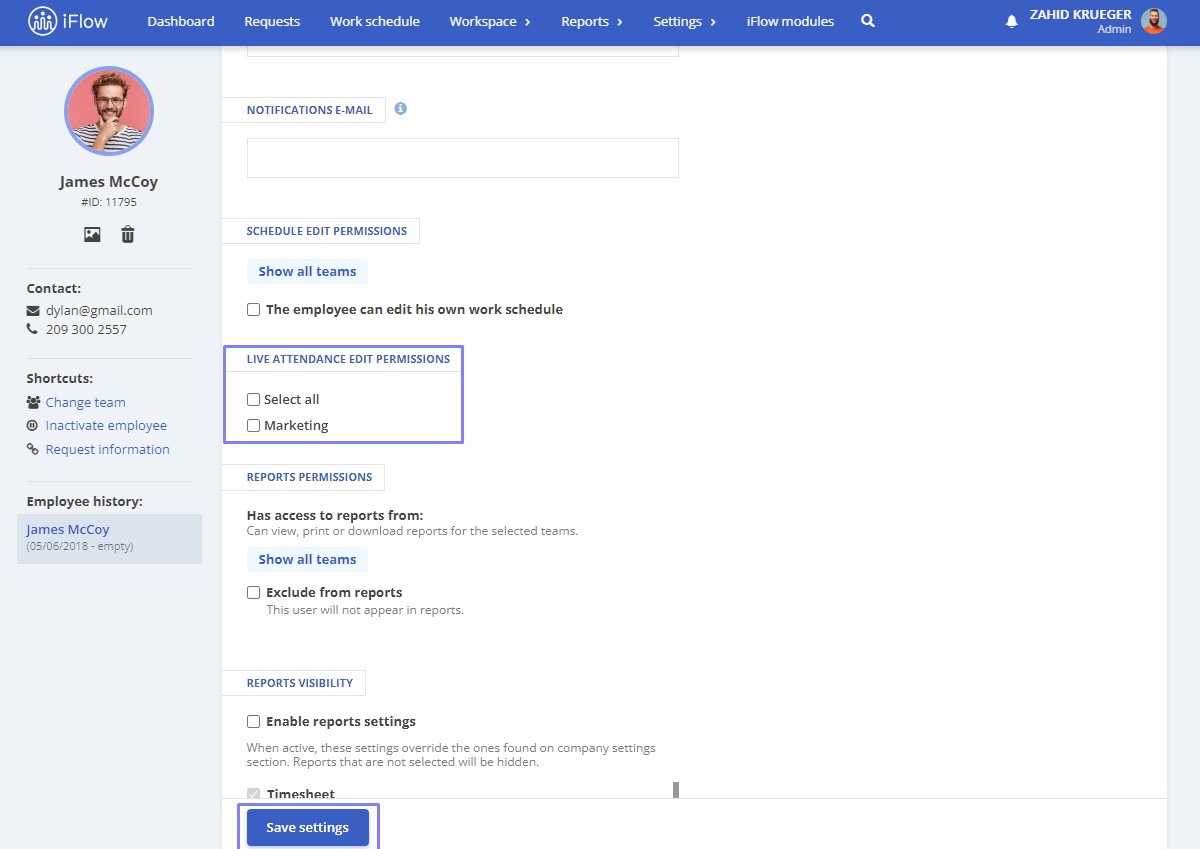
This permission allows only team leaders to add or edit the live attendance of their employees.
- From the Dashboard
- Click on the name of the employee you want to grant this permission
- Click on Settings in the employee’s profile menu
- Go to the Permissions and notifications section
- Select the teams for which this employee has the right to edit the live attendance
- To finish, click Save settings
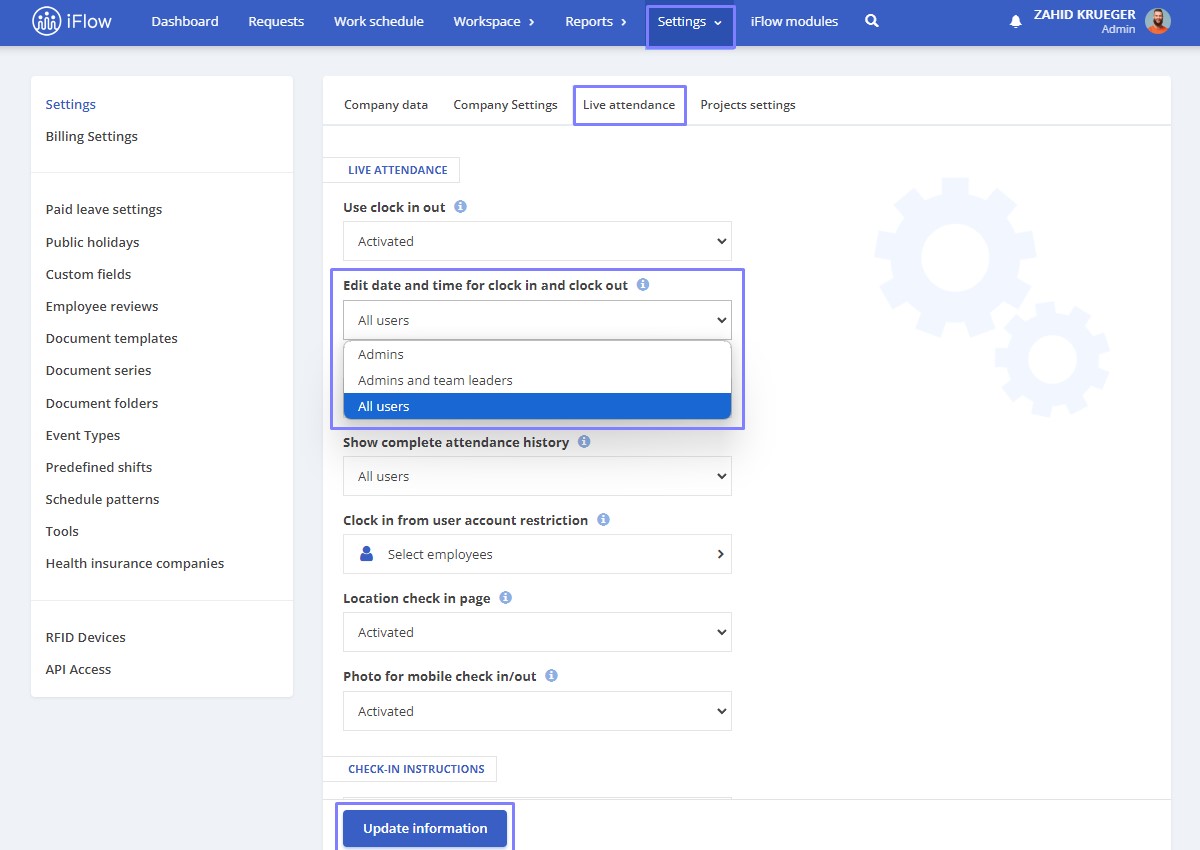
How to edit the date and time of check-ins and check-outs
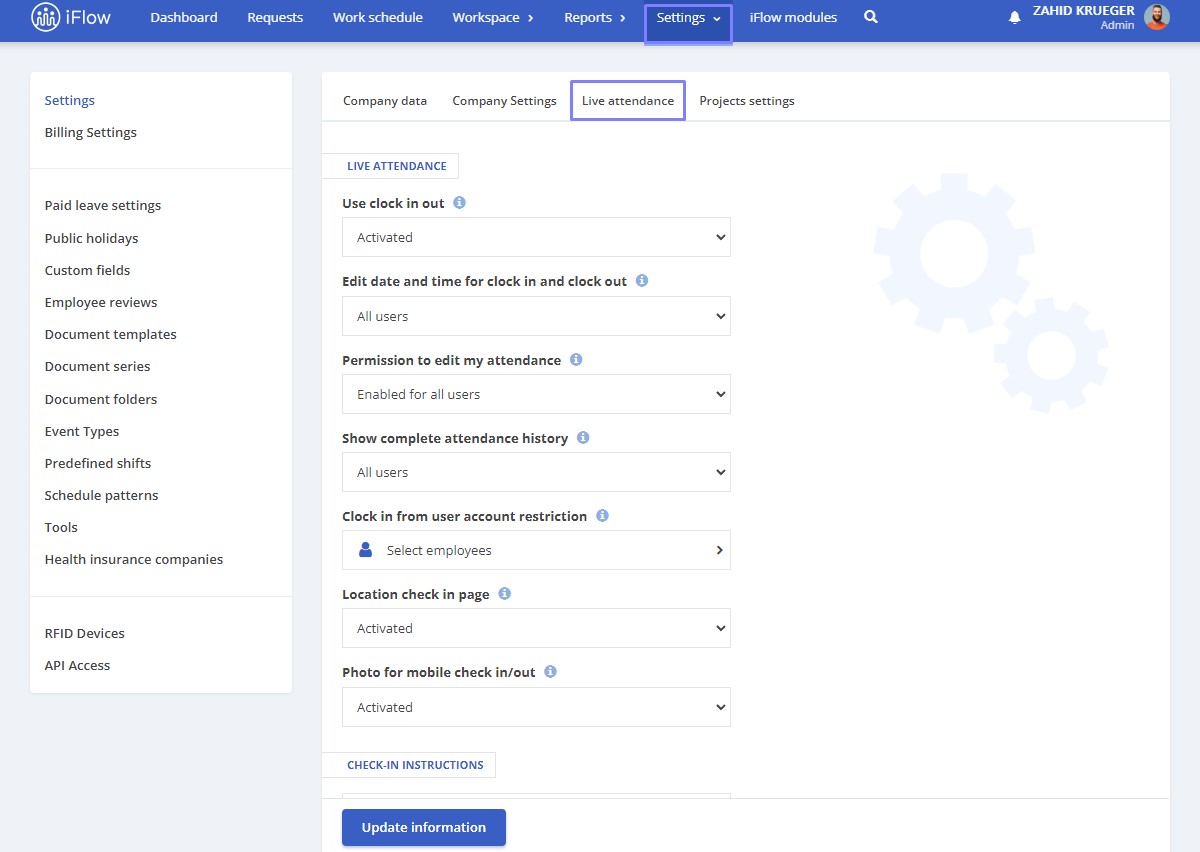
This setting allows you to enable or restrict users from adjusting the date or time when clocking in or out in the application. Follow the steps below to turn this setting on or off:
- From the main menu, go to Settings – Company
- Click on the Live attendance submenu
- Choose the option you want in the Edit date and time for clock in and clock out field
- To finish, click Update information
Admins – When this option is selected, only administrators can modify the date and time when clocking
Admins and team leaders – When this option is selected, only administrators and team leaders can modify the date and time when clocking
All users – When this option is selected, all users can modify the date and time at the time of clocking
How to edit permissions for modifying your attendance
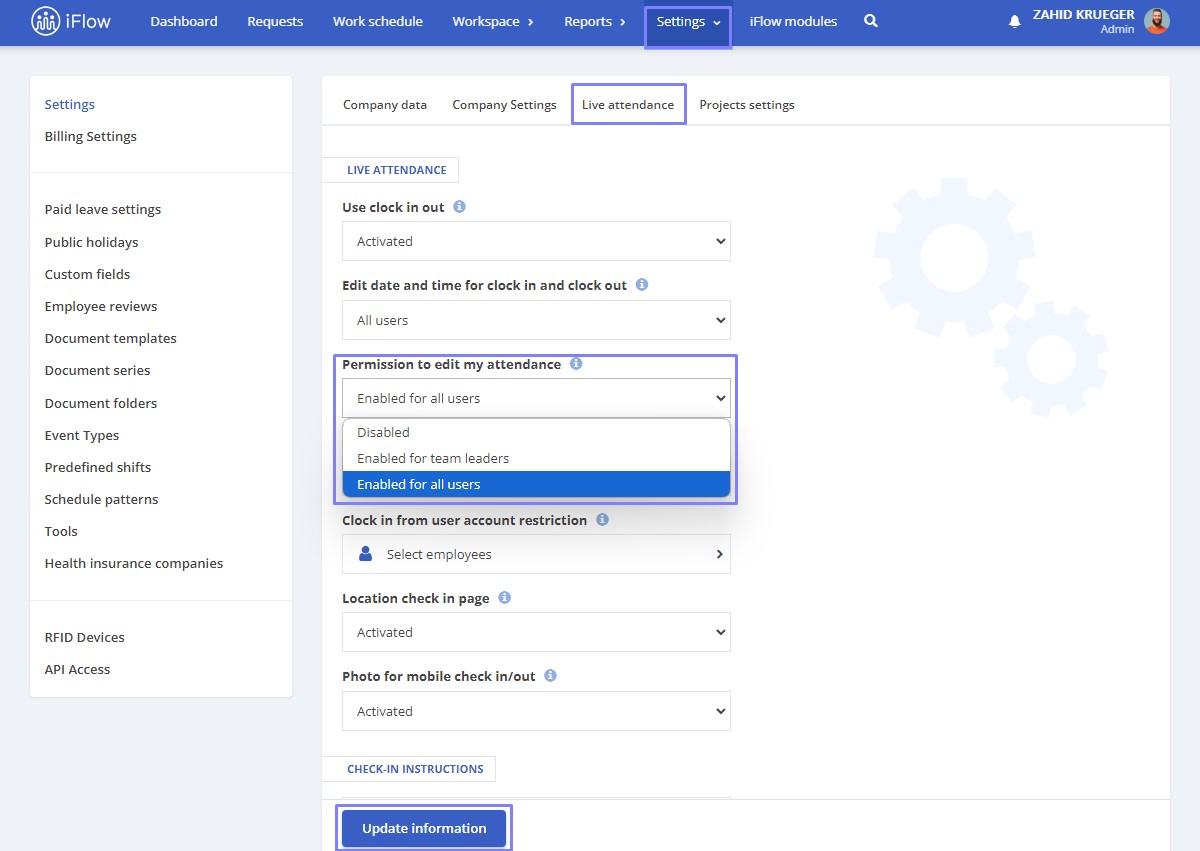
This setting enables or restricts users from editing their recorded attendance entries. Follow the steps below to turn this setting on or off:
- From the main menu, go to Settings – Company
- Click on the Live attendance submenu
- Choose the option you want in the Permission to edit my attendance field
- To finish, click Update information
Disabled – When this option is disabled, no users (except administrators) can edit their previously recorded presence
Team leaders – When this option is selected, only team leaders can edit their previously recorded presence
All users – All users can edit their previously recorded presence when this option is selected
How to view the complete attendance history
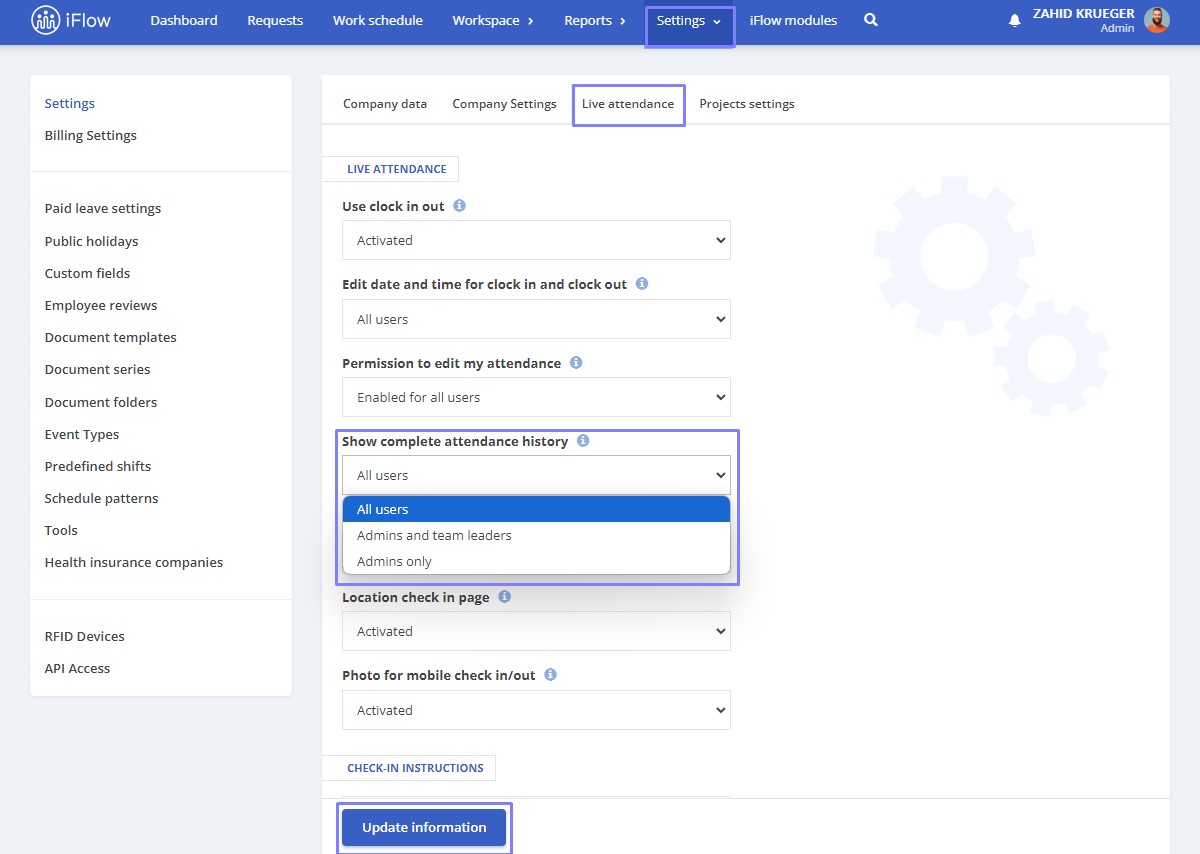
This setting manages user access to their attendance records:
- From the main menu, go to Settings – Company
- Click on the Live attendance submenu
- Choose the option you want in the Show complete attendance history field
- To finish, click Update information
All users – When this option is selected, all users have access to their attendance records
Admins only – When this option is selected, only the administrator has access to all attendance records for each user
Admins and team leaders – When this option is selected, administrators and team leaders have access to all attendance records for each user (Team Leaders have access only to the attendance history for the teams they manage)
Editing multiple live attendances
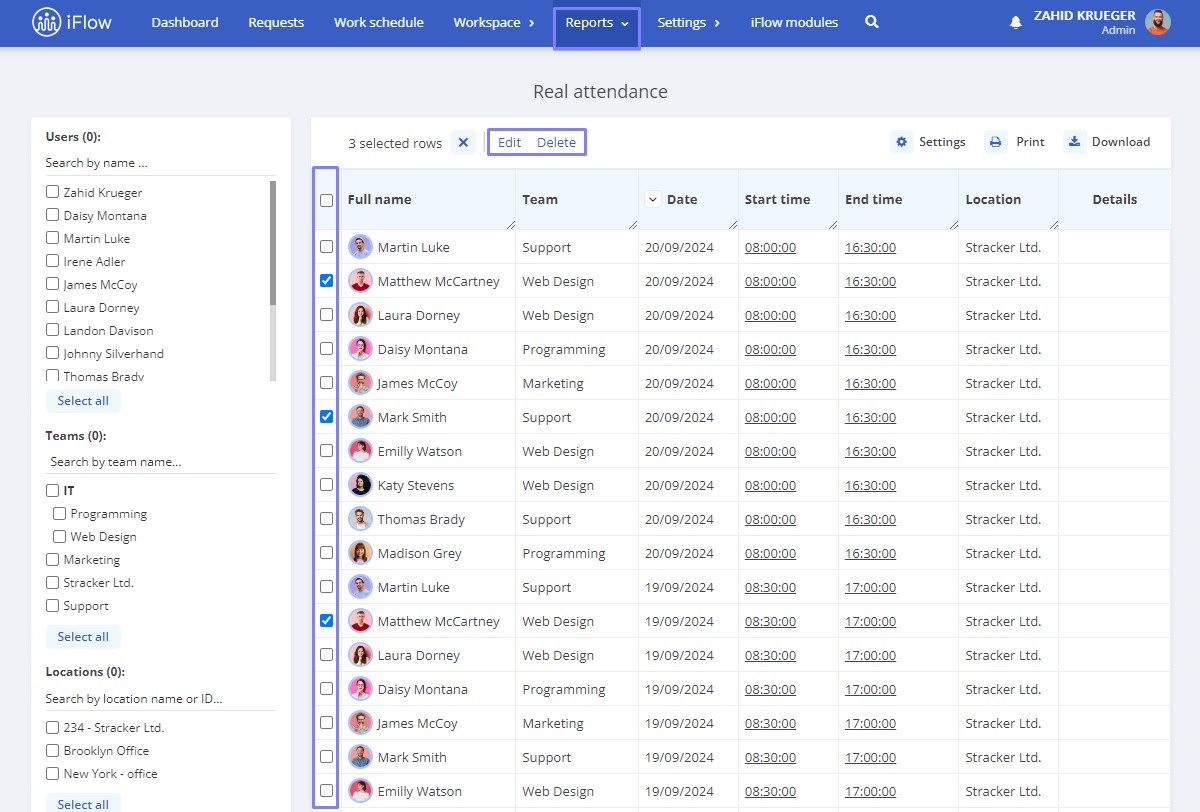
You can delete or edit multiple attendance records simultaneously by selecting them with the checkboxes next to each record.
How to delete multiple attendances
You can delete attendances by selecting them and then using the Delete button in the header.
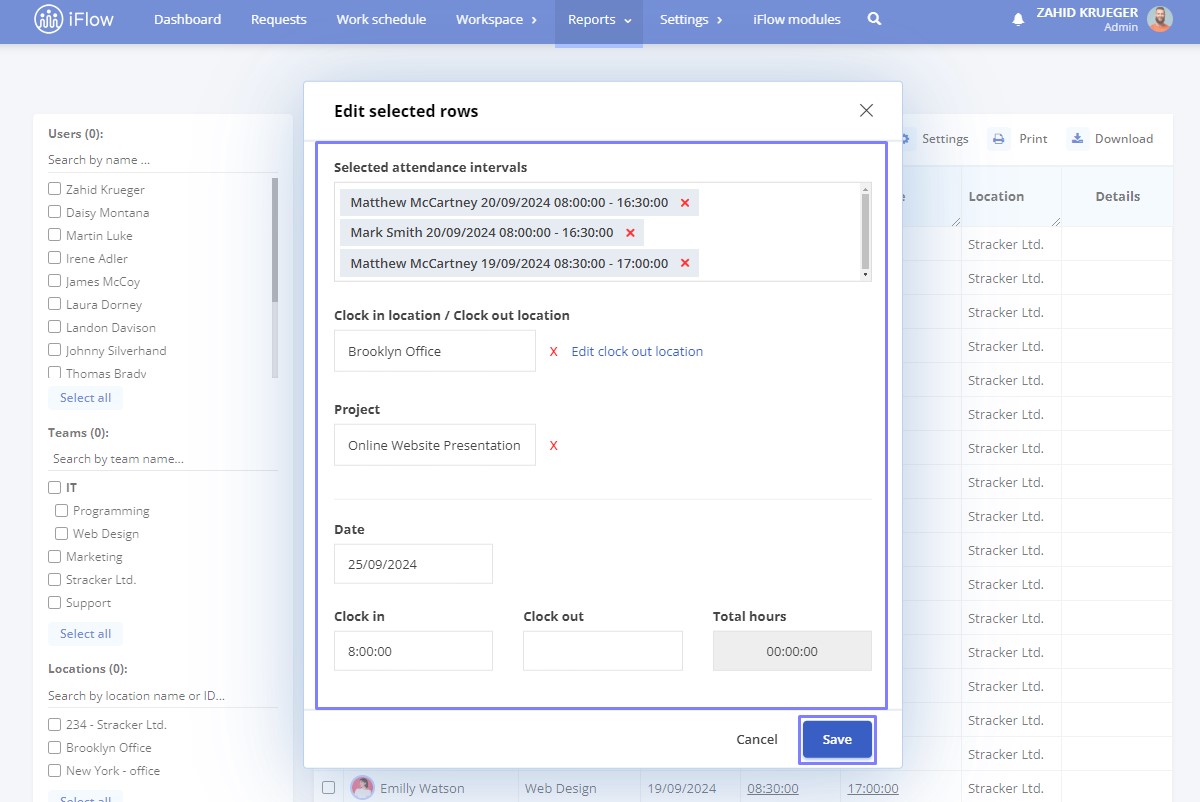
How to edit location/project
If employees selected the wrong location/project when clocking in, you can edit these details for multiple records simultaneously. First, select the attendances you want to edit, click the Edit button, and then choose the correct location/project (leave the date and time fields blank if you do not need to change them). Finally, click Save.
How to edit period/time
Similarly, you can modify the date and time if necessary. You can edit only the check in and check out intervals without altering the location/project.
Live attendance – geofencing clocking
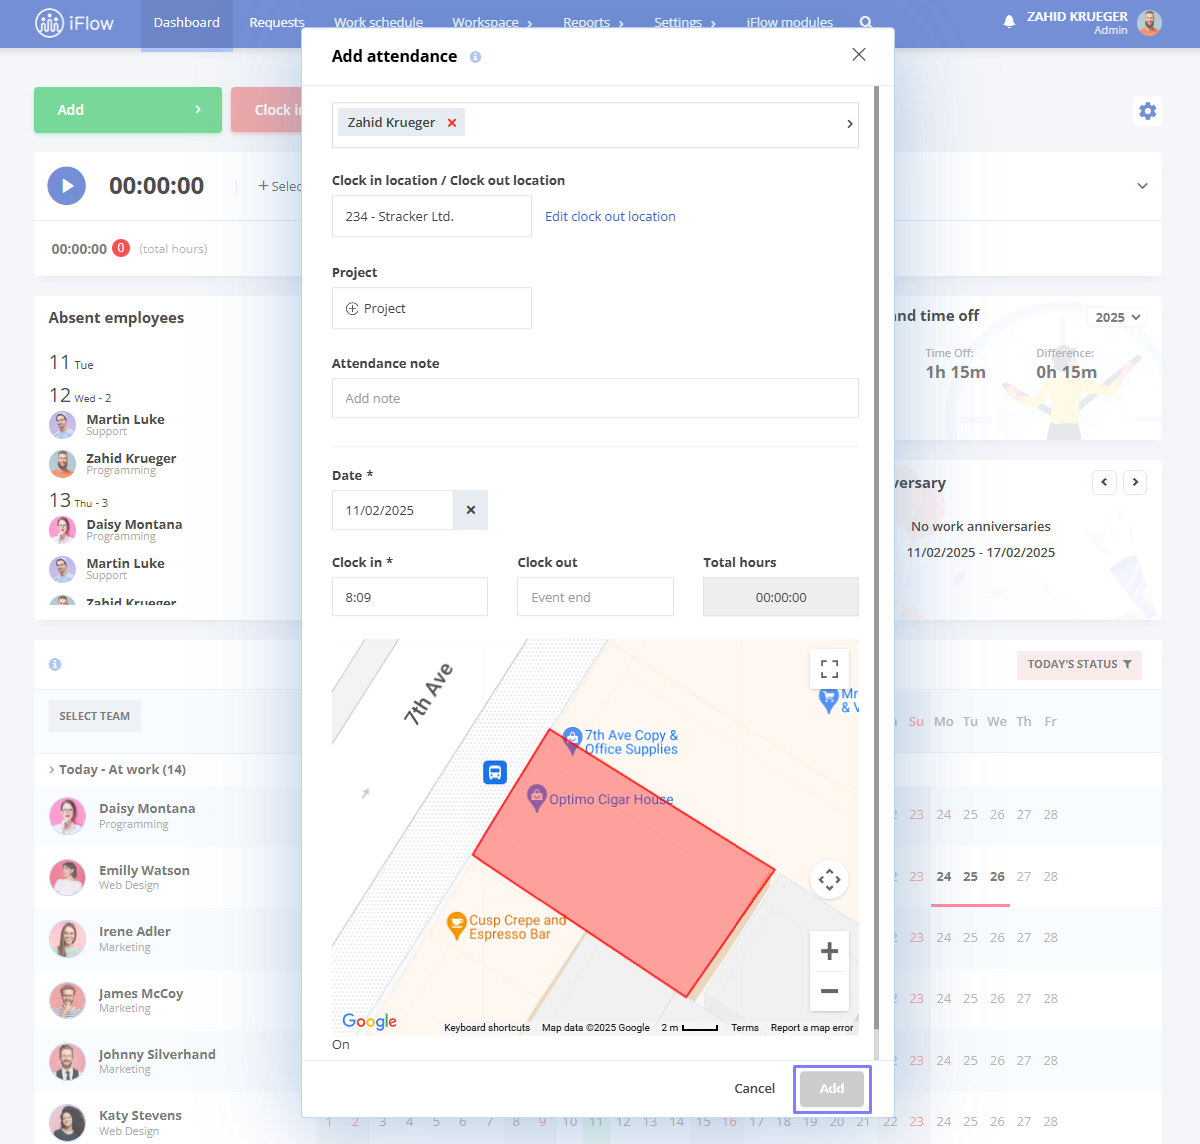
Geofencing technology uses GPS to create a virtual perimeter around a physical location. If an employee is outside this perimeter, they cannot log their attendance.
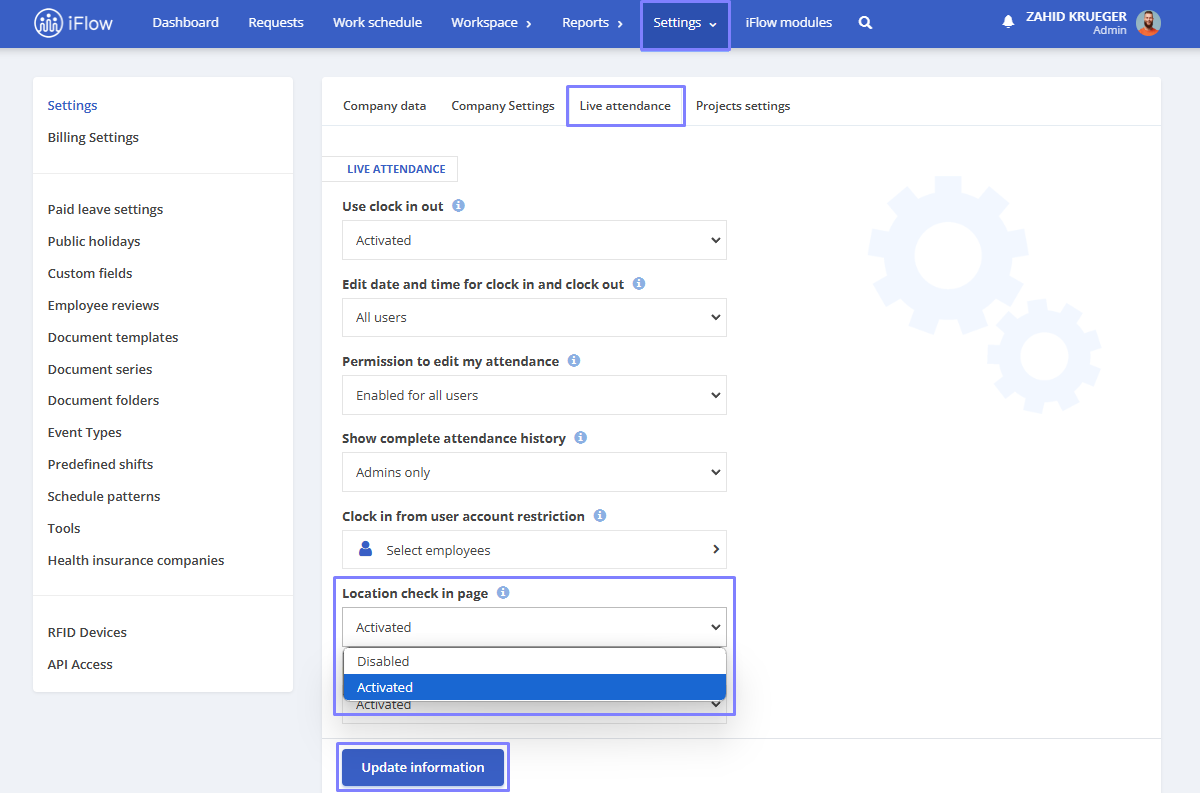
How to activate geofencing
- Go to Settings – Company – Live attendance
- Choose the Activated option in the Location check in page
Accessing geofencing settings
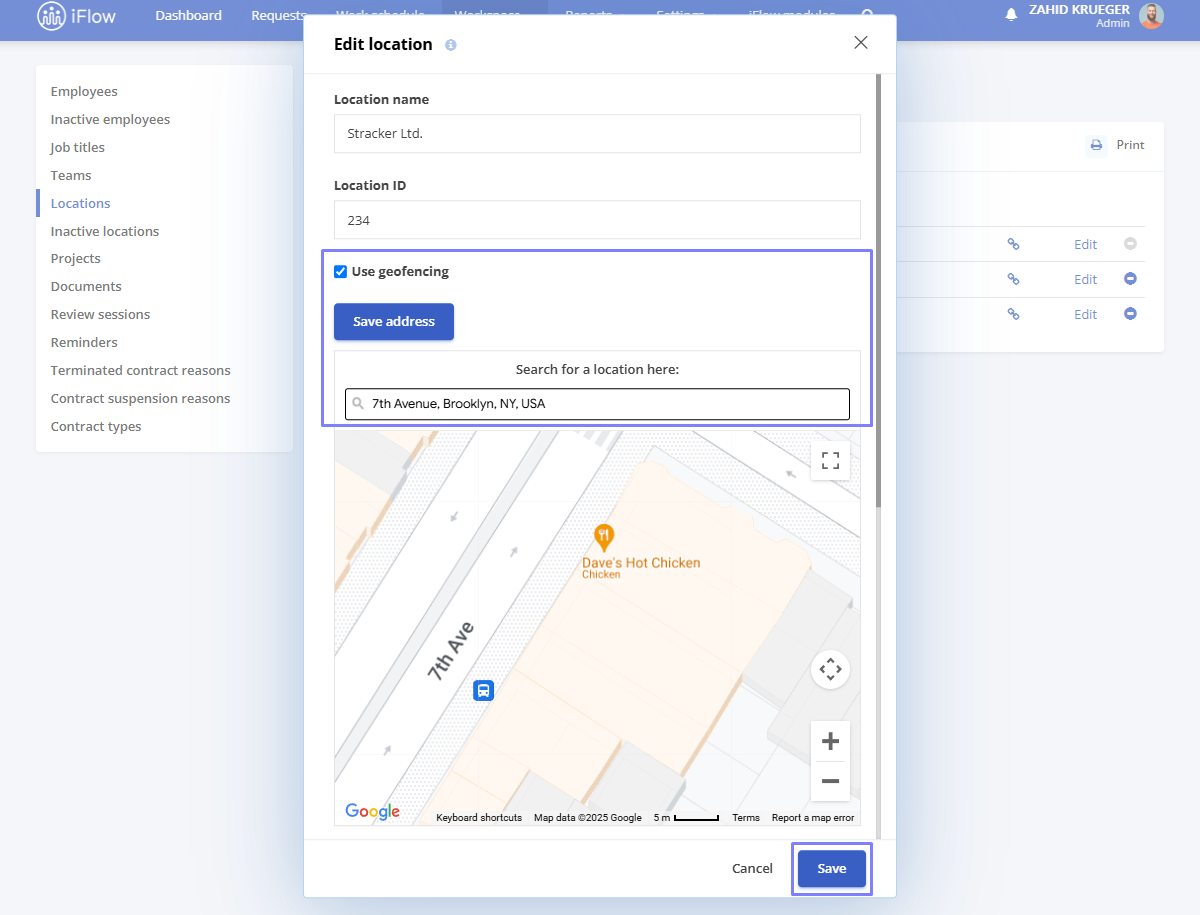
- Navigate to Workspace – Locations
- Click Edit on the required Location
- Check the option Use geofencing
- Enter the desired address
- Click the Save address button
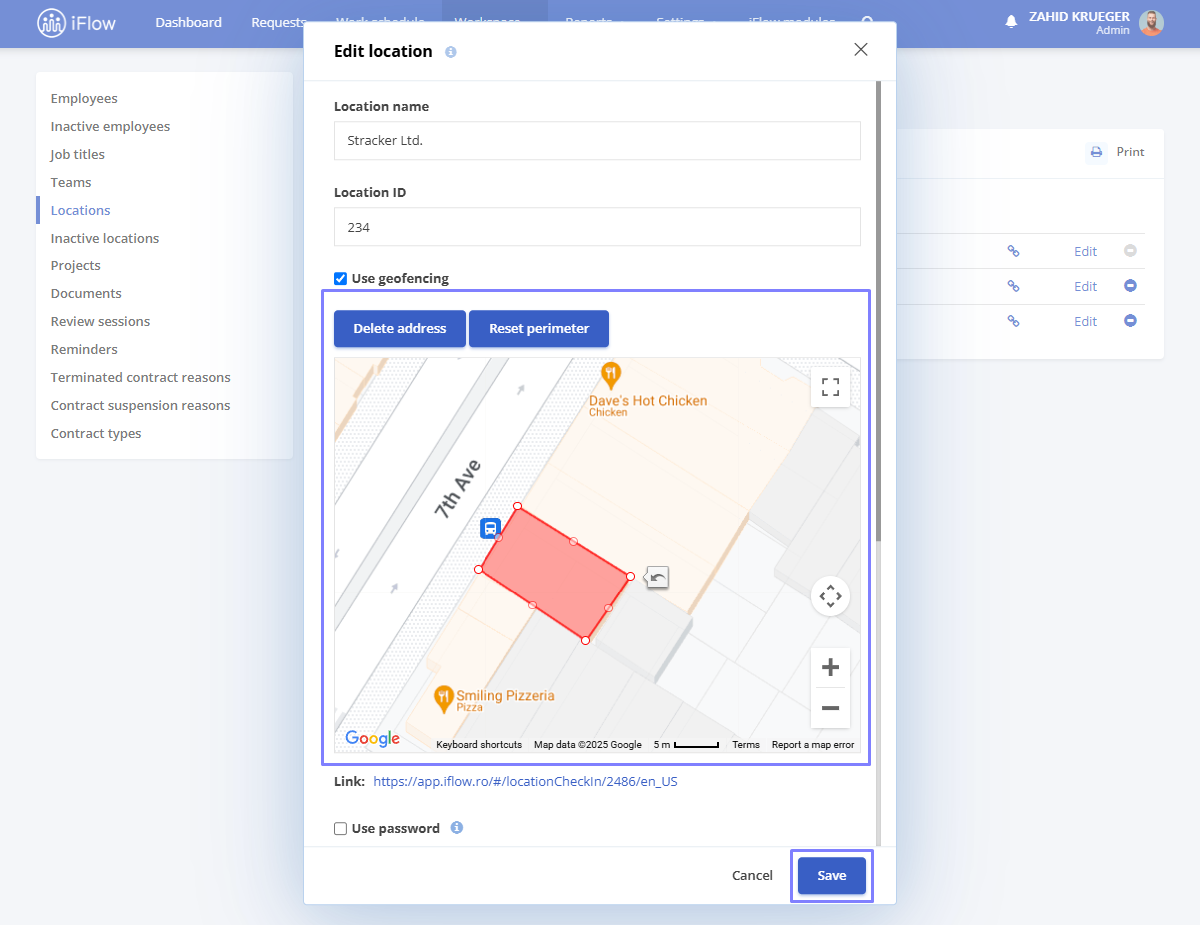
- After saving the address, set the desired geofence perimeter
- Click Save to confirm the settings
- After saving, you have the option to Delete address or Reset perimeter
Real-time monitoring
- The employee’s marker updates automatically every 5 seconds
- The perimeter turns green when the employee’s marker enters the designated area
- The Add button remains disabled until the marker is within the perimeter
Important!
This is a business module. Contact the iFlow team at [email protected] for activation.
Live attendance – QR code clocking
If you want to limit employee access to the platform but still allow them to clock in and out, a QR code clock is an ideal solution for you and your company.
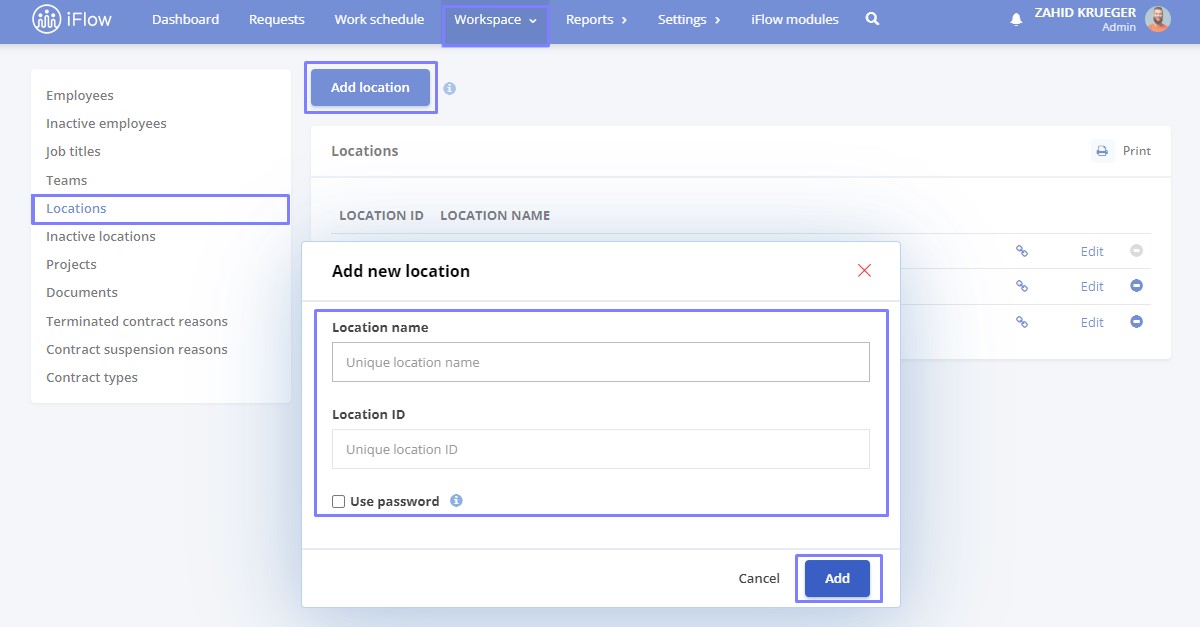
First, you must ensure you have created the locations in the application. You can create them manually from the menu by going to Workspace – Locations, clicking on Add location, filling in the Location name, and clicking Add.
To enable QR code clocking for employees, you must set a clocking code in their profile instead of the RFID Series. This code can be the employee’s internal number, for example.
Navigate to their profile, click the Settings button (next to the Profile button), click the RFID submenu, and enter the code/internal number in the RFID Series field. Then click Save settings.
Important!
You can choose to secure a location by setting a password. To do this, check the Use password box and enter and confirm the password. When employees access the link for this location, they must enter the password before they can clock in.
How to activate QR code clocking
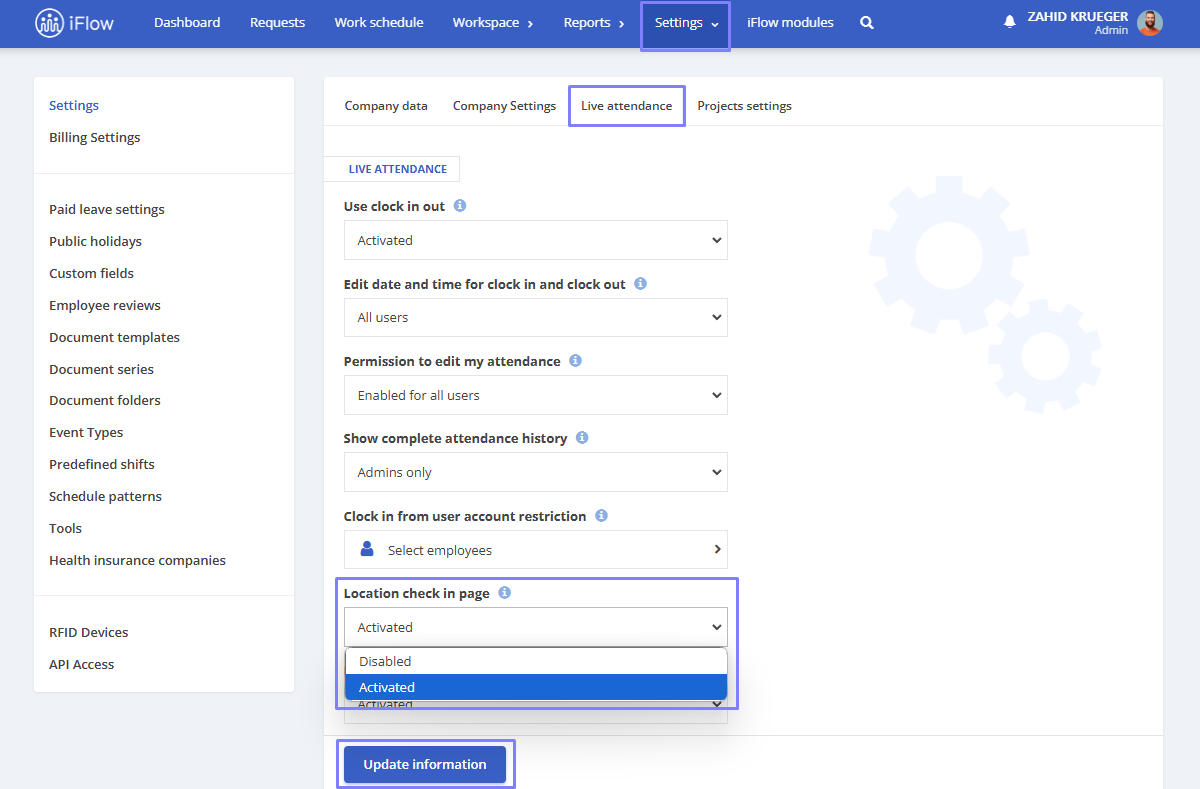
- From the main menu, go to Settings – Company
- Click on the Live attendance submenu
- In the Location check in page field, select Activated
- Click Update information
How to share the QR code
To share the QR code for clocking, follow these steps:
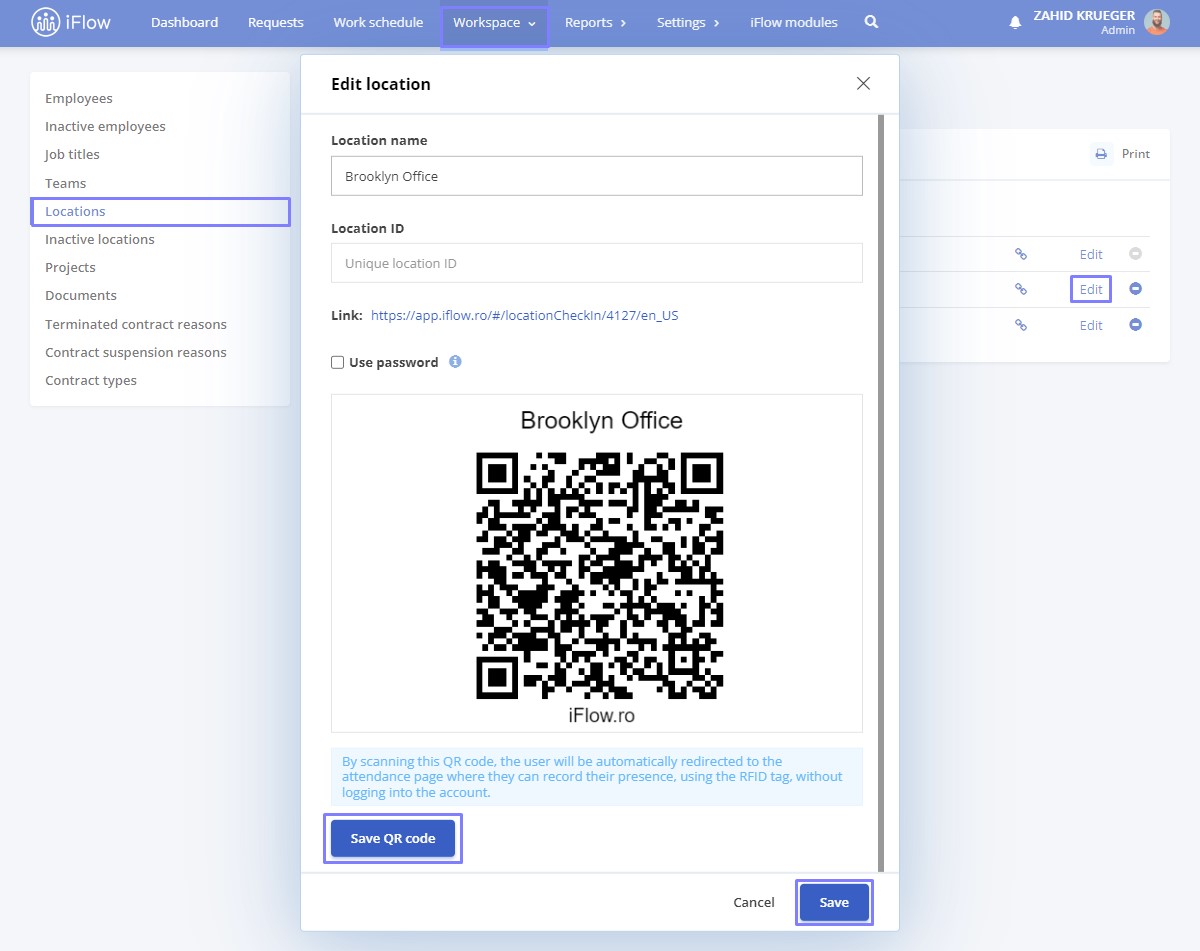
- Go to the main menu, select Workspace, and click on Locations
- Click on Edit and Save QR code
- Print this QR code and display it at the location you choose
How to set up clocking instructions
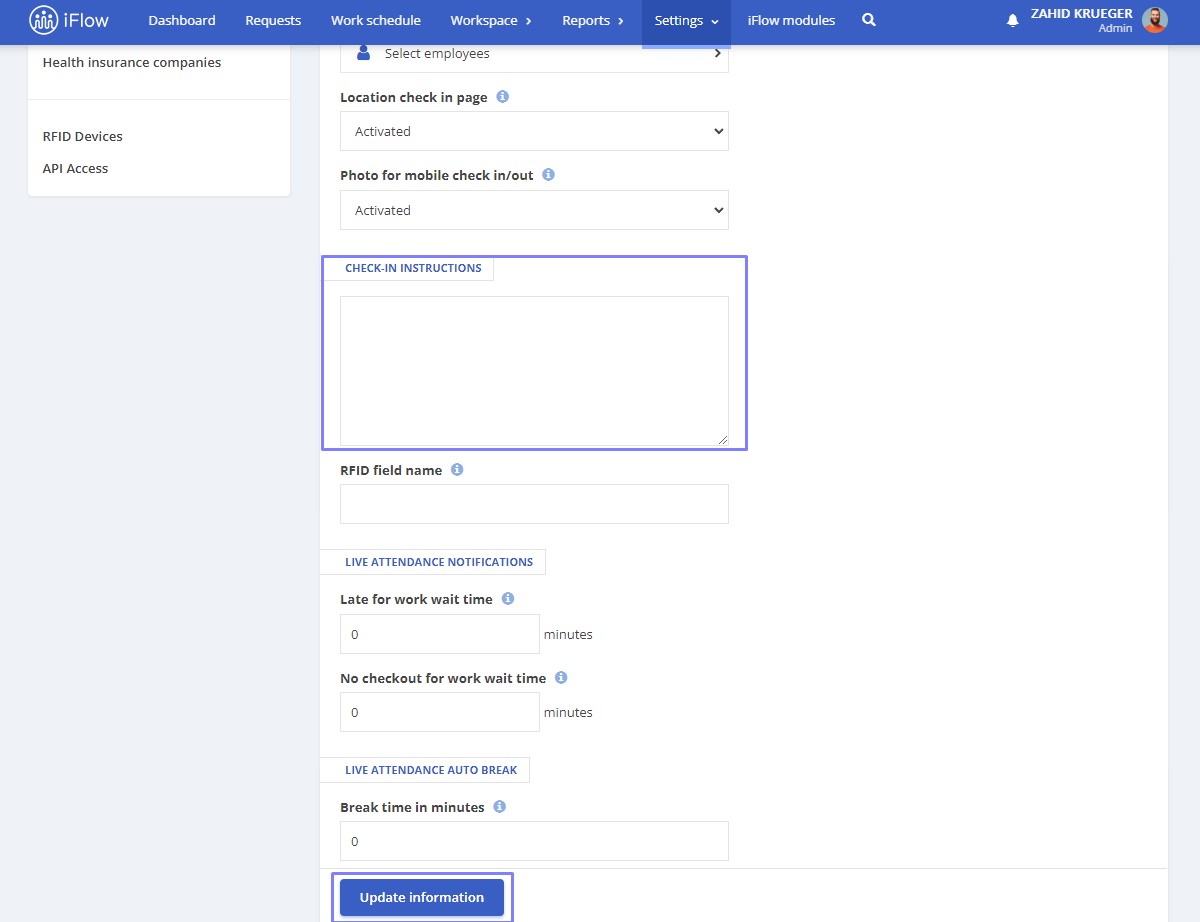
In iFlow, you can write instructions for employees who clock in using a QR code. They will see your instructions directly on the clocking page.
- From the main menu, go to Settings – Company
- Click on the Live attendance submenu
- Fill in the desired information in the Check in instructions field
- You can even change the name of the RFID field
- Then click Update information
How employees clock in
Employees scan the QR code using their mobile phones, enter the required password, and then input their RFID series, internal number, or clocking code to record their presence.
Live attendance – clocking via link
If you want to limit employee access to the platform but still allow them to clock in, clocking via link is an ideal solution for you and your company.
First, ensure that you have created the locations in the application. You can create them manually from the main menu by going to Workspace – Locations, clicking on Add location, entering the Location name, and clicking Add.
To enable employees to clock in via the clocking link, you need to set a clocking code in their profile instead of the RFID Series. This code can be the employee’s internal number, for example.
Navigate to their profile, click the Settings button (next to the Profile button), click the RFID submenu, and enter the code/internal number in the RFID series field. Then click Save settings.
Important!
You can choose to secure a location by setting a password. To do so, check the Use password box and enter and confirm the password. When employees access the link for this location, they must enter the password before they can clock in.
Activating clocking via link
- From the main menu, go to Settings – Company
- Click on the Live attendance submenu
- In the Location check in page field, select Activated
- Click Update information
Sharing the clocking link
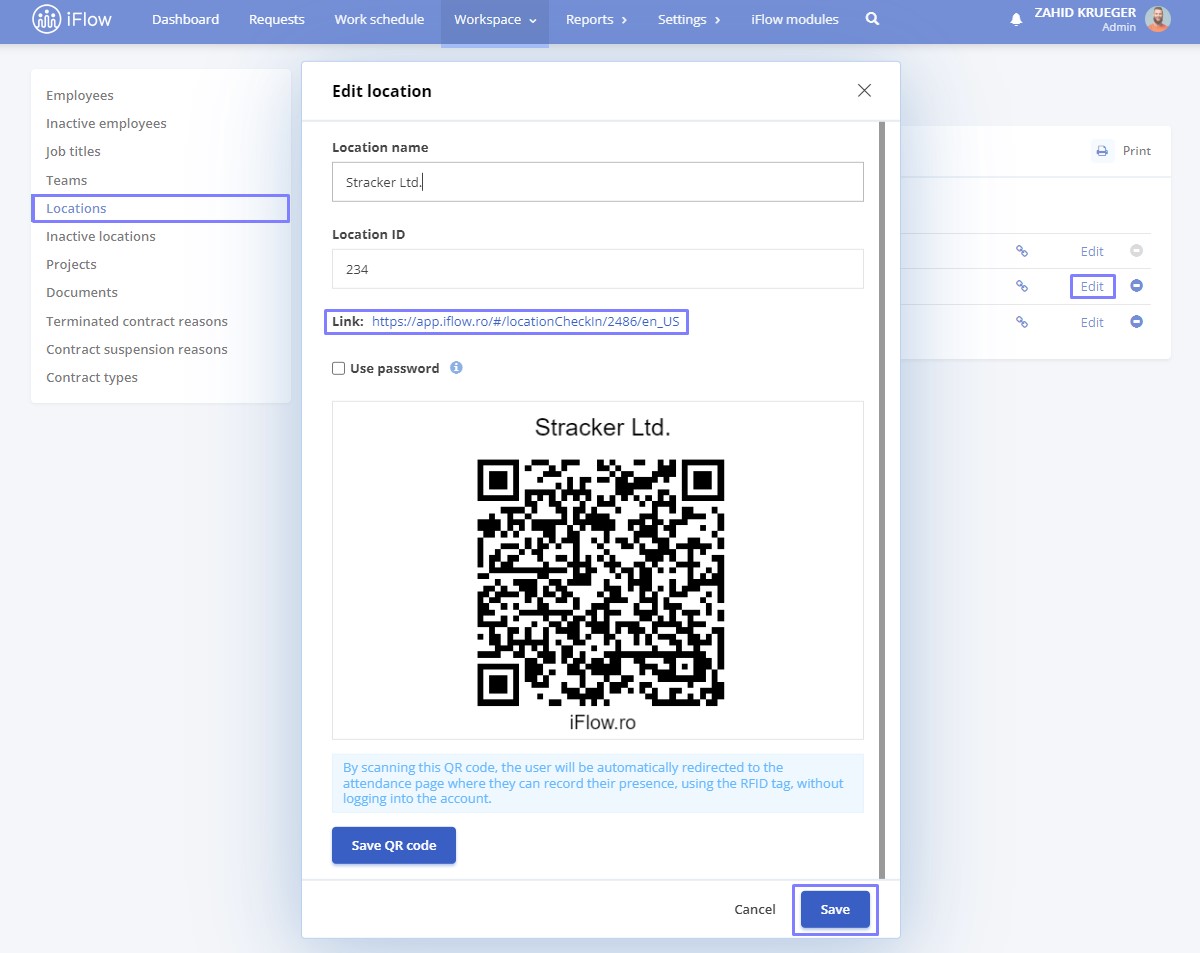
To share the clocking links, follow these steps:
- From the main menu, select Workspace– Locations
- Click the button to copy the link, or click on Edit and copy the link from there
- Then, send the link to the employees
Setting up clocking instructions
In iFlow, you can write instructions for employees who clock in via a link. They will see your instructions directly on the clocking page.
- From the main menu, go to Settings – Company
- Click on the Live attendance submenu
- Fill in the information you choose in the Check in instructions field
- You can even change the name of the RFID field
- Click Update information
How employees clock in
Employees access the link you provided, enter the password if required, and then input their RFID series, internal number, or clocking code to record their presence.
They can either clock in themselves or be clocked in by someone else at that location.
iFlow PIN Client
Learn how to connect the iFlow PIN Client to your iFlow account:
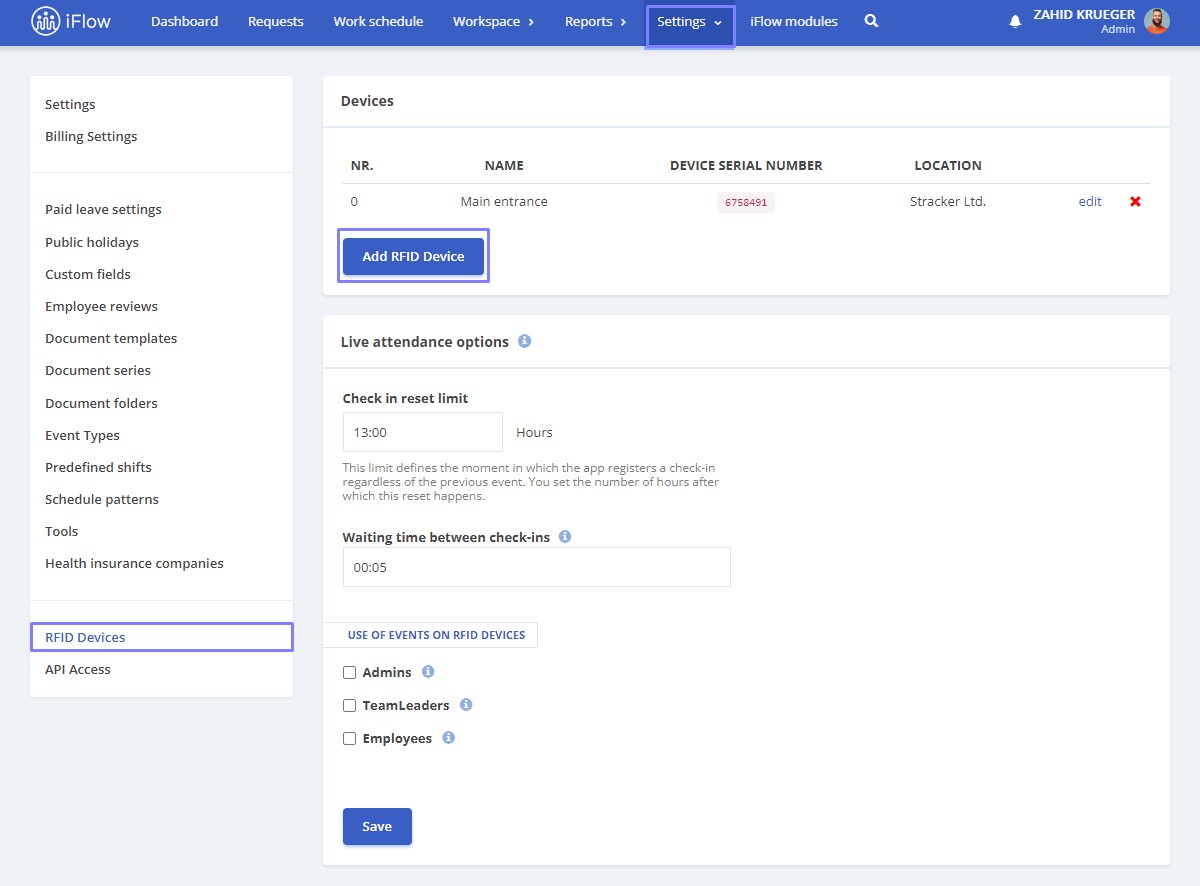
- After downloading and installing the iFlow PIN Client application
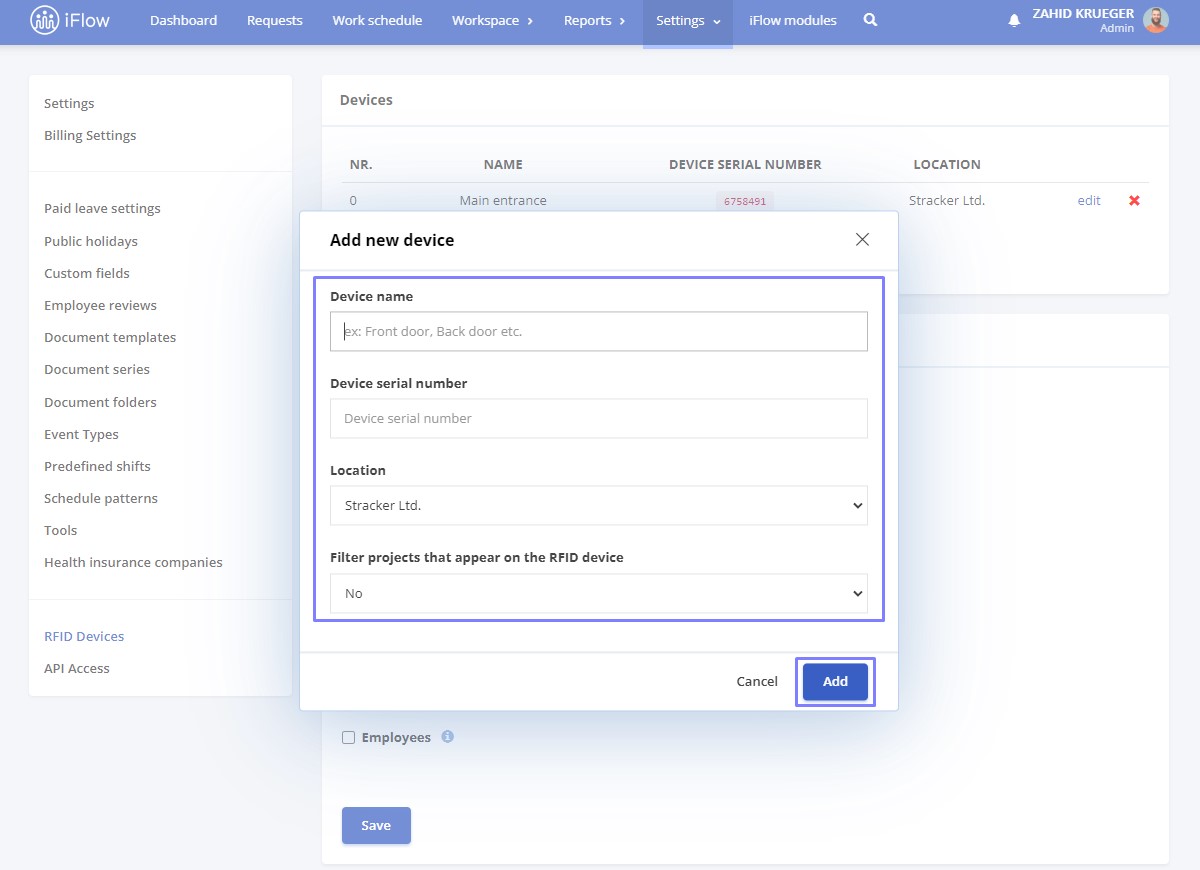
- Navigate to your account, and from the main menu, go to Settings – RFID devices
- Click on the Add RFID device button
- Enter the Device name
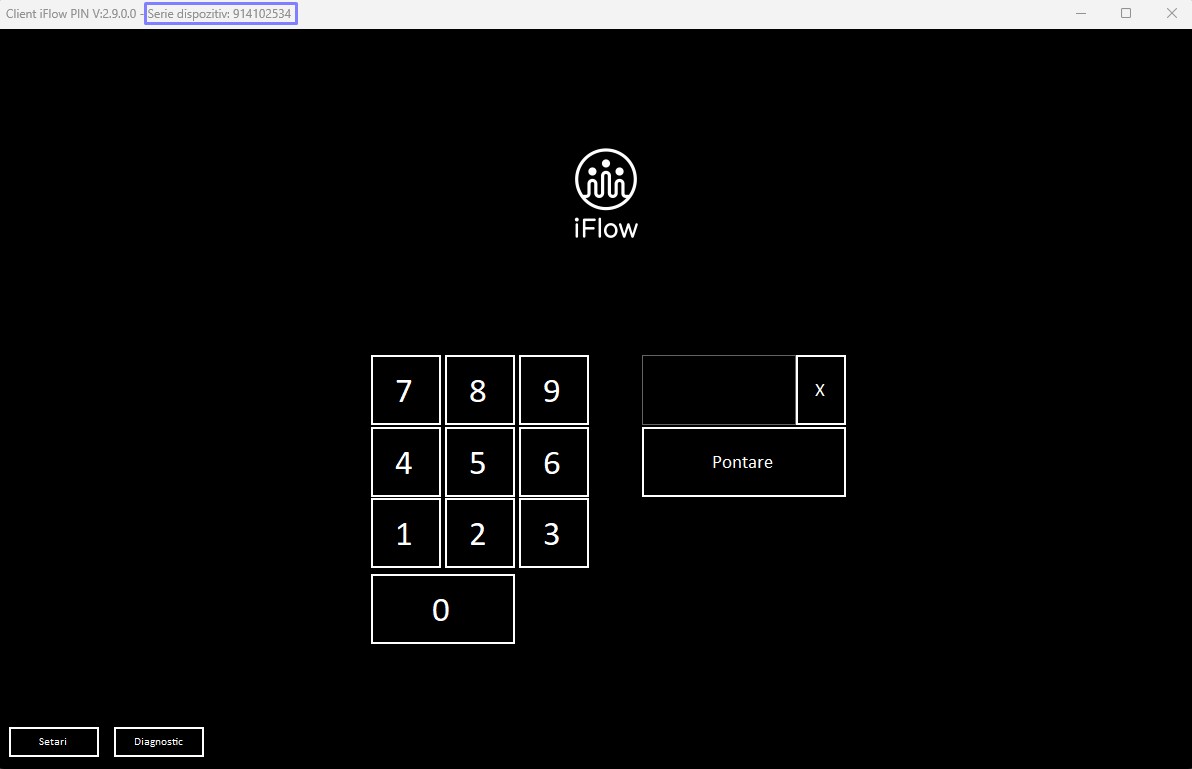
- Copy the Device series from the window’s top bar, as shown in the image below
- Click Add to finalise
After registering the code for RFID devices:
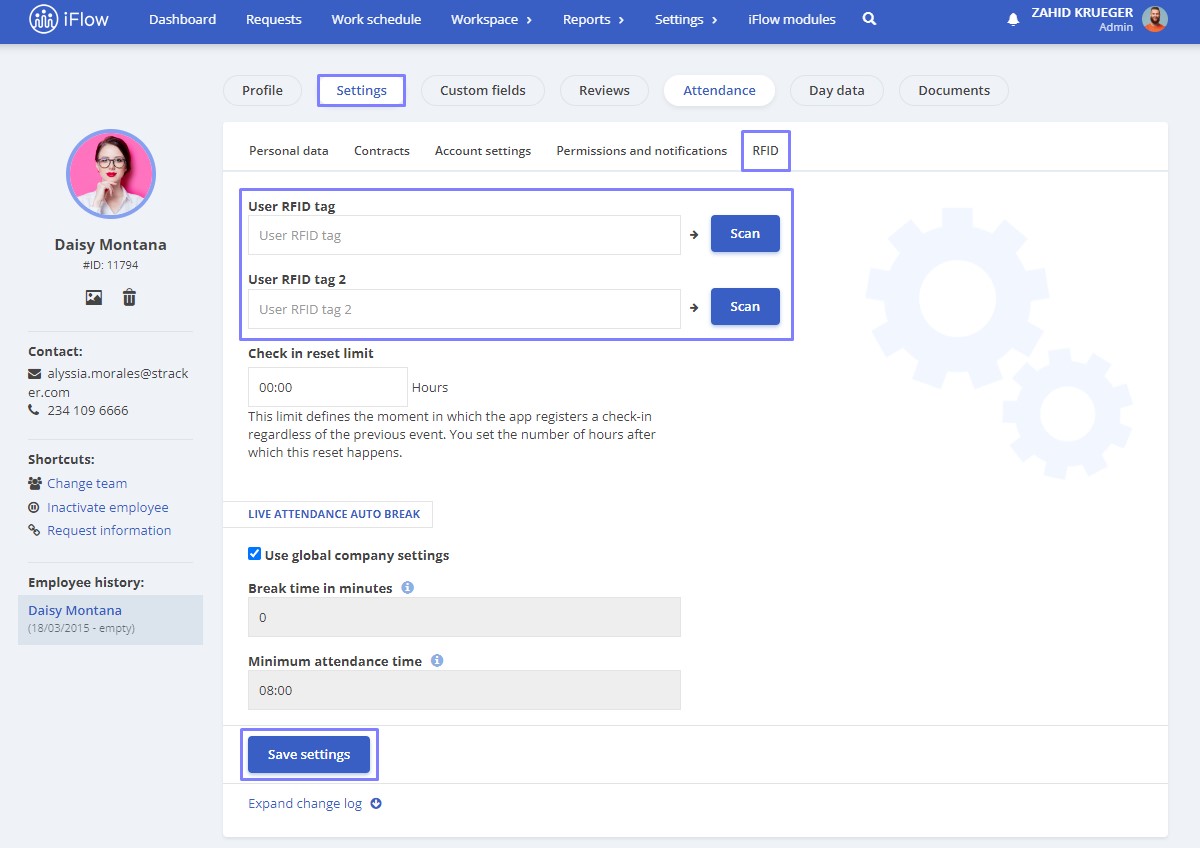
- Navigate to the profile of the employee who will clock in this way
- Click on the Settings button next to the Profile button
- Click on the RFID submenu
- In the RFID series field, enter the employee’s PIN
- Click Save settings
The employee will clock in using the PIN code you entered through the iFlow PIN Client application.
Important!
Turning off the employee clocking option in the account settings is necessary.
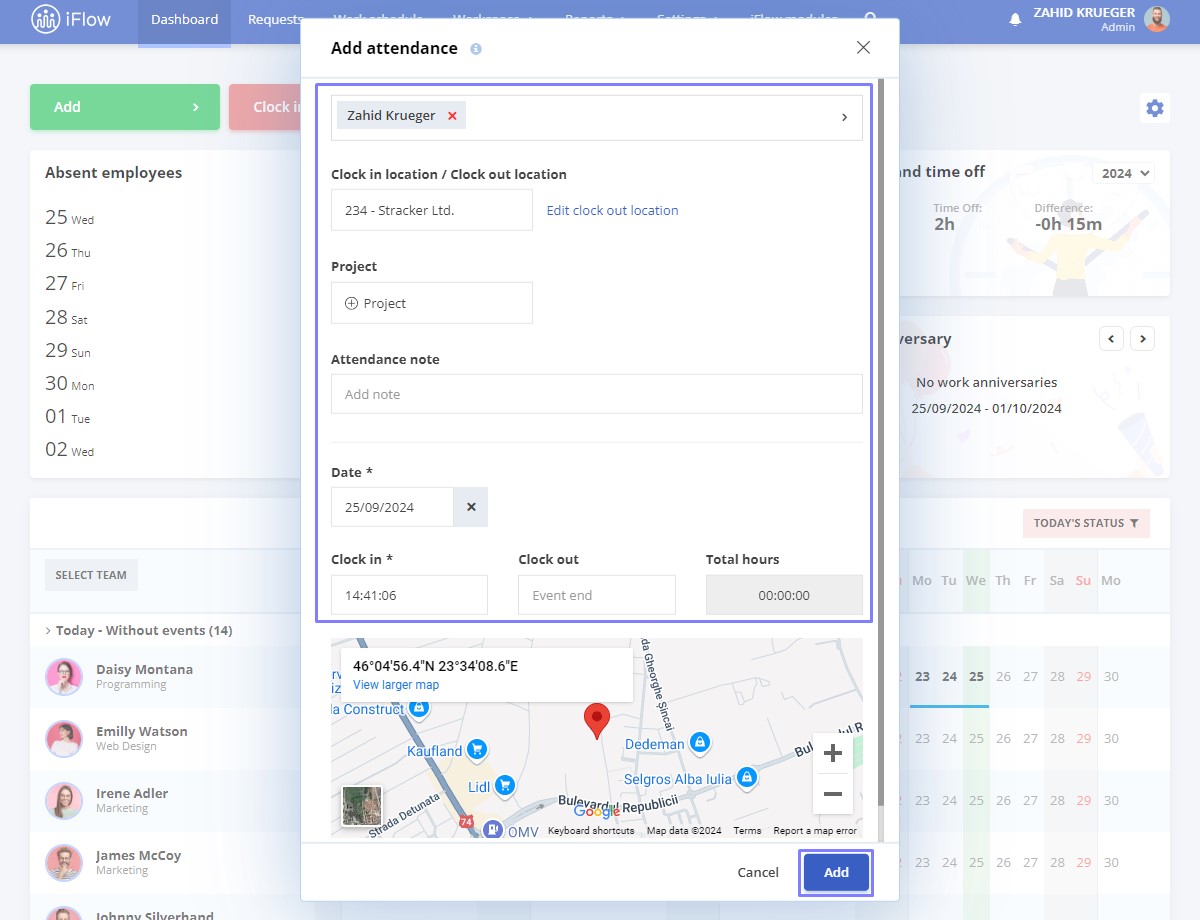
Attendance note
How to add a note to attendance
- Click the + button
- Click on Add sttendance/Close attendance
- Select the employee(s)
- Choose the Location and Project
- Add a Note to attendance
- Set the Date
- Complete the clock in/clock out entry
- Click Add to finalise
